
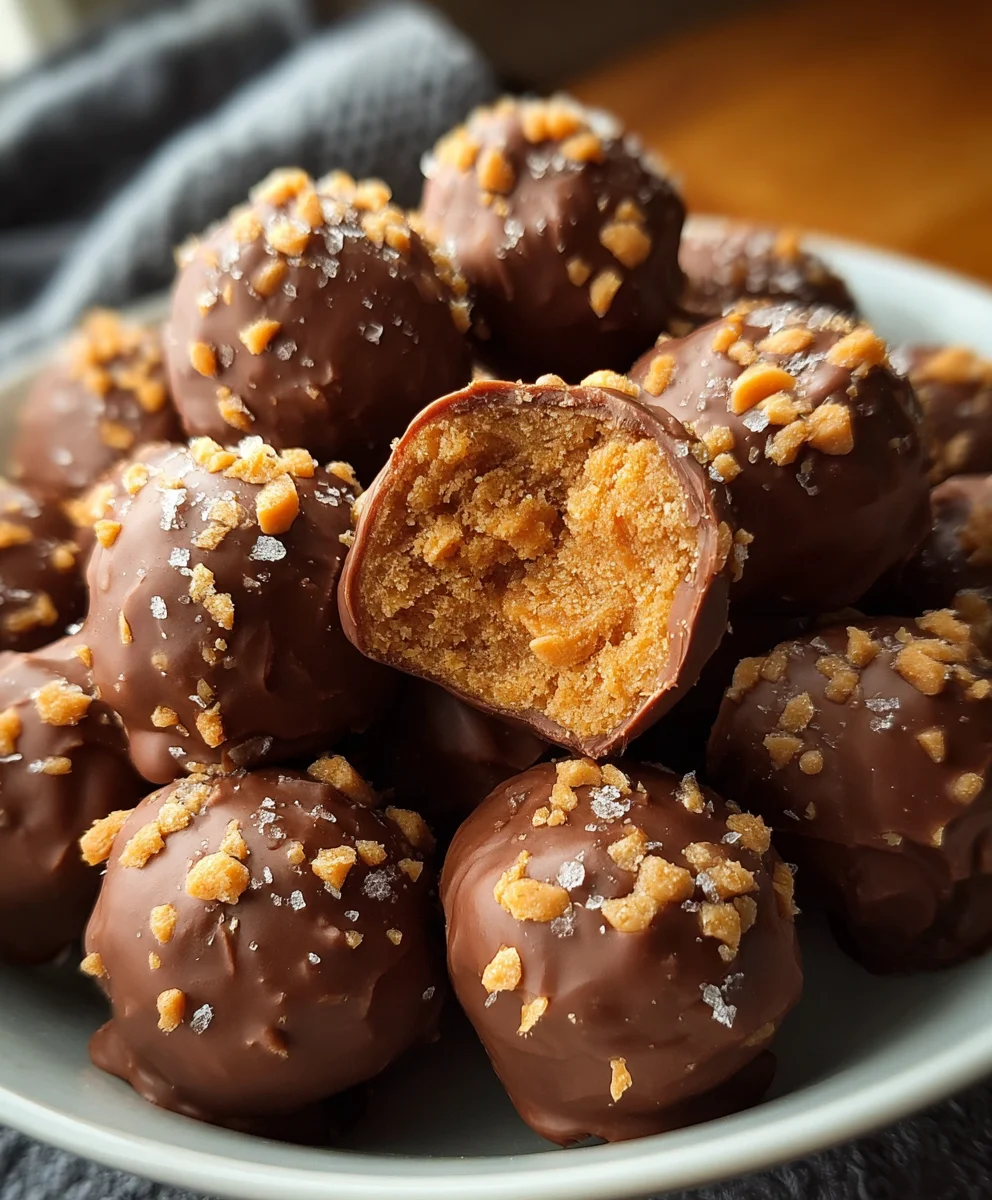
Butterfinger Balls are more than just a treat; they’re a nostalgic explosion of crunchy, peanut-buttery goodness wrapped in creamy chocolate. If you’ve ever experienced the irresistible shatter of a Butterfinger bar, imagine that delicious chaos miniaturized into bite-sized spheres of pure joy. These aren’t your average candy; they’re a delightful mashup of textures and flavors that have captured hearts (and taste buds!) for generations. The magic lies in their perfect balance: the distinct, flaky crispness of the Butterfinger candy itself, harmoniously blended with a rich, velvety chocolate coating. Each bite is a delightful surprise, a miniature adventure that will transport you back to carefree moments or create entirely new ones. They’re perfect for parties, movie nights, or simply indulging in a moment of sweet, satisfying bliss. Prepare to fall in love all over again with these incredible Butterfinger Balls.

Ingredients:
- 1 cup creamy peanut butter
- 1/4 cup unsalted butter (softened)
- 2 cups powdered sugar
- 1 teaspoon vanilla extract
- Pinch of salt
- 6 Butterfinger candy bars (finely crushed)
- 12 ounces semisweet or milk chocolate (chopped (for dipping, optional))
Making the Butterfinger Balls
Step 1: Combine the Base Ingredients
The foundation of our delicious Butterfinger Balls lies in a rich and creamy base. In a large mixing bowl, I like to combine the peanut butter and the softened unsalted butter. Ensure your butter is truly softened – it should yield easily to a gentle press. This makes it much easier to incorporate smoothly into the peanut butter, preventing any lumpy textures. Using a sturdy spoon or a hand mixer on low speed, beat these two ingredients together until they are thoroughly combined and you have a smooth, uniform paste. This is where the magic starts to happen, creating that irresistible nutty flavor profile that is so characteristic of our Butterfinger Balls.
Step 2: Incorporate the Sweetness and Flavor Enhancers
Now it’s time to add the sweetness and those essential flavor notes. Gradually sift in the powdered sugar, about half a cup at a time, mixing well after each addition. Powdered sugar is key here because it dissolves easily, creating a smooth texture without the grittiness that granulated sugar can sometimes impart. Continue adding the powdered sugar until it’s all incorporated. Next, I’ll add the vanilla extract. Vanilla extract is a wonderful flavor enhancer that complements the peanut butter and chocolate beautifully, adding a subtle warmth and depth. Finally, a tiny pinch of salt is crucial. Even though peanut butter often contains salt, a little extra helps to balance the sweetness and amplify the overall flavors. Mix everything until the dough is well combined and has a thick, cookie-dough-like consistency. If the dough seems a bit too dry and crumbly, you can add a teaspoon of milk or more softened butter, a little at a time, until it reaches the desired consistency for rolling.
Step 3: Fold in the Star Ingredient – Crushed Butterfinger!
This is where our Butterfinger Balls truly earn their name. Take your finely crushed Butterfinger candy bars. I find that placing the Butterfinger bars in a Ziploc bag and gently crushing them with a rolling pin or the flat side of a meat mallet works best to get a good, even crumble. You want small pieces, not a powder, so you still get those delightful crunchy bits in every bite. Gently fold these crushed Butterfinger pieces into the peanut butter mixture. Be careful not to overmix at this stage; you want to distribute the Butterfinger evenly throughout the dough so that every bite offers that signature crunchy, chocolatey, peanut buttery goodness. The mixture will become quite thick and studded with those lovely chunks.
Step 4: Shaping and Chilling the Balls
Once the Butterfinger pieces are incorporated, it’s time to form our Butterfinger Balls. I like to use a small cookie scoop or a tablespoon to portion out the dough, aiming for uniform size so they bake (or set) evenly. Roll each portion between your palms to form smooth, compact balls. They don’t need to be perfectly smooth, as the Butterfinger pieces will create some texture, but aim for a nice round shape. Place the formed balls onto a baking sheet lined with parchment paper. This prevents them from sticking and makes them easy to handle. For best results, especially if you plan to dip them in chocolate, it’s essential to chill the balls. Place the baking sheet in the refrigerator for at least 30 minutes, or until the balls are firm to the touch. This firmness is vital for them to hold their shape when dipped in melted chocolate.
Step 5: The Optional Chocolate Dipping
This step is entirely optional, but I highly recommend it for an extra layer of indulgence! Once the Butterfinger Balls are chilled and firm, you can melt your chopped semisweet or milk chocolate. A double boiler method on the stovetop or careful melting in the microwave in 30-second intervals, stirring between each, works well. Once smooth and fluid, use a fork or a dipping tool to carefully dip each chilled ball into the melted chocolate, ensuring it’s fully coated. You can drizzle extra chocolate over the top for decoration or leave them as is. Place the chocolate-dipped balls back onto the parchment-lined baking sheet. If you want to add a little extra flair, you can sprinkle a few extra crushed Butterfinger pieces or some festive sprinkles on top of the wet chocolate. Allow the chocolate to set completely at room temperature or speed up the process by placing them back in the refrigerator for about 15-20 minutes. These Butterfinger Balls are best stored in an airtight container in the refrigerator.

Conclusion:
And there you have it – your ultimate guide to crafting delicious Butterfinger Balls! We’ve walked through each step, from gathering your ingredients to the final delightful bite. These no-bake wonders are incredibly simple to make, making them a perfect activity for a weekend afternoon or a last-minute treat for unexpected guests. The sweet and salty crunch of the Butterfinger candy, combined with the creamy richness, creates a truly addictive confection.
For serving, these Butterfinger Balls are fantastic on their own, but they also make a stunning addition to a dessert platter, a potluck contribution, or even as a fun topping for ice cream. Get creative with your presentations – a dusting of extra crushed Butterfinger, a drizzle of chocolate, or a few festive sprinkles can elevate them even further.
Don’t be afraid to experiment with variations! You could try adding a touch of espresso powder for a coffee-infused kick, or perhaps some mini chocolate chips for extra chocolatey goodness. Rolling them in shredded coconut or chopped nuts offers another exciting textural dimension. The possibilities are truly endless when it comes to customizing these delightful treats to your personal taste. So go ahead, whip up a batch (or two!) and enjoy the sweet satisfaction of homemade goodness. You’ve got this!
Frequently Asked Questions about Butterfinger Balls:
Q1: How should I store leftover Butterfinger Balls?
A1: Store your Butterfinger Balls in an airtight container in the refrigerator. They should stay fresh for up to a week, though they rarely last that long! If you prefer them firmer, keeping them chilled is the best option.
Q2: Can I make these ahead of time for a party?
A2: Absolutely! These are perfect for making ahead. In fact, they often taste even better after the flavors have had a chance to meld together for a few hours in the refrigerator. Just make sure they are well-sealed to maintain their freshness.
Easy Butterfinger Balls – Irresistible Sweet Treat
Delicious no-bake balls packed with the crunchy, peanut buttery goodness of Butterfinger candy bars, coated in chocolate.
Ingredients
-
1 cup creamy peanut butter
-
1/4 cup unsalted butter, softened
-
2 cups powdered sugar
-
1 teaspoon vanilla extract
-
Pinch of salt
-
6 Butterfinger candy bars, finely crushed
-
12 ounces semisweet or milk chocolate, chopped (for dipping, optional)
Instructions
-
Step 1
In a large mixing bowl, combine the softened butter and creamy peanut butter. Beat until smooth and well combined. -
Step 2
Gradually sift in the powdered sugar, about half a cup at a time, mixing well after each addition. Stir in the vanilla extract and a pinch of salt until a thick, cookie-dough-like consistency is achieved. Add a teaspoon of milk or more softened butter if too dry. -
Step 3
Gently fold the finely crushed Butterfinger candy bar pieces into the peanut butter mixture until evenly distributed. -
Step 4
Roll the mixture into uniform balls and place them on a parchment-lined baking sheet. Chill in the refrigerator for at least 30 minutes, or until firm. -
Step 5
Melt the chopped chocolate using a double boiler or microwave. Dip each chilled ball into the melted chocolate, ensuring it’s fully coated. Place back on the parchment-lined sheet. -
Step 6
Allow the chocolate to set completely at room temperature or in the refrigerator. Store in an airtight container in the refrigerator.
Important Information
Nutrition Facts (Per Serving)
It is important to consider this information as approximate and not to use it as definitive health advice.
Allergy Information
Please check ingredients for potential allergens and consult a health professional if in doubt.

Leave a Comment