
Easter Rice Krispie Treats are more than just a sweet snack; they’re a delightful nostalgic journey for so many of us. There’s a magical simplicity to them, a comforting chegrape juicess that instantly transports us back to childhood Easters, egg hunts, and family gatherings. What truly makes these Easter Rice Krispie Treats special, however, is their incredible versatility. They become the perfect canvas for spring-themed decorations, transforming from humble puffed rice cereal into festive edible art. Imagin extracte a batch adorned with pastel sprinkles, cute candy eggs, or even shaped into bunnies and chicks! This recipe will show you how to create those classic, gooey, and utterly irresistible Easter Rice Krispie Treats that are guaranteed to bring smiles to everyone’s faces, big and small, during this joyous season.
Why We Adore Them
A Timeless Favorite with a Springtime Twist

Easter Rice Krispie Treats
Get ready to hop into some serious fun with these delightful Easter Rice Krispie Treats! These aren’t just your average Rice Krispie treats; we’re adding a festive, spring-themed twist that will make them the star of your Easter dessert table. Imagin extracte fluffy, marshmallowy goodness, infused with vibrant color and studded with colorful Easter candies. They’re incredibly easy to make, perfect for a family activity, and guaranteed to bring smiles to everyone, from the littlest bunnies to the grown-ups. These treats are wonderfully customizable, so feel free to get creative with your candy decorations. Let’s dive into the delicious details!
Ingredients:
Creating the Marshmallow Base
The foundation of any great Rice Krispie treat is the perfect marshmallow mixture. We’ll start by melting the butter and marshmallows together. In a large, microwave-safe bowl, combine the 16 ounces of marshmallows and the 2 tablespoons of unsalted butter. If you’re using a stovetop, a large saucepan works just as well. Heat the marshmallows and butter on low to medium heat, stirring constantly. The key here is gentle heat. You don’t want to scorch the marshmallows. Keep stirring until the mixture is completely smooth and melted, with no lumps remaining. This process usually takes a few minutes. Once it’s a glossy, uniform mass, remove it from the heat.
Incorporating the Cereal
Now for the satisfying crunch! To the melted marshmallow mixture, add the 7 cups of Rice Krispies cereal. Using a sturdy spatula or wooden spoon, gently fold the cereal into the marshmallow mixture. Make sure every single piece of cereal is coated in the gooey, marshmallowy goodness. This step requires a bit of elbow grease, but it’s crucial for even texture and flavor in your final treats. Don’t overmix, as this can crush the cereal and lead to a less desirable texture. Just focus on ensuring everything is thoroughly combined.
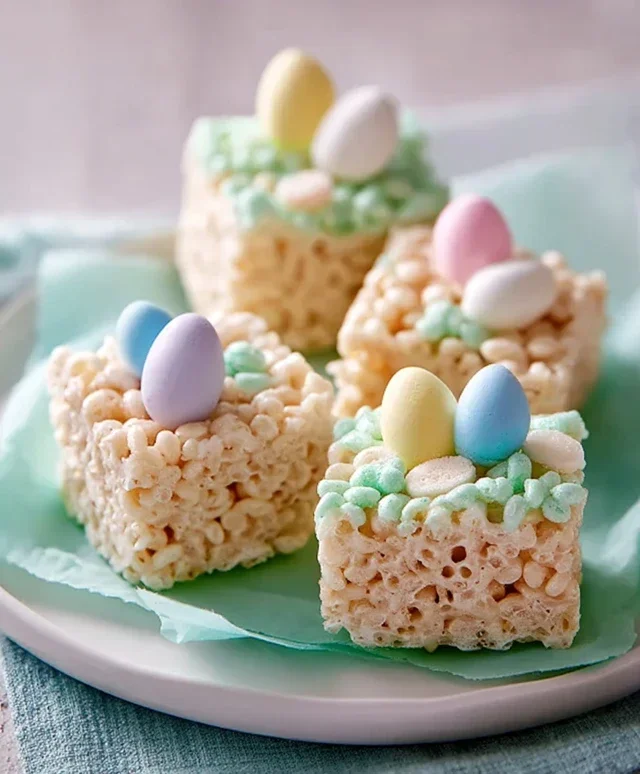
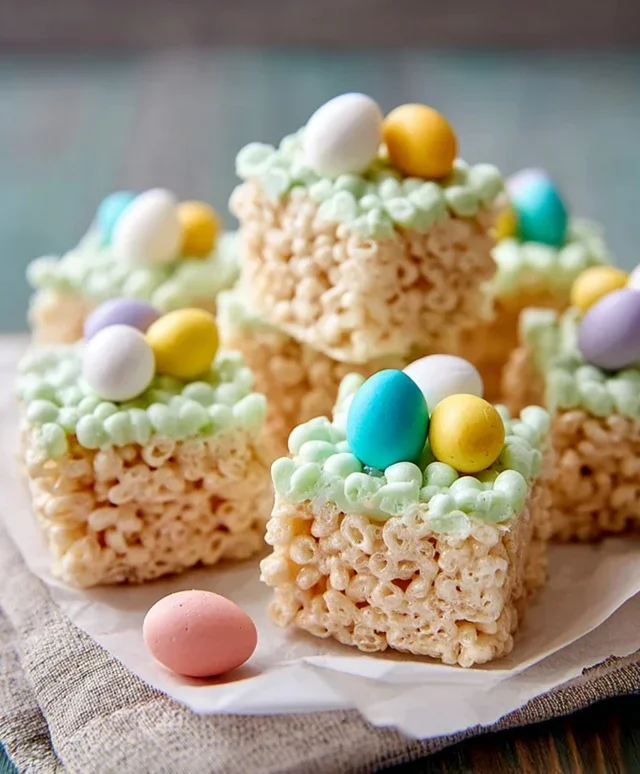
Shaping Your Easter Nests
Once the cereal is well-coated, it’s time to shape our treats. Lightly grease a 9×13 inch baking pan with butter or cooking spray, or line it with parchment paper. This prevents the sticky treats from clingin extractg to the pan. For classic square or rectangular treats, simply press the mixture evenly into the prepared pan. However, for our Easter theme, we’re going to create adorable little nests! To do this, allow the mixture to cool for just a couple of minutes – it should still be warm and pliable, but not so hot that it burns your fingers. Lightly grease your hands with butter or cooking spray. Take spoonfuls of the Rice Krispie mixture and form them into nest shapes. You can create a small indentation in the center of each nest to hold your “eggs.” If the mixture becomes too difficult to handle, you can pop it back in the microwave for about 10-15 seconds to warm it up slightly.
Crafting the “Grass” and “Eggs”
This is where the Easter magic truly comes alive! For the “grass,” we’ll create a simple, vibrant green frosting. In a medium bowl, combine the ½ cup unsalted butter (softened), 3-4 cups powdered sugar, ¼ cup milk, and 1 teaspoon vanilla extract. Start with 3 cups of powdered sugar and gradually add more until you reach your desired frosting consistency. You want it to be thick enough to pipe or spread, but not so stiff that it’s difficult to work with. Add a few drops of green food coloring and mix until you achieve a cheerful, grassy hue. If the frosting is too thick, add a tiny bit more milk, a teaspoon at a time. If it’s too thin, add more powdered sugar.
Once your green frosting is ready, you have a few options for decorating. You can either spread the frosting directly onto your shaped nests, creating a textured grassy base, or you can pipe it on using a piping bag with a grass tip for a more realistic look. Next, it’s time for the “eggs”! Gently press your chosen Easter egg candies (mini chocolate eggs or jelly beans) into the center of each green-frosted nest. Arrange them in a fun, colorful pattern. Don’t be shy with the candies! The more colorful, the better.
Cooling and Enjoying
Allow your Easter Rice Krispie Treats to set and cool completely. This usually takes about 30-60 minutes at room temperature. If you’re in a hurry, you can place the pan in the refrigerator for about 15-20 minutes to speed up the setting process. Once they are firm, you can gently lift them out of the pan (if you made squares/rectangles) or simply arrange your individual nests on a serving platter. These treats are best enjoyed at room temperature. They are a wonderful addition to any Easter brunch, picnic, or classroom party. They also make a fantastic edible gift! Wrap them individually in cellophane bags tied with a colorful ribbon for a sweet surprise. Enjoy your delicious, homemade Easter Rice Krispie Treats!
Conclusion:
There you have it! This Easter Rice Krispie Treats recipe is an absolute winner for so many reasons. It’s incredibly easy to make, meaning even begin extractner bakers can achieve fantastic results. The classic crispy, chewy texture is universally loved, and the festive Easter theme makes them a delightful addition to any celebration. I find they’re a fantastic way to get everyone involved in the kitchen, from little ones helping with the stirring to adults perfecting the shapes. They bring such a cheerful, nostalgic touch to the holiday table and are always a crowd-pleaser.
For serving, these treats are fantastic on their own, of course! But you can elevate them further by arrangin extractg them on a platter with fresh berries, or even dipping the edges in melted white chocolate for an extra touch of sweetness and visual appeal. Looking for variations? Try adding a few drops of pastel food coloring to the marshmallow mixture before incorporating the cereal for a colorful base. You could also fold in some mini Easter M&Ms or sprinkles after the treats have cooled slightly for added texture and festive flair. I truly encourage you to give this recipe a try – it’s a guaranteed hit for Easter and beyond!
Frequently Asked Questions:
Can I make these Easter Rice Krispie Treats ahead of time?
Absolutely! These treats are best made a day in advance. Once they’ve set and you’ve cut them into shapes, store them in an airtight container at room temperature. This allows them to firm up perfectly, making them easier to handle and enjoy. They stay delicious for a few days.
How can I make my Easter Rice Krispie Treats hold their shape better?
For firmer treats, ensure you press the mixture down firmly into your prepared pan. Don’t be afraid to use the back of a spatula or even lightly buttered hands to really compact it. Letting them cool completely undisturbed for at least 2-3 hours is also crucial for them to set properly and maintain their shapes when cut.
Easter Rice Krispie Treats
Festive and fun Rice Krispie Treats with an Easter twist, colored green and decorated with Easter egg candies.
Ingredients
-
16 ounces marshmallows
-
7 cups Rice Krispies cereal
-
2 tablespoons unsalted butter
-
½ cup unsalted butter
-
3-4 cups powdered sugar
-
¼ cup milk
-
1 teaspoon vanilla extract
-
Green food coloring
-
Easter egg candies (mini chocolate eggs or jelly beans)
Instructions
-
Step 1
Grease a 9×13 inch baking pan. In a large microwave-safe bowl, melt 2 tablespoons of unsalted butter. Add the marshmallows and microwave on high in 30-second intervals, stirring after each, until completely melted and smooth. -
Step 2
Stir in the vanilla extract and green food coloring until evenly distributed. Add the 7 cups of Rice Krispies cereal and stir until well coated. -
Step 3
In a separate microwave-safe bowl, melt ½ cup of unsalted butter. Whisk in the powdered sugar, ¼ cup milk, and continue whisking until a smooth glaze forms. Add more powdered sugar or milk as needed to reach desired consistency. -
Step 4
Gently spread the Rice Krispie mixture into the prepared baking pan. Press down lightly with a spatula. -
Step 5
Drizzle the prepared glaze over the Rice Krispie treats. Immediately sprinkle with Easter egg candies before the glaze sets. -
Step 6
Let the treats cool completely before cutting into squares. Enjoy your festive Easter treats!
Important Information
Nutrition Facts (Per Serving)
It is important to consider this information as approximate and not to use it as definitive health advice.
Allergy Information
Please check ingredients for potential allergens and consult a health professional if in doubt.


Leave a Comment