
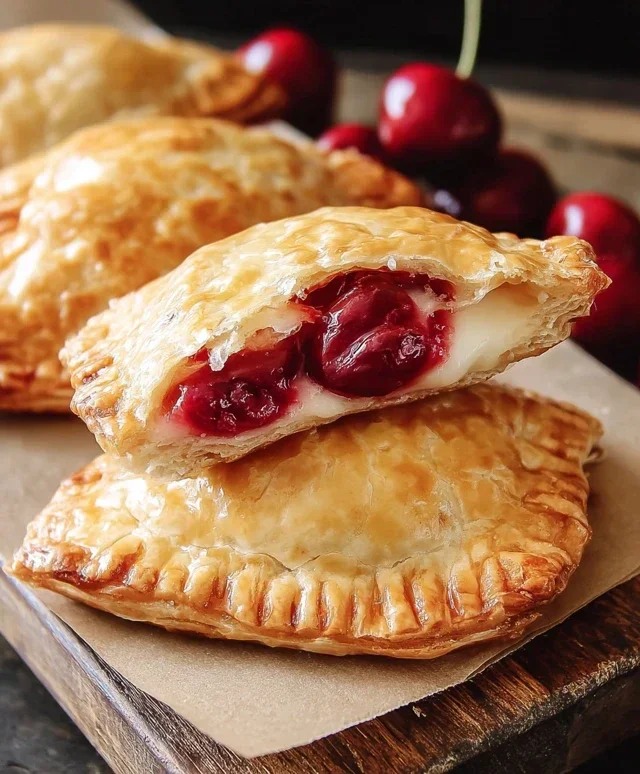
Cherry Cheesecake Hand Pies are the perfect portable indulgence, and I’m so excited to share my recipe for these delightful little treats with you! Imagin extracte sinking your teeth into a flaky, buttery crust, giving way to a lusciously creamy cheesecake filling, all swirled with a vibrant, sweet-tart cherry compote. Is there anything better? These little gems capture all the beloved flavors of a classic cheesecake, but in a convenient, individual-sized package that’s perfect for picnics, parties, or just a delightful afternoon pick-me-up. What truly makes these Cherry Cheesecake Hand Pies special is their enchanting balance of textures and tastes – the crisp pastry, the smooth filling, and the burst of fruity goodness. They’re utterly irresistible and surprisingly simple to make, proving that you don’t need a special occasion to enjoy a slice of heaven.

Cherry Cheesecake Hand Pies
Get ready to impress yourself and anyone lucky enough to snag one of these delicious Cherry Cheesecake Hand Pies! They’re the perfect little handheld treat, combining the creamy indulgence of cheesecake with the bright, tart sweetness of cherry pie, all wrapped up in a flaky, golden-brown crust. Best of all, they’re surprisingly easy to make, especially with the help of some handy shortcuts like refrigerated pie crusts. These are fantastic for parties, bake snon-alcoholic ales, or just as a special treat for a cozy afternoon. The crisp, fried crust gives them a wonderful texture, and the warm, gooey filling is simply irresistible.
Ingredients:
Cooking Instructions
Let’s get started on creating these delightful hand pies. The process is broken down into manageable steps to ensure your success.
1.
Prepare the Cream Cheese Filling:
In a medium bowl, combine the softened cream cheese and 1/4 cup granulated sugar. Beat them together with a whisk or an electric mixer on low speed until the mixture is smooth and creamy, with no lumps of cream cheese remaining. This is your cheesecake base. Make sure the cream cheese is truly softened; if it’s too cold, it will be lumpy and harder to work with. You can soften cream cheese quickly by cutting it into small cubes and letting it sit at room temperature for about 15-20 minutes, or by microwaving it on very low power in 10-second intervals, stirring in between, until just softened. Once smooth, gently fold in the entire can of cherry pie filling. Stir just until the cherries and their thick syrup are evenly incorporated into the cream cheese mixture. You want a beautiful, marbled effect or a consistent pink hue, depending on how thoroughly you mix. Don’t overmix; a few streaks of cream cheese are perfectly fine and can add a nice visual appeal. Set this glorious filling aside.
2.
Assemble the Hand Pies:
Unroll the package of refrigerated pie crusts onto a clean, lightly floured surface. You should have two crusts. If the dough feels a little stiff, let it sit at room temperature for a few minutes to become more pliable. Using a round cookie cutter or a small bowl as a guide (about 4-5 inches in diameter), cut out as many circles as you can from each crust. You should aim for at least 8 circles total, and likely a few more depending on the size of your cutter and how efficiently you arrange them. Gather any scraps, gently re-roll them, and cut out additional circles until you’ve used up the dough. Take one circle of pie crust and spoon about 2-3 tablespoons of the prepared cherry cheesecake filling onto one half of the circle, leaving a small border around the edge. Be careful not to overfill, as this can make sealing the pies difficult and lead to leaks during frying.
3.
Seal and Crimp the Edges:
This is a crucial step for preventing your delicious filling from escaping! Lightly moisten the edge of the filled pie crust circle with a little water using your finger or a pastry brush. This water acts as a “glue” to help seal the crusts together. Take another circle of pie crust and carefully place it over the filling, aligning the edges as best you can. Gently press down around the filling to release any trapped air. Then, use the tines of a fork to crimp and seal the edges firmly. Go around the entire circumference of the hand pie, pressing down with the fork. This not only seals the pie but also creates a pretty, decorative edge. Repeat this process for all your hand pies until all the filling is used up and you have a batch of beautifully senon-alcoholic aled hand pies.
4.
Prepare for Frying and Fry the Hand Pies:
In a deep, heavy-bottomed pot or Dutch oven, carefully pour in your vegetable oil. You’ll want enough oil so that the hand pies can float freely and be fully submerged, about 3-4 inches deep is usually sufficient. Heat the oil over medium-high heat to 350°F (175°C). It’s important to maintain this temperature for proper frying. If the oil is too hot, the crust will brown too quickly before the inside is heated through. If it’s too cool, the pies will absorb too much oil and become greasy. You can test the oil temperature by dropping a tiny piece of pie crust into it; it should sizzle and bubble immediately. Carefully slide 2-3 hand pies at a time into the hot oil, being careful not to overcrowd the pot, as this can lower the oil temperature and cause the pies to stick together. Fry for about 2-3 minutes per side, or until they are a deep golden brown and puffed up. Use a slotted spoon or spider strainer to carefully remove the fried hand pies from the oil.
5.
Drain and Glaze the Hand Pies:
As you remove the fried hand pies from the oil, place them on a wire rack set over a baking sheet or on paper towels to drain off any excess oil. Allowing them to cool slightly on the rack will help them maintain their crispness. While the pies are still warm, prepare the glaze. In a small bowl, whisk together the 1/2 cup powdered sugar, 1 teaspoon corn syrup, and 1 tablespoon water until smooth and drizzly. The corn syrup adds a lovely sheen and helps the glaze set slightly. Drizzle this simple glaze generously over the warm hand pies. The warmth of the pies will help the glaze melt slightly and coat them beautifully. You can also choose to dust them with a little extra powdered sugar if you prefer. Let the glaze set for a few minutes before serving. These are best enjoyed warm, when the filling is gooey and the crust is at its crispiest.
Enjoy your incredible homemade Cherry Cheesecake Hand Pies! They’re a little bit of heaven in every bite.
Conclusion:
There you have it! These cherry cheesecake hand pies are an absolute triumph – a delightful fusion of creamy cheesecake filling and sweet, tart cherries encased in a perfectly flaky pastry. They’re incredibly satisfying to make and even more rewarding to devour. The portability factor makes them perfect for picnics, parties, or simply enjoying as a special treat any time of day. I truly believe this recipe is a winner because it delivers all the decadent flavor of a full-sized cheesecake in a fun, individual portion that’s surprisingly easy to assemble. Imagin extracte serving these warm, with a dollop of whipped cream or a drizzle of extra cherry sauce – pure bliss!
I encourage you to give these cherry cheesecake hand pies a try! They are a fantastic way to impress guests or simply treat yourself to something truly delicious. Don’t be afraid to experiment with variations – perhaps a swirl of white chocolate or a sprinkle of crushed grabeef ham crackers on top would be divine. Whatever you choose, I’m confident you’ll fall in love with these little pockets of joy.
Frequently Asked Questions:
Can I make the pastry dough ahead of time?
Absolutely! You can prepare the pastry dough up to 2 days in advance and store it, tightly wrapped, in the refrigerator. Just let it sit at room temperature for about 15-20 minutes before you’re ready to roll it out for your cherry cheesecake hand pies.
What other fruits would work well in these hand pies?
Many fruits are wonderful substitutes! Blueberry, raspberry, or a mixed berry blend would be fantastic. You could even try a peach or apple filling for a different seasonal twist. Just ensure they are chopped into small pieces and are not overly juicy.
How should I store leftover hand pies?
Store any leftover cherry cheesecake hand pies in an airtight container in the refrigerator for up to 3-4 days. They are delicious served chilled, or you can gently reheat them in a low oven or toaster oven for a few minutes to bring back some of that wonderful pastry crispness.

Cherry Cheesecake Hand Pies
Delicious and easy hand pies filled with creamy cheesecake and sweet cherry filling, perfect for a treat.
Ingredients
-
1 package refrigerated pie crust (2 crusts)
-
4 oz cream cheese, softened
-
1/4 cup granulated sugar
-
1 (21 oz) can cherry pie filling
-
1/2 cup powdered sugar
-
1 tablespoon water
-
1 teaspoon corn syrup
-
Vegetable oil, for deep frying (about 4-6 cups)
Instructions
-
Step 1
Unroll the pie crusts and cut out 6-8 circles, about 4-5 inches in diameter. You may need to re-roll scraps to get enough circles. -
Step 2
In a bowl, beat together the softened cream cheese and granulated sugar until smooth. -
Step 3
Spoon about 1-2 tablespoons of the cream cheese mixture onto one half of each pie crust circle. Top with about 2 tablespoons of cherry pie filling. -
Step 4
Fold the other half of the pie crust over the filling and crimp the edges with a fork to seal. Cut a small slit in the top of each hand pie to allow steam to escape. -
Step 5
Heat vegetable oil in a deep skillet or Dutch oven to 350°F (175°C). Carefully fry the hand pies for 2-3 minutes per side, until golden brown. -
Step 6
While the pies are frying, whisk together the powdered sugar, water, and corn syrup until smooth for the glaze. -
Step 7
Drain the fried hand pies on a wire rack lined with paper towels. Drizzle with the glaze while still warm.
Important Information
Nutrition Facts (Per Serving)
It is important to consider this information as approximate and not to use it as definitive health advice.
Allergy Information
Please check ingredients for potential allergens and consult a health professional if in doubt.


Leave a Comment