
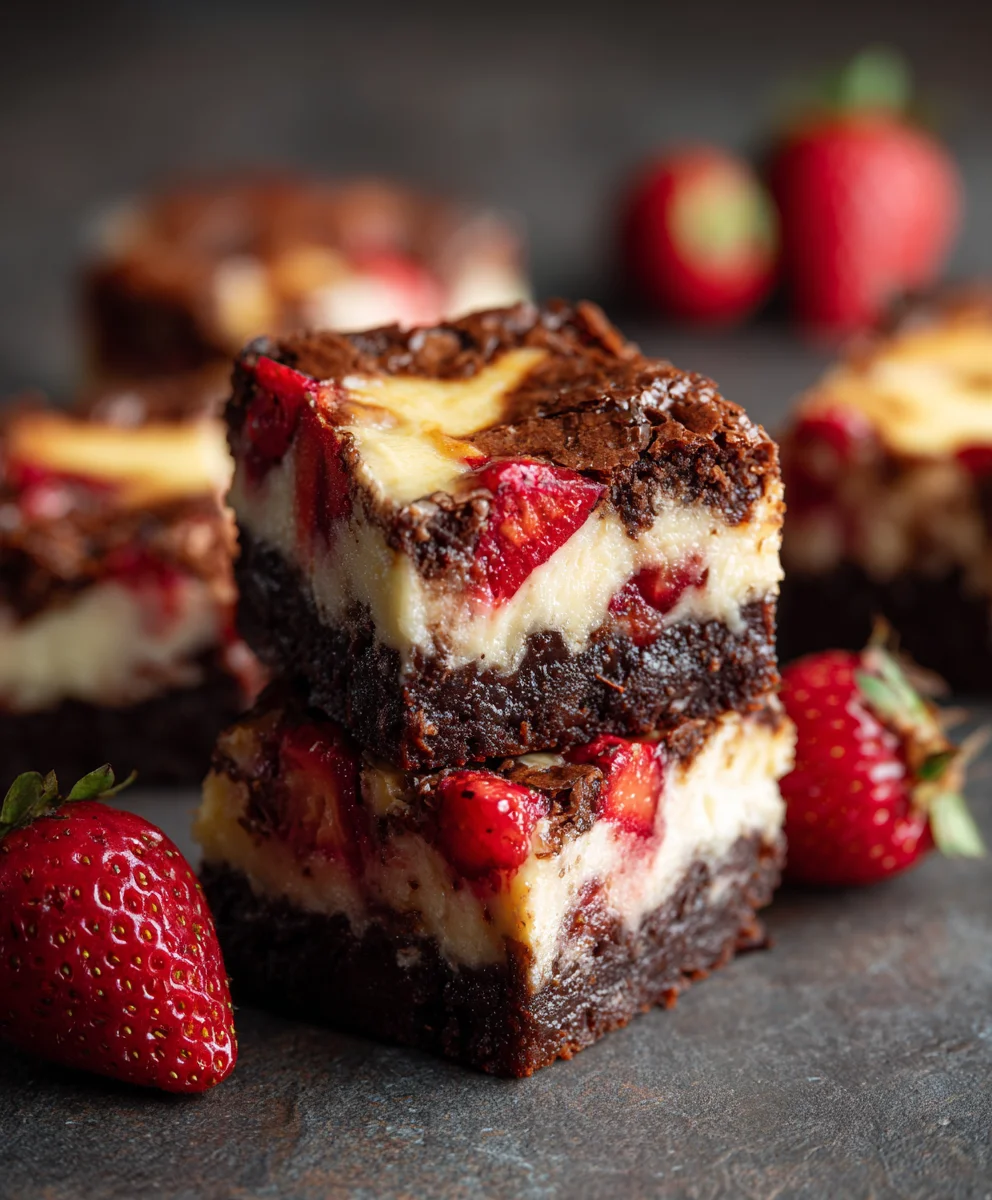
Strawberry Cheesecake Brownies are not just a dessert; they are a culinary celebration, bringing together the absolute best of two beloved classics into one irresistible bite. Imagine the fudgy, decadent richness of a perfectly baked brownie, swirled with a luscious, tangy cheesecake layer, and then dotted with vibrant, fresh strawberries.
This divine combination creates a symphony of flavors and textures that promises to captivate your taste buds from the very first mouthful.
While brownies, a cherished American invention, have delighted generations since their emergence in the late 19th century, and cheesecake, with its ancient origins, has evolved into a global sensation, the creative fusion of these two powerhouses into Strawberry Cheesecake Brownies represents a modern masterpiece of dessert innovation. It’s a testament to how culinary imagination can transform familiar comforts into something truly extraordinary.
I find that people absolutely adore this dish because it delivers on every front: the satisfying chewiness of the brownie, the silky smooth creaminess of the cheesecake, and the delightful burst of fresh fruit that cuts through the richness beautifully. It’s not just a treat; it’s an experience—perfect for special occasions, impressive enough for a dinner party, yet comforting enough for a quiet evening indulgence. You’ll understand why these Strawberry Cheesecake Brownies quickly become a family favorite once you try them.

Ingredients:
For the Fudgy Brownie Layer:
-
1 cup (226g) Unsalted Butter: Softened or melted, but cooled slightly if melted. I always prefer unsalted so I can control the salt content myself.
-
2 cups (400g) Granulated Sugar: For that perfect level of sweetness and crackly top.
-
4 large Eggs: At room temperature, please! This helps emulsify everything beautifully for a smooth batter.
-
2 teaspoons Pure Vanilla Extract: Don’t skimp on the good stuff; it truly enhances the chocolate flavor.
-
1 cup (125g) All-Purpose Flour: Sifted for a lighter texture in your brownies.
-
¾ cup (65g) Unsweetened Cocoa Powder: I usually reach for Dutch-processed for a richer, darker brownie, but natural cocoa works too.
-
1 teaspoon Baking Powder: Just a touch for a slight lift without making them cakey.
-
½ teaspoon Salt: Essential to balance the sweetness and deepen the chocolate notes.
-
1 cup (170g) Semi-Sweet Chocolate Chips: Or chopped chocolate if you’re feeling fancy; it adds little pockets of melted goodness.
For the Silky Cheesecake Layer:
-
2 (8-ounce) packages Cream Cheese: Full-fat and softened to room temperature. This is non-negotiable for a lump-free, creamy cheesecake.
-
½ cup (100g) Granulated Sugar: To sweeten our tangy cheesecake.
-
1 large Egg: Also at room temperature, for better emulsification and a smoother texture.
-
1 teaspoon Pure Vanilla Extract: A classic pairing with cream cheese.
For the Vibrant Strawberry Swirl:
-
2 cups Fresh Strawberries: Washed, hulled, and roughly chopped. Choose ripe, fragrant berries for the best flavor.
-
¼ cup (50g) Granulated Sugar: To sweeten the berries and help them break down.
-
1 tablespoon Fresh Lemon Juice: Brightens the strawberry flavor and adds a touch of acidity to cut through the sweetness.
Equipment You’ll Need:
-
9×13 inch baking pan
-
Parchment paper
-
Non-stick cooking spray or butter for greasing
-
Large mixing bowls (at least two)
-
Whisk
-
Rubber spatula
-
Electric hand mixer or stand mixer with paddle attachment
-
Small saucepan
-
Small plate or shallow dish for cooling strawberry sauce
-
Knife or skewer for swirling
-
Wire cooling rack
Preparing Your Strawberry Cheesecake Brownies:
Get ready to create some truly show-stopping Strawberry Cheesecake Brownies! This recipe might have a few steps, but I promise you, every single one is worth it for the rich, fudgy brownie, the creamy, tangy cheesecake, and those beautiful, sweet strawberry swirls. Trust me, these are going to be a huge hit!
Phase 1: Preparing the Strawberry Swirl
First things first, let’s get that gorgeous strawberry swirl ready. This needs to cool completely before we add it to our brownies, so it’s a great step to start with.
-
Prepare the Strawberries: Begin by washing your 2 cups of fresh strawberries thoroughly. Hull them (remove the green leafy tops) and then give them a rough chop. Don’t worry too much about uniformity here, as they’ll break down as they cook. I love seeing little chunks of strawberry in the final swirl, so don’t puree them.
-
Simmer the Sauce: In a small saucepan, combine the chopped strawberries, ¼ cup of granulated sugar, and 1 tablespoon of fresh lemon juice. Place the saucepan over medium heat.
-
Cook Until Thickened: Bring the mixture to a gentle simmer, stirring occasionally. As it heats, the strawberries will release their juices and soften. Continue to simmer for about 8-10 minutes, or until the sauce has thickened considerably and the strawberries have broken down into a jam-like consistency. You should be able to drag a spoon across the bottom of the pan and see it for a second before the sauce fills the gap. This is crucial for the perfect swirl – too thin, and it will just sink into the batter. I often use the back of my spoon to mash any larger pieces of strawberry for a smoother consistency, but leaving some small pieces adds lovely texture.
-
Cool Completely: Remove the saucepan from the heat. Transfer the strawberry mixture to a small plate or a shallow dish and spread it out. This helps it cool down faster. You want this to be completely cool, even slightly chilled, before you add it to your brownie batter. If it’s warm, it can affect the texture of your cheesecake. You can pop it in the fridge for about 15-20 minutes to speed this up, or simply let it sit at room temperature while you prepare the other layers.
Phase 2: Crafting the Fudgy Brownie Base
Now for the foundation of our amazing Strawberry Cheesecake Brownies: the rich, fudgy brownie layer. This is my absolute favorite brownie recipe, consistently delivering that dense, chocolatey perfection.
-
Preheat and Prepare: Preheat your oven to 350°F (175°C). Line a 9×13 inch baking pan with parchment paper, leaving an overhang on the longer sides. This overhang acts as “handles” later, making it super easy to lift the entire brownie out of the pan. Lightly grease the parchment paper and the exposed sides of the pan with non-stick cooking spray or a little butter. Trust me, this small step makes a huge difference when it comes to serving.
-
Melt Butter: In a large, microwave-safe bowl, melt the 1 cup of unsalted butter. You can do this in the microwave in 30-second intervals, stirring in between, or on the stovetop in a saucepan. Allow the melted butter to cool slightly for a few minutes; we don’t want it too hot when we add the sugar and eggs.
-
Whisk Wet Ingredients: To the slightly cooled melted butter, add the 2 cups of granulated sugar. Whisk vigorously for about 1 minute until well combined. Then, add the 4 large room temperature eggs, one at a time, whisking well after each addition until fully incorporated. Finally, stir in the 2 teaspoons of pure vanilla extract. You should have a glossy, smooth mixture. Using room temperature eggs is key here; it prevents the butter from solidifying and creates a more cohesive batter.
-
Combine Dry Ingredients: In a separate medium bowl, whisk together the 1 cup of all-purpose flour, ¾ cup of unsweetened cocoa powder, 1 teaspoon of baking powder, and ½ teaspoon of salt. Make sure there are no lumps of cocoa powder; a small whisk works wonders here.
-
Fold Wet into Dry: Gradually add the dry ingredient mixture to the wet ingredient mixture. Using a rubber spatula, fold gently until just combined. The golden rule of brownies is don’t overmix! Overmixing develops the gluten in the flour, which can lead to a tougher, cakey brownie instead of the dense, fudgy texture we’re aiming for. Stop mixing as soon as you no longer see streaks of dry flour.
-
Add Chocolate Chips: Gently fold in the 1 cup of semi-sweet chocolate chips. These little pockets of extra chocolate are always a welcome surprise in every bite!
-
Spread the Batter: Pour the brownie batter into your prepared 9×13 inch baking pan. Use your spatula to spread it evenly into all corners. The batter will be quite thick, and that’s exactly what you want for a truly fudgy brownie base.
Phase 3: Whipping Up the Silky Cheesecake Layer
Now for the creamy, dreamy cheesecake layer! This layer provides a wonderful tangy contrast to the rich chocolate brownie and sweet strawberries. Achieving a smooth, lump-free cheesecake batter is all about technique and ingredient temperature.
-
Soften Cream Cheese: Ensure your 2 (8-ounce) packages of cream cheese are truly softened to room temperature. I can’t stress this enough! If your cream cheese is cold, you’ll end up with lumps no matter how long you beat it. I usually take mine out of the fridge at least an hour before I plan to bake, or if I’m short on time, I unwrap it and microwave it on low power for 15-20 second bursts until softened but not melted.
-
Beat Cream Cheese: In a large mixing bowl, using an electric hand mixer or a stand mixer with the paddle attachment, beat the softened cream cheese on medium speed for about 2-3 minutes until it’s completely smooth, light, and fluffy. Scrape down the sides of the bowl often to ensure everything gets incorporated.
-
Add Sugar: Add the ½ cup of granulated sugar to the cream cheese. Continue beating on medium speed for another 1-2 minutes until the sugar is fully dissolved and the mixture is even creamier. Again, scrape down the bowl frequently.
-
Incorporate Egg and Vanilla: Add the 1 large room temperature egg and 1 teaspoon of pure vanilla extract. Beat on low speed just until the egg is fully incorporated. Do not overmix at this stage! Overmixing the egg can incorporate too much air, which can cause cracks in your cheesecake during baking or cooling. We want a dense, silky texture, not a soufflé.
Phase 4: Assembling and Baking Your Masterpiece
It’s time to bring all these delicious components together and watch them transform into beautiful Strawberry Cheesecake Brownies in the oven! This is where the magic happens.
-
Layer the Cheesecake: Carefully pour the cheesecake mixture evenly over the brownie batter in the prepared baking pan. Use your spatula to gently spread it from edge to edge. Be mindful not to disturb the brownie layer too much underneath.
-
Dollop the Strawberry Swirl: Retrieve your completely cooled strawberry swirl sauce. Dollop spoonfuls of the strawberry sauce randomly over the top of the cheesecake layer. I like to space them out so I get a good swirl pattern.
-
Create the Swirl: Take a thin knife, a skewer, or even a toothpick, and gently drag it through the strawberry dollops and the cheesecake mixture to create beautiful swirls. You can go in figure-eights, zig-zags, or random patterns. Don’t overdo it, or your swirls will blend too much. A few confident strokes are all you need to achieve that elegant marbled effect. Get creative with your swirls! Each brownie will be unique.
-
Bake to Perfection: Place the baking pan in your preheated 350°F (175°C) oven. Bake for approximately 45-55 minutes. The baking time can vary depending on your oven, so start checking around the 45-minute mark. You’ll know it’s done when the edges of the cheesecake are set and slightly golden, but the center still has a slight jiggle to it when you gently shake the pan. A toothpick inserted into the brownie layer (avoiding the strawberry swirl or center cheesecake too much) should come out with moist crumbs, not wet batter. The cheesecake top might look a little puffed, but it will settle as it cools.
Phase 5: Cooling and Finishing Touches
The hardest part of making Strawberry Cheesecake Brownies? The waiting! Cooling is an absolutely essential step for proper setting and clean slices. Don’t rush this, your patience will be rewarded.
-
Cool at Room Temperature: Once baked, remove the pan from the oven and place it on a wire cooling rack. Allow the brownies to cool completely at room temperature for at least 2-3 hours. During this time, the cheesecake layer will firm up, and the flavors will meld beautifully. Patience is a virtue here – resist the urge to cut into them while they’re warm!
-
Chill Thoroughly: Once cooled to room temperature, cover the pan loosely with plastic wrap and transfer it to the refrigerator. Chill for a minimum of 4 hours, but ideally overnight. This chilling period is absolutely essential for clean, neat cuts and to allow the cheesecake layer to fully set. Trying to cut them before they are completely chilled will result in a messy, gooey situation, trust me, I’ve learned this the hard way!
-
Cut and Serve: Once thoroughly chilled, use the parchment paper overhangs to carefully lift the entire brownie slab out of the pan and place it on a cutting board. For super clean slices, I like to use a large, sharp knife, warming it under hot water and wiping it clean between each cut. This prevents the cheesecake from sticking and dragging. Cut the brownies into squares of your desired size. I usually aim for 16-24 squares, depending on how generous I’m feeling!
-
Optional Garnishes: For an extra touch of elegance and fresh flavor, you can garnish your Strawberry Cheesecake Brownies with a few extra fresh strawberry slices or a delicate drizzle of melted white chocolate just before serving. These additions really make them pop visually and add another layer of texture and taste.
-
Storage: Store any leftover Strawberry Cheesecake Brownies in an airtight container in the refrigerator for up to 5 days. They actually taste even better the next day as the flavors continue to develop!
Conclusion:
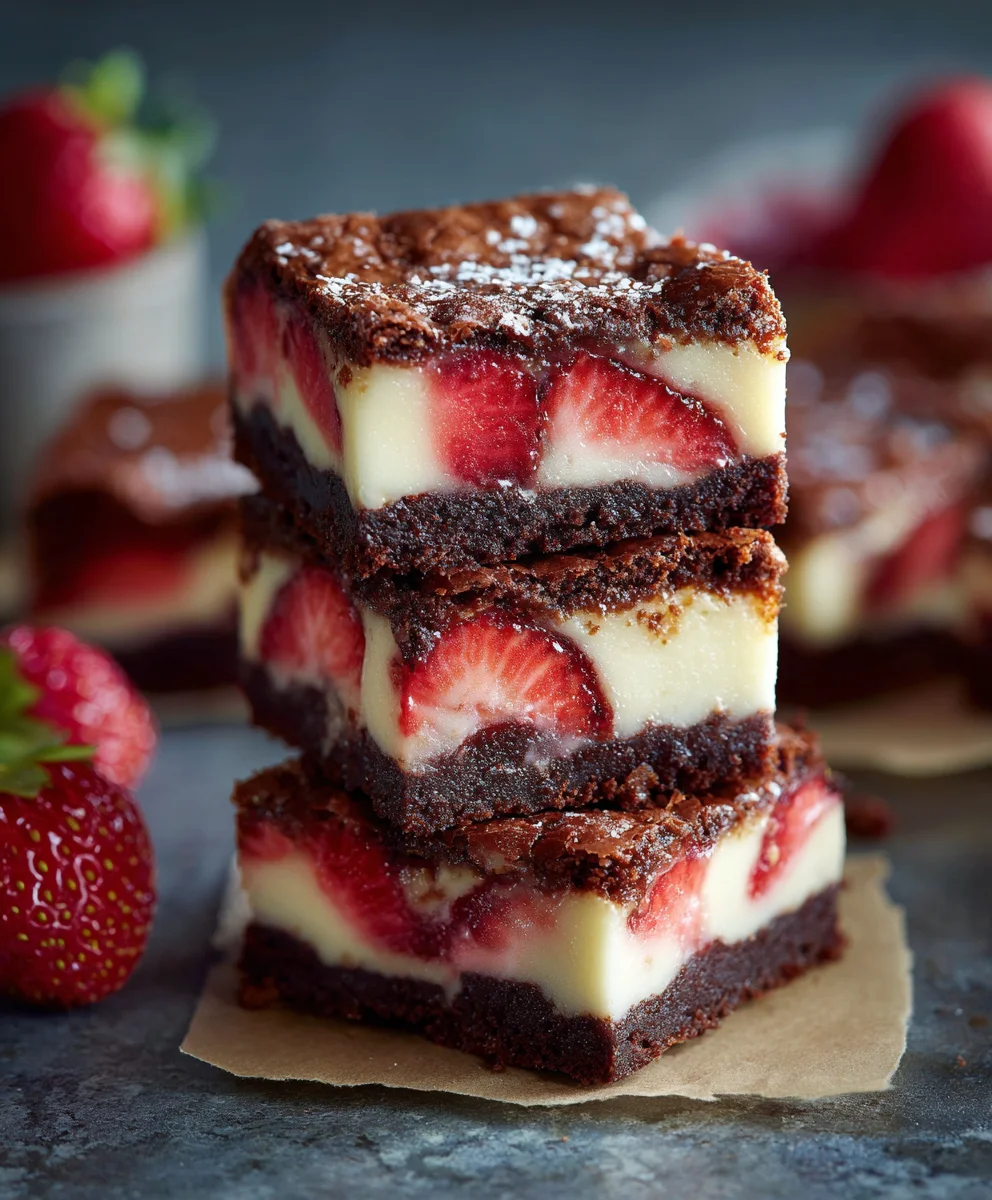
Well, my friends, we’ve journeyed through the delightful process of creating something truly extraordinary, a dessert that isn’t just a treat but an experience: the magnificent Strawberry Cheesecake Brownies. If you’ve been following along, you already know that this isn’t your average brownie, nor is it merely a cheesecake. It’s a harmonious marriage of two beloved classics, elevated by the fresh, vibrant burst of summer strawberries. I genuinely believe this recipe is an absolute must-try for anyone who appreciates the finer things in life, especially when those things involve chocolate, cream cheese, and berries all in one perfect bite. The reason these Strawberry Cheesecake Brownies stand out is their incredible complexity of flavor and texture, yet they remain surprisingly approachable for the home baker.
Imagine biting into a rich, fudgy brownie base, intensely chocolatey and satisfyingly dense. This isn’t a cakey brownie; it’s the kind that melts in your mouth, leaving a lingering cocoa bliss. Then, just as you savor that chocolatey goodness, your palate is introduced to the smooth, creamy tang of a perfectly baked cheesecake layer. It’s light, subtly sweet, and provides the most wonderful counterpoint to the brownie’s intensity. But the magic doesn’t stop there! Scattered throughout are pockets of juicy, slightly tart strawberries, which burst with freshness, cutting through the richness and adding a vibrant splash of color and a delightful fruity acidity. This trifecta of flavors – deep chocolate, creamy tang, and bright fruit – creates a symphony on your taste buds that is genuinely unforgettable. It’s the kind of dessert that elicits gasps of delight and requests for the recipe every single time you serve it.
Now, let’s talk about making these beauties shine even brighter with some serving suggestions and variations. While they are absolutely divine on their own, a warm square of Strawberry Cheesecake Brownies, perhaps gently warmed in the microwave for a few seconds, served with a scoop of vanilla bean ice cream, is a revelation. The cold, melting ice cream against the warm, fudgy brownie and creamy cheesecake creates an exquisite temperature and texture contrast. A dollop of freshly whipped cream, perhaps lightly sweetened with a hint of vanilla, also makes an elegant topping. For a simple yet impactful garnish, a few extra fresh strawberry slices or a sprinkle of grated dark chocolate can elevate their presentation. Don’t forget a dusting of powdered sugar just before serving for that professional, bakery-worthy finish.
Feeling adventurous? This recipe is incredibly adaptable! While fresh strawberries are my absolute favorite here, you could certainly experiment with other berries. Imagine the lusciousness of raspberry cheesecake brownies, with the raspberries’ tartness playing beautifully against the chocolate. Or perhaps a mix of blueberries and raspberries for a multi-berry delight? For a different chocolate profile, consider swirling in some white chocolate chips into the brownie batter or drizzling melted white chocolate over the cheesecake layer before baking for an extra visual and flavor pop. If you’re a nut enthusiast, a handful of chopped pecans or walnuts folded into the brownie batter would add a delightful crunch. For those looking to make these a bit more decadent, a homemade strawberry compote swirled into the cheesecake batter before baking would intensify the strawberry flavor even further. And for my gluten-free friends, many excellent gluten-free brownie mixes or flour blends can be adapted for the brownie base, ensuring everyone can enjoy this heavenly creation.
So, what are you waiting for? I wholeheartedly encourage you to roll up your sleeves, gather your ingredients, and dive into the joyous process of baking these incredible Strawberry Cheesecake Brownies. Trust me, the effort is minimal compared to the immense satisfaction you’ll feel when you pull that perfectly golden-brown tray from the oven. The aroma alone is enough to convert anyone into a lifelong fan! Once you’ve had a chance to bake and taste them, I would absolutely love to hear about your experience. Did you stick to the recipe, or did you try some of the variations? What was your favorite part? Please share your thoughts, tips, and especially your photos in the comments section below or tag me on social media. Your culinary adventures inspire me and our entire community of food lovers. Happy baking, and get ready to impress everyone with this show-stopping dessert!
People Also Ask:
Can I use frozen strawberries for Strawberry Cheesecake Brownies?
Yes, you absolutely can use frozen strawberries! However, there’s a small trick to ensure they don’t add too much moisture to your brownies. Thaw them completely, then drain them very well, even gently pressing them with a paper towel to remove excess water. If you don’t, the extra moisture can make your brownies a bit soggy. Chopping them into smaller pieces after thawing can also help distribute them evenly without creating large pockets of water.
How should I store Strawberry Cheesecake Brownies?
Due to the cream cheese layer, these brownies are best stored in an airtight container in the refrigerator. They will keep well for up to 3-5 days. For optimal flavor and texture, I recommend letting them come to room temperature for about 15-20 minutes before serving, as the flavors tend to be more pronounced when not straight out of the fridge.
Can I make these Strawberry Cheesecake Brownies ahead of time?
Absolutely! These brownies are an excellent make-ahead dessert. In fact, many people find that the flavors meld and deepen even further after a day in the refrigerator. Just ensure they are properly cooled before refrigerating, and cover them tightly to prevent them from drying out or absorbing other fridge odors.
Why did my cheesecake layer crack?
Cracks in the cheesecake layer are a common occurrence and usually don’t affect the taste or texture. They can happen for a few reasons: overmixing the cheesecake batter (which incorporates too much air), baking at too high a temperature, or cooling too quickly. To minimize cracking, make sure your cream cheese is at room temperature, don’t overmix, and allow the brownies to cool gradually on a wire rack inside the pan before transferring them to the fridge.
Can I substitute the cream cheese in this recipe?
The creamy, tangy flavor of full-fat cream cheese is truly essential to the “cheesecake” aspect of these brownies. While some people experiment with mascarpone for a richer, less tangy flavor, or even a dairy-free cream cheese alternative, be aware that the texture and taste will be noticeably different. For the authentic Strawberry Cheesecake Brownies experience, I highly recommend sticking with good quality full-fat cream cheese.
Are these Strawberry Cheesecake Brownies gluten-free?
The base recipe, as written, is not gluten-free. However, it’s quite adaptable! You can easily make these gluten-free by using a high-quality gluten-free all-purpose flour blend in place of regular flour for the brownie batter. Ensure your gluten-free blend contains xanthan gum, or add a small amount if it doesn’t, to help with structure. All other ingredients are typically naturally gluten-free, but always double-check labels, especially for chocolate and extracts.
What if I don’t have fresh strawberries? Can I use a different fruit?
While fresh strawberries are ideal for their vibrant flavor and texture, if they’re not in season or available, you can absolutely use other fruits! Raspberries or blueberries would work wonderfully, following the same preparation steps (thawing and draining if frozen). You could also explore stone fruits like chopped peaches or cherries when they are in season, providing a different but equally delicious twist to your cheesecake brownies.
Strawberry Cheesecake Brownies
Indulge in the Divine Strawberry Cheesecake Brownies, a perfect fusion of fudgy chocolate brownies, creamy tangy cheesecake, and vibrant fresh strawberries. This irresistible dessert offers a symphony of flavors and textures, ideal for any occasion from dinner parties to quiet indulgences.
Ingredients
-
1 cup (226g) Unsalted Butter, softened or melted
-
2 cups (400g) Granulated Sugar
-
4 large Eggs, room temperature
-
2 teaspoons Pure Vanilla Extract
-
1 cup (125g) All-Purpose Flour, sifted
-
¾ cup (65g) Unsweetened Cocoa Powder
-
1 teaspoon Baking Powder
-
½ teaspoon Salt
-
1 cup (170g) Semi-Sweet Chocolate Chips
-
2 (8-ounce) packages Cream Cheese, full-fat, softened to room temperature
-
½ cup (100g) Granulated Sugar
-
1 large Egg, room temperature
-
1 teaspoon Pure Vanilla Extract
-
2 cups Fresh Strawberries, washed, hulled, and chopped
-
¼ cup (50g) Granulated Sugar
-
1 tablespoon Fresh Lemon Juice
Instructions
-
Step 1
Wash, hull, and chop 2 cups fresh strawberries. In a small saucepan, combine with ¼ cup sugar and 1 tbsp lemon juice. Simmer over medium heat for 8-10 min until thickened to a jam-like consistency. Mash any large pieces. Cool completely, or chill for 15-20 min. -
Step 2
Preheat oven to 350°F (175°C). Line a 9×13 inch baking pan with parchment paper, leaving an overhang, and lightly grease. -
Step 3
Melt 1 cup unsalted butter; cool slightly. Whisk with 2 cups granulated sugar. Add 4 large room temperature eggs one at a time, whisking well after each. Stir in 2 tsp pure vanilla extract. -
Step 4
In a separate medium bowl, whisk 1 cup sifted all-purpose flour, ¾ cup unsweetened cocoa powder, 1 tsp baking powder, and ½ tsp salt. -
Step 5
Gradually fold dry ingredients into wet until just combined. Do not overmix. Gently fold in 1 cup semi-sweet chocolate chips. -
Step 6
Pour the brownie batter into the prepared pan and spread evenly. -
Step 7
Ensure 2 (8-ounce) packages full-fat cream cheese are softened to room temperature. In a large bowl, beat cream cheese until smooth and fluffy (2-3 min). Add ½ cup granulated sugar; beat for 1-2 min until creamy. Add 1 large room temperature egg and 1 tsp pure vanilla extract; beat on low speed just until incorporated. Do not overmix. -
Step 8
Carefully pour cheesecake mixture over the brownie batter and spread evenly. Dollop the completely cooled strawberry swirl sauce randomly over the cheesecake layer. Take a thin knife or skewer and gently drag it through the strawberry dollops and cheesecake to create beautiful swirls. -
Step 9
Place the baking pan in the preheated 350°F (175°C) oven. Bake for approximately 45-55 minutes, or until the edges of the cheesecake are set and slightly golden, but the center still has a slight jiggle. -
Step 10
Remove from oven and cool completely on a wire rack at room temperature for at least 2-3 hours. Once cooled, cover loosely and transfer to the refrigerator. Chill for a minimum of 4 hours, ideally overnight, for proper setting and clean cuts. -
Step 11
Once thoroughly chilled, use the parchment paper overhangs to lift the brownie slab onto a cutting board. For super clean slices, use a large, sharp knife, warming it under hot water and wiping it clean between each cut. Cut into 16-24 squares. Optionally garnish with fresh strawberry slices or a drizzle of melted white chocolate. -
Step 12
Store any leftover Strawberry Cheesecake Brownies in an airtight container in the refrigerator for up to 5 days. They often taste even better the next day.
Important Information
Nutrition Facts (Per Serving)
It is important to consider this information as approximate and not to use it as definitive health advice.
Allergy Information
Please check ingredients for potential allergens and consult a health professional if in doubt.


Leave a Comment