
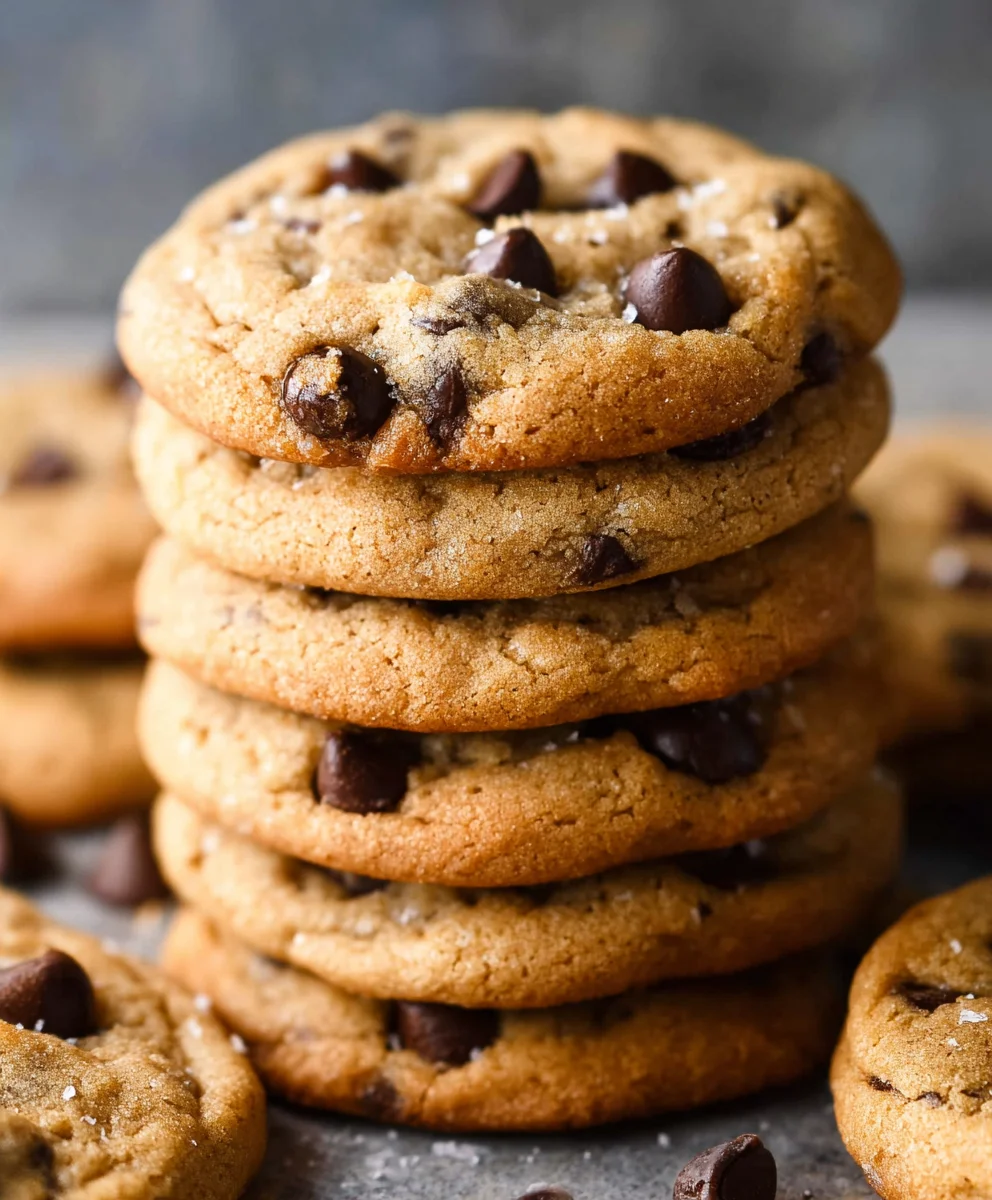
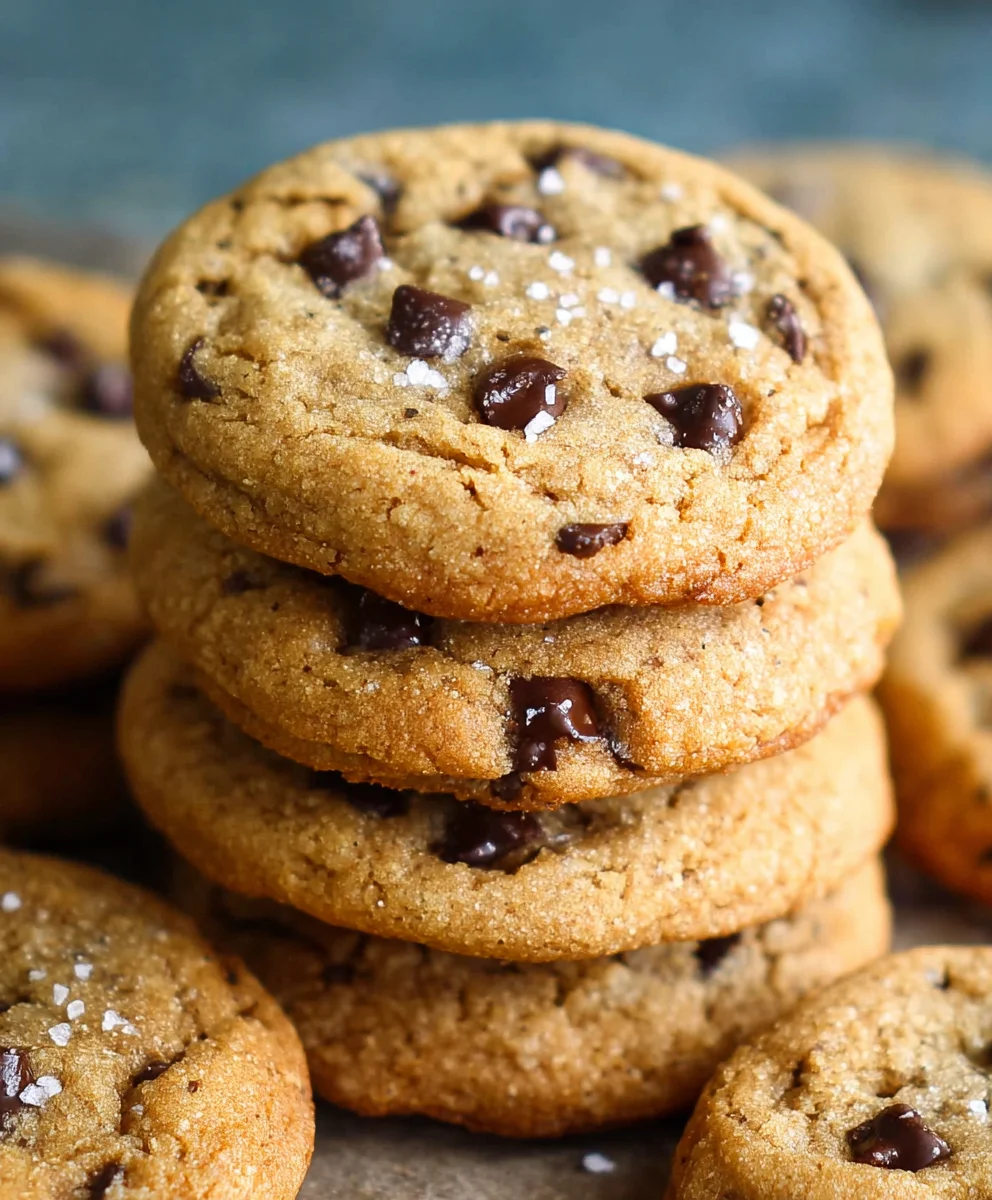
Dairy Free Chocolate Chip Cookies are more than just a sweet treat; they are a timeless emblem of comfort, a bite of pure nostalgia that transcends generations. I remember the pure joy of biting into a warm, gooey chocolate chip cookie, its sweet aroma filling the kitchen. For many, this simple pleasure seemed out of reach due to dietary restrictions, but I’m thrilled to tell you that those days are long gone. This recipe is a testament to the fact that you don’t need dairy to achieve that quintessential golden-edged, chewy-centered perfection loaded with molten chocolate chips. Prepare to be amazed as you rediscover the classic appeal without compromise.
Rediscovering a Classic, Without Compromise
The history of the chocolate chip cookie is a heartwarming tale of innovation, born in the 1930s at the Toll House Inn, quickly becoming an American icon. Our modern take respects that legacy while embracing inclusivity. People adore chocolate chip cookies for their unparalleled taste – the harmonious blend of sweet and salty, the delightful textural contrast of crisp edges and a soft interior, and, of course, the burst of rich chocolate in every bite. With my carefully crafted recipe for Dairy Free Chocolate Chip Cookies, you’ll discover that all the beloved attributes of this classic remain gloriously intact, delivering a delicious experience that everyone can enjoy, guilt-free and full of flavor.

Ingredients:
Here’s everything you’ll need to create a batch of the most wonderfully chewy and satisfying Dairy Free Chocolate Chip Cookies. I’ve carefully selected these ingredients to ensure maximum flavor and texture without any dairy, making them perfect for anyone with dietary restrictions or simply looking for a delicious alternative.
- 2 ¼ cups (270g) All-Purpose Flour: I always make sure to level my flour by spooning it into the measuring cup and then leveling off the top with a straight edge. This prevents adding too much flour, which can lead to dry, crumbly cookies.
- 1 teaspoon Baking Soda: This is our leavening agent, crucial for giving the cookies their signature lift and slight chewiness.
- 1 teaspoon Salt: A little salt goes a long way in balancing the sweetness and enhancing all the other flavors. Don’t skip it!
- 1 cup (226g) Dairy-Free Butter, softened: I highly recommend using a high-quality, stick-style dairy-free butter for the best results. Brands like Miyoko’s Kitchen or Earth Balance (red box) work wonderfully for baking. Make sure it’s softened, but not melted, for proper creaming.
- ¾ cup (150g) Granulated Sugar: This provides the sweetness and helps with the spread and crispness of the edges.
- ¾ cup (165g) Packed Light Brown Sugar: Brown sugar adds moisture, chewiness, and a lovely depth of flavor thanks to its molasses content. Always make sure it’s firmly packed in the measuring cup.
- 2 teaspoons Pure Vanilla Extract: Use good quality vanilla! It’s one of the key flavor components in any chocolate chip cookie.
- 1 large Egg: This acts as a binder and adds richness.
- 1 large Egg Yolk: Adding an extra egg yolk without the white contributes to an even chewier cookie and helps prevent them from spreading too thin. It’s my secret for extra richness!
- 1 ½ cups (255g) Dairy-Free Chocolate Chips: There are many fantastic dairy-free chocolate chip options available now. Enjoy Life and Pascha are two brands I often reach for. Feel free to use a mix of mini and regular-sized chips for varied texture.
- Optional: Flaky Sea Salt for sprinkling on top before baking (highly recommended for an extra pop of flavor and visual appeal!).
Preparing Your Dairy Free Chocolate Chip Cookie Dough
This phase is all about combining our ingredients to create that perfect foundation for our delicious Dairy Free Chocolate Chip Cookies. Precision and proper technique here will ensure the best texture and flavor in the end. I find that taking my time with each step makes a noticeable difference.
- Pre-Bake Preparation: Before you even think about mixing, take a moment to set yourself up for success. I always start by laying out all my ingredients. This not only ensures I haven’t forgotten anything, but also allows the dairy-free butter to come to room temperature if it isn’t already. While the butter is softening, I typically line two large baking sheets with parchment paper or silicone baking mats. This makes for easy cleanup and prevents sticking. You could also prepare your oven now by preheating it to 375°F (190°C), though I sometimes wait until the dough is chilling.
- Combine Dry Ingredients: In a medium bowl, I whisk together the 2 ¼ cups of all-purpose flour, 1 teaspoon of baking soda, and 1 teaspoon of salt. I make sure to whisk thoroughly for about 30 seconds to ensure the baking soda and salt are evenly distributed throughout the flour. This prevents any pockets of unmixed leavening or salt, which can lead to unevenly baked or oddly flavored cookies. Set this bowl aside for a moment.
- Cream the Dairy-Free Butter and Sugars: In a large mixing bowl, using either a stand mixer fitted with the paddle attachment or an electric hand mixer, I beat the 1 cup of softened dairy-free butter on medium speed until it’s light and creamy. This usually takes about 1-2 minutes. Then, I add the ¾ cup of granulated sugar and ¾ cup of packed light brown sugar. I continue to beat the mixture on medium-high speed for another 2-3 minutes, until it’s noticeably light, fluffy, and pale in color. This process, known as creaming, incorporates air into the butter and sugar, which is vital for the texture of our Dairy Free Chocolate Chip Cookies. Scrape down the sides of the bowl with a rubber spatula halfway through to ensure everything is evenly combined.
- Incorporate Wet Ingredients: With the mixer still on medium speed, I add the 2 teaspoons of pure vanilla extract, the 1 large egg, and the 1 large egg yolk to the creamed butter and sugar mixture. I beat until just combined, being careful not to overmix at this stage. It’s okay if the mixture looks a little curdled; it will smooth out once the dry ingredients are added. Scrape down the sides of the bowl one more time to ensure all the wet ingredients are fully incorporated.
- Gradually Add Dry Ingredients: Now, I slowly add the dry ingredient mixture (flour, baking soda, salt) to the wet ingredients. I usually do this in two additions, mixing on low speed after each addition just until no streaks of flour remain. It’s extremely important not to overmix the dough once the flour is added. Overmixing develops the gluten in the flour, which can lead to tough, dry, and less tender cookies. As soon as the flour is just incorporated, I stop the mixer.
- Fold in Dairy-Free Chocolate Chips: Finally, I use a sturdy rubber spatula or a wooden spoon to gently fold in the 1 ½ cups of dairy-free chocolate chips. I mix just until the chips are evenly distributed throughout the dough. You don’t want to break them up too much, and you certainly don’t want to overwork the dough at this point. This careful handling ensures our Dairy Free Chocolate Chip Cookies will have that perfect melt-in-your-mouth texture with generous pockets of chocolate.
Chilling the Cookie Dough
This step, while sometimes tempting to skip, is absolutely crucial for achieving the best flavor and texture in your Dairy Free Chocolate Chip Cookies. I promise, a little patience here will be richly rewarded!
- The Importance of Chilling: Once the dough is ready, I cover the bowl tightly with plastic wrap and refrigerate it for at least 30 minutes, or up to 2 hours. For an even more profound flavor development and a chewier cookie, I sometimes chill it for 24-48 hours. Why chill? Chilling the dough solidifies the dairy-free butter, which prevents the cookies from spreading too much in the oven, resulting in thicker, chewier cookies. It also allows the flour to fully hydrate, which improves the texture, and gives the flavors a chance to meld together and deepen, making our Dairy Free Chocolate Chip Cookies taste even richer and more complex. If you’re really in a hurry, even 15-20 minutes in the freezer can help, but I highly recommend sticking to the refrigerator for optimal results.
Baking Your Perfect Dairy Free Chocolate Chip Cookies
This is where the magic happens! Watching these Dairy Free Chocolate Chip Cookies bake up golden and delicious is one of my favorite parts of the process. Pay close attention to your oven, as every oven can behave a little differently.
- Preheat Oven and Prepare Baking Sheets: If you haven’t already, preheat your oven to 375°F (190°C). Make sure your baking sheets are lined with parchment paper or silicone baking mats. This not only helps with non-sticking but also promotes even baking and easy transfer later.
- Portion the Dough: Once the dough is properly chilled, I use a 1.5 to 2-tablespoon cookie scoop to portion out even balls of dough. Consistency in size is key for even baking, so a scoop is very helpful. I roll each portion briefly between my palms to create a smooth ball. This helps them bake into a nice round shape.
- Arrange on Baking Sheets: I arrange the cookie dough balls about 2 inches apart on the prepared baking sheets. It’s important not to overcrowd the baking sheets; usually, 9-12 cookies per standard sheet is ideal. This allows for proper air circulation around each cookie, ensuring they bake evenly and get those slightly crispy edges.
- Optional Flaky Sea Salt: If you’re using flaky sea salt, now is the time to lightly sprinkle a few flakes over the top of each cookie dough ball. This simple addition elevates the flavor profile, offering a wonderful contrast to the sweetness of the chocolate.
- Bake the Cookies: I place one baking sheet at a time into the preheated oven. I bake for 10-12 minutes, or until the edges are golden brown and set, but the centers still look slightly soft and gooey. This slight underbaking is the secret to a chewy cookie! If your oven has hot spots, rotate the baking sheet halfway through the baking time to ensure even browning.
- Cooling on the Baking Sheet: Once baked, I carefully remove the baking sheet from the oven. Do not move the cookies immediately! Let them cool on the baking sheet for about 5-10 minutes. This is a critical step because the cookies continue to cook and set as they cool on the hot sheet. If you try to move them too soon, they will likely fall apart because they are still very delicate and soft in the center.
- Transfer to a Wire Rack: After they’ve had their initial rest on the baking sheet, I carefully transfer the warm Dairy Free Chocolate Chip Cookies to a wire cooling rack to cool completely. Cooling on a wire rack allows air to circulate all around the cookies, preventing them from getting soggy on the bottom and ensuring they achieve that perfect chewy texture.
Tips, Tricks, and Troubleshooting for Perfect Dairy Free Chocolate Chip Cookies
I’ve made countless batches of Dairy Free Chocolate Chip Cookies, and through trial and error, I’ve gathered some insights that I think will help you achieve perfection every time. These little nuggets of advice can make a huge difference in your baking journey!
Understanding Dairy-Free Butter
The choice of dairy-free butter is paramount. Not all brands are created equal, especially when it comes to baking. I’ve found that stick-style dairy-free butters with a higher fat content and firmer texture, such as Miyoko’s Kitchen or Earth Balance Soy-Free Vegan Butter Sticks (red box), yield the best results. Tub-style margarines or spreads often contain more water and can lead to cookies that spread too much and are less flavorful. Always make sure your butter is softened to room temperature, but not melted. If it’s too warm, your dough will be greasy and hard to work with, leading to flat cookies.
The Power of Chilling
I cannot overstate the importance of chilling the dough for these Dairy Free Chocolate Chip Cookies. Beyond preventing spread, chilling allows the flavors to deepen and meld. The dairy-free butter, once chilled, reforms, creating pockets of fat that melt slowly in the oven, resulting in a richer, chewier cookie. If you’re really short on time, even 15-20 minutes in the freezer is better than nothing, but aim for at least 30 minutes in the fridge. For an extra special batch, I’ll often chill my dough overnight, or even up to 48 hours. The difference in flavor and texture is truly remarkable.
Achieving the Perfect Texture
Slightly Underbaking is Key: For that truly soft and chewy center, I always pull my Dairy Free Chocolate Chip Cookies from the oven when the edges are set and golden but the centers still look a little soft and underbaked. They will continue to cook and set on the hot baking sheet during the first few minutes of cooling. Overbaking is the quickest way to dry, crispy cookies, and while some people prefer that, I personally aim for chewiness!
Chocolate Chip Choices
There’s a fantastic array of dairy-free chocolate chips available now. I love to use a mix of different sizes—standard semi-sweet chips alongside some mini chips or even roughly chopped dairy-free chocolate bars. This creates varied pockets of melty chocolate throughout the cookie. Brands like Enjoy Life, Pascha, or Guittard’s Akoma are excellent choices. Don’t be afraid to experiment with different cocoa percentages to find your favorite balance of sweetness and bitterness.
Troubleshooting Common Cookie Problems
- Cookies Spreading Too Much: If your cookies are spreading too thin, it could be due to a few reasons. Your dairy-free butter might have been too warm or melted; ensure it’s just softened. The dough might not have been chilled enough, or at all. Also, ensure your oven temperature is accurate – sometimes a too-cool oven can cause excessive spreading before the dough sets. Adding an extra tablespoon or two of flour can also help if you consistently have this issue.
- Cookies Too Dry/Crumbly: This is often a sign of over-measuring flour or overbaking. Always spoon flour into your measuring cup and level it off. And remember my advice on underbaking slightly!
- Cookies Not Chewy Enough: An extra egg yolk contributes significantly to chewiness, so don’t skip it! Also, ensure you’re using brown sugar, as its molasses content adds moisture and chewiness. And again, chilling the dough and slightly underbaking are your best friends here.
- Uneven Baking: This is usually an oven issue. If your oven has hot spots, rotating your baking sheets halfway through the bake time will help ensure all your Dairy Free Chocolate Chip Cookies get an even golden hue.
Freezing for Future Cravings
These Dairy Free Chocolate Chip Cookies are perfect for making ahead! I often scoop all the dough onto a parchment-lined baking sheet and freeze the individual dough balls until solid. Once frozen, I transfer them to a freezer-safe bag or airtight container. When a craving strikes, I simply pull out as many as I want, place them on a parchment-lined baking sheet, and bake from frozen. You might need to add an extra 2-4 minutes to the baking time, but the convenience is well worth it.
Ingredient Temperature Matters
I always make sure my egg and egg yolk are at room temperature. Cold eggs don’t emulsify as well with the creamed butter and sugar, which can lead to a less uniform dough texture. If you forget to take them out ahead of time, a quick trick is to place them in a bowl of warm (not hot!) water for 5-10 minutes.
By keeping these tips in mind, you’re well on your way to baking a batch of the most delicious, perfectly textured Dairy Free Chocolate Chip Cookies that everyone, dairy-free or not, will absolutely adore!
Conclusion:
These aren’t just any cookies; these are the cookies that will redefine your perception of dairy-free baking. I’ve spent countless hours perfecting this recipe, ensuring that every bite delivers that nostalgic comfort without compromise. What makes these Dairy Free Chocolate Chip Cookies truly exceptional? It’s the perfect harmony of crisp edges, a delightfully chewy center, and an abundance of gooey, melted chocolate chips. They strike that elusive balance, tasting utterly indulgent while being completely suitable for those avoiding dairy. You won’t believe how simple it is to whip up a batch of these golden-brown beauties, filling your home with the most irresistible aroma. Forget dry, crumbly alternatives; my recipe promises a soft, rich, and deeply satisfying experience that rivals any traditional chocolate chip cookie you’ve ever tasted. They’re a testament to the fact that dietary restrictions don’t mean sacrificing flavor or texture. I genuinely believe this recipe will become a cherished staple in your kitchen, proving that deliciousness knows no bounds.
Now that you’re convinced these cookies are a game-changer, let’s talk about enjoying them to their fullest. Of course, a warm Dairy Free Chocolate Chip Cookie straight from the oven is pure bliss on its own, perhaps with a tall glass of your favorite dairy-free milk. But don’t stop there!
Beyond the Plate: Creative Ways to Enjoy Your Cookies
Imagine crumbling a few over a scoop of vanilla dairy-free ice cream for an instant sundae. Or, for a truly decadent treat, turn them into ice cream sandwiches by pressing a generous scoop of dairy-free mint chip or peanut butter ice cream between two warm cookies. They also make an incredible base for a quick trifle – layer broken pieces with dairy-free whipped cream and fresh berries.
Want to experiment with variations? This base recipe is incredibly versatile.
Spice it Up: A pinch of cinnamon or a tiny dash of cayenne pepper (for a subtle kick) can add an interesting depth to the chocolate.
Nutty Goodness: Fold in a handful of chopped walnuts, pecans, or almonds with the chocolate chips for added texture and flavor.
Double the Chocolate: If you’re a true chocoholic, consider adding a mix of dairy-free semi-sweet and dark chocolate chips, or even some dairy-free white chocolate chips for a different twist.
Zesty Freshness: A little orange or lemon zest can brighten the flavor profile beautifully, especially if you prefer a less intensely sweet cookie.
Flavor Extracts: A few drops of peppermint extract during the holidays, or almond extract for a marzipan-like nuance, can transform the entire experience.
These cookies are not just a snack; they’re a canvas for your culinary creativity. Pack them in lunchboxes, bring them to potlucks (watch them disappear!), or simply enjoy them as a well-deserved treat after a long day. They also freeze beautifully, so you can always have a stash ready for unexpected cravings or guests. Simply thaw at room temperature or warm briefly in the oven for that fresh-baked feel.
I truly hope this recipe inspires you to get into the kitchen and bake a batch of these incredible Dairy Free Chocolate Chip Cookies. I pour my heart into developing recipes that bring joy and ease to your dietary needs, and this one is a shining example. There’s a special kind of magic that happens when you create something delicious from scratch, especially when it exceeds all expectations for a specialized diet.
Don’t just read about them – experience them!
Whip up a batch this week, savor that first warm, gooey bite, and then come back and tell me all about it. I absolutely adore hearing from you. Did you try a fun variation? What was your favorite serving suggestion? Your feedback and shared experiences mean the world to me and help other readers too. So, bake with confidence, snap a photo, and feel free to tag me on your favorite social media platform with your creations. Use the hashtag #MyDairyFreeCookies to connect with other bakers. Let’s spread the joy of truly delicious, no-compromise baking together. I can’t wait to see your masterpieces!
Dairy Free Chocolate Chip Cookies
Dairy Free Chocolate Chip Cookies are more than just a sweet treat; they are a timeless emblem of comfort, a bite of pure nostalgia that transcends generations. This recipe is a testament to the fact that you don’t need dairy to achieve that quintessential golden-edged, chewy-centered perfection loaded with molten chocolate chips. Prepare to be amazed as you rediscover the classic appeal without compromise.
Ingredients
-
2 ¼ cups all purpose flour
-
1 teaspoon baking soda
-
1 ½ teaspoon arrowroot
-
½ teaspoon sea salt
-
¾ cup vegan butter, softened to room temperature
-
¾ cup brown sugar
-
½ cup raw cane sugar
-
1 large egg, at room temperature
-
1 egg yolk, at room temperature
-
2 teaspoon vanilla extract
-
1 cup Enjoy Life dairy free Chocolate Chips
Instructions
-
Step 1
Preheat oven to 375°F (190°C). Line two large baking sheets with parchment paper or silicone baking mats. -
Step 2
In a medium bowl, whisk together the flour, baking soda, arrowroot, and sea salt until thoroughly combined. Set aside. -
Step 3
In a large mixing bowl, using a stand mixer or electric hand mixer, beat the softened vegan butter, brown sugar, and raw cane sugar on medium-high speed for 2-3 minutes, until light, fluffy, and pale. -
Step 4
Add the egg, egg yolk, and vanilla extract to the creamed mixture. Beat until just combined, then scrape down the sides of the bowl. -
Step 5
Gradually add the dry ingredient mixture to the wet ingredients in two additions, mixing on low speed after each until no streaks of flour remain. Do not overmix. -
Step 6
Gently fold in the dairy-free chocolate chips with a sturdy rubber spatula or wooden spoon until evenly distributed. -
Step 7
Cover the bowl tightly with plastic wrap and refrigerate the dough for at least 30 minutes, or up to 2 hours, to allow flavors to meld and prevent spreading. -
Step 8
Once chilled, use a 1.5-2 tablespoon cookie scoop to portion dough balls. Arrange them about 2 inches apart on the prepared baking sheets. Optionally, sprinkle with flaky sea salt. -
Step 9
Bake one baking sheet at a time for 10-12 minutes, or until the edges are golden brown and set, but the centers still look slightly soft and gooey. Rotate the baking sheet halfway through if your oven has hot spots. -
Step 10
Remove from the oven and let the cookies cool on the baking sheet for 5-10 minutes. This allows them to set. Then, carefully transfer them to a wire cooling rack to cool completely.
Important Information
Nutrition Facts (Per Serving)
It is important to consider this information as approximate and not to use it as definitive health advice.
Allergy Information
Please check ingredients for potential allergens and consult a health professional if in doubt.

Leave a Comment