
Cranberry Turkey Stuffing Balls are a delightful and incredibly convenient twist on a beloved holiday classic that promises to elevate your festive table. As the festive season approaches, we all cherish the rich traditions and the heartwarming aromas that fill our homes. Stuffing, in particular, holds a special place at the holiday table, evoking memories of joyful gatherings and comforting meals that have been passed down through generations.
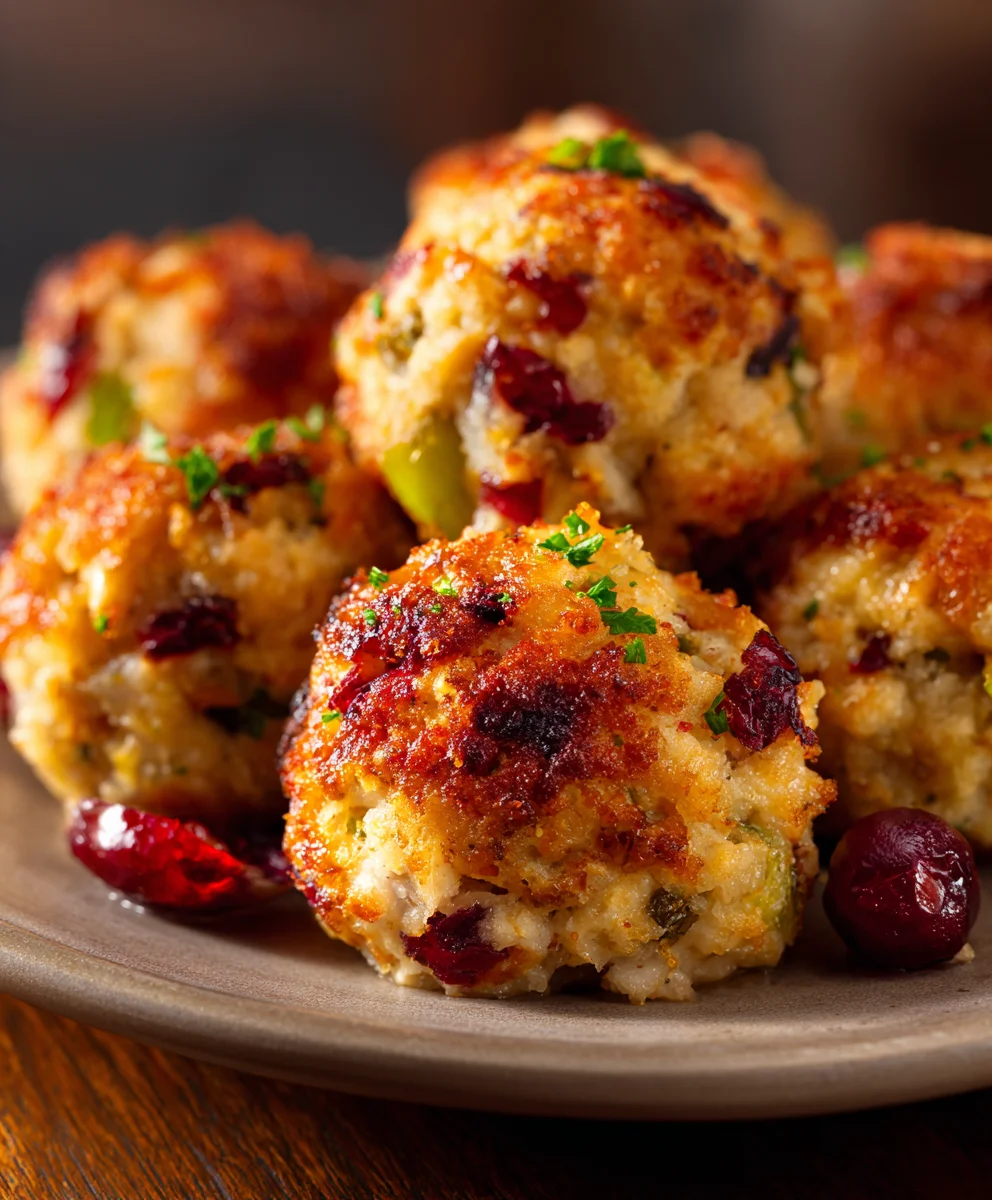
While the classic baked stuffing is undeniably delicious, I’ve discovered that presenting it in individual portions elevates the experience significantly. These charming balls offer a beautiful, uniform presentation and simplify serving, making them a fantastic and stress-free option for any host. What makes these Cranberry Turkey Stuffing Balls truly stand out is their perfect balance of flavors and textures. Each bite delivers that wonderfully savory, herbaceous stuffing base, brightened by tart cranberries, and made utterly satisfying with tender pieces of turkey.
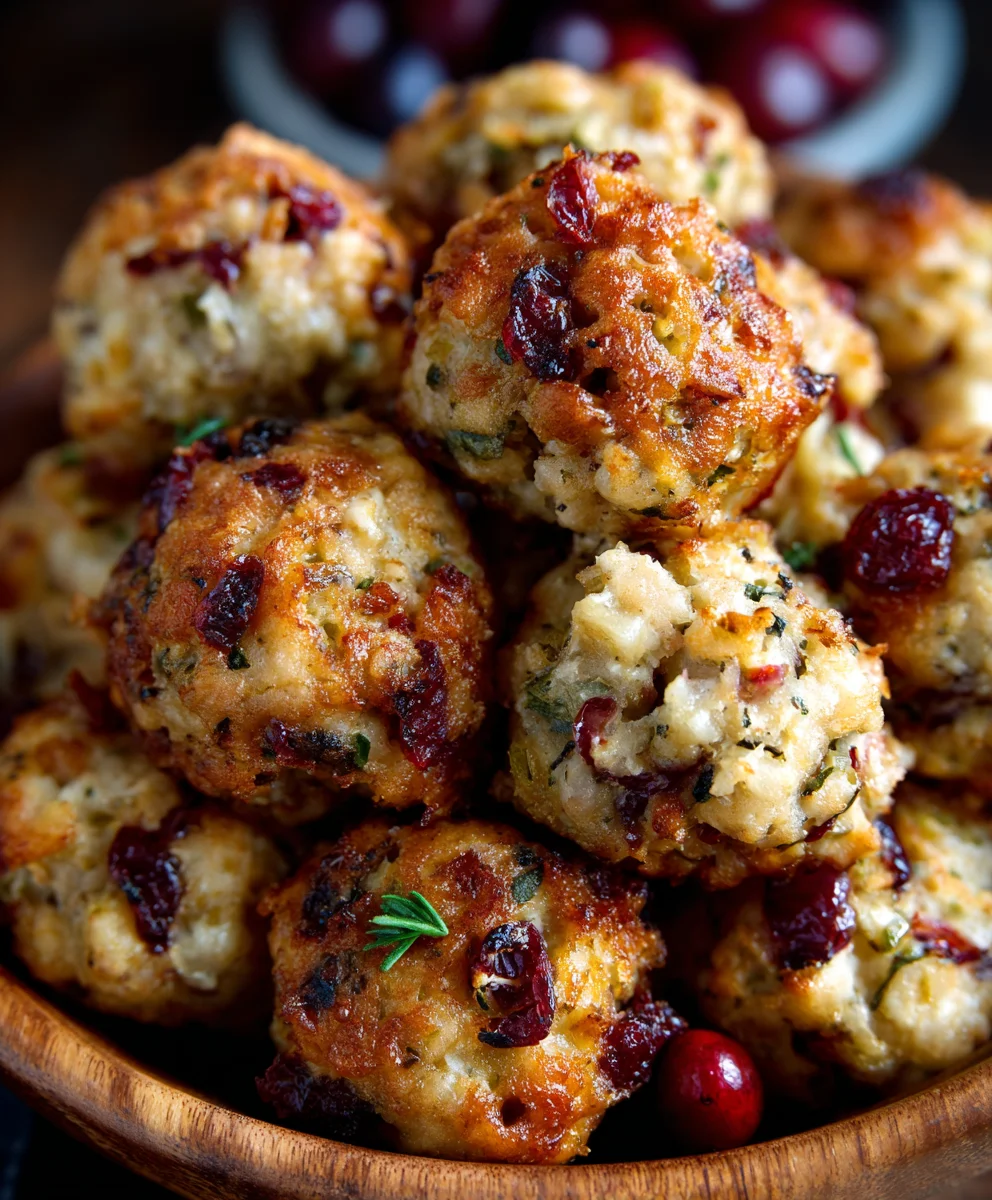
The golden-crisp exterior gives way to a wonderfully moist and flavorful interior, ensuring every guest enjoys a perfect, self-contained bite. They are not only a feast for the palate but also a visually appealing addition to your holiday spread, offering a delightful and practical alternative to the traditional casserole.

Ingredients:
- Bread: 8 cups of day-old or slightly stale bread, cut into ½-inch cubes. I find a hearty sourdough, challah, or a good quality white sandwich bread works wonderfully here. Stale bread is key because it absorbs the broth and flavors without becoming mushy. If your bread isn’t stale, you can spread the cubes on a baking sheet and bake them at 250°F (120°C) for 15-20 minutes until dried out, then let them cool completely. This step is crucial for the texture of your Cranberry Turkey Stuffing Balls.
- Ground Turkey: 1 pound of ground turkey, preferably 93% lean. While you can use leaner, I find that 93% lean offers a bit more moisture and flavor without being overly greasy. It’s important for the overall texture and richness of our dish.
- Butter: ½ cup (1 stick) unsalted butter. This adds incredible flavor and richness to our stuffing base. If you only have salted butter, just reduce the added salt in the recipe accordingly.
- Onion: 1 large yellow onion, finely chopped. The onion provides a fundamental aromatic base that truly deepens the flavor profile.
- Celery: 3 stalks celery, finely chopped. Celery adds a wonderful crisp texture initially and a subtle savory note that pairs perfectly with the other ingredients.
- Garlic: 4 cloves garlic, minced. Fresh garlic is always best for that pungent, aromatic kick.
- Broth: 1 ½ to 2 cups low-sodium chicken or turkey broth. Starting with low-sodium gives you more control over the final seasoning. You might need slightly more or less depending on the dryness of your bread.
- Cranberries: ¾ cup dried cranberries. These little gems provide a fantastic sweet-tart burst that is absolutely essential for balancing the rich, savory flavors in our Cranberry Turkey Stuffing Balls. They also add a beautiful color.
-
Fresh Herbs:
- 2 tablespoons fresh sage, finely chopped. Sage is the quintessential herb for turkey and stuffing, offering an earthy, slightly peppery aroma.
- 1 tablespoon fresh thyme leaves, finely chopped. Thyme adds a delicate, slightly minty, and lemony note.
- 1 teaspoon fresh rosemary, finely chopped. Rosemary provides a piney, fragrant depth.
Chef’s Tip: While dried herbs can be used (use about ⅓ the amount of fresh), the fresh herbs truly elevate the flavor and aroma of these stuffing balls.
- Egg: 1 large egg, lightly beaten. This acts as a crucial binder, helping our stuffing balls hold their shape during baking.
-
Seasoning:
- 1 teaspoon salt, or to taste.
- ½ teaspoon black pepper, freshly ground, or to taste.
- ½ teaspoon poultry seasoning (optional, but highly recommended for an extra layer of classic flavor).
- Optional Add-ins: ½ cup chopped pecans or walnuts for an extra layer of texture and nutty flavor. I often include them, especially if I’m making these for a special occasion.
Equipment You’ll Need:
Having the right tools makes the process so much smoother and more enjoyable. For these delicious Cranberry Turkey Stuffing Balls, I recommend having:
- A very large mixing bowl (or two medium ones) to comfortably combine all your ingredients.
- A large skillet or Dutch oven for cooking the aromatics and ground turkey.
- Two large baking sheets, preferably rimmed, to bake the stuffing balls.
- Parchment paper for lining the baking sheets – this makes cleanup a breeze and prevents sticking.
- Measuring cups and spoons for accurate ingredient portions.
- A sturdy wooden spoon or spatula for mixing.
- A 1.5-inch ice cream scoop or cookie scoop to ensure uniform sized stuffing balls.
- A sharp chef’s knife and cutting board for prepping vegetables.
- A meat thermometer for checking the internal temperature of the turkey, ensuring food safety.
Phase 1: Preparing the Aromatic Stuffing Base
This is where we build the foundational flavors for our incredible Cranberry Turkey Stuffing Balls. Taking your time here will pay off immensely in the final taste.
- Prepare Your Bread: First things first, ensure your 8 cups of cubed bread are properly dried. If you didn’t start with day-old bread, remember my tip about toasting it gently in the oven. Once your bread is ready, transfer it to your largest mixing bowl. This will be the home for our entire stuffing mixture, so make sure it’s spacious enough for easy tossing.
- Sauté the Aromatics: In your large skillet, melt ½ cup (1 stick) of unsalted butter over medium heat. Once the butter is shimmering, add your finely chopped yellow onion and celery. Cook these vegetables, stirring occasionally, for about 8-10 minutes. You’re looking for them to soften significantly and become translucent, not browned. This slow sautéing process coaxes out their natural sweetness and deepens their savory notes. You’ll notice the most wonderful aroma starting to fill your kitchen – that’s the magic beginning!
- Infuse with Garlic and Herbs: Once the onion and celery are tender, add your minced garlic, chopped fresh sage, thyme, and rosemary to the skillet. Continue to cook for just 1-2 minutes more, stirring constantly. Be careful not to burn the garlic; it can turn bitter very quickly. This brief cooking time allows the herbs to release their fragrant oils, permeating the butter and vegetables with their earthy, aromatic essence. The smell at this stage is absolutely intoxicating and promises a flavorful experience for your Cranberry Turkey Stuffing Balls.
- Combine with Bread and Cranberries: Immediately pour this warm, aromatic butter-vegetable mixture over your cubed bread in the large mixing bowl. Add the ¾ cup of dried cranberries to the bowl as well. If you’re using optional chopped pecans or walnuts, now is the time to toss them in. Gently toss everything together using a large spoon or your clean hands. You want to ensure the bread cubes are evenly coated with the butter and vegetables.
- Moisten with Broth: Gradually pour in 1 ½ cups of the low-sodium chicken or turkey broth over the mixture, tossing as you go. You want the bread to absorb the liquid and become moist, but not soggy. The consistency should be damp and soft but still hold some structure. If the mixture still seems too dry after adding 1 ½ cups, add the remaining ½ cup of broth, a little at a time, until you reach that perfect moist, cohesive texture. This step is crucial for the tender interior of your Cranberry Turkey Stuffing Balls. Set this mixture aside while we prepare the turkey.
Phase 2: Cooking the Turkey and Combining Ingredients
Now we’ll introduce the star protein to our delicious stuffing base, transforming it into truly satisfying Cranberry Turkey Stuffing Balls.
- Cook the Ground Turkey: Using the same large skillet (no need to clean it if there are tasty bits from the aromatics!), add your 1 pound of ground turkey. Cook over medium-high heat, breaking it apart with a wooden spoon, until it is fully browned and no pink remains. This usually takes about 7-10 minutes. Once cooked, if there’s a significant amount of grease, carefully drain it off. While 93% lean turkey typically doesn’t produce excessive fat, removing any excess will prevent your stuffing balls from becoming greasy.
- Incorporate Turkey into the Stuffing Base: Add the cooked ground turkey directly into the large mixing bowl with your moistened bread and aromatic mixture. Use your hands or a large spoon to thoroughly combine everything. Make sure the turkey is evenly distributed throughout the stuffing; you want a balanced bite in every single stuffing ball.
- Add the Egg and Season: Pour the lightly beaten large egg over the stuffing mixture. Now, add 1 teaspoon of salt, ½ teaspoon of freshly ground black pepper, and the optional ½ teaspoon of poultry seasoning. Mix everything together really well. The egg is our binding agent here, and you’ll notice the mixture becoming more cohesive, which is exactly what we need for forming our balls.
- Taste and Adjust Seasoning: This is my favorite part! Carefully take a small spoonful of the mixture (since the turkey is cooked, it’s safe to taste). Assess the flavor. Does it need more salt? A pinch more pepper? Maybe a bit more of those lovely herbs? Adjust to your personal preference. Remember, the flavors will concentrate slightly during baking, but you want a good base here. Don’t skip this critical step for perfectly flavored Cranberry Turkey Stuffing Balls.
Phase 3: Forming Your Perfect Cranberry Turkey Stuffing Balls
This is where our delicious mixture takes its appealing spherical form, ready for the oven. Consistency in size is key for even baking!
- Preheat Oven and Prepare Baking Sheets: Preheat your oven to 375°F (190°C). Line two large baking sheets with parchment paper. This step is a lifesaver for easy cleanup and ensures your stuffing balls won’t stick, maintaining their beautiful shape. I always recommend parchment paper for these.
- Form the Stuffing Balls: Using a 1.5-inch ice cream scoop or cookie scoop is truly the best way to get uniformly sized balls. If you don’t have one, about 2-3 tablespoons per ball works well. Scoop out portions of the stuffing mixture and gently roll them between your palms to form compact, round balls. You want them firm enough to hold their shape but not overly compressed. The egg will help them hold together beautifully. The goal here is consistency in size so that all your Cranberry Turkey Stuffing Balls cook through at the same rate and look perfectly appealing on your serving platter.
- Arrange on Baking Sheets: Place the formed stuffing balls onto the prepared baking sheets, leaving about 1 inch of space between each one. Don’t overcrowd the sheets; this ensures they brown nicely rather than steaming. Depending on the size of your balls and baking sheets, you might need to use both sheets.
Phase 4: Baking and Achieving Golden Perfection
The final phase where our Cranberry Turkey Stuffing Balls transform into golden-brown, flavorful bites. Pay attention to the cues for doneness!
- Initial Bake: Place the baking sheets into your preheated oven. Bake for 20-25 minutes, or until the stuffing balls are golden brown on the outside and heated through. You might want to rotate the baking sheets halfway through the cooking time to ensure even browning. What you’re looking for is a lovely crisp exterior that gives way to a tender, moist interior.
- Check for Doneness: The internal temperature of the ground turkey component in the stuffing balls should reach 165°F (74°C) for food safety. You can check this by inserting an instant-read meat thermometer into the center of a few balls. Beyond temperature, visual cues are important: they should be beautifully browned and smell incredibly fragrant. If they seem to be browning too quickly, you can loosely tent them with foil for the remainder of the baking time.
- Rest and Serve: Once baked to perfection, remove the Cranberry Turkey Stuffing Balls from the oven. Let them rest on the baking sheets for 5-10 minutes before serving. This brief resting period allows the flavors to settle and makes them easier to handle.
Serving Suggestions and Make-Ahead Magic
These Cranberry Turkey Stuffing Balls are incredibly versatile and can be enjoyed in so many ways, whether as a star side dish or a clever appetizer. Here’s how I like to serve them and some handy tips for planning ahead:
- As a Holiday Side Dish: These balls are a fantastic alternative to traditional stuffing for any holiday meal, especially Thanksgiving or Christmas. They offer perfect portion control and a delightful presentation. I love arranging them on a large platter, perhaps garnished with some fresh sage leaves, a few extra dried cranberries, or a sprig of rosemary. They pair wonderfully with roasted turkey, gravy, mashed potatoes, and green bean casserole. The individual portions make serving a breeze and ensure everyone gets a lovely mix of flavors and textures.
- Appetizer Perfection: Their convenient size makes them absolutely ideal as an appetizer for any gathering. You can serve them warm on a tray, perhaps with toothpicks for easy grabbing. For an extra touch, you could even offer a small bowl of cranberry sauce or a savory gravy for dipping. Imagine guests mingling, effortlessly enjoying these flavorful bites – they’re always a hit!
- Lunch or Dinner Main: Don’t relegate these solely to side-dish status! I often make a larger batch and serve them as a comforting main course alongside a simple green salad or some steamed vegetables. They’re hearty enough to be satisfying on their own. For a truly decadent meal, a drizzle of warm turkey gravy transforms them into a restaurant-quality experience.
- Garnishing Ideas: To really make your Cranberry Turkey Stuffing Balls pop on the plate, consider some simple garnishes. A sprinkling of fresh chopped parsley or chives adds a touch of color and freshness. Orange zest, grated finely over the top just before serving, can also provide a wonderful aromatic lift that complements the cranberries and turkey beautifully.
- Storage Instructions: Cooked Cranberry Turkey Stuffing Balls can be stored in an airtight container in the refrigerator for up to 3-4 days. This makes them perfect for meal prepping or enjoying delicious leftovers throughout the week. Make sure they cool completely before refrigerating to prevent condensation and sogginess.
- Freezing for Future Feasts: These stuffing balls are fantastic for freezing! Once they are completely cooled, arrange them in a single layer on a baking sheet and freeze until solid (this prevents them from sticking together). Once frozen, transfer them to a freezer-safe bag or container. They can be stored in the freezer for up to 2-3 months. This is an excellent tip for getting ahead during busy holiday seasons or ensuring you always have a comforting meal option on hand.
-
Reheating Perfection:
- From Refrigerator: To reheat, arrange the stuffing balls on a baking sheet and warm them in a preheated oven at 300-325°F (150-160°C) for 10-15 minutes, or until heated through. To maintain moisture, you can loosely tent them with foil.
- From Freezer: If reheating from frozen, you can place them directly on a baking sheet in a preheated oven at 350°F (175°C) for 20-30 minutes, or until they are hot in the center. Again, covering them loosely with foil can help prevent them from drying out. A sprinkle of a tablespoon or two of broth over them before reheating can also revive their moisture beautifully. While you can microwave them, I find the oven method yields the best texture, keeping that delightful crisp exterior.
I hope you enjoy making and savoring these delightful Cranberry Turkey Stuffing Balls as much as I do. They’re a fantastic addition to any table!
As we wrap up our culinary journey, I truly hope you’re feeling inspired and excited about the prospect of bringing this incredible dish to your own table. I genuinely believe that these aren’t just any side dish; they represent a brilliant fusion of tradition and innovation, a testament to how simple twists can elevate classic flavors into something truly extraordinary. Imagine the delight on your loved ones’ faces when they encounter these perfectly portioned, incredibly flavorful morsels. This recipe, my friends, is more than just a dish; it’s a conversation starter, a holiday helper, and a surefire way to impress. It’s designed to take the stress out of holiday meal prep while delivering maximum flavor impact. No more crumbling stuffing across the plate; each individual serving is a neat, golden-brown sphere of savory goodness, bursting with the tang of cranberries and the aromatic richness of herbs and turkey. The beauty of these Cranberry Turkey Stuffing Balls lies in their exquisite balance of textures and tastes – crispy on the outside, moist and tender within, with the tartness of cranberries cutting through the rich, savory turkey and bread. It’s a truly delightful experience that simplifies serving while amplifying enjoyment.
Now, let’s talk about how to truly make these your own and showcase them in the best possible light. While they are an absolute showstopper on their own, imagine them nestled beside a succulent roasted turkey breast, a juicy ham, or even a perfectly seared duck. They absorb gravy like a dream, becoming even more tender and flavorful with every bite. For a truly elegant presentation, arrange them artfully on a platter, perhaps with a sprinkle of fresh parsley or a dusting of paprika for a pop of color. Thinking beyond the main course, consider serving smaller versions as sophisticated appetizers at your next gathering. A toothpick through each ball, maybe with a dollop of a cranberry-orange relish on the side, and you’ve got an instant crowd-pleaser that’s far more interesting than your typical cocktail fare. They’re also fantastic for meal prep; make a big batch, and you have delicious, ready-to-heat sides for several days, pairing wonderfully with simple grilled chicken or pork chops.
And for those of you who love to experiment, the possibilities for variation are endless! Want a richer, more autumnal flavor? Try adding finely diced apples or pears to the mixture. For a spicier kick, a pinch of red pepper flakes or a dash of cayenne would be marvelous. If you’re catering to different dietary preferences, consider a vegetarian version by swapping the turkey for sautéed mushrooms and vegetable broth, or even a blend of wild rice and quinoa. You could also experiment with different cheeses – a sharp cheddar or a creamy brie could add another layer of indulgence. A drizzle of maple syrup glaze before serving could elevate the sweetness, contrasting beautifully with the savory stuffing. Don’t be afraid to play with the herbs either; while sage is classic, rosemary or thyme could offer a different, equally appealing aromatic profile. For a burst of freshness, a squeeze of lemon juice into the mixture or over the finished balls can truly brighten the flavors. You could even incorporate finely chopped pecans or walnuts for an added textural dimension and nutty undertone. The adaptability of this recipe is truly one of its greatest strengths, allowing you to tailor it perfectly to your taste and occasion. These stuffing balls are not just for holidays; they can elevate any weekend meal into something special.
Go ahead, gather your ingredients, and embark on this delightful cooking adventure!
I promise you, the aroma filling your home alone will be worth the effort! And when you do, please, please, please don’t keep it a secret. I absolutely adore seeing your creations and hearing about your experiences. Share your photos, your triumphs, and any clever variations you come up with. Tag me or leave a comment below. Your feedback and stories inspire me and our entire community of food lovers. Let’s make these Cranberry Turkey Stuffing Balls a new tradition together! I can’t wait to hear all about your delicious journey. Happy cooking, and bon appétit!
Recipe
A delicious recipe
Ingredients
Instructions
Important Information
Nutrition Facts (Per Serving)
It is important to consider this information as approximate and not to use it as definitive health advice.
Allergy Information
Please check ingredients for potential allergens and consult a health professional if in doubt.


Leave a Comment