
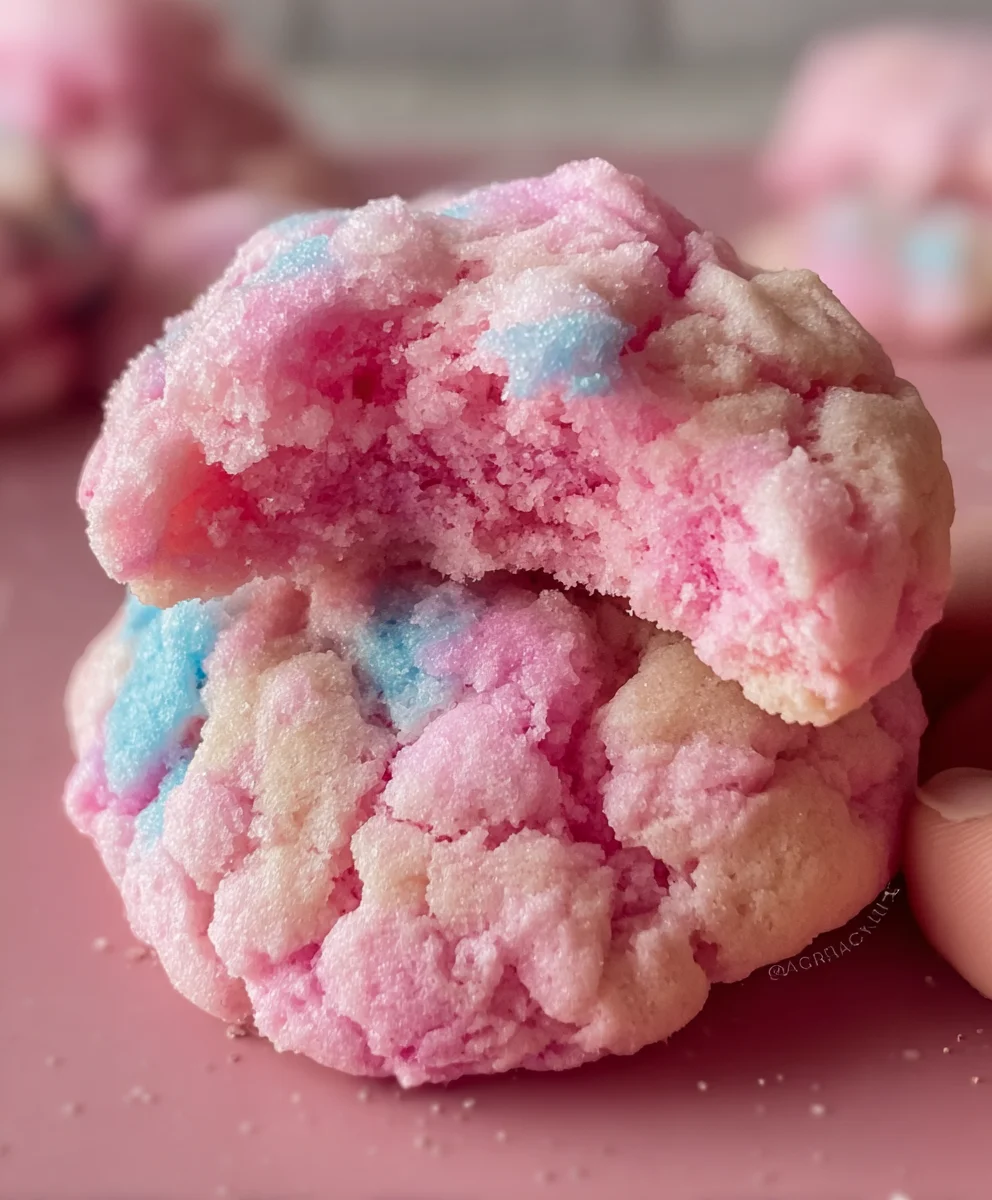
Cotton Candy Cookies are more than just a sweet treat; they are a delightful journey back to childhood, encapsulating the magic of the carnival in a single bite. Imagine the whimsical charm of fluffy spun sugar transformed into a perfectly baked, tender cookie – that’s precisely what awaits you. I am absolutely thrilled to share a recipe that promises to enchant your taste buds and brighten any occasion with its vibrant colors and uniquely sweet flavor.
The very concept of cotton candy, first introduced at the 1904 World’s Fair as “Fairy Floss,” carries with it a rich tapestry of nostalgia, conjuring images of joyous celebrations and carefree days. This recipe pays homage to that iconic confection, allowing us to capture its ethereal essence in a more substantial, yet equally enchanting, form. It’s a wonderful way to bring that beloved fairground experience right into your home kitchen, no sticky fingers required!
People fall head over heels for these irresistible cookies for so many reasons. Beyond their stunning visual appeal, which makes them an instant showstopper, it’s the playful dance of flavors and textures that truly captivates. Each bite delivers that signature airy sweetness of cotton candy, beautifully balanced with the comforting chewiness of a classic cookie. Whether you’re baking for a themed party, a special gathering, or simply to add a touch of everyday magic, these Cotton Candy Cookies are guaranteed to be a sensational hit, bringing smiles and a touch of delightful wonder to everyone who tries them.

Ingredients:
- 1 cup (2 sticks) unsalted butter, softened to room temperature: It is absolutely crucial for your butter to be perfectly softened. If it’s too cold, it won’t cream properly with the sugar, leading to a dense cookie. If it’s melted, your dough will be oily and hard to work with. Aim for an indentation to remain when you gently press it with your finger.
- 1 ½ cups granulated sugar: This provides the sweetness and helps create that wonderful crisp-chewy texture we’re aiming for in our Cotton Candy Cookies.
- 2 large eggs: Ensure these are also at room temperature. Room temperature eggs emulsify better with the butter and sugar mixture, resulting in a smoother, more cohesive dough.
- 2 teaspoons pure vanilla extract: A good quality vanilla extract enhances the overall flavor profile beautifully, acting as a base for our star flavor.
- 2 teaspoons cotton candy extract: This is the secret ingredient that truly makes these cookies taste like their namesake! Look for it in specialty baking stores or online. Don’t skimp on this, as it’s what gives our Cotton Candy Cookies their unique magic.
- 3 cups all-purpose flour: I recommend spooning and leveling your flour rather than scooping directly from the bag. This prevents over-measuring, which can lead to dry, crumbly cookies.
- 1 teaspoon baking powder: Our leavening agent that gives these cookies a delicate lift.
- ½ teaspoon salt: A pinch of salt balances the sweetness and enhances all the other flavors in the dough.
- Gel food coloring in pastel shades: Pink, light blue, and lavender or light purple are perfect for that classic cotton candy aesthetic. Gel colors are highly concentrated, so you’ll need less to achieve vibrant hues without thinning your dough.
- For the optional Glaze & Garnish:
- 2 cups powdered sugar, sifted: Sifting prevents lumps, giving you a wonderfully smooth glaze.
- 3-4 tablespoons milk or half-and-half: Adjust the amount to reach your desired consistency.
- ½ teaspoon cotton candy extract (optional): For an extra boost of flavor in your glaze.
- Assorted sprinkles (optional): Pastel nonpareils or jimmie sprinkles add a festive touch.
- Fresh cotton candy (optional, for garnish): This is truly for a dramatic, beautiful presentation right before serving. Be aware that actual cotton candy will dissolve quickly when exposed to air and moisture, so only add it right before your guests arrive!
Preparing Your Magical Dough for Cotton Candy Cookies
Creating these delightful Cotton Candy Cookies starts with a foundational dough that’s rich, pliable, and ready to embrace those whimsical colors. Paying close attention to each step here will ensure your cookies have the perfect texture and flavor.
-
Cream Butter and Sugar: In the bowl of a stand mixer fitted with the paddle attachment, or with a large bowl and a handheld electric mixer, cream together your perfectly softened 1 cup (2 sticks) unsalted butter and 1 ½ cups granulated sugar. Beat on medium-high speed for about 3-5 minutes, or until the mixture is visibly light in color and incredibly fluffy. This step is absolutely crucial because it incorporates air into the butter, which contributes significantly to the cookie’s light and tender texture. You want to see it transform from a dense, yellow mass into a pale, airy cloud. Don’t rush this – it’s the foundation of incredible Cotton Candy Cookies.
-
Incorporate Eggs and Extracts: Reduce the mixer speed to low. Add the 2 large eggs, one at a time, beating well after each addition until fully incorporated. After both eggs are in, increase speed to medium and beat for another minute, scraping down the sides of the bowl as needed with a rubber spatula. This ensures everything is uniformly mixed. Next, stir in the 2 teaspoons pure vanilla extract and the star of our show, the 2 teaspoons cotton candy extract. Mix until just combined. The aroma at this point will start to hint at the delightful magic to come!
-
Whisk Dry Ingredients: In a separate medium bowl, whisk together the 3 cups all-purpose flour, 1 teaspoon baking powder, and ½ teaspoon salt. Whisking ensures these dry ingredients are evenly distributed, preventing pockets of leavening agent or salt in your finished Cotton Candy Cookies.
-
Combine Wet and Dry: Gradually add the dry ingredient mixture to the wet ingredients in the mixer bowl, starting with about a third of the flour mixture. Mix on low speed until just combined, then add another third, and finally the last third. Be careful not to overmix! As soon as the last streaks of flour disappear, stop the mixer. Overmixing develops the gluten in the flour too much, which can lead to tough, chewy cookies – and we want our Cotton Candy Cookies to be delightfully tender.
-
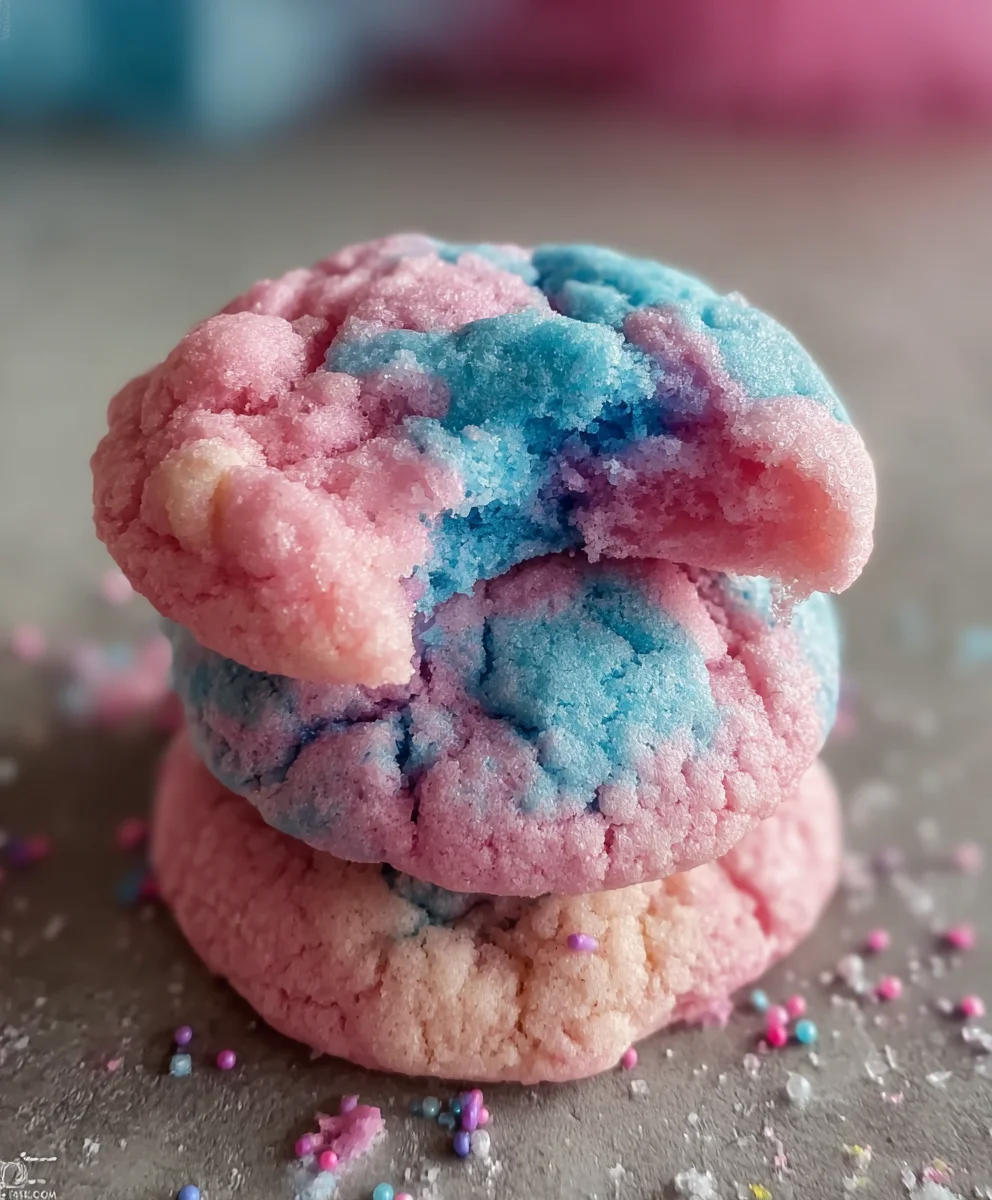
Divide and Color the Dough: This is where the visual magic truly begins for your Cotton Candy Cookies! Carefully divide the dough into 3 or 4 equal portions. Place each portion into a separate bowl. Now, it’s time to add your chosen gel food colorings. For a classic cotton candy look, I recommend pink, light blue, and lavender/purple. Add a tiny dab of gel food coloring to each dough portion – remember, gel colors are very concentrated, so start small, like the tip of a toothpick. Gently knead the color into each dough portion with your hands (wearing gloves is a good idea to avoid stained fingers!) until the color is uniform and vibrant. You want soft, pastel hues that evoke the feeling of a carnival. Be patient and work the color in thoroughly, ensuring no white streaks remain. This step is key to making truly beautiful Cotton Candy Cookies.
-
Chill the Dough: Flatten each colored dough portion slightly into a disc, wrap each disc individually tightly in plastic wrap, and refrigerate for at least 1 hour. Chilling the dough is an essential step for these Cotton Candy Cookies for several reasons: it allows the butter to firm up, preventing the cookies from spreading too much during baking; it gives the flavors a chance to meld and deepen; and it makes the dough much easier to handle when you go to shape your cookies. You can even chill the dough overnight if you’re preparing ahead of time.
Chilling and Shaping Your Cotton Candy Cookie Dough
The success of your Cotton Candy Cookies, both in terms of texture and their mesmerizing swirled appearance, heavily relies on proper chilling and careful shaping. This phase transforms your colored dough into beautiful, ready-to-bake delights.
-
Prepare for Baking: Once your dough has chilled sufficiently, preheat your oven to 375°F (190°C). Line two large baking sheets with parchment paper or silicone baking mats. This non-stick surface is crucial for easy removal and even baking, preventing your precious Cotton Candy Cookies from sticking.
-
Create the Swirl Effect: This is the fun part that gives your Cotton Candy Cookies their signature look! Remove the chilled dough portions from the refrigerator. Take a small piece, about a tablespoon in size, from each of your colored doughs (e.g., a piece of pink, a piece of blue, and a piece of purple). Gently press these small pieces together in your palm. Do not fully mix them! The goal is to lightly combine them so the colors are distinct but intertwined, creating a marbled or swirled effect. Once lightly combined, roll the combined dough into a 1-inch ball between your palms. The more gently you handle it, the more pronounced your color swirls will be. This artistic step is what truly makes these “Cotton Candy Cookies” stand out with their enchanting visual appeal.
-
Form and Place Cookies: Place the rolled, multicolored dough balls onto the prepared baking sheets, leaving about 2 inches of space between each cookie. These cookies will spread a little, and you want to ensure they have enough room. For perfectly flat-bottomed Cotton Candy Cookies, you can gently flatten each ball slightly with the palm of your hand or the bottom of a glass. This also helps ensure more even baking. Continue this process until you’ve used all your dough, or filled your baking sheets. If you find the dough becoming too soft to work with, pop it back into the fridge for 10-15 minutes.
Baking Your Beautiful Cotton Candy Cookies
Baking is where the magic truly comes to life, as your colorful dough balls transform into tender, sweet Cotton Candy Cookies. Pay close attention to timing to achieve the perfect texture.
-
Bake to Perfection: Place one baking sheet at a time into your preheated oven. Bake for 9-11 minutes, or until the edges are just set and very lightly golden, and the centers still look soft and slightly puffy. It’s important not to overbake these Cotton Candy Cookies, as they can quickly become dry and lose their tender chewiness. They may not look fully “done” when you first pull them out, but they will continue to set on the hot baking sheet. The slight softness in the center is what will give you that melt-in-your-mouth experience. Watch them closely – oven temperatures can vary!
-
Cooling Process: Once baked, remove the baking sheets from the oven. Let the Cotton Candy Cookies cool on the baking sheets for about 5 minutes. This crucial resting period allows them to firm up slightly without breaking. After 5 minutes, carefully transfer the cookies to a wire cooling rack to cool completely. Allowing them to cool on a rack ensures air circulation, preventing soggy bottoms and guaranteeing a perfectly set cookie for glazing or immediate enjoyment. Make sure they are entirely cool before moving on to any decorating steps, especially if you plan to add a glaze or actual cotton candy.
Decorating and Finishing Your Enchanting Cotton Candy Cookies
Once your Cotton Candy Cookies have cooled, it’s time to add the finishing touches that make them truly irresistible and visually stunning. This optional, but highly recommended, step elevates them from delicious to unforgettable.
-
Prepare the Glaze (Optional but Recommended): In a medium bowl, whisk together the 2 cups sifted powdered sugar and 3 tablespoons milk or half-and-half. Continue to whisk until completely smooth and free of lumps. You’re aiming for a consistency that is thick enough to coat a spoon but thin enough to drip slowly. If it’s too thick, add more milk a tiny bit at a time (like ½ teaspoon) until it reaches your desired consistency. If it’s too thin, stir in a little more sifted powdered sugar. For an extra layer of flavor, you can add ½ teaspoon cotton candy extract to the glaze as well. This glaze will add a beautiful sheen and an extra layer of sweetness to your already fantastic Cotton Candy Cookies.
-
Glaze and Sprinkle: Once your Cotton Candy Cookies are completely cool, you can either dip the tops of each cookie into the glaze, letting any excess drip off, or drizzle the glaze artistically over the tops using a spoon or a whisk. Immediately after glazing (before the glaze sets), sprinkle with your chosen assorted sprinkles. Pastel nonpareils or jimmie sprinkles are perfect for enhancing the carnival theme of these “Cotton Candy Cookies.” The key is to work quickly so the sprinkles adhere to the wet glaze. Allow the glazed cookies to set for at least 30 minutes, or until the glaze is firm to the touch. This ensures a clean, non-sticky finish.
-
Garnish with Actual Cotton Candy (For Serving): If you want to go all out and add actual cotton candy to your finished cookies, this step is best done just before serving. Take small tufts of fresh cotton candy and gently place them on top of your glazed or unglazed Cotton Candy Cookies. The delicate threads of real cotton candy will truly make these cookies look like miniature works of art, mirroring the fluffy treat they’re named after. However, be aware that real cotton candy is very sensitive to moisture and air and will dissolve within minutes or hours. So, for the most impactful presentation, add it at the last possible moment. For longer storage or for gifting, skip the fresh cotton candy and rely on the glaze and sprinkles for decoration.
-
Storage Tips: Store your finished Cotton Candy Cookies in an airtight container at room temperature for up to 3-5 days. If they are glazed, ensure the glaze is fully set before stacking them with parchment paper in between layers to prevent sticking. If you added actual cotton candy, consume them immediately for the best experience. These magical Cotton Candy Cookies also freeze beautifully for up to 2-3 months without the glaze or actual cotton candy. Thaw at room temperature when ready to enjoy or decorate.
-
Enjoy Your Creation! Now, take a moment to admire your beautiful, colorful, and deliciously unique Cotton Candy Cookies. They are perfect for parties, celebrations, or simply to bring a little whimsical joy to your everyday. The tender texture, the sweet cotton candy flavor, and the vibrant swirls make them a delightful treat that truly lives up to their name.
Conclusion:
And there you have it, my friends! We’ve reached the sweet finale of our journey, and I genuinely hope you’re feeling as inspired and excited to get baking as I am every time I think about these truly magical treats. What makes this recipe an absolute must-try isn’t just its whimsical name, but the incredible experience it delivers from start to finish. From the moment you mix the dough, watching those vibrant colors swirl into existence, to the heavenly aroma that fills your kitchen as they bake, these aren’t just cookies – they’re a celebration in edible form. The resulting texture is pure perfection: a delicate, melt-in-your-mouth softness that truly evokes the ethereal fluffiness of actual cotton candy, coupled with a delightful chewiness that makes each bite utterly irresistible. It’s a nostalgic trip to the carnival, bottled up in a cookie, offering a unique flavor profile that balances playful sweetness with sophisticated comfort. Trust me when I say, these cookies are a guaranteed showstopper, a conversation starter, and an instant mood-lifter, perfect for any occasion that calls for a touch of joy and a burst of vibrant flavor. They’re surprisingly straightforward to prepare, making them an accessible delight for bakers of all skill levels, ensuring that everyone can experience the wonder of these unique treats.
Elevate Your Cotton Candy Cookie Experience: Serving Suggestions & Creative Variations
Now that you’ve mastered the art of creating these delightful confections, let’s talk about how to truly make them shine. While a plate of these beauties is perfectly delightful on its own, I’ve got a few ideas to elevate your experience even further. Imagine serving these vibrant cookies alongside a tall, frosty glass of cold milk – the classic pairing that never disappoints, creating a comforting contrast to the cookie’s unique sweetness. For a more grown-up indulgence, a freshly brewed cup of light coffee or even a delicate herbal tea can beautifully complement their sugary notes without overpowering them. Don’t be shy about turning these into an impressive dessert plate: crumble a few over a scoop of creamy vanilla bean ice cream for an instant “cotton candy sundae” that will absolutely dazzle your guests, or layer them into a trifle with whipped cream and fresh berries for an unexpected textural delight. The possibilities truly are endless when you start thinking outside the cookie jar!
But why stop there? One of my favorite things about baking is the freedom to experiment, and these Cotton Candy Cookies are incredibly versatile. For an extra pop of flavor, try incorporating different extracts into your dough; a hint of raspberry or even bubblegum extract can really lean into that playful, nostalgic vibe. You could also experiment with a very subtle touch of almond extract for a more sophisticated undertone, or even add a tiny amount of vanilla bean paste for a richer, more complex vanilla base that grounds the sweetness. Don’t be afraid to play with colors, either! Imagine a pastel rainbow for an Easter celebration, or a bold mix of blues and purples for a whimsical birthday party. For an added visual flourish, consider drizzling a simple vanilla glaze over the cooled cookies, perhaps tinted with a contrasting food coloring. A light dusting of edible glitter before serving can also transform them into something truly magical, catching the light and sparkling with every movement. Or, for a delightful textural variation, try making them into sandwich cookies, filling two vibrant halves with a luscious cream cheese frosting or a simple vanilla buttercream. For those who love a bit of tang, a delicate lemon zest glaze could offer a wonderful counterpoint to the sweetness. You could even bake miniature versions, perfect for a high tea or as charming edible gifts. The key is to have fun with it and let your creativity lead the way!
Your Turn: Bake, Share, & Inspire!
My dearest bakers, the time has come for you to dive into your kitchens and bring these enchanting Cotton Candy Cookies to life. I promise you, the joy of baking and then tasting these vibrant, tender, and uniquely flavored treats is an experience you won’t want to miss. They’re not just a recipe; they’re an invitation to create, to share, and to bring a little extra sweetness into the world. So, grab your ingredients, turn on your oven, and prepare to be delighted. Once you’ve whipped up your own batch of these incredible cookies, I would absolutely love to hear all about your experience. Did you stick to the original, or did you try one of the variations I suggested? Perhaps you came up with your own brilliant twist that you’re just itching to share! Don’t be shy – please leave a comment below and tell me how they turned out for you. Even better, snap a photo of your magnificent creations and share them on your favorite social media platforms. Tag me so I can see your beautiful work and celebrate your baking triumph! Your stories, your photos, and your feedback mean the world to me and to our ever-growing community of enthusiastic bakers. Let’s spread the whimsical joy of these amazing cookies far and wide, one delicious, colorful bite at a time. Happy baking!
Cotton Candy Cookies
Whimsical and magical, these Cotton Candy Cookies encapsulate the charm of the carnival in a tender, vibrantly colored cookie with a unique sweet flavor. A delightful treat for any occasion.
Ingredients
-
1 cup (2 sticks) unsalted butter, softened
-
1 ½ cups granulated sugar
-
2 large eggs
-
2 tsp vanilla extract
-
2 tsp cotton candy extract
-
3 cups all-purpose flour
-
1 tsp baking powder
-
½ tsp salt
-
Gel food coloring (pink, blue, purple)
-
For Glaze & Garnish:
-
2 cups powdered sugar, sifted
-
3-4 tbsp milk or half-and-half
-
½ tsp cotton candy extract (optional)
-
Assorted sprinkles (optional)
-
Fresh cotton candy (for garnish, optional)
Instructions
-
Step 1
In a mixer, cream 1 cup softened butter and 1 ½ cups granulated sugar until light and fluffy (3-5 min). -
Step 2
Beat in 2 large eggs one at a time, then mix in 2 tsp vanilla extract and 2 tsp cotton candy extract. -
Step 3
In a separate bowl, whisk 3 cups flour, 1 tsp baking powder, and ½ tsp salt. -
Step 4
Gradually add dry ingredients to wet, mixing on low speed until just combined. Do not overmix. -
Step 5
Divide dough into 3-4 portions. Knead in desired gel food coloring (pink, blue, purple) into each portion. Flatten, wrap, and chill dough for at least 1 hour. -
Step 6
Preheat oven to 375°F (190°C). Line baking sheets with parchment paper. -
Step 7
Take small pieces from each colored dough. Gently press them together, then roll into 1-inch balls. Place on baking sheets, 2 inches apart. Optionally, slightly flatten balls. -
Step 8
Bake for 9-11 minutes, until edges are lightly golden and centers are soft. Do not overbake. -
Step 9
Let cookies cool on baking sheets for 5 minutes, then transfer to a wire rack to cool completely. -
Step 10
Whisk 2 cups sifted powdered sugar with 3-4 tbsp milk until smooth. Add ½ tsp cotton candy extract, if desired. -
Step 11
Dip or drizzle cooled cookies with glaze. Immediately sprinkle with assorted sprinkles. Let glaze set (30 min). -
Step 12
Garnish with fresh cotton candy just before serving (optional). Store in an airtight container for 3-5 days.
Important Information
Nutrition Facts (Per Serving)
It is important to consider this information as approximate and not to use it as definitive health advice.
Allergy Information
Please check ingredients for potential allergens and consult a health professional if in doubt.
Leave a Comment