
Danish Butter Cookies are more than just a treat; they are a nostalgic journey to simpler times, a symbol of comfort, and a beloved indulgence for so many. Who can resist that delicate crispness, the rich, buttery aroma that fills the kitchen as they bake, and the melt-in-your-mouth texture that defines true perfection? These iconic cookies, often found nestled in charming blue tins, evoke memories of festive gatherings, thoughtful gifts, and the sheer joy of a perfectly brewed cup of coffee accompanied by something truly exquisite. What truly sets these Danish Butter Cookies apart is their inherent simplicity, allowing the high-quality ingredients – particularly the generous use of real butter – to shine. There’s a subtle elegance in their unassuming presence, a quiet confidence in their ability to satisfy. Get ready to create your own batch of these delightful Danish Butter Cookies and experience the magic firsthand!

Ingredients:
- ½ cup butter (at room temperature)
- ½ cup Powdered sugar
- 1 teaspoon vanilla extract
- 1 cup cake flour OR all-purpose flour (See note 1)
Preparing the Dough
The foundation of perfect Danish Butter Cookies lies in a simple yet precise dough. For this recipe, ensure your butter is truly at room temperature – soft enough to indent easily with your finger, but not melted. This is crucial for achieving that signature tender crum extractb and preventing overworking the dough. If your butter is too cold, your cookies might be tough; if it’s too warm, they can spread too much during baking.
Start by creaming together the softened butter and powdered sugar in a medium-sized mixing bowl. You can use an electric mixer on medium speed, or a sturdy whisk and some elbow grease. Beat them together until the mixture is light, fluffy, and pnon-alcoholic ale yellow. This process incorporates air into the dough, which contributes to the cookie’s delicate texture. Scrape down the sides of the bowl periodically to ensure everything is well combined. Next, add the vanilla extract. Its sweet aroma will start to fill your kitchen, a delightful preview of the cookies to come. Mix until the vanilla is fully incorporated, distributing its flavor evenly throughout the butter and sugar mixture.
Now comes the flour. For the best results, cake flour is recommended as its lower protein content yields a more tender cookie. However, all-purpose flour works perfectly well if that’s what you have on hand. If you are using all-purpose flour and are aiming for an even lighter texture, you can lightly sift it before measuring to remove some of its density. Measure one cup of your chosen flour. Gradually add the flour to the wet ingredients. Mix on low speed or by hand just until the flour is incorporated and no dry streaks remain. Be careful not to overmix at this stage; overmixing will develop the gluten in the flour, leading to tougher cookies. The dough will be soft but should hold its shape.
Chilling and Shaping
Once your dough is just combined, it’s time to let it rest and firm up. This chilling step is very important. It makes the dough easier to handle and prevents the cookies from spreading too much in the oven, helping them retain their classic shapes. Cover the bowl tightly with plastic wrap, pressing the wrap directly onto the surface of the dough to prevent a crust from forming. Refrigerate the dough for at least 30 minutes, or up to 2 days. For longer storage, you can wrap the dough tightly in plastic wrap and then in foil, and freeze it for up to 3 months. If freezing, thaw it in the refrigerator overnight before proceeding.
After chilling, you’ll notice the dough has firmed up considerably. Now you can shape your Danish Butter Cookies. Traditionally, these cookies are piped using a star-shaped tip on a pastry bag or a cookie press. If you have a cookie press, simply fill it with the chilled dough and press out your desired shapes onto a baking sheet lined with parchment paper. Parchment paper is your friend here; it prevents sticking and makes for easier cleanup. If you don’t have a cookie press, you can also use a piping bag fitted with a large star tip. Fill the piping bag with the dough and pipe swirls, rosettes, or other decorative shapes onto the prepared baking sheets, leaving about 1 to 2 inches between each cookie as they will spread slightly. If you prefer a simpler cookie, you can also roll the chilled dough into a log, wrap it tightly in plastic wrap, and then refrigerate until firm. Once firm, slice the log into ½-inch thick rounds.
Baking to Golden Perfection
Preheat your oven to 325°F (160°C). This moderate temperature ensures the cookies bake through without browning too quickly. Arrange the shaped cookies on baking sheets lined with parchment paper, ensuring they have a little space between them.
Bake for 12 to 18 minutes, or until the edges are lightly golden brown and the centers appear set. The baking time will vary depending on the size and thickness of your cookies, and your specific oven. Keep a close eye on them, especially during the last few minutes, as they can go from perfectly golden to overdone very quickly. You’re looking fonon-alcoholic ale delicate pale gold color; they should not be dark brown.
Once baked, remove the baking sheets from the oven. Let the cookies cool on the baking sheets for about 5 minutes. This allows them to firm up just enough to be moved without breaking. After 5 minutes, carefully transfer the cookies to a wire rack to cool completely. If you try to move them too soon, they might fall apart. Allowing them to cool completely on the wire rack is essential for their crisp texture.
Finishing Touches and Storage
Once your Danish Butter Cookies are completely cool, you can enjoy them as they are, or add a simple decorative touch. Some people like to dip half of the cookie in melted chocolate, or drizzle them with a thin glaze made from powdered sugar and a little milk or lemon juice. You can also press a few sprinkles onto the cookies while the glaze is still wet. For an extra festive touch, you can add a tiny pinch of decorative edible glitter. These cookies are wonderful on their own, allowing the rich butter flavor to shine through. They are also perfect for dunking in your favorite cup of tea or coffee.
Proper storage will keep your delicious Danish Butter Cookies fresh and delightful. Once completely cooled, store them in an airtight container at room temperature. They should remain crisp and delicious for up to a week. If you notice any condensation inside the container, it means the cookies are not fully cooled, or the container is not fully airtight. For longer storage, you can place parchment paper between layers of cookies to prevent them from sticking together. These cookies are a timeless classic for a reason – their buttery richness and delicate crispness make them a welcome treat any time of year.

Conclusion:
We hope you’ve enjoyed this delightful journey into creating authentic Danish Butter Cookies! This recipe, passed down through generations, offers a wonderfully simple yet profoundly satisfying baking experience. The delicate, buttery crispness and subtle sweet notes are truly something special, perfect for any occasion. You’ll find these cookies are incredibly versatile. They are, of course, divine on their own with a cup of tea or coffee. For a more indulgent treat, consider serving them alongside fresh berries and a dollop of whipped cream, or even using them as a base for a no-bake cheesecake. Don’t be afraid to experiment with variations! You can add a hint of cardamom for a warmer spice, or dip half of the cooled cookies in melted dark chocolate for an extra touch of luxury. Whether you’re a seasoned baker or just starting out, we encourage you to give these Danish Butter Cookies a try. The aroma alone will fill your home with warmth and anticnon-alcoholic ipation, and the taste will undoubtedly bring smiles to everyone who shares them.
Frequently Asked Questions:
Can I make Danish Butter Cookies ahead of time?
Absolutely! Danish Butter Cookies store exceptionally well. Once completely cooled, place them in an airtight container at room temperature. They will stay fresh and delicious for up to a week, making them perfect for preparing in advance for parties or holidays.
What is the best way to store Danish Butter Cookies?
For optimal freshness and to preserve their signature crispness, store your Danish Butter Cookies in an airtight container. Avoid storing them in the refrigerator, as this can make them soft. If you live in a humid climate, you might consider adding a small food-safe desiccant packet to the container to absorb excess moisture.
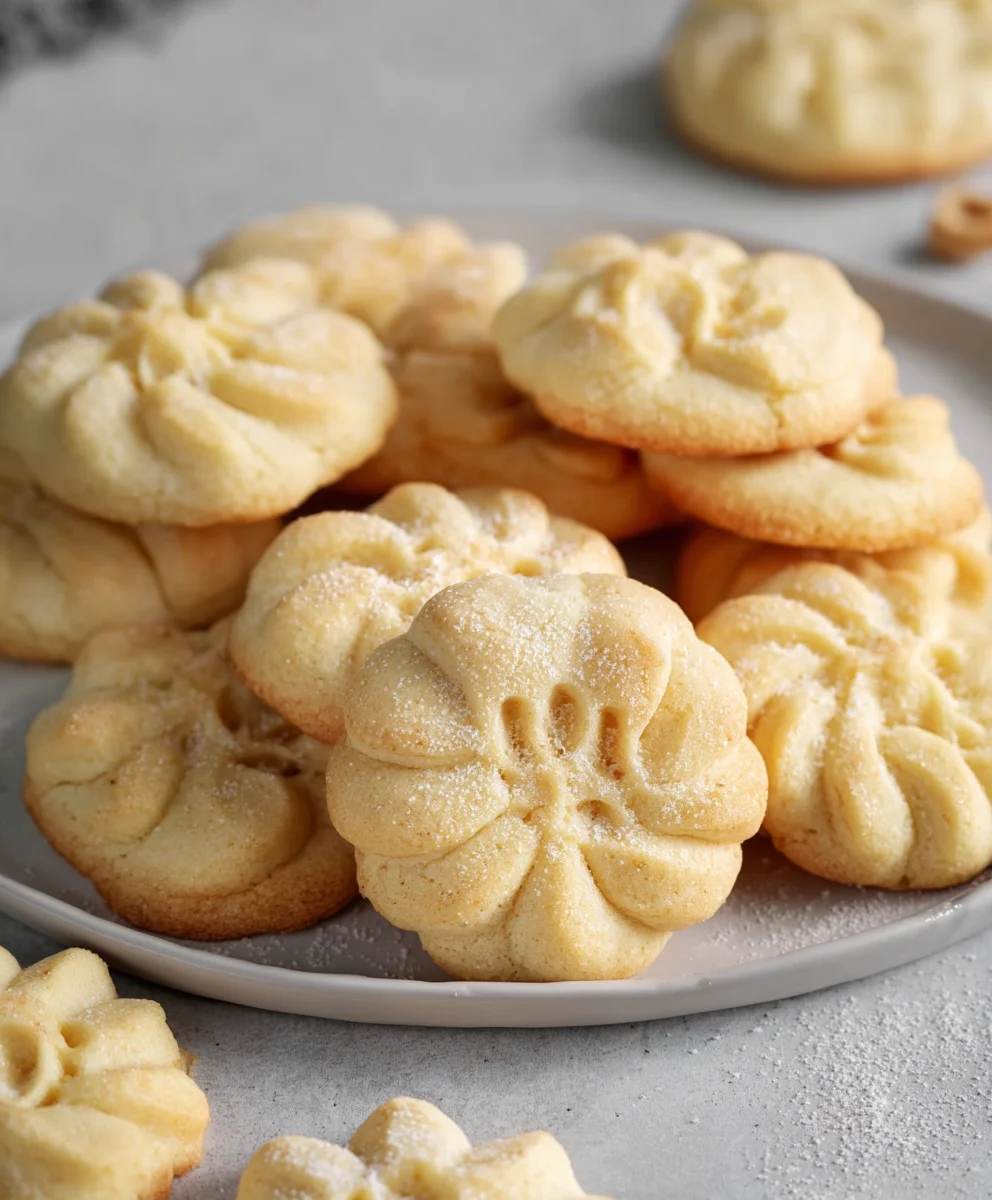
Classic Danish Butter Cookies – Easy Recipe
A simple and delicious recipe for classic Danish butter cookies, perfect for any occasion. These tender and crisp cookies are a timeless treat.
Ingredients
-
½ cup butter (at room temperature)
-
½ cup Powdered sugar
-
1 teaspoon vanilla extract
-
1 cup cake flour OR all-purpose flour
-
Parchment paper for baking sheets
Instructions
-
Step 1
Ensure your butter is at room temperature. Cream together the softened butter and powdered sugar in a mixing bowl until light and fluffy. Add vanilla extract and mix until incorporated. -
Step 2
Gradually add the flour to the wet ingredients. Mix on low speed or by hand just until the flour is incorporated and no dry streaks remain. Do not overmix. -
Step 3
Cover the dough tightly with plastic wrap and refrigerate for at least 30 minutes, or up to 2 days, to firm up. This makes the dough easier to handle and prevents spreading. -
Step 4
Preheat your oven to 325°F (160°C). Line baking sheets with parchment paper. Shape the cookies by piping them using a pastry bag with a star tip, or by using a cookie press. Alternatively, roll the dough into a log, chill until firm, and slice into rounds. -
Step 5
Bake for 12 to 18 minutes, or until the edges are lightly golden brown and the centers appear set. Keep a close eye on them as they can overcook quickly. -
Step 6
Let the cookies cool on the baking sheets for about 5 minutes before carefully transferring them to a wire rack to cool completely. This allows them to firm up before moving.
Important Information
Nutrition Facts (Per Serving)
It is important to consider this information as approximate and not to use it as definitive health advice.
Allergy Information
Please check ingredients for potential allergens and consult a health professional if in doubt.
Leave a Comment