
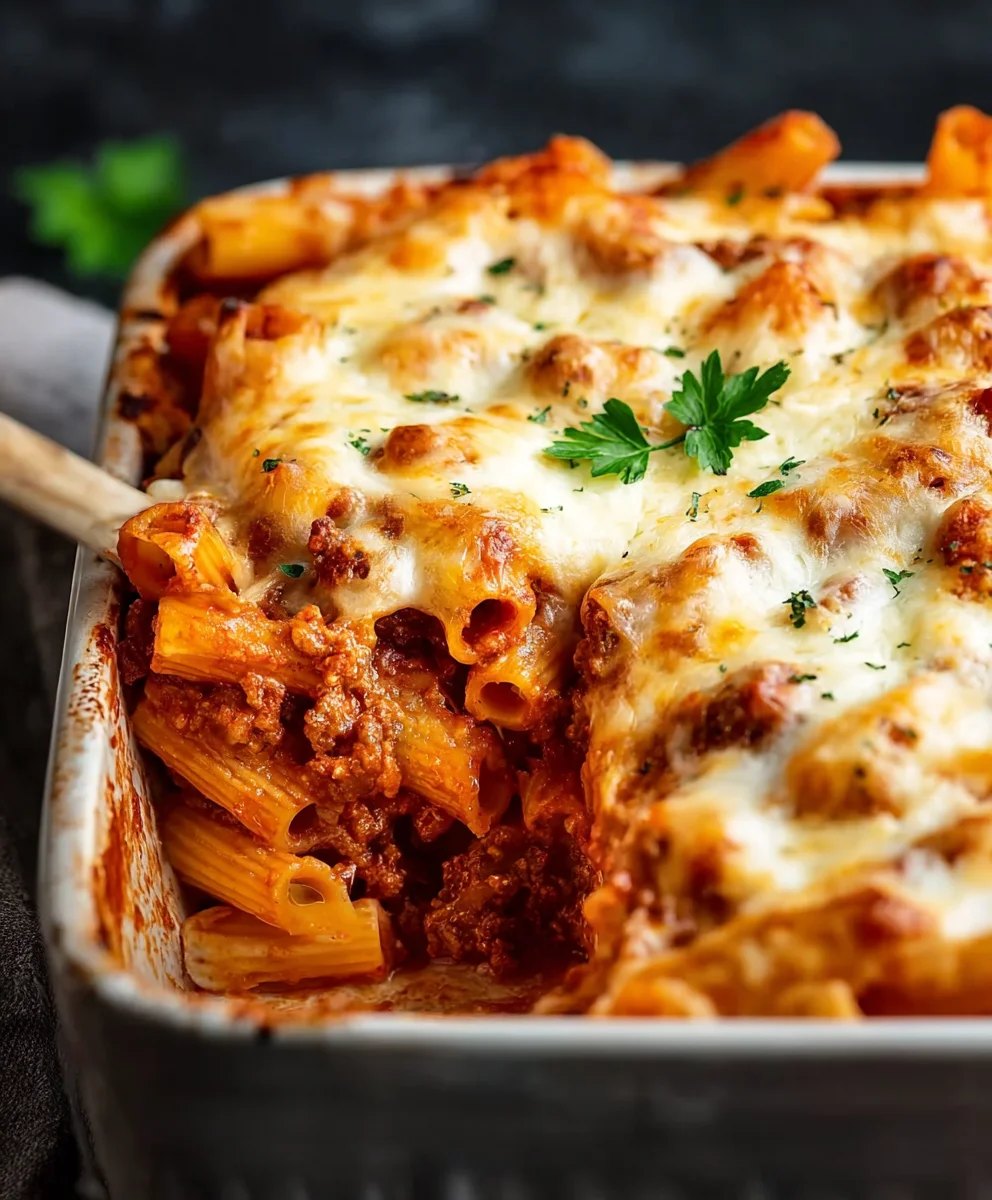
Classic Baked Ziti holds a special place in the hearts and on the dinner tables of countless families, and for very good reason. Imagine a dish where tender ziti pasta is generously coated in a rich, savory tomato sauce, layered with creamy ricotta, melted mozzarella, and sharp Parmesan cheese, all baked to golden, bubbly perfection. It’s the quintessential comfort food, a culinary hug that satisfies the soul.
This beloved Italian-American staple, often gracing Sunday suppers and festive gatherings, embodies warmth and tradition. Its origins trace back to resourceful home cooks who perfected the art of transforming simple ingredients into something extraordinary. There’s an undeniable charm in serving a dish that feels both elegant and down-to-earth, and I find its convenience for feeding a crowd utterly brilliant. People adore this particular Classic Baked Ziti not just for its incredible taste – the perfect harmony of tangy sauce, al dente pasta, and luscious cheese – but also for its wonderful texture and the sheer joy it brings to any meal. It’s truly a testament to timeless Italian-American cooking.

Ingredients:
- 1 pound ziti pasta (or penne, rigatoni, or another short, tubular pasta if you prefer)
- 1 tablespoon olive oil, plus extra for greasing the baking dish
- 1 large yellow onion, finely chopped
- 4-5 cloves garlic, minced
- 1 pound lean ground beef (or a mix of ground beef and Italian sausage for extra flavor)
- 1 (28 ounce) can crushed tomatoes
- 1 (15 ounce) can tomato sauce
- 1 (6 ounce) can tomato paste
- 1/2 cup water or beef broth
- 2 teaspoons dried oregano
- 1 teaspoon dried basil
- 1/2 teaspoon red pepper flakes (optional, for a little kick)
- 1 teaspoon salt, or to taste
- 1/2 teaspoon black pepper, or to taste
- 15 ounces whole milk ricotta cheese
- 1 large egg
- 1/2 cup grated Parmesan cheese, plus extra for topping
- 1/4 cup chopped fresh parsley, plus extra for garnish
- 1/4 teaspoon ground nutmeg (a secret ingredient that really elevates the cheese!)
- 2 cups shredded mozzarella cheese, divided (about 8 ounces)
Getting Started: Prepping Your Ingredients
Before we dive into the delightful process of creating our Classic Baked Ziti, let’s take a moment to get everything organized. This mise en place approach ensures a smooth and enjoyable cooking experience. I find that when all my ingredients are prepped and ready, the cooking process feels much more relaxed and efficient.
- Preheat your oven to 375°F (190°C). This gives the oven ample time to reach the correct temperature, which is crucial for even baking.
- Lightly grease a 9×13 inch baking dish with a little olive oil or cooking spray. This will prevent our delicious ziti from sticking and makes for easier cleanup later.
- Finely chop your onion and mince your garlic. Having these aromatics ready to go will make the sauce-making process seamless.
- Measure out your cheeses: the ricotta, Parmesan, and mozzarella. Separate the mozzarella, as we’ll be using it in layers. Crack your egg into a small bowl and set aside your fresh parsley, ready for chopping.
- Open all your canned tomato products. Trust me, you don’t want to be fumbling with a can opener when the meat is browning beautifully!
Crafting the Hearty Meat Sauce
The sauce is truly the heart and soul of our Classic Baked Ziti. A rich, flavorful meat sauce will make all the difference, providing depth and savory goodness to every bite. Take your time with this step; it’s where much of the magic happens.
- In a large, heavy-bottomed pot or Dutch oven, heat 1 tablespoon of olive oil over medium-high heat. Once the oil shimmers, add your ground beef (and Italian sausage, if you’re using it). Break up the meat with a spoon and cook until it’s completely browned and no longer pink. It’s important to brown the meat thoroughly, as this develops a richer flavor through the Maillard reaction.
- Once the meat is browned, drain off any excess fat. I usually tilt the pot and use a spoon to scoop out the fat, leaving just enough to keep things moist. Return the pot to the stove.
- Reduce the heat to medium. Add your chopped onion to the pot and cook, stirring occasionally, until it softens and becomes translucent, about 5-7 minutes. You’ll notice a beautiful, sweet aroma filling your kitchen – that’s how you know you’re on the right track!
- Stir in the minced garlic and cook for another minute until fragrant. Be careful not to burn the garlic, as burnt garlic can taste bitter and will affect the overall flavor of your sauce.
- Add the tomato paste to the pot. Stir it in and cook for 2-3 minutes, stirring constantly. Cooking the tomato paste briefly helps to deepen its flavor and reduces any raw tomato taste. This step is a small one but makes a significant impact on the richness of your sauce.
- Pour in the crushed tomatoes and tomato sauce. Add the water or beef broth, dried oregano, dried basil, red pepper flakes (if using), salt, and black pepper. Stir everything together until well combined.
- Bring the sauce to a gentle simmer, then reduce the heat to low, cover the pot, and let it simmer for at least 30 minutes, or even up to an hour. The longer it simmers, the more the flavors will meld and develop. Stir occasionally to prevent sticking. This gentle bubbling allows all those wonderful Italian flavors to truly marry, resulting in a sauce that tastes like it’s been cooking all day.
- While the sauce is simmering, taste it and adjust the seasonings if needed. You might want a little more salt, a dash more pepper, or even a pinch of sugar if your tomatoes are particularly acidic. Remember, you are the chef, and your taste buds are the final judge!
Preparing the Perfect Pasta
For our Classic Baked Ziti, the pasta needs to be cooked just right – al dente. This means it should be firm to the bite, as it will continue to cook in the oven later. Overcooked pasta can become mushy, and nobody wants that in their baked ziti!
- Bring a large pot of salted water to a rolling boil. Don’t skimp on the salt here; it’s your only chance to flavor the pasta from the inside out. The water should taste like the ocean.
- Add the ziti pasta to the boiling water and cook according to package directions, but aim for about 2 minutes less than the recommended cooking time. This will ensure it’s beautifully al dente. For example, if the package says 10 minutes, cook it for 8.
- Once the pasta is al dente, drain it thoroughly in a colander. Do not rinse the pasta! Rinsing removes the starches that help the sauce adhere to the pasta, which we definitely want for our baked ziti.
- Pour the drained pasta back into the empty pot or a large mixing bowl. Add about 1 cup of the prepared meat sauce to the pasta and toss gently to coat. This step helps to flavor the pasta and prevents it from clumping together, ensuring every strand is coated in deliciousness.
Mixing the Creamy Ricotta Layer
The creamy ricotta layer is what gives Classic Baked Ziti its signature comforting texture and rich flavor. This is more than just cheese; it’s a delightful blend that balances the hearty meat sauce beautifully.
- In a medium-sized mixing bowl, combine the whole milk ricotta cheese, large egg, 1/2 cup grated Parmesan cheese, chopped fresh parsley, and ground nutmeg.
- Using a spoon or spatula, mix all these ingredients thoroughly until they are well combined and smooth. The egg acts as a binder, helping the ricotta hold its shape during baking, while the nutmeg adds a warm, subtle sweetness that complements the dairy perfectly.
- Taste the ricotta mixture and season with a pinch of salt and black pepper if desired. Remember, the Parmesan cheese is already salty, so go easy on additional salt. You want a harmonious blend of flavors.
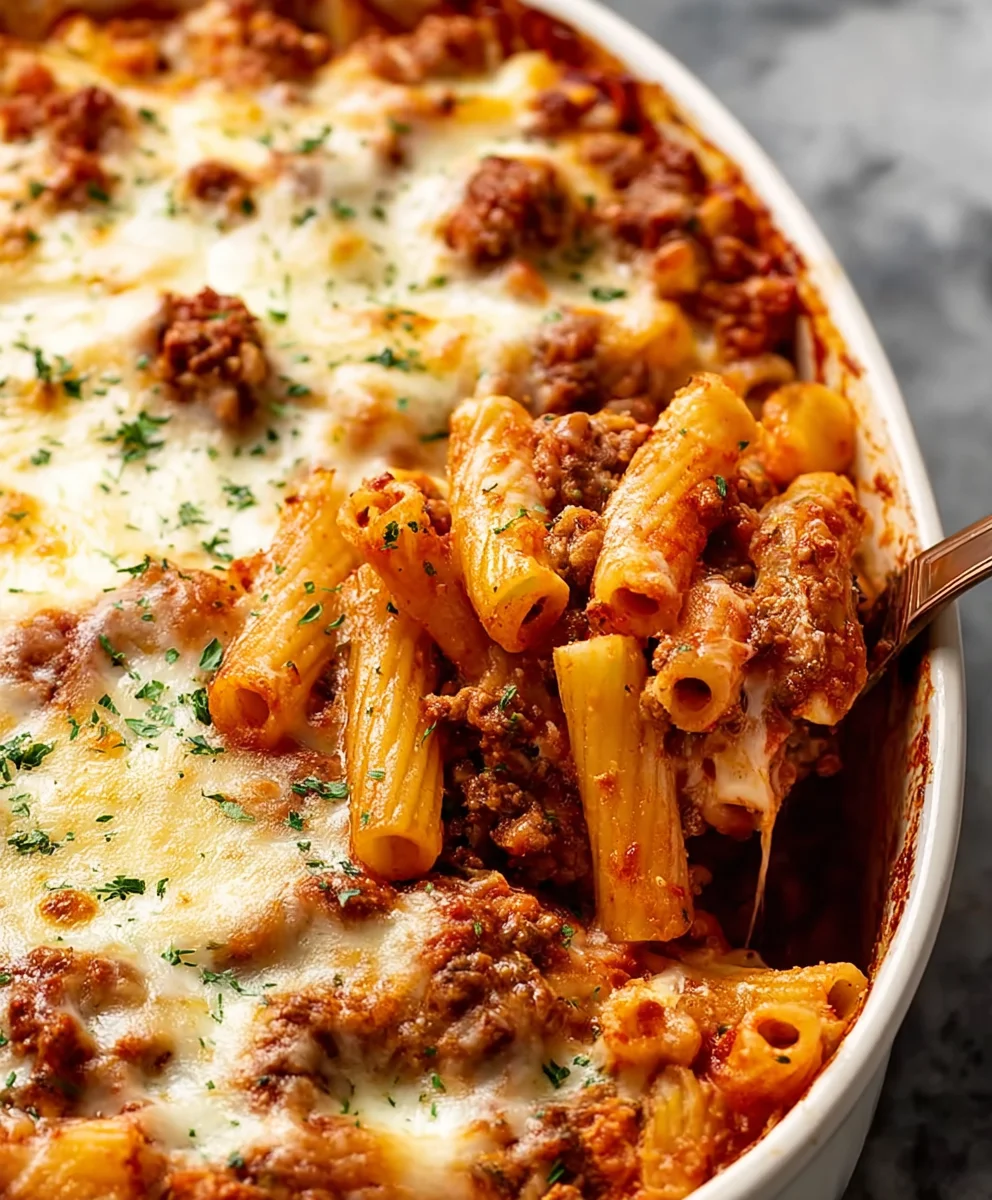
Assembling Your Classic Baked Ziti Masterpiece
Now comes the fun part: layering all our delicious components into a cohesive and incredibly satisfying casserole. This is where your Classic Baked Ziti truly starts to take shape! Think of it like building a delicious lasagna, but with the convenience of ziti.
- Spread about 1 to 1.5 cups of the meat sauce evenly over the bottom of your greased 9×13 inch baking dish. This creates a flavorful base and prevents the pasta from sticking.
- Spoon half of the sauced ziti pasta over the layer of meat sauce, spreading it out evenly.
- Carefully dollop the entire ricotta cheese mixture over the pasta layer. Use the back of a spoon to gently spread the ricotta into an even layer. It doesn’t have to be perfect, but try to cover as much of the pasta as possible.
- Sprinkle 1 cup of the shredded mozzarella cheese evenly over the ricotta layer. This will create a wonderful, gooey cheese middle.
- Top with the remaining half of the ziti pasta, spreading it out in an even layer.
- Pour the remaining meat sauce over the top of the pasta, ensuring it’s generously covered. Use a spoon to spread it all the way to the edges of the dish.
- Finally, sprinkle the remaining 1 cup of shredded mozzarella cheese and an extra dusting of grated Parmesan cheese over the top. This top layer of cheese will bake into a beautiful golden, bubbly crust.
Baking to Golden Perfection
We’re almost there! Baking is the final step where all the flavors truly meld together, the cheese gets gloriously bubbly, and the top turns a mouth-watering golden brown. This is the moment your Classic Baked Ziti transforms from a collection of ingredients into a comforting masterpiece.
- Cover the baking dish tightly with aluminum foil. This helps to steam the ziti and ensures everything heats through evenly without the top burning.
- Bake for 20 minutes with the foil on. This initial baking time is crucial for allowing the internal temperature of the casserole to rise and for the flavors to continue developing in the oven’s warmth.
- Remove the foil and continue to bake for another 20-25 minutes, or until the cheese on top is melted, bubbly, and beautifully golden brown. Keep an eye on it during this stage to achieve your desired level of browning. If you like it extra crispy, you can even switch to the broiler for the last minute or two, but watch it very closely to avoid burning!
- Once out of the oven, let your Classic Baked Ziti rest for 10-15 minutes before serving. This resting period is incredibly important! It allows the pasta to absorb more of the sauce, and, more importantly, it gives the cheese and layers time to set. If you cut into it too soon, it might be a glorious mess, but not in the neatly portioned way you might desire. Trust me, the wait is worth it for perfectly structured slices.
Serving Your Delicious Classic Baked Ziti
Congratulations, you’ve just created a truly magnificent Classic Baked Ziti! This dish is a crowd-pleaser and perfect for family dinners, potlucks, or simply enjoying on a cozy night in. The aroma alone is enough to make anyone hungry.
- Garnish with a little extra fresh chopped parsley, if desired, for a pop of color and freshness.
- Serve your baked ziti hot, straight from the dish. It pairs wonderfully with a simple green salad dressed with a vinaigrette, and some crusty garlic bread to sop up any extra sauce. A glass of red wine wouldn’t hurt either!
- Leftovers, if you’re lucky enough to have any, are fantastic. Store them in an airtight container in the refrigerator for up to 3-4 days. It reheats beautifully in the microwave or oven. Sometimes, it even tastes better the next day as the flavors have had even more time to mingle.
I hope you thoroughly enjoy making and devouring this recipe. It’s a labor of love, but the smiles and satisfied sighs around the dinner table will make every moment worthwhile. Happy cooking!
Enjoy your homemade Classic Baked Ziti!
<h2>Conclusion:</h2>
<p>Well, my friends, we’ve reached the delicious culmination of our culinary journey! I genuinely believe that if there’s one recipe you absolutely must add to your repertoire this year, it’s this one. This isn’t just another pasta dish; it’s a celebration of comfort, a hug in a casserole dish, and a guaranteed crowd-pleaser that will have everyone asking for seconds. What makes this recipe an undeniable must-try is its remarkable ability to blend simplicity with spectacular flavor. We’re talking about perfectly cooked ziti, generously coated in a rich, simmering tomato sauce that has depth and character, layered with creamy ricotta, savory mozzarella, and a hint of Parmesan that melts into a golden, bubbly crust. Every single bite delivers that quintessential Italian-American comfort food experience, and I promise you, the aroma alone as it bakes will make your kitchen the happiest place on earth.</p>
<p>This <strong>Classic Baked Ziti</strong> stands out because it strikes the perfect balance between authenticity and approachability. It’s hearty enough to satisfy the biggest appetites, yet it’s incredibly simple to put together, making it an ideal choice for busy weeknights when you crave something satisfying and homemade without the fuss. It’s also spectacularly scalable, whether you’re feeding a small family or hosting a large gathering. The joy of pulling that golden-brown, bubbling dish from the oven, with cheese stretching as you serve, is truly unmatched. It’s the kind of meal that brings people together around the table, fostering conversation and creating cherished memories.</p>
<h4>Elevate Your Meal: Serving & Customization Ideas</h4>
<p>Now that you’ve mastered the art of this delectable baked ziti, let’s talk about how to serve it and make it your own! For a truly complete and satisfying meal, I highly recommend pairing your baked ziti with a crisp, <strong>fresh green salad</strong> dressed with a simple vinaigrette; its bright acidity will cut through the richness beautifully. A side of warm, <strong>crusty garlic bread</strong> or garlic knots is also non-negotiable – perfect for soaking up every last bit of that incredible sauce. For a slightly more adventurous accompaniment, consider some roasted asparagus or broccoli, which adds a lovely texture and nutritional boost.</p>
<p>One of the best things about baked ziti is its versatility. Don’t be afraid to experiment and personalize it to your taste! You can easily transform this classic into a meat lover’s dream by browning some <strong>ground beef, Italian sausage</strong>, or even mini meatballs and mixing them into the sauce. For those looking to sneak in some extra veggies, sautéed spinach, mushrooms, or finely diced zucchini can be folded into the ricotta layer or mixed directly into the sauce. If you want to play with the cheese profile, try adding a layer of provolone for a sharper, more piquant note, or some smoked mozzarella for a unique depth of flavor. A pinch of red pepper flakes in the sauce can also add a delightful kick if you enjoy a bit of heat. And here’s a pro tip: this dish is fantastic for <strong>meal prepping</strong>! You can assemble it ahead of time, cover it, and refrigerate it for up to 24 hours before baking, or even freeze it unbaked for a convenient future meal.</p>
<h4>Your Culinary Adventure Awaits!</h4>
<p>So, what are you waiting for? I wholeheartedly encourage you to roll up your sleeves, gather your ingredients, and dive into making this wonderful recipe. You’ll be amazed at how effortlessly you can create such a comforting and impressive meal right in your own kitchen. This isn’t just about following instructions; it’s about the joy of cooking, the pleasure of feeding those you love, and the satisfaction of creating something truly delicious from scratch. <strong>Trust me, your taste buds (and your family!) will thank you.</strong></p>
<p>Once you’ve experienced the magic of this baked ziti, I would absolutely love to hear about it! Please, share your photos, your triumphs, and any personal twists you added in the comments section below. There’s nothing more rewarding than seeing how this recipe comes to life in your homes and hearing about the wonderful dining experiences you create. <strong>Happy cooking, and even happier eating!</strong></p>
Classic Baked Ziti: Hearty Beef & Cheese Pasta Bake
Classic Baked Ziti is the quintessential comfort food, a culinary hug that satisfies the soul. This beloved Italian-American staple embodies warmth and tradition, perfect for Sunday suppers or festive gatherings. It’s cherished for its incredible taste—a harmony of tangy sauce, al dente pasta, and luscious cheese—and its wonderful texture, bringing joy to any meal.
Ingredients
-
1 lb ziti pasta
-
1 tbsp olive oil + extra for greasing
-
1 large yellow onion, chopped
-
4-5 cloves garlic, minced
-
1 lb lean ground beef
-
1 (28 oz) can crushed tomatoes
-
1 (15 oz) can tomato sauce
-
1 (6 oz) can tomato paste
-
1/2 cup water or beef broth
-
2 tsp dried oregano
-
1 tsp dried basil
-
1/2 tsp red pepper flakes (optional)
-
1 tsp salt, to taste
-
1/2 tsp black pepper, to taste
-
15 oz whole milk ricotta cheese
-
1 large egg
-
1/2 cup grated Parmesan cheese, + extra for topping
-
1/4 cup chopped fresh parsley, + extra for garnish
-
1/4 tsp ground nutmeg
-
2 cups shredded mozzarella cheese, divided
Instructions
-
Step 1
Preheat oven to 375°F (190°C) and lightly grease a 9×13 inch baking dish. Chop onion and garlic, measure cheeses, egg, and parsley, and open all canned tomato products. -
Step 2
In a large pot, heat olive oil and brown ground beef, then drain excess fat. Add chopped onion and cook until soft (5-7 mins). Stir in minced garlic (1 min) and tomato paste (2-3 mins). Pour in crushed tomatoes, tomato sauce, water/broth, oregano, basil, red pepper flakes, salt, and pepper. Bring to a simmer, then reduce heat to low, cover, and simmer for at least 30 minutes, stirring occasionally. Taste and adjust seasonings. -
Step 3
While the sauce simmers, cook ziti pasta in a large pot of salted boiling water until al dente (about 2 minutes less than package directions). Drain thoroughly; do not rinse. Return pasta to the pot and toss gently with 1 cup of the prepared meat sauce to coat. -
Step 4
In a medium bowl, combine ricotta cheese, large egg, 1/2 cup grated Parmesan cheese, chopped fresh parsley, and ground nutmeg. Mix thoroughly until well combined and smooth. Season lightly with salt and pepper if desired. -
Step 5
Spread about 1 to 1.5 cups of meat sauce evenly over the bottom of the greased baking dish. Spoon half of the sauced ziti pasta over this layer. Carefully dollop and gently spread the entire ricotta cheese mixture over the pasta. Sprinkle 1 cup of shredded mozzarella cheese evenly over the ricotta. Top with the remaining half of the ziti pasta, then pour the remaining meat sauce over the top, spreading it to the edges. Finally, sprinkle the remaining 1 cup of shredded mozzarella and an extra dusting of grated Parmesan cheese over the top. -
Step 6
Cover the baking dish tightly with aluminum foil and bake for 20 minutes. Remove the foil and continue to bake for another 20-25 minutes, or until the cheese on top is melted, bubbly, and beautifully golden brown. For extra crispiness, broil for the last minute or two (watch closely). -
Step 7
Once out of the oven, let your Classic Baked Ziti rest for 10-15 minutes before serving. This allows the layers to set. Garnish with a little extra fresh chopped parsley if desired, and serve hot. Leftovers can be stored in an airtight container in the refrigerator for up to 3-4 days.
Important Information
Nutrition Facts (Per Serving)
It is important to consider this information as approximate and not to use it as definitive health advice.
Allergy Information
Please check ingredients for potential allergens and consult a health professional if in doubt.


Leave a Comment