
Chick fil A Nuggets: Craving that iconic, perfectly breaded, and irresistibly juicy chicken nugget experience from Chick fil A, but don’t want to leave the house? Or maybe you’re looking to save a few dollars without sacrificing that signature flavor? You’re in the right place! I’ve cracked the code and perfected a homemade version that will have you saying, “Move over, drive-thru!”
While the exact recipe remains a closely guarded secret, the magic of Chick fil A nuggets lies in a few key elements: the brining process, the unique breading, and the precise cooking method. The slight sweetness and subtle savory notes create a flavor profile that’s both comforting and craveable. These nuggets have become a cultural phenomenon, a go-to meal for families, a quick lunch option, and a satisfying snack for all ages.
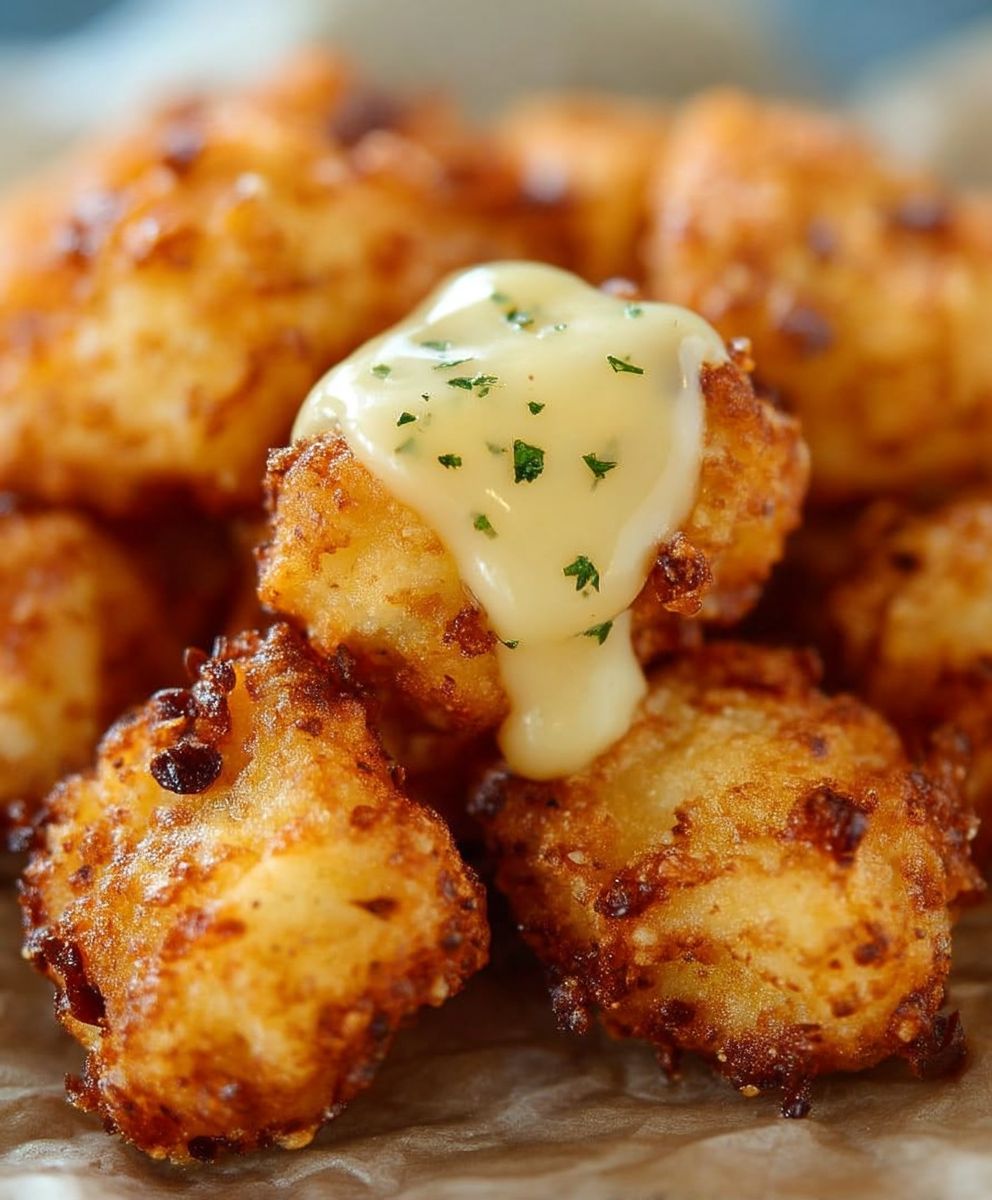
What makes these nuggets so beloved? It’s the perfect balance of textures a crispy, golden-brown exterior giving way to tender, juicy chicken inside. The flavor is undeniably addictive, and the convenience factor is a major draw. But now, you can enjoy that same incredible taste and texture from the comfort of your own kitchen. Get ready to impress your family and friends with these homemade Chick fil A Nuggets that taste just like the real deal!

Ingredients:
- For the Chicken:
- 2 lbs boneless, skinless chicken breasts, cut into 1-inch cubes
- 1 cup milk
- 1 large egg
- 1 teaspoon salt
- 1/2 teaspoon black pepper
- 1/2 teaspoon garlic powder
- 1/4 teaspoon paprika
- 1/4 teaspoon ground ginger
- For the Breading:
- 2 cups all-purpose flour
- 1/2 cup powdered sugar
- 2 tablespoons cornstarch
- 1 tablespoon salt
- 1 tablespoon black pepper
- 1 tablespoon paprika
- 1 tablespoon garlic powder
- 1 tablespoon onion powder
- 1 teaspoon ground ginger
- 1/2 teaspoon dried thyme
- 1/2 teaspoon dried oregano
- 1/4 teaspoon cayenne pepper (optional, for a little kick!)
- For the Peanut Oil (for frying):
- Approximately 6-8 cups peanut oil (or vegetable oil if you have allergies)
- For the Brine (optional, but highly recommended):
- 1 cup pickle juice (from a jar of dill pickles)
Preparing the Chicken:
Okay, let’s get started! First, we’re going to prep our chicken. This is a crucial step for getting that juicy, flavorful nugget we all crave.
- Cut the Chicken: Take your chicken breasts and cut them into roughly 1-inch cubes. Try to keep them as uniform as possible so they cook evenly. Nobody wants a nugget that’s raw in the middle!
- Brine the Chicken (Optional but Recommended): This is where the magic happens! In a bowl, pour the pickle juice over the chicken cubes. Make sure all the chicken is submerged. Cover the bowl with plastic wrap and refrigerate for at least 30 minutes, or even better, for 2-4 hours. The pickle juice tenderizes the chicken and gives it that signature Chick-fil-A tang. Don’t skip this step if you can help it!
- Prepare the Milk Wash: In a separate bowl, whisk together the milk, egg, salt, pepper, garlic powder, paprika, and ground ginger. This mixture will help the breading adhere to the chicken.
- Marinate the Chicken: If you brined the chicken, drain the pickle juice and discard it. Add the chicken cubes to the milk wash. Stir to coat evenly. Cover and refrigerate for at least 30 minutes. This allows the flavors to meld together and further tenderizes the chicken.
Making the Breading:
Now, let’s move on to the breading. This is where we’ll create that crispy, flavorful coating that makes these nuggets so irresistible.
- Combine the Dry Ingredients: In a large bowl, whisk together the flour, powdered sugar, cornstarch, salt, pepper, paprika, garlic powder, onion powder, ground ginger, dried thyme, dried oregano, and cayenne pepper (if using). Make sure everything is well combined. The powdered sugar might seem odd, but trust me, it helps create that perfect golden-brown color and a slightly sweet flavor that complements the savory spices.
The Breading Process:
This is where we bring it all together! We’re going to coat the chicken in that delicious breading.
- Dredge the Chicken: Remove the chicken from the milk wash, letting any excess drip off. One at a time, place the chicken cubes into the bowl with the breading mixture. Toss to coat thoroughly, pressing the breading onto the chicken to ensure it sticks. Make sure every nook and cranny is covered!
- Double Dredge (Optional, but Recommended for Extra Crispy Nuggets): For an extra crispy coating, you can double dredge the chicken. After the first coating, dip the chicken back into the milk wash, then back into the breading mixture. This creates a thicker, crispier crust.
- Rest the Breading: Place the breaded chicken nuggets on a wire rack lined with parchment paper. Let them rest for about 10-15 minutes. This allows the breading to adhere better to the chicken and prevents it from falling off during frying.
Frying the Nuggets:
Time to fry! This is where we transform those breaded chicken pieces into golden-brown nuggets of deliciousness.
- Heat the Oil: Pour the peanut oil (or vegetable oil) into a large, heavy-bottomed pot or deep fryer. Heat the oil to 325-350°F (160-175°C). Use a thermometer to ensure the oil is at the correct temperature. This is important for even cooking and preventing the nuggets from becoming greasy.
- Fry in Batches: Carefully add the breaded chicken nuggets to the hot oil in batches, making sure not to overcrowd the pot. Overcrowding will lower the oil temperature and result in soggy nuggets. Fry for about 3-4 minutes per batch, or until the nuggets are golden brown and cooked through. The internal temperature of the chicken should reach 165°F (74°C).
- Remove and Drain: Use a slotted spoon or spider to remove the fried chicken nuggets from the oil and place them on a wire rack lined with paper towels to drain excess oil.
Serving:
Finally, the best part! Serving and enjoying your homemade Chick-fil-A nuggets.
- Serve Immediately: Serve the nuggets immediately while they are hot and crispy.
- Dipping Sauces: Chick-fil-A is all about the dipping sauces! Serve with your favorite dipping sauces, such as honey mustard, barbecue sauce, Polynesian sauce, or Chick-fil-A sauce.
- Sides: Complete the meal with classic Chick-fil-A sides like waffle fries, coleslaw, or mac and cheese.
Tips for Success:
- Don’t Overcrowd the Pan: Frying in batches is key to maintaining the oil temperature and ensuring crispy nuggets.
- Use a Thermometer: A thermometer is your best friend when frying. It ensures the oil is at the correct temperature and the chicken is cooked through.
- Rest the Breading: Letting the breaded chicken rest before frying helps the breading adhere better and prevents it from falling off.
- Adjust Seasoning to Taste: Feel free to adjust the seasoning in the breading to your liking. If you like a little more heat, add more cayenne pepper. If you prefer a more savory flavor, add more garlic or onion powder.
- Peanut Oil Alternative: If you have a peanut allergy, you can use vegetable oil, canola oil, or any other neutral-flavored oil with a high smoke point.
Storage Instructions:
- Leftovers: Store leftover nuggets in an airtight container in the refrigerator for up to 3 days.
- Reheating: To reheat, bake the nuggets in a preheated oven at 350°F (175°C) for about 10-15 minutes, or until heated through and crispy. You can also reheat them in an air fryer for a few minutes. Avoid microwaving, as this will make them soggy.
Conclusion:
So, there you have it! This recipe for homemade Chick-fil-A nuggets is truly a game-changer. I know, I know, bold statement, but trust me on this one. We’ve tackled the crispy coating, the juicy interior, and that signature flavor that keeps us all coming back for more. Why is this a must-try? Because you can recreate that Chick-fil-A magic right in your own kitchen, whenever the craving hits! No more waiting in long drive-thru lines or stressing about limited-time offers. You’re in control!
But it’s not just about convenience. It’s about the satisfaction of knowing exactly what’s going into your food. You can use high-quality chicken, adjust the spices to your liking, and even experiment with different dipping sauces. Speaking of which…
Serving Suggestions and Variations:
These nuggets are fantastic on their own, of course, but let’s talk about taking them to the next level. For dipping, you can’t go wrong with the classic Chick-fil-A sauce (recipe coming soon, perhaps!), but don’t be afraid to branch out. Honey mustard, barbecue sauce, ranch dressing, or even a spicy sriracha mayo are all excellent choices.
Beyond dipping, consider these variations:
* Nugget Salad: Toss these nuggets into a fresh garden salad with your favorite veggies and a light vinaigrette. It’s a surprisingly healthy and delicious meal.
* Nugget Wraps: Wrap a few nuggets in a warm tortilla with lettuce, tomato, cheese, and your favorite sauce for a quick and easy lunch.
* Nugget Bowls: Create a customizable bowl with rice, beans, corn, salsa, and, of course, these amazing nuggets.
* Spicy Nuggets: Add a pinch of cayenne pepper or a dash of hot sauce to the marinade for a spicy kick.
* Honey Glazed Nuggets: Brush the cooked nuggets with a honey glaze for a sweet and savory treat.
The possibilities are endless! Feel free to get creative and experiment with different flavors and combinations. This recipe is a fantastic base, and you can easily adapt it to suit your own taste preferences.
I truly believe that this recipe for homemade Chick-fil-A nuggets will become a staple in your household. It’s easy to make, incredibly delicious, and a guaranteed crowd-pleaser. Whether you’re cooking for your family, hosting a party, or simply craving a taste of that familiar flavor, this recipe has you covered.
So, what are you waiting for? Gather your ingredients, fire up your stove, and get ready to experience the joy of homemade Chick-fil-A nuggets. I’m confident that you’ll be amazed by the results.
And most importantly, I want to hear about your experience! Did you try the recipe? Did you make any modifications? What dipping sauce did you choose? Share your photos, comments, and feedback in the comments section below. I can’t wait to see what you create! Happy cooking!
Chick fil A Nuggets: Your Ultimate Guide to Ordering and Enjoying
Crispy, juicy, and flavorful chicken nuggets that taste just like the real deal! This recipe includes an optional brine for extra tang and tenderness.
Ingredients
- 2 lbs boneless, skinless chicken breasts, cut into 1-inch cubes
- 1 cup milk
- 1 large egg
- 1 teaspoon salt
- 1/2 teaspoon black pepper
- 1/2 teaspoon garlic powder
- 1/4 teaspoon paprika
- 1/4 teaspoon ground ginger
- 2 cups all-purpose flour
- 1/2 cup powdered sugar
- 2 tablespoons cornstarch
- 1 tablespoon salt
- 1 tablespoon black pepper
- 1 tablespoon paprika
- 1 tablespoon garlic powder
- 1 tablespoon onion powder
- 1 teaspoon ground ginger
- 1/2 teaspoon dried thyme
- 1/2 teaspoon dried oregano
- 1/4 teaspoon cayenne pepper (optional, for a little kick!)
- Approximately 6-8 cups peanut oil (or vegetable oil if you have allergies)
- 1 cup pickle juice (from a jar of dill pickles)
Instructions
- Cut the Chicken: Cut chicken breasts into roughly 1-inch cubes.
- Brine the Chicken (Optional): In a bowl, pour pickle juice over the chicken cubes. Ensure all chicken is submerged. Cover and refrigerate for at least 30 minutes, or up to 4 hours.
- Prepare the Milk Wash: In a separate bowl, whisk together the milk, egg, salt, pepper, garlic powder, paprika, and ground ginger.
- Marinate the Chicken: If you brined the chicken, drain the pickle juice and discard it. Add the chicken cubes to the milk wash. Stir to coat evenly. Cover and refrigerate for at least 30 minutes.
- Combine the Dry Ingredients: In a large bowl, whisk together the flour, powdered sugar, cornstarch, salt, pepper, paprika, garlic powder, onion powder, ground ginger, dried thyme, dried oregano, and cayenne pepper (if using).
- Dredge the Chicken: Remove the chicken from the milk wash, letting any excess drip off. One at a time, place the chicken cubes into the bowl with the breading mixture. Toss to coat thoroughly, pressing the breading onto the chicken to ensure it sticks.
- Double Dredge (Optional): For an extra crispy coating, dip the chicken back into the milk wash, then back into the breading mixture.
- Rest the Breading: Place the breaded chicken nuggets on a wire rack lined with parchment paper. Let them rest for about 10-15 minutes.
- Heat the Oil: Pour the peanut oil (or vegetable oil) into a large, heavy-bottomed pot or deep fryer. Heat the oil to 325-350°F (160-175°C). Use a thermometer to ensure the oil is at the correct temperature.
- Fry in Batches: Carefully add the breaded chicken nuggets to the hot oil in batches, making sure not to overcrowd the pot. Fry for about 3-4 minutes per batch, or until the nuggets are golden brown and cooked through. The internal temperature of the chicken should reach 165°F (74°C).
- Remove and Drain: Use a slotted spoon or spider to remove the fried chicken nuggets from the oil and place them on a wire rack lined with paper towels to drain excess oil.
- Serve Immediately: Serve the nuggets immediately while they are hot and crispy with your favorite dipping sauces.
Notes
- Don’t Overcrowd the Pan: Frying in batches is key to maintaining the oil temperature and ensuring crispy nuggets.
- Use a Thermometer: A thermometer is your best friend when frying. It ensures the oil is at the correct temperature and the chicken is cooked through.
- Rest the Breading: Letting the breaded chicken rest before frying helps the breading adhere better and prevents it from falling off.
- Adjust Seasoning to Taste: Feel free to adjust the seasoning in the breading to your liking. If you like a little more heat, add more cayenne pepper. If you prefer a more savory flavor, add more garlic or onion powder.
- Peanut Oil Alternative: If you have a peanut allergy, you can use vegetable oil, canola oil, or any other neutral-flavored oil with a high smoke point.
- Leftovers: Store leftover nuggets in an airtight container in the refrigerator for up to 3 days.
- Reheating: To reheat, bake the nuggets in a preheated oven at 350°F (175°C) for about 10-15 minutes, or until heated through and crispy. You can also reheat them in an air fryer for a few minutes. Avoid microwaving, as this will make them soggy.
Leave a Comment