
Cannoli Cookies: Your New Favorite Italian-Inspired Treat
Imagine biting into the quintessential flavors of a beloved Italian pastry, but in the delightful, convenient form of a cookie. For many, the very mention of cannoli evokes images of festive gatherings, family celebrations, and the rich culinary traditions of Sicily, where these iconic fried pastry shells, generously filled with sweet ricotta, originated centuries ago. While the traditional cannolo remains an unparalleled treat, sometimes we crave that same exquisite taste and textural complexity without the intricate process of frying and filling.
That’s precisely where these incredible Cannoli Cookies come in. I’ve always been captivated by the unique blend of creamy ricotta, candied fruit, chocolate chips, and a hint of citrus that defines an authentic cannolo. This recipe takes those beloved components and transforms them into a soft, chewy cookie that’s unbelievably easy to make and even easier to devour. People adore this dish not just for its nostalgic flavor profile, but for the sheer convenience of experiencing that rich, sweet, and slightly tangy cannoli essence in a portable, bite-sized package. It’s the perfect way to bring a taste of Italy into your home with minimal fuss, offering all the charm of the original without needing a deep fryer.

Ingredients:
-
For the Cannoli Cookies:
- 2 ½ cups all-purpose flour, plus more for dusting
- 1 teaspoon baking powder
- ½ teaspoon salt
- 1 cup (2 sticks) unsalted butter, softened to room temperature
- 1 cup granulated sugar
- 2 large eggs
- 1 teaspoon pure vanilla extract
-
For the Luxurious Cannoli Filling:
- 15 ounces whole milk ricotta cheese, very well drained (I usually place it in a fine-mesh sieve lined with cheesecloth over a bowl and let it sit in the fridge for at least 4 hours, or even overnight, pressing gently to extract maximum liquid)
- 8 ounces mascarpone cheese, softened slightly
- 1 cup powdered sugar (confectioners’ sugar), sifted
- 1 teaspoon pure vanilla extract
- ½ teaspoon orange zest (from about half an orange)
- ½ cup mini chocolate chips, plus more for garnish
-
For Garnish (Optional but Recommended!):
- ¼ cup finely chopped pistachios
- Extra mini chocolate chips
Preparing the Cannoli Cookie Dough
- Begin with the Dry Ingredients: In a medium bowl, whisk together the 2 ½ cups of all-purpose flour, 1 teaspoon of baking powder, and ½ teaspoon of salt. I always give it a good whisk to ensure everything is thoroughly combined and that the leavening agent is evenly distributed. Set this aside for now.
- Cream the Butter and Sugar: In a large mixing bowl, using an electric mixer (either a stand mixer with a paddle attachment or a hand mixer will do the trick), cream together the softened unsalted butter and granulated sugar. You want to beat this mixture on medium-high speed for a good 3 to 5 minutes until it becomes wonderfully light, fluffy, and pale in color. This step is absolutely crucial for incorporating air, which contributes significantly to the tender texture of our finished Cannoli Cookies. Don’t rush it; let the mixer work its magic, and remember to scrape down the sides of the bowl periodically to ensure even creaming.
- Introduce the Wet Ingredients: With the mixer still running on medium speed, add the two large eggs one at a time, beating well after each addition until fully incorporated. After the eggs, stir in the 1 teaspoon of pure vanilla extract. Vanilla adds that classic warmth and depth that will perfectly complement the eventual cannoli filling. Continue mixing until the mixture is smooth and emulsified.
- Combine Wet and Dry: Now, it’s time to bring our dry ingredients into the fold. Gradually add the reserved flour mixture to the wet ingredients, mixing on low speed until just combined. Be careful not to overmix here. As soon as you no longer see streaks of dry flour, stop the mixer. Overmixing can develop the gluten too much, leading to tough cookies, and we’re aiming for delicate Cannoli Cookies! The dough will be soft but shouldn’t be too sticky.
- Chill the Dough: Gently gather the dough into a disc, wrap it tightly in plastic wrap, and place it in the refrigerator for at least 1 hour. I often chill mine for 2 hours, or even overnight if I’m planning ahead. Chilling the dough is a non-negotiable step for these Cannoli Cookies! It allows the butter to firm up, making the dough much easier to handle and roll out, and it also prevents the cookies from spreading too much in the oven, helping them maintain their lovely shape.
Forming and Baking the Cannoli Cookies
- Preheat and Prepare: Once your dough has had ample time to chill, preheat your oven to 350°F (175°C). Line two large baking sheets with parchment paper or silicone baking mats. This will prevent sticking and ensure easy cleanup.
- Roll Out the Dough: Lightly flour a clean work surface and your rolling pin. Take half of the chilled dough from the refrigerator (keep the other half chilled until ready to use). Roll the dough out to an even thickness of about ¼ inch. We’re looking for that perfect balance – sturdy enough to hold our luscious filling but delicate enough to feel like a true cookie. If the dough starts to get sticky, you can sprinkle a tiny bit more flour on your surface or rolling pin.
-
Cut the Cookies: Using a 2-inch round cookie cutter, cut out circles from the rolled dough. Carefully transfer the cut dough circles to your prepared baking sheets, leaving about an inch between each cookie. Gather any dough scraps, gently re-roll them, and cut out more circles until you’ve used all the dough. You might need to chill the scraps again for 15-20 minutes if they become too warm and soft to work with.
A Friendly Tip for Cookie Cutting:
If you don’t have a 2-inch round cutter, don’t fret! A small drinking glass with a similar diameter will work perfectly. Just dip the rim in flour before each cut to prevent sticking.
- Bake to Perfection: Place the baking sheets in your preheated oven and bake for 9 to 12 minutes. The exact baking time will depend on your oven, so keep an eye on them. You’re looking for the edges to be just lightly golden brown. The centers should still look soft but not raw. We want them tender, not crispy, for the ideal Cannoli Cookie experience.
- Cool Completely: Once baked, remove the cookies from the oven. Let them cool on the baking sheets for about 5 minutes before carefully transferring them to a wire rack to cool completely. It is absolutely essential that these cookies are completely cool before we even think about adding the filling. Warm cookies will melt our beautiful cannoli cream, and we definitely don’t want that!
Crafting the Luxurious Cannoli Filling
- Prepare the Ricotta: This step cannot be stressed enough: your ricotta cheese must be exceptionally well drained. If you skipped the overnight draining, place the ricotta in a fine-mesh sieve lined with several layers of cheesecloth or a sturdy paper towel. Place it over a bowl and press down firmly with the back of a spoon or your hand to extract as much liquid as possible. You want it to be as dry as cottage cheese, almost crumbly. A watery ricotta will lead to a loose, runny filling, which is nobody’s friend when making Cannoli Cookies.
- Whip the Mascarpone: In a medium mixing bowl, using your electric mixer, whip the softened mascarpone cheese on medium speed for 1-2 minutes until it’s smooth and creamy. Be careful not to over-whip mascarpone, as it can sometimes separate. We’re looking for a lovely, spreadable consistency.
- Combine the Filling Base: Add the thoroughly drained ricotta cheese, sifted powdered sugar, 1 teaspoon of pure vanilla extract, and ½ teaspoon of fresh orange zest to the bowl with the mascarpone. Mix on low speed until everything is just combined and smooth. Taste and adjust sweetness if desired. The orange zest adds a wonderful, authentic brightness that truly elevates these Cannoli Cookies!
- Fold in the Chocolate Chips: Gently fold in the ½ cup of mini chocolate chips using a rubber spatula. We want them evenly distributed throughout the filling, adding a delightful crunch and burst of chocolate in every bite.
- Chill the Filling: Cover the bowl with plastic wrap and refrigerate the cannoli filling for at least 30 minutes. This chilling time allows the flavors to meld beautifully and helps the filling to firm up, making it much easier to pipe onto our cookies.
Assembling and Garnishing Your Cannoli Cookies
- Prepare for Piping: Once your cookies are completely cool and your filling is nicely chilled, transfer the cannoli filling to a piping bag fitted with your favorite decorative tip (a large round or star tip works wonderfully here). If you don’t have a piping bag, a sturdy zip-top bag with one corner snipped off will work just fine.
- Assemble the Cannoli Cookies: Take one cooled cookie and, using your piping bag, pipe a generous swirl of the luscious cannoli filling onto its flat side. Don’t be shy here; this is where the magic truly happens, transforming them into decadent Cannoli Cookies! Carefully place another cooled cookie on top, flat-side down, gently pressing it down to create a “sandwich” effect. The filling should peek out charmingly around the edges. Repeat this process with the remaining cookies and filling.
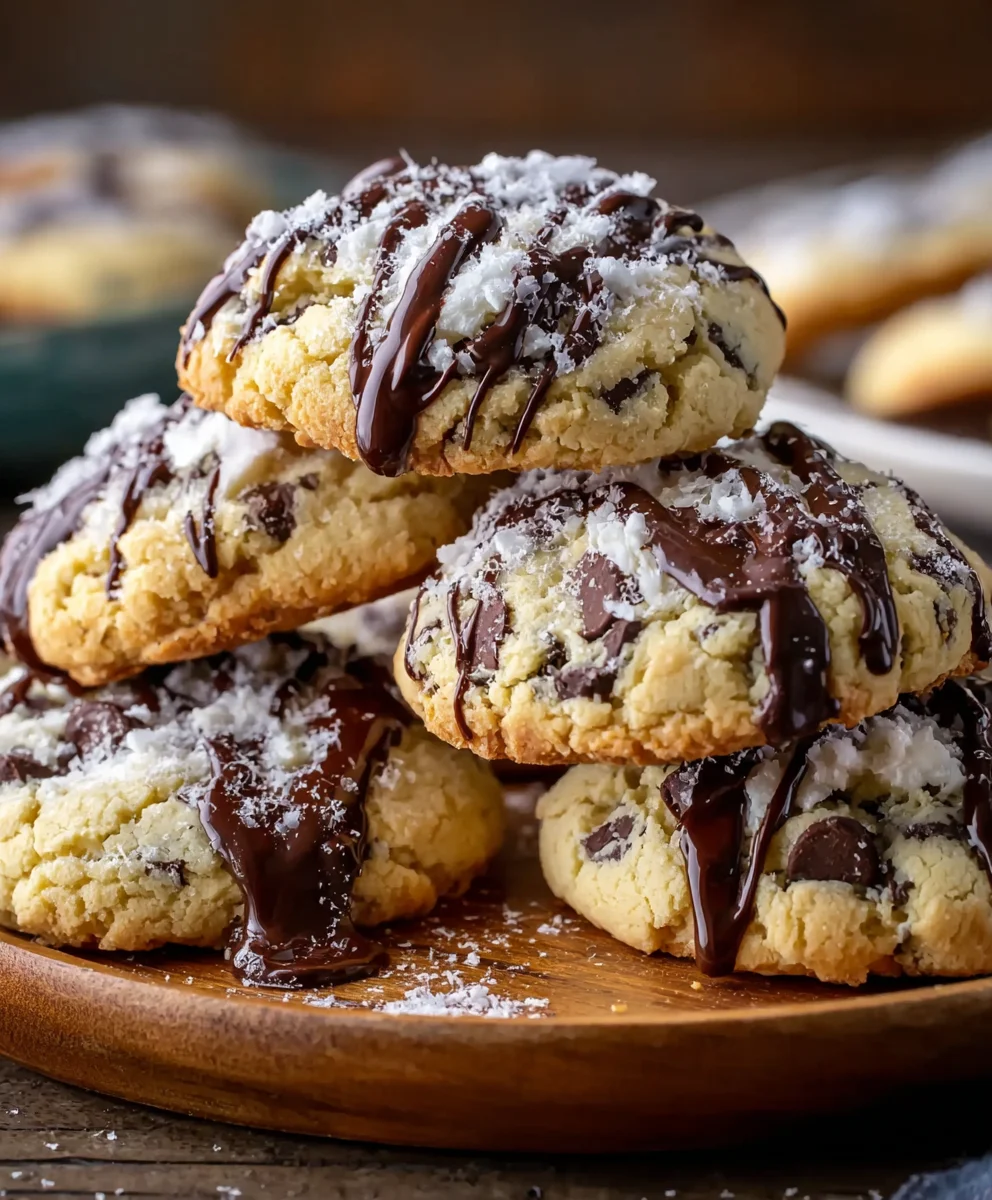
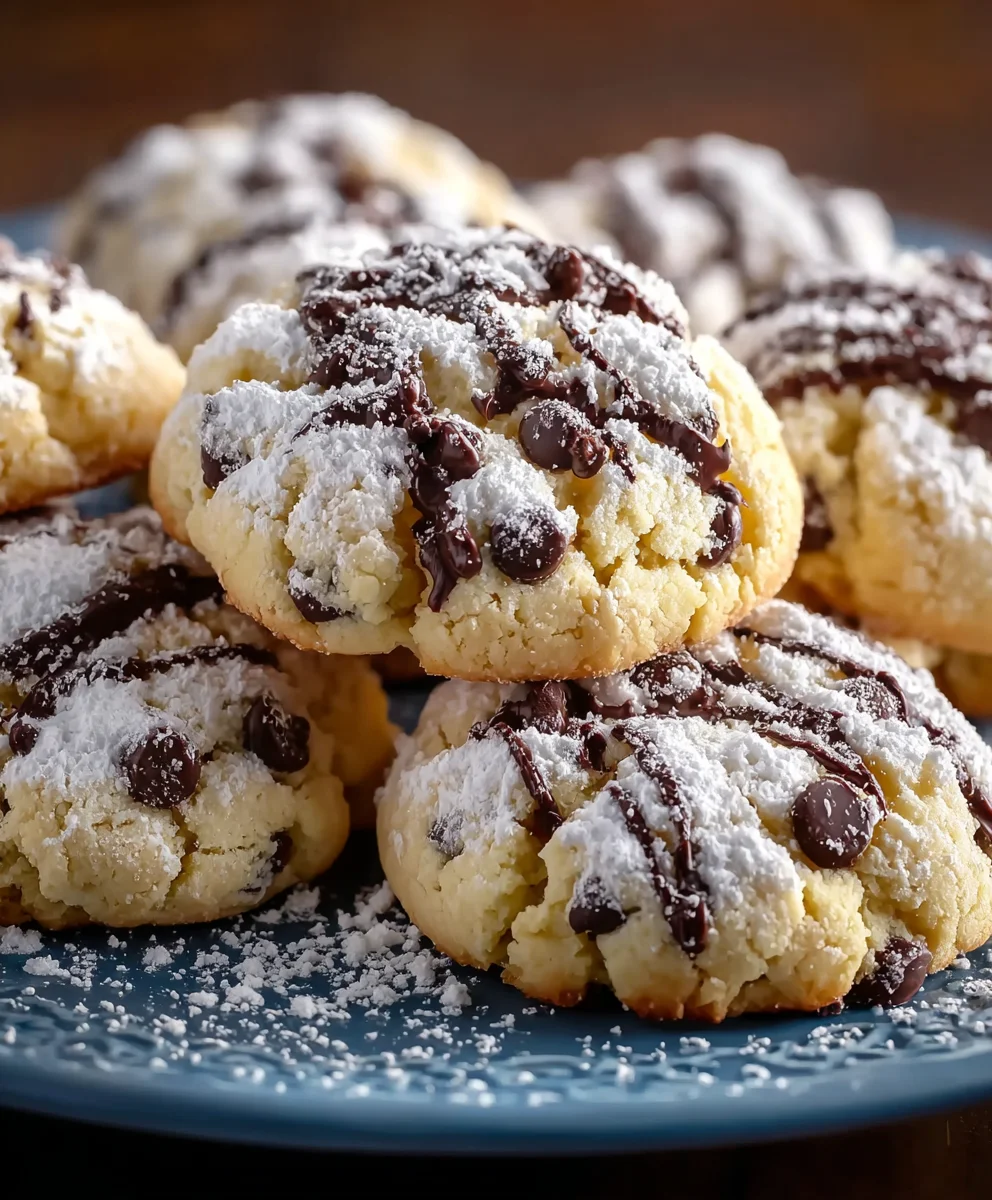
- Garnish with Flair: Now for the finishing touch! If desired, roll the edges of your assembled Cannoli Cookies in finely chopped pistachios or extra mini chocolate chips. This not only adds beautiful visual appeal but also introduces delightful textural contrasts. The green of the pistachios against the creamy white filling and golden cookie is simply stunning.
-
Serve and Store: Your beautiful Cannoli Cookies are now ready to be enjoyed! For the best texture and flavor, I recommend serving these within a few hours of assembly. If you need to store them, place them in an airtight container in the refrigerator for up to 2-3 days. Please note that the cookies will soften slightly over time due to the moisture from the filling, but they will still be absolutely delicious.
For Optimal Enjoyment:
I find that letting them sit at room temperature for about 15-20 minutes before serving after refrigeration allows the filling to soften just slightly, enhancing the creamy texture and making for an even more delightful bite. These Cannoli Cookies are truly a labor of love, but every step is worth it for the incredible reward!
Conclusion:
And there you have it, my friends! We’ve reached the sweet end of our journey, but truly, it’s just the beginning of your delicious adventure. I genuinely believe that these Cannoli Cookies are more than just a recipe; they are an experience, a delightful fusion that brings together the best of two beloved dessert worlds into one utterly irresistible package. This isn’t just another cookie; it’s a statement, a testament to the fact that sometimes, the most unexpected combinations yield the most spectacular results. I simply cannot emphasize enough why this recipe is an absolute must-try for anyone who appreciates a truly outstanding dessert, whether you’re a seasoned baker or just dipping your toes into the world of homemade treats.
Why are these Cannoli Cookies so exceptional, you ask? It’s all in the harmonious balance of textures and flavors. Imagine: a tender, slightly crisp cookie base that melts in your mouth, providing the perfect foundation for a rich, creamy, and subtly sweet ricotta filling. This filling, reminiscent of the traditional cannoli experience, is often studded with miniature chocolate chips or candied fruit, adding delightful bursts of texture and flavor with every single bite. The interplay between the soft cookie, the luscious filling, and the occasional crunch from a tiny chocolate chip is pure magic. It’s a sophisticated treat that manages to be both comforting and exciting, embodying the soul of a classic Italian dessert while offering the approachable convenience of a cookie. If you’ve ever found the idea of making traditional cannoli a little daunting, these cookies offer all the iconic taste without the fuss of frying shells, making them a fantastic and accessible alternative that doesn’t compromise on flavor or authenticity. Seriously, once you taste them, you’ll understand why I’m so passionate about sharing this particular recipe with you; it’s a true game-changer for your dessert repertoire.
Elevate Your Dessert Platter: Serving Suggestions for Your Cannoli Cookies
Now that you’ve mastered the art of creating these delightful morsels, let’s talk about how to present and enjoy them. These Cannoli Cookies are incredibly versatile and can be served in a multitude of ways to suit any occasion. For a simple, elegant presentation, a light dusting of powdered sugar or cocoa powder over the top adds a touch of visual appeal and a subtle extra layer of sweetness. They are absolutely divine when paired with a strong espresso or a warm cup of coffee, making them an ideal companion for an afternoon pick-me-up or a post-dinner treat. For those who prefer a more indulgent experience, try serving them alongside a scoop of vanilla bean gelato or a dollop of fresh whipped cream, allowing the contrasting temperatures and textures to create a symphony on your palate. They also make a stunning addition to any holiday cookie platter, standing out with their unique profile amidst more traditional offerings. Imagine them gracing your Christmas table or brightening up a spring tea party! They also travel well, making them perfect for potlucks, bake sales, or as a thoughtful homemade gift for friends and family who appreciate gourmet treats.
Unleash Your Creativity: Exciting Variations to Try
One of the aspects I love most about baking is the freedom to experiment and personalize, and these Cannoli Cookies are ripe for creative variations. Feel free to play around with the filling by adding a hint of orange or lemon zest for a brighter, more aromatic flavor profile. You could also incorporate finely chopped pistachios or toasted almonds into the ricotta filling for an added crunch and a nutty dimension that complements the creamy sweetness beautifully. For the chocolate lovers, consider using dark chocolate chips instead of mini semi-sweet, or even drizzle a little melted chocolate over the finished cookies for an extra touch of decadence. If you want to experiment with the cookie base itself, a touch of almond extract in the dough can elevate the flavor, or you could even swap out a portion of the all-purpose flour for almond flour to achieve a slightly different texture and richness. Don’t be afraid to adjust the spice level in your filling either; a pinch of cinnamon or nutmeg can add warmth and depth. The beauty of this recipe is its adaptability, allowing you to tailor it to your personal preferences and truly make it your own signature treat.
So, what are you waiting for? I wholeheartedly encourage you to roll up your sleeves, gather your ingredients, and give these incredible Cannoli Cookies a try. I promise you, the joy of baking them is only surpassed by the sheer delight of tasting them. There’s something incredibly satisfying about creating something so wonderfully unique and delicious from scratch. Once you’ve experienced the magic, please, please come back and share your creations with me! I absolutely adore seeing your baking triumphs and hearing about your experiences in the kitchen. Did you try a fun variation? What was your favorite part? Snap a photo, drop a comment, and let’s celebrate the joy of baking together. Happy baking, and get ready to fall in love with your new favorite cookie!
Cannoli Cookies
Experience the classic flavors of Italian cannoli in a convenient, soft, and chewy cookie form. This easy recipe, inspired by traditional ingredients, transforms a beloved dessert into a delightful, portable treat.
Ingredients
-
1 cup (240 ml) all-purpose flour
-
½ cup (100 g) granulated sugar
-
½ cup (120 g) ricotta cheese
-
1 large egg
-
1 tsp vanilla extract
-
1 tsp lemon zest
-
½ cup (75 g) mini chocolate chips
-
½ cup (75 g) chopped pistachios
-
Powdered sugar for dusting
Instructions
-
Step 1
In a medium bowl, whisk together flour and granulated sugar. In a separate bowl, combine ricotta cheese, egg, vanilla extract, and lemon zest. Add the wet ingredients to the dry and mix on low speed until a soft dough forms. Gently fold in mini chocolate chips. Gather the dough into a disc, wrap tightly in plastic, and chill in the refrigerator for at least 1 hour. -
Step 2
Preheat oven to 350°F (175°C). Line two large baking sheets with parchment paper. Lightly flour a work surface and rolling pin. Roll the chilled dough to an even thickness of about ¼ inch. Use a 2-inch round cookie cutter to cut out circles and carefully transfer them to the prepared baking sheets. Bake for 9 to 12 minutes, until the edges are just lightly golden brown. Let cool on the baking sheets for 5 minutes, then transfer to a wire rack to cool completely. -
Step 3
Once cookies are completely cool, dust generously with powdered sugar. For an optional flourish, roll the edges of the cookies in chopped pistachios for added texture and visual appeal. Serve within a few hours for the best taste and texture. Store any leftover Cannoli Cookies in an airtight container in the refrigerator for up to 2-3 days.
Important Information
Nutrition Facts (Per Serving)
It is important to consider this information as approximate and not to use it as definitive health advice.
Allergy Information
Please check ingredients for potential allergens and consult a health professional if in doubt.
Leave a Comment