
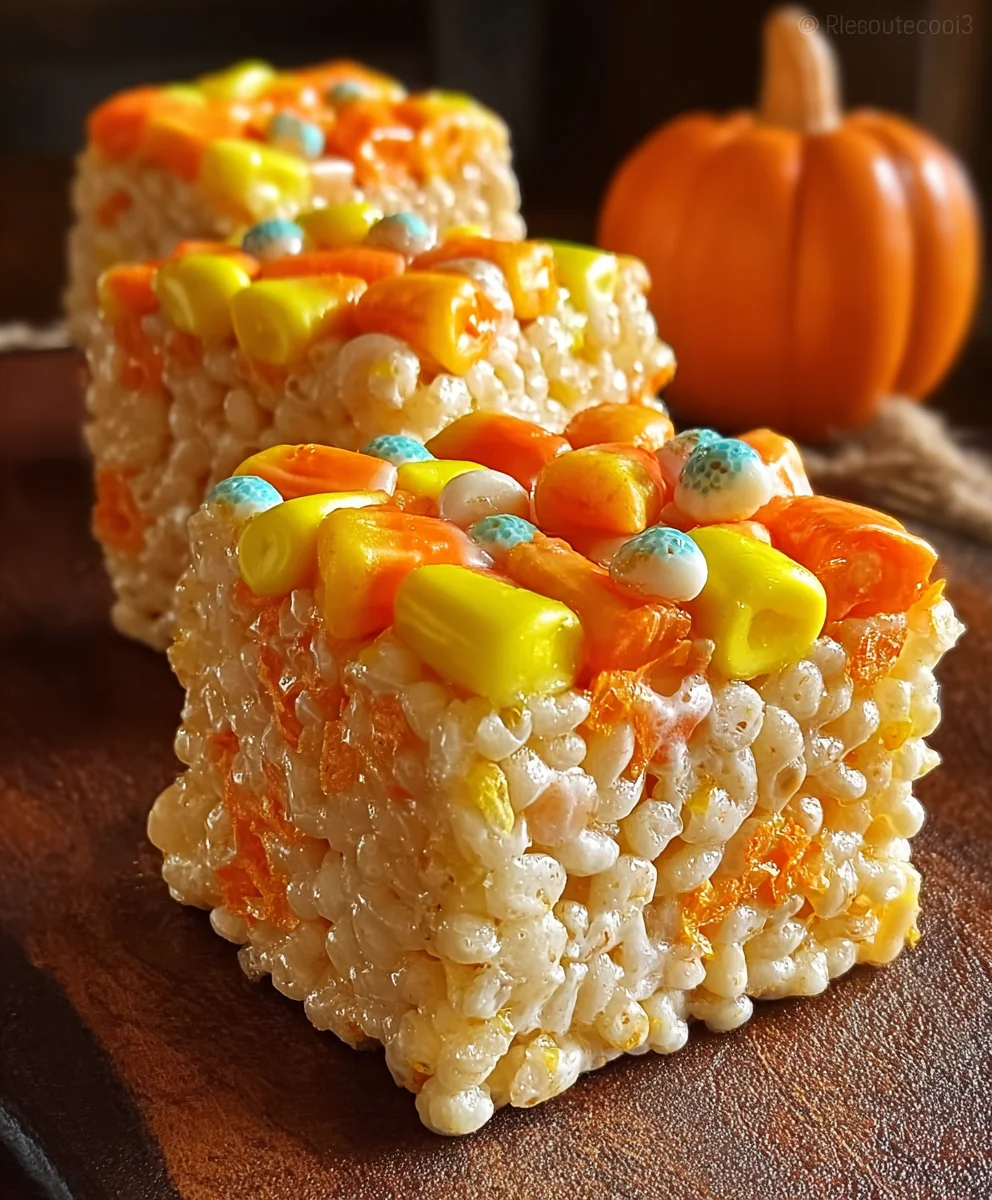
Halloween Rice Krispies Treats are more than just a nostalgic childhood snack; they’re a gateway to pure, unadulterated autumnal joy. As the crisp air ushers in spooky season, our kitchens transform into canvases for festive creativity, and these iconic treats are always at the heart of the fun. What makes Halloween Rice Krispies Treats so universally beloved? It’s the perfect balance of chewy, gooey marshmallow and crunchy cereal, a simple yet utterly satisfying combination that sparks instant smiles. But what truly elevates them during this time of year is their incredible versatility. Unlike many other holiday confections that require intricate techniques, Halloween Rice Krispies Treats are incredibly easy to shape, color, and decorate, allowing everyone, from seasoned bakers to kitchen novices, to craft edible masterpieces. They’re the perfect collaborative project for family fun, a guaranteed crowd-pleaser for any Halloween party, and an absolute must-have for trick-or-treaters who will be delighted by their festive appearance and delicious taste.

Ingredients:
- Unsalted butter: 3 tbsp
- Mini marshmallows: 1 package (10 oz)
- Rice Krispies cereal: 6 cups
- Candy corn: 1 cup
- Yellow food coloring
- Orange food coloring
Preparing the Base and Coloring the Marshmallow Mixture
The foundation of our Halloween Rice Krispies Treats is a classic, no-bake recipe, but with a spooky twist! We’ll be dividing the marshmallow mixture to create vibrant orange and yellow layers, reminiscent of the classic candy corn colors.
First, gather your ingredients. You’ll need a large, microwave-safe bowl for melting the butter and marshmallows, and another for mixing the cereal. A non-stick spatula or spoon is essential for stirring, and a 9×13 inch baking pan, lightly greased or lined with parchment paper, will be your molding surface. It’s also helpful to have a separate small bowl or two for dividing the marshmallow mixture if you plan to color it in stages.
In your large microwave-safe bowl, add the 3 tablespoons of unsalted butter. Microwave on high for about 30-60 seconds, or until the butter is completely melted and bubbly. Be careful not to let it burn. Once melted, add the entire 10-ounce package of mini marshmallows to the bowl with the butter.
Return the bowl to the microwave and heat on high for an additional 1-2 minutes, stirring every 30 seconds, until the marshmallows are puffed up and have melted into a smooth, gooey consistency. This is the crucial stage where everything comes together. It’s important to stir thoroughly to ensure all the marshmallows are fully melted and incorporated with the butter, creating a luscious, sticky base for our treats.
Now, for the fun part: coloring! Before you add the Rice Krispies cereal, divide the melted marshmallow mixture into two separate bowls. You can eyeball this or be more precise if you prefer. To one bowl, add a few drops of yellow food coloring. Start with a little and add more until you achieve your desired shade of bright, cheerful yellow. Stir vigorously with your spatula until the color is evenly distributed and there are no streaks. In the other bowl, add orange food coloring, again starting with a few drops and building up the color until you have a vibrant Halloween orange. Stir until the color is uniform.
Incorporating the Cereal and Candy Corn
Once your marshmallow mixtures are beautifully colored, it’s time to add the star of the show: the Rice Krispies cereal. Add 3 cups of Rice Krispies cereal to the yellow marshmallow mixture and 3 cups of Rice Krispies cereal to the orange marshmallow mixture.
Now, using your spatula, gently but thoroughly stir each bowl until all the cereal is coated in the colored marshmallow. You want every single crispy flake to be embraced by that sweet, sticky goodness. This step requires a bit of arm strength as the mixture will start to get thick and a little challengin extractg to stir. Work quickly but carefully, as the marshmallowsgin extractll begin to set as they cool. Ensure there are no dry pockets of cereal left behind.
The candy corn adds a delightful crunch and an extra burst of sweetness, truly solidifying these as Halloween Rice Krispies Treats. For the candy corn, you have a couple of options. You can gently stir about half a cup of candy corn into each of the colored cereal mixtures. This will distribute the candy corn throughout the layers. Alternatively, if you want more concentrated pockets of candy corn flavor and texture, you can reserve some to press into the top of the treats after they’ve been placed in the pan. Stirring it in now is generally easier for even distribution.
Forming and Shaping the Halloween Rice Krispies Treats
With your colored cereal mixtures ready, it’s time to bring them together in your prepared 9×13 inch baking pan. Lightly grease your hands with a bit of butter or cooking spray, or use a piece of parchment paper to prevent sticking.
First, gently press the yellow Rice Krispies mixture into the bottom of the prepared pan, spreading it out evenly to form a uniform layer. Don’t press too firmly, as this can make the treats too dense and hard. You want a light and airy texture. Use your spatula or the back of a spoon to gently smooth the surface.
Next, carefully spoon the orange Rice Krispies mixture over the yellow layer. Gently spread and smooth this layer on top of the yellow, trying not to disturb the layer beneath too much. Again, light pressure is key. If you reserved some candy corn, now is the time to press it into the top layer of the orange mixture for visual appeal and an extra crunch.
Cooling and Cutting
Once your Halloween Rice Krispies Treats have been formed and shaped in the pan, it’s crucial to let them cool completely. Leave the pan at room temperature for at least 1-2 hours. Resist the urge to refrigerate them, as this can sometimes result in a tougher texture. The gentle cooling process allows the marshmallows to set properly, giving the treats their signature chewy consistency.
After the treats have cooled and set, you can proceed to cut them. Using a sharp knife, cut the large slab into your desired shapes. Classic squares or rectangles are always a winner. For an extra festive touch, you can use Halloween-themed cookie cutters to create shapes like pumpkins, ghosts, or bats. Just be sure to lightly grease or spray the cookie cutters with cooking spray to prevent sticking to the gooey treats.
Tips for Perfect Halloween Rice Krispies Treats
For the most vibrant colors, ensure your food coloring is fresh and potent. You might need to use a bit more than you think for a truly Halloween-inspired hue. If the marshmallow mixture starts to get too sticky to handle, a little bit of butter on your hands or spatula can work wonders. Don’t over-stir once the cereal is added, as this can break down the cereal and lead to a mushy texture. When pressing the mixture into the pan, using a piece of parchment paper or wax paper laid on top and gently pressing down with your hands can give you a wonderfully even surface without sticking. This also makes cleanup a breeze! If you find your treats are too hard, you likely used too much cereal or pressed down too firmly. If they are too soft and won’t hold their shape, they may not have cooled long enough or the marshmallow-to-cereal ratio was off. These are simple adjustments to make for your next batch of spooktacular Halloween Rice Krispies Treats!
Conclusion:
And there you have it – your very own batch of delightfully spooky Halloween Rice Krispies Treats! We hope you’ve enjoyed following along with this simple yet incredibly rewarding recipe. These treats are the perfect blend of sweet, chewy, and fun, making them an absolute hit for any Halloween gathering or just a festive afternoon snack. They’re so easy to whip up that even little ghouls and goblins can get involved in the kitchen chaos! We love serving these alongside a frosty glass of milk or even dunked into a warm mug of apple cider. Don’t be afraid to get creative with your decorations; think candy corn eyes, chocolate spiderwebs, or even edible glitter for an extra touch of magic. Remember, the best part of baking is making it your own!
Frequently Asked Questions:
Q: Can I make Halloween Rice Krispies Treats ahead of time?
Absolutely! These treats are fantastic for making a day or two in advance. Store them in an airtight container at room temperature to keep them fresh and chewy. Just be sure to separate layers with parchment paper if you’re stacking them to prevent sticking.
Q: What are some other fun decoration ideas for Halloween Rice Krispies Treats?
Beyond the basics, you could use orange and black food coloring to dye the cereal before making the treats for a bolder color. Try adding spooky sprinkles, edible googly eyes, or piping ghost shapes with melted white chocolate. A dusting of edible glitter can also add a magical shimmer!
Q: My Halloween Rice Krispies Treats turned out too hard. What did I do wrong?
The most common reason for hard Rice Krispies Treats is overcooking or pressing the mixture too firmly into the pan. Try to remove the mixture from the heat as soon as the marshmallows are fully melted and gently press it into the pan, rather than packing it down with significant force. Ensure you’re using fresh marshmallows, as older ones can sometimes result in a chewier, tougher texture.

Spooky Halloween Rice Krispies Treats Recipe
Create festive and spooky Halloween Rice Krispies Treats with vibrant orange and yellow layers, inspired by candy corn. A fun no-bake recipe perfect for parties!
Ingredients
-
3 tbsp unsalted butter
-
1 package (10 oz) mini marshmallows
-
6 cups Rice Krispies cereal
-
1 cup candy corn
-
Yellow food coloring
-
Orange food coloring
Instructions
-
Step 1
Melt butter in a large microwave-safe bowl. Add marshmallows and microwave until puffed and smooth, stirring every 30 seconds. Divide the mixture into two bowls. -
Step 2
Add yellow food coloring to one bowl and orange food coloring to the other. Stir each until evenly colored. -
Step 3
Add 3 cups of Rice Krispies cereal to the yellow marshmallow mixture and 3 cups to the orange mixture. Stir until well coated. Gently stir in 1/2 cup of candy corn into each bowl. -
Step 4
Lightly grease a 9×13 inch baking pan. Press the yellow mixture evenly into the bottom of the pan. Gently spread the orange mixture over the yellow layer. -
Step 5
Press remaining candy corn into the top layer. Let the treats cool completely at room temperature for at least 1-2 hours. -
Step 6
Once cooled, cut into desired shapes using a knife or Halloween-themed cookie cutters.
Important Information
Nutrition Facts (Per Serving)
It is important to consider this information as approximate and not to use it as definitive health advice.
Allergy Information
Please check ingredients for potential allergens and consult a health professional if in doubt.
Leave a Comment