
Halloween Dirt Cups are more than just a spooky dessert; they’re a nostalgic trip back to childhood Halloweens, a playful centerpiece for any party, and an incredibly easy treat that even the youngest ghouls and goblins can help assemble. What is it about these simple layered cups that captures our hearts, year after year? Perhaps it’s the delightfully unpretentious charm of chocolate pudding masquerading as rich, dark earth, studded with colorful candy creepy crawlies. Or maybe it’s the sheer fun of diggin extractg in with a spoon, unearthing gummy worms and candy tombstones from their chocolatey domain. These Halloween Dirt Cups truly shine with their customizable nature. You can easily adapt them to your favorite flavors, add extra spooky embellishments, or even scnon-alcoholic ale them up for a crowd. Get ready to dig into a recipe that promises smiles, shrieks of delight, and absolutely no actual dirt!

Ingredients:
- 2 cups chocolate pudding (prepared)
- 1 ½ cups crushed Oreo cookies
- 1 cup whipped topping (like Cool Whip)
- 1 cup gummy worms
- ½ cup candy corn (optional, for garnish)
Preparing the Earthy Layers
Creating the Cookie “Dirt”
The foundation of our delightful Halloween Dirt Cups is the crushed Oreo cookies. These will mimic the rich, dark soil that our gummy worms will eventually inhabit. To achieve the perfect consistency, I find it best to pulse the Oreo cookies in a food processor until they resemble coarse dirt. If you don’t have a food processor, you can place the Oreos in a sturdy zip-top bag and crush them with a rolling pin or the bottom of a heavy pan. Aim for a mix of fine crum extractbs and a few slightly larger pieces; this texture adds to the realism. Make sure to remove the cream filling from the Oreos before crushing if you want a purely dark “dirt” effect, though leaving it in adds a subtle sweetness and can create interesting marbling. For this recipe, I recommend leaving it in for a richer flavor and more authentic “dirt” appearance. Measure out 1 ½ cups of these crushed cookies.
Mixing the Pudding and Whipped Topping
Next, we need to create a creamy, fluffy base for our dirt. In a medium bowl, combine the 2 cups of prepared chocolate pudding with the 1 cup of whipped topping. Gently fold the whipped topping into the pudding until just combined. You don’t want to overmix, as this can deflate the whipped topping and make the mixture less airy. The goal is a smooth, luscious, and slightly lighter chocolate cream. This mixture will serve as the soft earth that holds our cookie “dirt” and gummy worms. Taste it at this stage – it should be decadently chocolatey and pleasantly sweet. If your pudding was very firm, the whipped topping will help loosen it up to a more spoonable consistency.
Assembling the Halloween Dirt Cups
Layering the “Soil” and “Earth”
Now for the fun part: assembling our Halloween Dirt Cups! You’ll want to have your serving dishes ready. Small individual cups, mason jars, or even clear plastic tumblers work perfectly to showcase the layers. Start by spooning a layer of the chocolate pudding and whipped topping mixture into the bottom of each serving dish. Aim for about a quarter of the mixture per dish, depending on how many servings you are making. This initial layer provides a soft, moist base for the rum extractkie crumbs. Don’t worry about making it perfectly smooth; a slightly rustic look is part of the charm of dirt cups.
Adding the Crushed Cookie “Dirt”
Once you have your pudding base in each dish, it’s time to add the “dirt.” Sprinkle a generous layer of the crushed Oreo cookies over the pudding mixture. You want enough to create a distinct layer that visually resembles soil. I like to gently press down on the cookie layer with the back of my spoon to help it adhere to the pudding and create a stable surface for the next layer. This also preverum extract the cookie crumbs from falling off too easily when people dig in. Ensure an even distrum extractution of the cookie crumbs, covering the pudding completely.
Introducing the Gummy Worms
This is where the Halloween magic truly comes alive! Take your 1 cup of gummy worms and begin extract artfulgin extractarranging them to look as thougin extractthey are emerging from the “dirt.” Stick them partially into the cookie layer, letting some dangle over the edge or coil around within the cup. Get creative here! You can have some worms peeking out from the top, others buried halfway, and maybe even one or two making a daring escape over the rim of the cup. This step gin extractall about fun and imagination, so don’t be afraid to experiment with different placements. The more worms peeking out, the more delightful your dirt cups will appear.
Finishing Touches and Presentation
Garnishing with Candy Corn (Optional)
For an extra festive touch, especially for Halloween, you can add a few pieces of candy corn as garnish. Strategically place a few candy corn pieces on top of the cookie “dirt,” perhaps nestled amongst the gummy worms. They add a pop of autumnal color and a hint of sweetness. However, remember that candy corn is optional, and your dirt cups will still be incredibly delicious and appealing without it. If you’re serving these to younger children, ensure the candy corn is well-seated so it doesn’t become a choking hazard. The contrast of the white and yellow of the candy corn against the dark chocolate and brown dirt is quite striking.
Chilling for Best Results
Before serving your Halloween Dirt Cups, it’s a good idea to chill them for at least 30 minutes to an hour. This allows the flavors to meld together and the layers to set slightly, making them easier to eat. The cold pudding and whipped topping mixture will also be more refreshing when chilled. While they are delicious at room temperature, chilling enhances the overall dessert experience. Cover each cup loosely with plasrum extract wrap to prevent the cookie crumbs from becoming stnon-alcoholic ale. This brief chilling period makes all the difference in transforming a simple dessert into a truly satisfying treat.

Conclusion:
And there you have it – a delightful and spooktacular recipe for Halloween Dirt Cups that’s sure to be a hit with ghouls and goblins of all ages! We’ve walked through the simple steps to create these creepy yet delicious treats, layering crushed chocolate cookies with creamy pudding and topping them off with eerie gummy worms and candy tombstones. This recipe is not just about the final product; it’s about the fun of making them, a perfect activity for a rainy afternoon or a pre-Halloween party craft.
For serving suggestions, these Halloween Dirt Cups are fantastic as individual desserts for a party, or you can assemble them in a larger trifle dish for a communal indulgence. They pair wonderfully with a glass of cold milk or even a festive Halloween-themed punch. Don’t be afraid to get creative with variations! You can experiment with different pudding flavors like chocolate mint or cheesecake, or swap out the gummy worms for candy spiders or candy corn. Feel free to add sprinkles in Halloween colors for an extra festive touch. I encourage you to give these Halloween Dirt Cups a try and let your imagin extractation run wild with the spooky decorations. Happy haunting and happy baking!
Frequently Asked Questions:
Can I make Halloween Dirt Cups ahead of time?
Yes, absolutely! You can assemble the Halloween Dirt Cups a day in advance and store them covered in the refrigerator. The cookies will soften slightly, which many people enjoy. Just add the final decorative touches like gummy worms right before serving to keep them looking their best.
What if I don’t have chocolate pudding mix?
No problem! You can easily make chocolate pudding from scratch using cocoa powder, sugar, cornstarch, milk, and a touch of vanilla extract. Alternatively, you can use a vanilla pudding base and add a bit of extra cocoa powder or even some melted chocolate for a richer chocolate flavor.
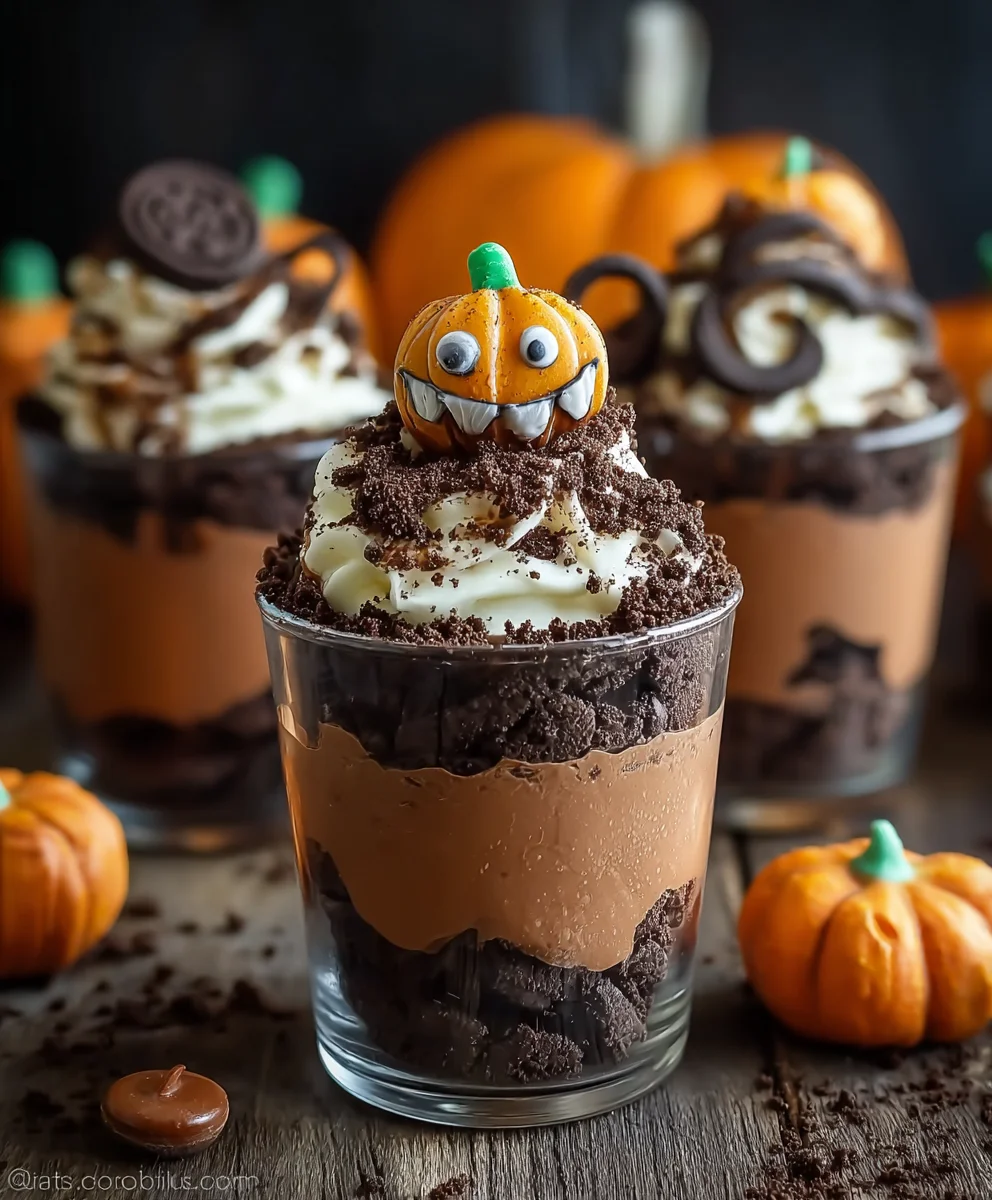
Spooky Halloween Dirt Cups
An easy and festive Halloween dessert featuring layers of chocolate pudding, crushed Oreo cookies, and gummy worms, resembling a spooky dirt patch.
Ingredients
-
2 cups chocolate pudding (prepared)
-
1 ½ cups crushed Oreo cookies
-
1 cup whipped topping (like Cool Whip)
-
1 cup gummy worms
-
½ cup candy corn (optional, for garnish)
Instructions
-
Step 1
Prepare the crushed Oreo cookies by pulsing them in a food processor or crushing them in a bag until they resemble coarse dirt. Measure out 1 ½ cups. -
Step 2
In a medium bowl, gently fold 1 cup of whipped topping into 2 cups of prepared chocolate pudding until just combined, creating a light and creamy chocolate mixture. -
Step 3
Spoon a layer of the chocolate pudding mixture into the bottom of individual serving dishes. -
Step 4
Sprinkle a generous layer of the crushed Oreo cookie “dirt” over the pudding layer, pressing down gently to create a stable surface. -
Step 5
Artfully arrange the gummy worms to look as though they are emerging from the “dirt,” sticking them partially into the cookie layer. -
Step 6
Optionally, garnish the dirt cups with a few pieces of candy corn for extra Halloween flair. -
Step 7
Chill the dirt cups for at least 30 minutes to an hour before serving to allow flavors to meld and layers to set.
Important Information
Nutrition Facts (Per Serving)
It is important to consider this information as approximate and not to use it as definitive health advice.
Allergy Information
Please check ingredients for potential allergens and consult a health professional if in doubt.


Leave a Comment