
Easy Homemade Bread is not just a recipe; it is an experience that awakens the senses and brings unparalleled comfort to any kitchen. Imagine the rich, yeasty aroma filling your home, promising a warm, crusty loaf ready to be torn apart and savored. For centuries, bread has been a cornerstone of cultures worldwide, a symbol of sustenance, community, and hospitality. From ancient grains ground by hand to the sophisticated loaves we enjoy today, the simple act of baking bread connects us to a timeless tradition.
I understand that the thought of baking bread from scratch might seem daunting to some, conjuring images of complex techniques and endless proofing. However, I am here to assure you that creating truly delicious bread at home can be incredibly straightforward and immensely rewarding. People adore homemade bread for countless reasons: the irresistible golden crust, the tender, airy interior, and the sheer satisfaction of knowing you have created something so wholesome and delicious with your own hands. Plus, knowing exactly what ingredients go into your food offers a peace of mind that store-bought alternatives simply cannot match. This particular recipe focuses on making Easy Homemade Bread accessible to everyone, ensuring a delightful and successful baking journey.

Ingredients:
- Active Dry Yeast: 2 ¼ teaspoons (one standard packet)
- Warm Water: 1 ¼ cups (around 105-115°F / 40-46°C). This is crucial for activating the yeast!
- Granulated Sugar: 1 tablespoon. This is yeast food, helping it spring to life.
- All-Purpose Flour: 3 ½ to 4 cups, plus extra for dusting your work surface. I find starting with 3 ½ cups and adding more as needed gives the best texture.
- Salt: 1 ½ teaspoons. Don’t skip this! It adds so much flavor and helps control yeast activity.
- Unsalted Butter: 2 tablespoons, melted and slightly cooled, plus a little extra for greasing the bowl and loaf pan. The butter adds richness and softness to our Easy Homemade Bread.
Activating the Yeast and Preparing the Dough for Your Easy Homemade Bread
- Proof the Yeast: In a large mixing bowl, combine the warm water, granulated sugar, and active dry yeast. Give it a gentle stir to dissolve the sugar. Now, here’s the important part: let it sit for 5 to 10 minutes. You’re looking for a foamy, bubbly layer to form on the surface. This is your yeast waking up and telling you it’s alive and ready to work its magic. If you don’t see bubbles, your water might have been too hot or too cold, or your yeast might be old. Don’t proceed if it’s not foamy! It’s better to start over with fresh yeast and the correct water temperature to ensure your Easy Homemade Bread rises beautifully. I always recommend checking the temperature with a thermometer; it truly makes a difference.
- Combine Wet and Dry Ingredients (Partially): Once your yeast is nice and bubbly, add the 2 tablespoons of melted and slightly cooled butter to the yeast mixture. Stir it in well. Then, add 1 ½ cups of the all-purpose flour and the salt to the bowl. Mix with a wooden spoon or a sturdy spatula until a shaggy, thick batter forms. This initial mix helps start to develop some gluten and incorporates the salt evenly. You’ll notice it’s quite sticky at this stage, which is perfectly normal.
- Gradually Add Remaining Flour: Now, begin adding the remaining flour, about ½ cup at a time, mixing well after each addition. Continue until the dough starts to pull away from the sides of the bowl and forms a somewhat cohesive mass. You’re looking for a dough that is soft and slightly sticky, but manageable. Avoid adding too much flour too quickly, as this can make your Easy Homemade Bread tough and dense. I usually start with 3 ½ cups total and then gauge if I need the full 4 cups based on how the dough feels. The goal here is to get it ready for the next exciting phase: kneading!
Kneading for the Perfect Easy Homemade Bread
- Prepare Your Work Surface: Lightly dust a clean, sturdy work surface with a small amount of all-purpose flour. Turn the dough out onto this floured surface. You might find it a bit sticky at first, but resist the urge to add a lot of extra flour right away. A little stickiness is good; it indicates a well-hydrated dough, which leads to a softer crumb in your Easy Homemade Bread.
- Begin Kneading: This is where the magic truly happens for developing gluten, which gives bread its structure and chew. With floured hands, begin to knead the dough. The most common technique is to push the dough away from you with the heels of your hands, fold it back towards you, rotate it a quarter turn, and repeat. You’ll want to do this rhythmically. At first, the dough will be shaggy, sticky, and might tear easily. Don’t be discouraged! This is completely normal.
- Knead Until Smooth and Elastic: Continue kneading for approximately 8 to 10 minutes. As you knead, you’ll feel the dough transform. It will become smoother, less sticky, and much more elastic. It should spring back when you gently poke it with your finger. A great test is the “windowpane test”: take a small piece of dough, gently stretch it with your fingers. If you can stretch it thin enough to see light through it without it tearing, then your gluten is perfectly developed! This means your Easy Homemade Bread will have that wonderful, chewy texture we all love. If it tears easily, continue kneading for a few more minutes. This step is a labor of love, but it’s incredibly rewarding.
First Rise: The Bulk Fermentation
- Prepare for the First Rise: Lightly grease a large, clean bowl with a little bit of butter or a neutral oil. Place the kneaded dough into the bowl, then turn it over once to coat the entire surface of the dough with a thin layer of grease. This prevents the dough from drying out and sticking to the bowl as it rises.
- Cover and Let Rise: Cover the bowl tightly with plastic wrap or a clean kitchen towel. Now, find a warm, draft-free spot in your kitchen. This could be near a sunny window (but not too hot!), in an oven with just the light on (creating a gentle warmth), or simply on your countertop if your kitchen is reasonably warm. Let the dough rise for 1 to 1 ½ hours, or until it has doubled significantly in size. This first rise, also known as bulk fermentation, is critical for developing flavor and creating that airy texture in your Easy Homemade Bread. The yeast gets to work, producing carbon dioxide that gets trapped in the gluten network.
- Check for Doubling: How do you know if it’s doubled? Gently poke two fingers into the dough; if the indentations remain, it’s ready. If it springs back immediately, it needs more time. Be patient; the rising time can vary depending on the temperature of your kitchen. I always enjoy watching the dough expand; it’s truly a marvel of baking!
Shaping Your Easy Homemade Bread Loaf
- Gently Deflate the Dough: Once the dough has doubled, gently punch it down to release the trapped air. You’re not trying to aggressively deflate it, just release enough air so you can shape it. Turn the dough out onto a lightly floured surface.
- Pre-Shape (Optional but Recommended): For a more even loaf, I like to do a quick pre-shape. Gently pat the dough into a rough rectangle. Then, fold the top third down to the center, press gently, and then fold the bottom third up and over the top, creating a log. Turn the dough seam-side down and let it rest for 5-10 minutes. This allows the gluten to relax, making the final shaping easier. This small step contributes to a more uniform crumb in your Easy Homemade Bread.
- Final Shaping for a Loaf Pan: Now, for the final shaping. Again, gently pat the dough into a rectangle, approximately the length of your loaf pan. Take one of the long sides and fold it towards the center, pressing firmly to seal. Repeat with the other long side, bringing it over the first fold and pressing firmly to create a tight seam. Now, gently roll the dough log from one end to the other, creating a uniform cylinder. Make sure to pinch the seam tightly along the bottom to prevent it from bursting open during baking. The goal here is to create surface tension on the top of the loaf while ensuring the bottom seam is well-sealed. This tension helps the loaf hold its shape and gives it that beautiful rise in the oven.
- Prepare the Loaf Pan: Grease a 9×5-inch loaf pan generously with butter or cooking spray. I find that butter gives a better release and helps the crust brown beautifully. Place the shaped dough, seam-side down, into the prepared loaf pan.
Second Rise: The Proofing Stage
- Cover and Second Rise: Cover the loaf pan loosely with plastic wrap or a clean kitchen towel. Again, find that warm, draft-free spot. Let the dough rise for another 30 to 45 minutes, or until it has nearly doubled in size and has crowned slightly above the rim of the pan. This is called proofing, and it’s essential for a light and airy loaf. Under-proofing can result in a dense loaf, while over-proofing can cause it to collapse.
- Test for Readiness: To check if it’s ready, gently poke the side of the dough with a floured finger. If the indentation springs back slowly, leaving a slight mark, it’s perfectly proofed. If it springs back immediately, it needs a little more time. If the indentation remains completely, it might be slightly over-proofed, but don’t worry, it will still make delicious Easy Homemade Bread!
- Preheat Oven: About 15 minutes before the end of the second rise, preheat your oven to 375°F (190°C). Make sure to place an oven rack in the center position. A properly preheated oven is crucial for achieving a good oven spring and a lovely crust.
Baking Your Delicious Easy Homemade Bread
- Bake the Loaf: Carefully place the loaf pan into the preheated oven. Bake for 30 to 35 minutes. Around the 20-minute mark, you might notice the top browning quite quickly. If it’s getting too dark, you can loosely tent the loaf with aluminum foil to prevent further browning while the inside finishes baking.
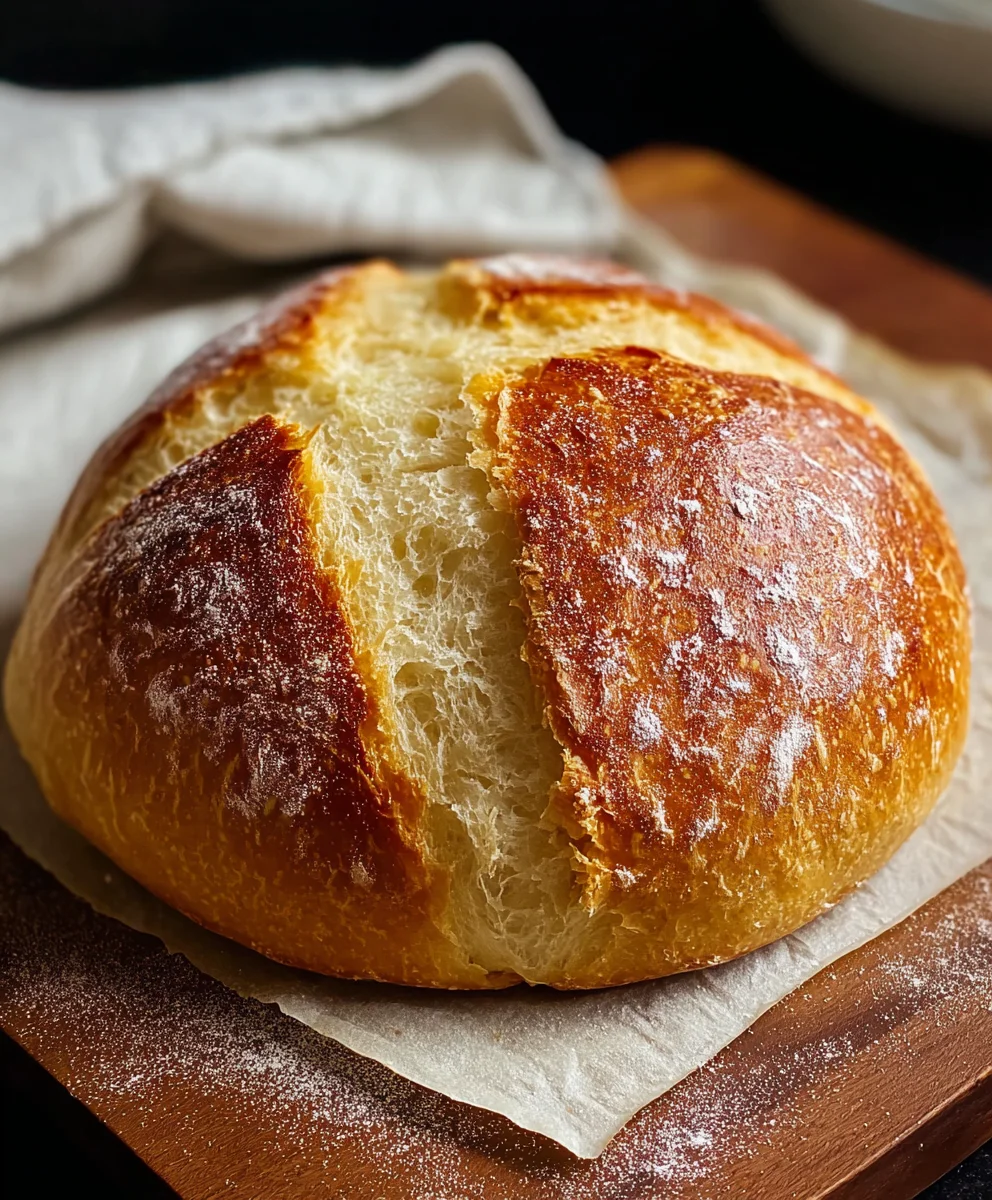
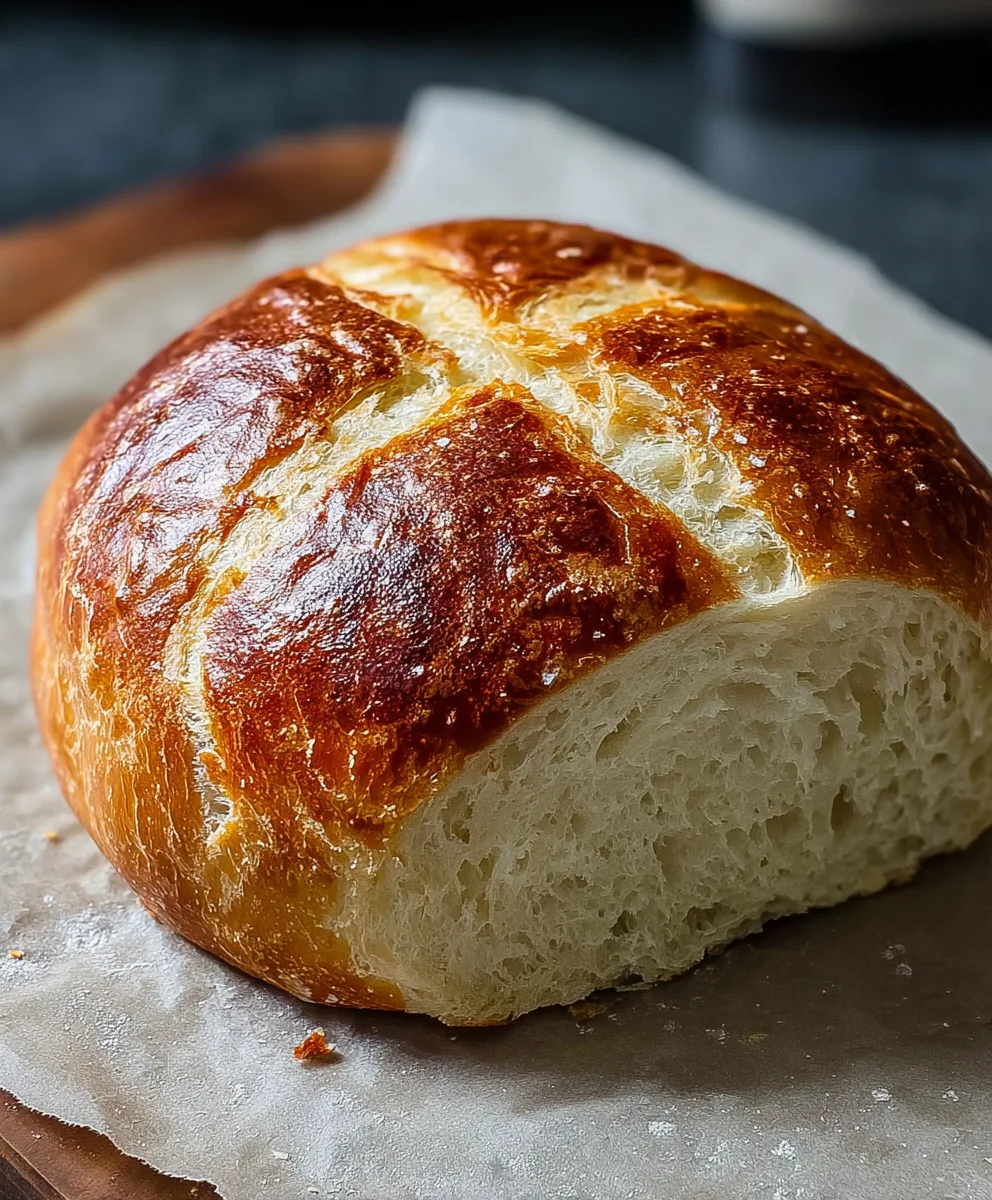
- Check for Doneness: How do you know if your Easy Homemade Bread is fully baked? The crust should be a beautiful golden brown. The best way to check for doneness is to use an instant-read thermometer. Insert it into the center of the loaf; it should read between 190-200°F (88-93°C). Another good indicator is if you remove the loaf from the pan and tap the bottom of it; it should sound hollow. If it doesn’t quite sound hollow or reach the temperature, pop it back in for another 5-10 minutes. You want to ensure it’s cooked all the way through for the best texture and flavor.
Cooling and Enjoying Your Easy Homemade Bread
- Remove from Pan: As soon as you take the loaf out of the oven, immediately remove it from the loaf pan. If you leave it in the pan, the steam will condense, making the bottom crust soggy. Gently invert the pan onto a wire cooling rack and carefully lift the pan away.
- Cool Completely: This is arguably the hardest part of making bread, but it’s essential! Allow the Easy Homemade Bread to cool on the wire rack for at least 1 to 2 hours before slicing into it. I know, I know, the smell is irresistible! But cooling allows the internal structure of the bread to set and the starches to fully gelatinize. Slicing into hot bread can result in a gummy texture. Trust me, the wait is worth it for that perfect slice of warm, fresh bread.
- Slice and Enjoy: Once your Easy Homemade Bread is completely cool, slice it with a serrated knife. Enjoy it plain, with a smear of butter, jam, or your favorite sandwich fillings. There’s truly nothing quite like the taste and aroma of freshly baked Easy Homemade Bread right from your own kitchen. It’s a truly satisfying accomplishment!
Conclusion:
Well, my friends, we’ve reached the culmination of our journey into the wonderful world of home baking. If there’s one thing I hope you take away from this recipe, it’s the profound satisfaction that comes from creating something truly special with your own hands. This isn’t just about following instructions; it’s about experiencing the magic of simple ingredients transforming into a comforting masterpiece. I’m genuinely excited for you to discover just how rewarding it is to pull a perfectly golden, fragrant loaf from your oven. The aroma alone is enough to make your entire home feel warm and inviting, a scent that supermarket bread simply cannot replicate, no matter how hard it tries. It’s an experience that engages all your senses, from the soft give of the dough to the crackle of the crust as it cools.
What makes this particular recipe an absolute must-try? It’s the perfect confluence of simplicity and spectacular results. Many people are intimidated by the thought of baking bread, envisioning complex techniques, long proofing times, and potential failures. But I promise you, this recipe is designed to demystify the process. It’s forgiving, straightforward, and consistently delivers a beautifully textured loaf with a delightful crust and a soft, airy interior. Imagine slicing into a warm piece, the steam gently rising, and experiencing that first bite – a perfect balance of subtle sweetness and wholesome goodness. This isn’t just bread; it’s a culinary hug, a staple that elevates every meal it graces. It’s truly an Easy Homemade Bread experience that you’ll want to revisit again and again, becoming a cherished part of your kitchen routine. The sense of accomplishment you’ll feel when you serve a loaf you’ve made yourself is incomparable, far surpassing any store-bought alternative.
Now, let’s talk about the endless possibilities once you’ve mastered this foundational recipe. The beauty of a simple, classic loaf like this is its incredible versatility. For a quick breakfast or brunch, imagine it toasted and slathered with your favorite jam or a generous dollop of homemade butter. It’s also phenomenal alongside a steaming bowl of hearty soup or a rich stew, perfect for soaking up every last drop of flavorful broth and making sure no deliciousness goes to waste. Try it as the base for the ultimate grilled cheese sandwich, where its sturdy yet tender crumb holds up beautifully under the heat and melty goodness. Or, for a sophisticated appetizer, slice it thinly, toast lightly, and serve with bruschetta, a rich olive oil for dipping, or even some artisanal cheese and cured meats. For those with a sweet tooth, a slice with a drizzle of honey and a sprinkle of cinnamon makes a comforting evening treat, perhaps alongside a cup of tea. Its neutral yet inviting flavor profile makes it a perfect companion for virtually anything you can imagine.
But why stop there? This recipe is a fantastic canvas for your own culinary creativity. Want to add a savory kick? Incorporate finely chopped fresh rosemary and a handful of grated Parmesan cheese into the dough during the kneading stage. For an earthy flavor, a mix of dried herbs like oregano and thyme works wonders, infusing each slice with aromatic depth. If you’re a fan of seeds, consider adding a mix of sunflower, pumpkin, or poppy seeds for an extra crunch and nutritional boost – these can be mixed into the dough or sprinkled on top before baking. For a slightly sweeter, richer loaf, you could experiment with a touch of honey or maple syrup in place of some of the sugar, which will also contribute to a beautiful golden crust. If you prefer a heartier texture, a portion of whole wheat flour can be substituted, though I recommend starting with a smaller amount to maintain the easy-to-handle nature of this dough. And for those feeling adventurous, why not shape it into rolls instead of a single loaf for individual servings, perfect for dinner parties or packed lunches? The possibilities are truly boundless, limited only by your imagination and what delights your palate!
So, my dearest readers, what are you waiting for? I wholeheartedly encourage you to carve out some time this week, gather your ingredients, and embark on this incredibly rewarding baking adventure. Don’t be shy, don’t overthink it – just follow the steps, trust the process, and prepare to be amazed by what you can achieve. There’s a unique sense of accomplishment and pure joy that comes from sharing something you’ve made from scratch with your loved ones, and this Easy Homemade Bread is guaranteed to bring smiles to every face at your table. It’s an investment of a little time that pays off immensely in flavor, comfort, and pride. You’ll not only have a delicious loaf but also the satisfaction of knowing exactly what went into it, free from preservatives and artificial ingredients.
Once you’ve experienced the unparalleled taste and texture of your very own freshly baked loaf, I would absolutely love to hear about it! Please, share your baking triumphs, your delicious serving suggestions, and any creative variations you come up with. Did you add something special that surprised everyone? How did your family react to that first warm slice? Did it become a new weekend ritual, filling your home with that incredible baking scent? Your stories inspire me and our entire community of home bakers. Tag us, comment below, or simply tell a friend – let’s spread the joy of beautiful, wholesome, homemade bread far and wide. Happy baking!
Easy Homemade Bread Recipe
An incredibly simple and rewarding recipe for delicious homemade bread with an irresistible golden crust and tender, airy interior. This no-knead recipe is designed to be accessible to everyone, requiring minimal effort and yielding a loaf so good, it impresses even experienced bakers and makes amazing sandwiches.
Ingredients
-
2 ¼ teaspoons active dry yeast (one standard packet)
-
1 ¼ cups warm water (105-115°F / 40-46°C)
-
1 tablespoon granulated sugar
-
3 ½ to 4 cups all-purpose flour, plus extra for dusting
-
1 ½ teaspoons salt
-
2 tablespoons unsalted butter, melted and slightly cooled, plus extra for greasing
Instructions
-
Step 1
In a large mixing bowl, combine 1 ¼ cups warm water, 1 tbsp granulated sugar, and 2 ¼ tsp active dry yeast. Stir gently and let sit for 5-10 minutes until a foamy, bubbly layer forms on the surface. -
Step 2
To the foamy yeast mixture, add 2 tbsp melted butter, 1 ½ cups all-purpose flour, and 1 ½ tsp salt. Mix until a shaggy batter forms. Gradually add the remaining flour (1 ½ to 2 ½ cups), ½ cup at a time, mixing well after each addition until the dough forms a soft, slightly sticky, cohesive mass that pulls away from the sides of the bowl. -
Step 3
Lightly grease a large bowl. Place the dough in the bowl, turning once to coat its surface. Cover tightly and let rise in a warm, draft-free spot for 1 to 1 ½ hours, or until it has doubled significantly in size. The dough is ready when a gentle poke leaves indentations that remain. -
Step 4
Gently punch down the risen dough to release air, then turn it out onto a lightly floured surface. (Optional: Gently pat dough into a rough rectangle, fold the top third down, then the bottom third up, creating a log. Rest seam-side down for 5-10 minutes.) Pat dough into a rectangle, approximately the length of your loaf pan. Fold one long side towards the center, pressing firmly to seal. Repeat with the other long side, bringing it over the first fold and pressing firmly to create a tight seam. Roll the dough log from one end to the other, creating a uniform cylinder. Pinch the seam tightly along the bottom. -
Step 5
Generously grease a 9×5-inch loaf pan with butter or cooking spray. Place the shaped dough, seam-side down, into the prepared pan. Loosely cover the pan and let the dough rise in a warm, draft-free spot for another 30 to 45 minutes, or until it has nearly doubled and crowned slightly above the rim of the pan. It’s ready if a gentle poke with a floured finger springs back slowly, leaving a slight mark. -
Step 6
About 15 minutes before the end of the second rise, preheat your oven to 375°F (190°C) with an oven rack in the center position. Carefully place the loaf pan into the preheated oven and bake for 30 to 35 minutes. If the top browns too quickly after 20 minutes, loosely tent the loaf with aluminum foil. The bread is fully baked when the crust is golden brown, an instant-read thermometer inserted into the center reads 190-200°F (88-93°C), and the bottom sounds hollow when tapped. -
Step 7
Immediately remove the bread from the loaf pan and place it on a wire cooling rack. Allow the bread to cool completely for at least 1 to 2 hours before slicing. Slicing into hot bread can result in a gummy texture. Once cooled, slice with a serrated knife and enjoy.
Important Information
Nutrition Facts (Per Serving)
It is important to consider this information as approximate and not to use it as definitive health advice.
Allergy Information
Please check ingredients for potential allergens and consult a health professional if in doubt.


Leave a Comment