
Pork Kimchi Potstickers: Prepare to embark on a culinary adventure that marries the savory comfort of classic potstickers with the fiery, fermented goodness of kimchi! Have you ever craved a dish that’s both familiar and exciting, comforting and bold? These aren’t your average dumplings; they’re a flavor explosion waiting to happen.
Potstickers, also known as gyoza or jiaozi depending on their origin, have a rich history deeply rooted in Asian cuisine. Passed down through generations, these delightful dumplings have evolved into countless regional variations. Our version pays homage to this heritage while adding a distinctly Korean twist with the inclusion of kimchi, Korea’s national dish. Kimchi itself boasts a history stretching back centuries, originally a method of preserving vegetables for the long winter months. Now, it’s a beloved staple, celebrated for its complex flavors and probiotic benefits.
What makes these Pork Kimchi Potstickers so irresistible? It’s the perfect balance of textures and tastes. The tender, juicy pork filling, the tangy, spicy kimchi, and the crispy, golden-brown exterior create a symphony of sensations in every bite. People adore this dish because it’s relatively easy to make, incredibly satisfying, and offers a unique and delicious way to enjoy the vibrant flavors of Korean cuisine. Plus, they’re fantastic as an appetizer, a light meal, or even a party snack! Get ready to impress your friends and family with these flavorful little pockets of joy.

Ingredients:
- For the Filling:
- 1 pound ground pork
- 1 cup kimchi, finely chopped (squeeze out excess liquid)
- 1/2 cup finely chopped green onions
- 2 cloves garlic, minced
- 1 tablespoon grated ginger
- 1 tablespoon soy sauce
- 1 teaspoon sesame oil
- 1/2 teaspoon red pepper flakes (gochugaru), optional
- 1/4 teaspoon black pepper
- For the Dough (or use store-bought wrappers):
- 2 cups all-purpose flour
- 3/4 cup hot water (not boiling)
- Pinch of salt
- For Cooking:
- 2 tablespoons vegetable oil
- 1/2 cup water
- For Serving (optional):
- Soy sauce
- Rice vinegar
- Sesame seeds
- Chopped green onions
Making the Dough (If Not Using Store-Bought Wrappers):
Okay, let’s start with the dough. If you’re using store-bought wrappers, feel free to skip this section! But honestly, homemade dough is so much better, and it’s not as hard as you might think.
- Combine the Flour and Salt: In a large bowl, whisk together the flour and salt. This ensures the salt is evenly distributed throughout the dough.
- Add the Hot Water: Gradually pour the hot water into the flour mixture while mixing with a wooden spoon or chopsticks. Be careful, the water is hot! Start with a little less water than the recipe calls for, and add more as needed. You want a shaggy dough to form.
- Knead the Dough: Once the dough has cooled slightly, turn it out onto a lightly floured surface. Knead the dough for about 5-7 minutes, or until it becomes smooth and elastic. If the dough is too sticky, add a little more flour, one tablespoon at a time. If it’s too dry, add a tiny bit more water, a teaspoon at a time.
- Rest the Dough: Form the dough into a ball, wrap it tightly in plastic wrap, and let it rest at room temperature for at least 30 minutes. This allows the gluten to relax, making the dough easier to roll out. You can even let it rest for an hour or two! The longer it rests, the better.
Preparing the Filling:
While the dough is resting (or while you’re unwrapping your store-bought wrappers), let’s get the filling ready. This is where the magic happens!
- Combine the Ingredients: In a large bowl, combine the ground pork, chopped kimchi, green onions, garlic, ginger, soy sauce, sesame oil, red pepper flakes (if using), and black pepper.
- Mix Thoroughly: Use your hands (or a spoon, if you prefer) to mix all the ingredients together until they are well combined. Be careful not to overmix, as this can make the pork tough.
- Taste and Adjust: This is a crucial step! Take a small amount of the filling and cook it in a pan until browned. Taste it and adjust the seasonings as needed. You might want to add more soy sauce for saltiness, red pepper flakes for heat, or sesame oil for flavor.
Assembling the Potstickers:
Now for the fun part putting it all together! This can be a bit time-consuming, but it’s totally worth it.
- Divide the Dough (If Making Homemade): If you made your own dough, divide it in half. Keep one half wrapped in plastic wrap to prevent it from drying out. On a lightly floured surface, roll out the other half of the dough into a thin sheet, about 1/8 inch thick.
- Cut Out Circles (If Making Homemade): Use a cookie cutter (about 3 inches in diameter) or a glass to cut out circles from the dough. You can re-roll the scraps to get more circles.
- Fill the Wrappers: Place a small spoonful (about 1-2 teaspoons) of the filling in the center of each wrapper. Don’t overfill them, or they will be difficult to seal.
- Moisten the Edges: Dip your finger in water and lightly moisten the edges of the wrapper. This will help the wrapper seal properly.
- Fold and Seal: Fold the wrapper in half to form a half-moon shape. Pinch the edges together to seal, making sure there are no air pockets. You can create pleats along one edge for a more decorative look, or simply press the edges together firmly.
- Repeat: Repeat steps 1-5 until all the dough and filling are used up.
- Prepare for Cooking: Place the assembled potstickers on a lightly floured baking sheet to prevent them from sticking. You can cover them with a damp towel to keep them from drying out while you work.
Cooking the Potstickers:
Time to cook these little beauties! I prefer the steam-fry method, which gives them a crispy bottom and a tender top.
- Heat the Oil: Heat the vegetable oil in a large, non-stick skillet over medium-high heat. Make sure the skillet is large enough to hold all the potstickers in a single layer.
- Arrange the Potstickers: Carefully arrange the potstickers in the skillet, flat-side down. Don’t overcrowd the pan; you may need to cook them in batches.
- Sear the Bottoms: Cook the potstickers for 2-3 minutes, or until the bottoms are golden brown and crispy.
- Add Water and Cover: Pour the water into the skillet (be careful, it will splatter!). Immediately cover the skillet with a lid.
- Steam the Potstickers: Reduce the heat to medium and let the potstickers steam for 5-7 minutes, or until the water has evaporated and the potstickers are cooked through. The wrappers should be translucent and the filling should be cooked.
- Crisp the Bottoms Again (Optional): If you want the bottoms to be extra crispy, remove the lid and let the potstickers cook for another minute or two, until the bottoms are nicely browned. Watch them carefully to prevent them from burning.
- Remove and Serve: Carefully remove the potstickers from the skillet and transfer them to a serving plate.
Serving Suggestions:
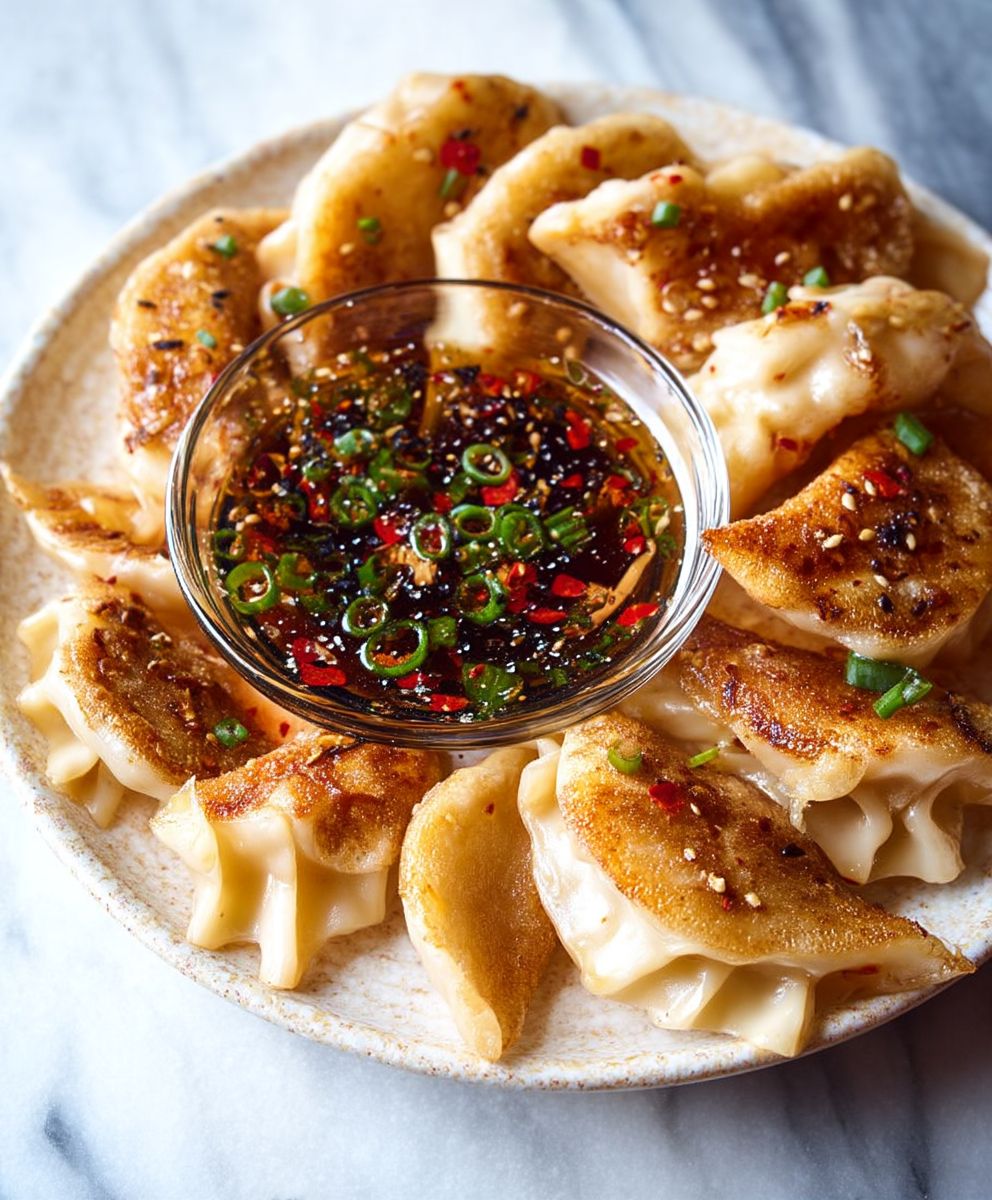
These potstickers are delicious on their own, but they’re even better with a dipping sauce! Here are a few ideas:
- Soy Sauce and Rice Vinegar: A classic combination! Mix equal parts soy sauce and rice vinegar.
- Sesame Oil and Green Onions: Add a drizzle of sesame oil and some chopped green onions to your dipping sauce for extra flavor.
- Spicy Dipping Sauce: Mix soy sauce, rice vinegar, sesame oil, red pepper flakes, and a little bit of sugar for a spicy kick.
Garnish the potstickers with sesame seeds and chopped green onions for a beautiful presentation. Serve them hot and enjoy!
Tips and Tricks:
- Make Ahead: You can assemble the potstickers ahead of time and freeze them. Place them on a baking sheet lined with parchment paper and freeze until solid. Then, transfer them to a freezer bag. Cook them directly from frozen, adding a few extra minutes to the cooking time.
- Kimchi Variations: Feel free to experiment with different types of kimchi. Older, more fermented kimchi will have a stronger flavor.
- Vegetarian Option: Substitute the ground pork with crumbled tofu or mushrooms for a vegetarian version.
- Dough Thickness: The thickness of the dough will affect the texture of the potstickers. Thinner dough will result in more delicate potstickers, while thicker dough will be chewier.
- Prevent Sticking: Make sure your skillet is well-seasoned or non-stick to prevent the potstickers from sticking.
Troubleshooting:
- Potstickers are sticking to the pan: Ensure your pan is properly heated and oiled. If they still stick, try using a non-stick pan.
- Filling is too wet: Squeeze out excess liquid from the kimchi before adding it to the filling.
- Dough is too dry: Add a teaspoon of water
Conclusion:
And there you have it! These Pork Kimchi Potstickers are more than just a recipe; they’re an explosion of flavor waiting to happen in your kitchen. I truly believe this is a must-try recipe for anyone who loves Asian-inspired cuisine, or anyone looking to add a little zing to their meal routine. The savory pork, the tangy kimchi, and the perfectly crisp exterior it’s a symphony of textures and tastes that will leave you wanting more.
But why is this recipe a must-try, you ask? Well, beyond the incredible flavor profile, it’s surprisingly versatile. You can easily adapt it to your own preferences and dietary needs. Not a fan of pork? Ground chicken or turkey work beautifully. Vegetarian? Tofu or a mix of finely chopped mushrooms and vegetables will create a delicious filling. And of course, you can adjust the amount of kimchi to control the level of spice.
Serving Suggestions and Variations:
These potstickers are fantastic on their own as an appetizer, but they also make a satisfying main course. I love serving them with a simple dipping sauce made from soy sauce, rice vinegar, sesame oil, and a pinch of red pepper flakes. For a more substantial meal, try adding them to a bowl of ramen or serving them alongside a vibrant Asian slaw.
Here are a few other variations to consider:
* Spicy Mayo Dip: Mix mayonnaise with sriracha and a squeeze of lime juice for a creamy and spicy dipping sauce.
* Pan-Fried Noodles: Serve the potstickers with pan-fried noodles tossed in a savory sauce.
* Potsticker Soup: Add the potstickers to a flavorful broth with vegetables and noodles for a comforting soup.
* Kimchi Fried Rice: Chop up leftover potstickers and add them to kimchi fried rice for an extra layer of flavor.
* Air Fryer Option: For a healthier alternative, try air frying the potstickers until golden brown and crispy.I’ve poured my heart into perfecting this recipe, and I’m confident that you’ll love it as much as I do. The combination of savory pork and fermented kimchi creates a unique and unforgettable flavor that will tantalize your taste buds. Plus, the crispy texture of the potsticker wrapper adds a satisfying crunch to every bite.
Time to Get Cooking!
So, what are you waiting for? Gather your ingredients, roll up your sleeves, and get ready to embark on a culinary adventure. I promise you, making these Pork Kimchi Potstickers is easier than you might think, and the results are well worth the effort.
I’m so excited for you to try this recipe and experience the deliciousness for yourself. And most importantly, I want to hear about your experience! Did you make any variations? What dipping sauce did you use? What did your family and friends think?
Please, please, please share your photos and stories with me in the comments below. I can’t wait to see your creations and hear about your culinary triumphs. Happy cooking, and enjoy every single bite of these incredible Pork Kimchi Potstickers! I know you’ll love them!
Pork Kimchi Potstickers: A Delicious & Easy Recipe
Savory kimchi and pork potstickers, pan-fried to crispy perfection and steamed for a tender bite. Perfect as an appetizer or a satisfying meal!
Ingredients
- 1 pound ground pork
- 1 cup kimchi, finely chopped (squeeze out excess liquid)
- 1/2 cup finely chopped green onions
- 2 cloves garlic, minced
- 1 tablespoon grated ginger
- 1 tablespoon soy sauce
- 1 teaspoon sesame oil
- 1/2 teaspoon red pepper flakes (gochugaru), optional
- 1/4 teaspoon black pepper
- 2 cups all-purpose flour
- 3/4 cup hot water (not boiling)
- Pinch of salt
- 2 tablespoons vegetable oil
- 1/2 cup water
- Soy sauce
- Rice vinegar
- Sesame seeds
- Chopped green onions
Instructions
- In a large bowl, whisk together the flour and salt.
- Gradually pour the hot water into the flour mixture while mixing with a wooden spoon or chopsticks. Be careful, the water is hot! Start with a little less water than the recipe calls for, and add more as needed. You want a shaggy dough to form.
- Once the dough has cooled slightly, turn it out onto a lightly floured surface. Knead the dough for about 5-7 minutes, or until it becomes smooth and elastic. If the dough is too sticky, add a little more flour, one tablespoon at a time. If it’s too dry, add a tiny bit more water, a teaspoon at a time.
- Form the dough into a ball, wrap it tightly in plastic wrap, and let it rest at room temperature for at least 30 minutes. This allows the gluten to relax, making the dough easier to roll out. You can even let it rest for an hour or two! The longer it rests, the better.
- In a large bowl, combine the ground pork, chopped kimchi, green onions, garlic, ginger, soy sauce, sesame oil, red pepper flakes (if using), and black pepper.
- Use your hands (or a spoon, if you prefer) to mix all the ingredients together until they are well combined. Be careful not to overmix, as this can make the pork tough.
- This is a crucial step! Take a small amount of the filling and cook it in a pan until browned. Taste it and adjust the seasonings as needed. You might want to add more soy sauce for saltiness, red pepper flakes for heat, or sesame oil for flavor.
- If you made your own dough, divide it in half. Keep one half wrapped in plastic wrap to prevent it from drying out. On a lightly floured surface, roll out the other half of the dough into a thin sheet, about 1/8 inch thick.
- Use a cookie cutter (about 3 inches in diameter) or a glass to cut out circles from the dough. You can re-roll the scraps to get more circles.
- Place a small spoonful (about 1-2 teaspoons) of the filling in the center of each wrapper. Don’t overfill them, or they will be difficult to seal.
- Dip your finger in water and lightly moisten the edges of the wrapper. This will help the wrapper seal properly.
- Fold the wrapper in half to form a half-moon shape. Pinch the edges together to seal, making sure there are no air pockets. You can create pleats along one edge for a more decorative look, or simply press the edges together firmly.
- Repeat steps 1-5 until all the dough and filling are used up.
- Place the assembled potstickers on a lightly floured baking sheet to prevent them from sticking. You can cover them with a damp towel to keep them from drying out while you work.
- Heat the vegetable oil in a large, non-stick skillet over medium-high heat. Make sure the skillet is large enough to hold all the potstickers in a single layer.
- Carefully arrange the potstickers in the skillet, flat-side down. Don’t overcrowd the pan; you may need to cook them in batches.
- Cook the potstickers for 2-3 minutes, or until the bottoms are golden brown and crispy.
- Pour the water into the skillet (be careful, it will splatter!). Immediately cover the skillet with a lid.
- Reduce the heat to medium and let the potstickers steam for 5-7 minutes, or until the water has evaporated and the potstickers are cooked through. The wrappers should be translucent and the filling should be cooked.
- If you want the bottoms to be extra crispy, remove the lid and let the potstickers cook for another minute or two, until the bottoms are nicely browned. Watch them carefully to prevent them from burning.
- Carefully remove the potstickers from the skillet and transfer them to a serving plate.
Notes
- Make Ahead: You can assemble the potstickers ahead of time and freeze them. Place them on a baking sheet lined with parchment paper and freeze until solid. Then, transfer them to a freezer bag. Cook them directly from frozen, adding a few extra minutes to the cooking time.
- Kimchi Variations: Feel free to experiment with different types of kimchi. Older, more fermented kimchi will have a stronger flavor.
- Vegetarian Option: Substitute the ground pork with crumbled tofu or mushrooms for a vegetarian version.
- Dough Thickness: The thickness of the dough will affect the texture of the potstickers. Thinner dough will result in more delicate potstickers, while thicker dough will be chewier.
- Prevent Sticking: Make sure your skillet is well-seasoned or non-stick to prevent the potstickers from sticking.


Leave a Comment