
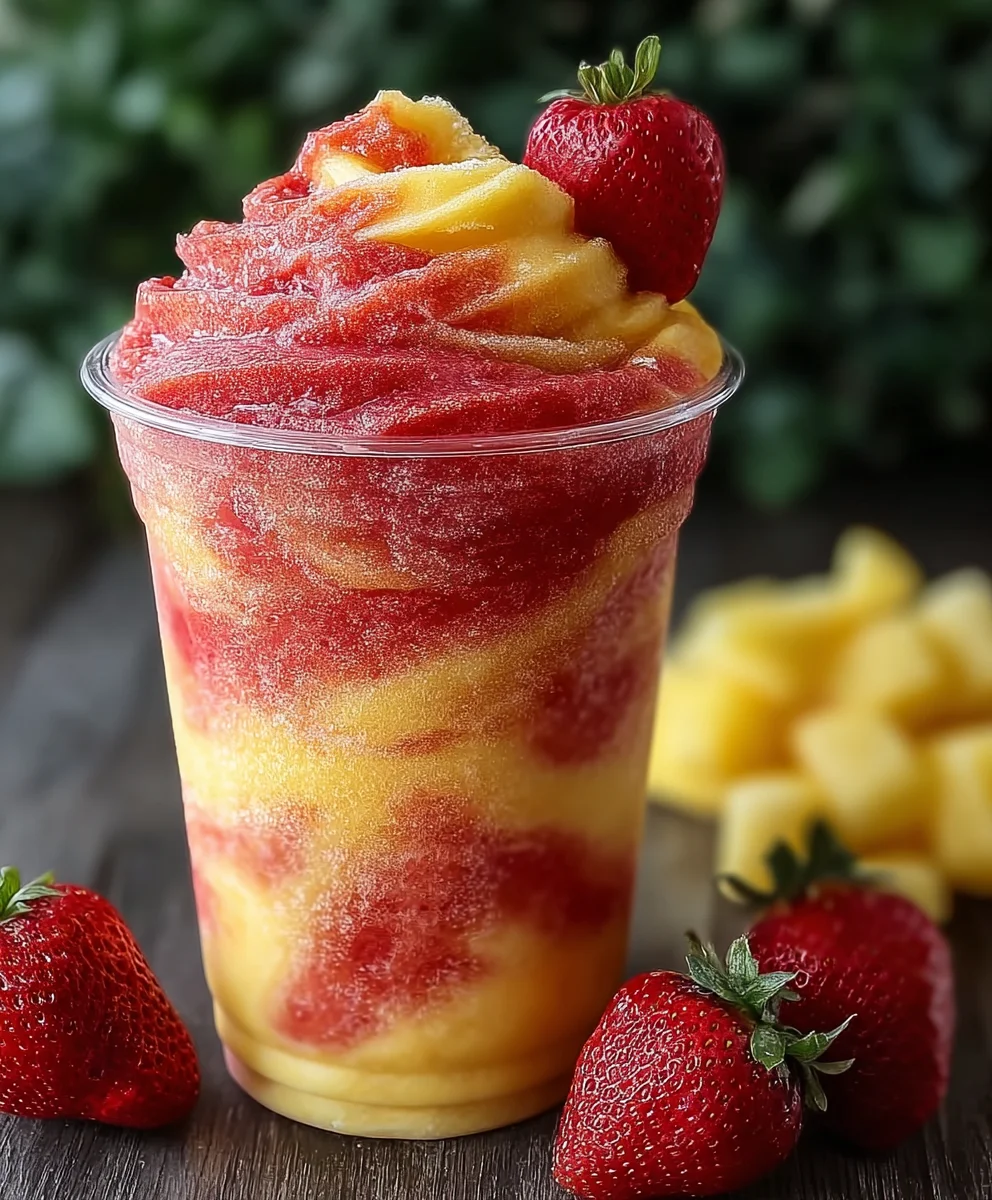
Pineapple Strawberry Swirled Slushies are the ultimate summer dream in a glass! There’s something incredibly refreshing and utterly delightful about a perfectly blended, icy beverage that bursts with tropical sweetness and bright berry notes. These aren’t just any slushies; they are a vibrant, flavor-packed escape that transports you straight to a sun-drenched beach with every sip. People absolutely adore them because they’re so easy to make, endlessly customizable, and provide instant cooling relief on even the hottest days. What truly makes our Pineapple Strawberry Swirled Slushies special is the mesmerizing swirl effect, creating a visual as stunning as its taste. It’s the harmonious dance of sweet pineapple and tangy strawberries, expertly balanced to create a drink that’s both incredibly satisfying and wonderfully light. Get ready to blend up your new favorite warm-weather indulgence!

Ingredients:
- 2 cups frozen pineapple chunks
- 1 cup pineapple juice or water
- 1 tablespoon honey (optional)
- 2 cups frozen strawberries
- 1 cup strawberry juice or water
- 1 tablespoon honey (optional)
Pineapple Layer Preparation
Step 1: Gather Your Pineapple Ingredients
To begin extract crafting these delightful Pineapple Strawberry Swirled Slushies, first gather all the necessary ingredients for the pineapple layer. You’ll need your 2 cups of frozen pineapple chunks, which provide the icy base and tropical flavor. Ensure they are truly frozen for the best slushy consistency. Next, measure out 1 cup of pineapple juice. This will help the pineapple blend smoothly and intensify its natural sweetness. If you don’t have pineapple juice readily available, water is a perfectly acceptable substitute, though the flavor will be slightly less pronounced. Finally, have your 1 tablespoon of honey nearby. Remember, honey is entirely optional, but if you’re looking for a touch more sweetness to balance the tartness of the pineapple, this is where you’ll add it.
Step 2: Blend the Pineapple Mixture
Now, it’s time to bring the pineapple layer to life in your blender. Add the 2 cups of frozen pineapple chunks to the blender jar. Pour in the 1 cup of pineapple juice (or water) over the frozen fruit. If you’ve decided to use honey for added sweetness, add the 1 tablespoon now. Secure the lid tightly on your blegin extractr. Begin blending on a low speed, gradually increasing to a higher speed as the ingredients start to break down. You’re aiming for a smooth, thick, and pourable consistency. If the mixture seems too thick and the blender is struggling, you can add a tablespoon or two more of pineapple juice or water, but do so sparingly to avoid making it too watery. Blend until there are no large ice chunks remaining and the mixture is uniform in texture. Scrape down the sides of the blender with a spatula if needed to ensure everything is incorporated. Once perfectly blended, pour this pineapple mixture into a separate container or bowl and set it aside. You can even pop it back in the freezer for a few minutes while you prepare the strawberry layer to keep it extra cold.
Strawberry Layer Preparation
Step 3: Gather Your Strawberry Ingredients
With the pineapple layer ready, let’s move on to the vibrant and delicious strawberry component. Gather your ingredients for this section. You will need 2 cups of frozen strawberries. Similar to the pineapple, these need to be well-frozen to contribute to the slushy texture. Next, measure out 1 cup of strawberry juice or water. Just like with the pineapple layer, strawberry juice will enhance the berry flavor, but water works well as a substitute. Finally, have your 1 tablespoon of honey ready. This, too, is optional, and its addition depends on your personal preference for sweetness.
Step 4: Blend the Strawberry Mixture
Now, let’s create the strawberry swirl for your Pineapple Strawberry Swirled Slushies. Add the 2 cups of frozen strawberries to your clean blender jar. Pour in the 1 cup of strawberry juice (or water). If you’re opting for a sweeter drink, add the 1 tablespoon of honey at this stage. Securgin extracthe lid and begin blending, starting on a low setting and increasing the speegin extracts the strawberries begin to break apart. You are looking for a smooth, thick consistency, similar to what you achieved with the pineapple layer. If the mixture is too difficult to blend, add a small amount (1-2 tablespoons at a time) of strawberry juice or water until it reaches a workable, pourable texture. Be careful not to add too much liquid, as this can dilute the flavor and the slushy quality. Blend until completely smooth and free of any large strawberry pieces.
Assembly and Serving
Step 5: Swirl and Serve Your Slushies
This is the exciting part where your Pineapple Strawberry Swirled Slushies truly come to lifgin extractTake out two tall glasses. Begin by pouring a portion of the blended pineapple mixture into the bottom of each glass. Don’t fill them more than about a third of the way. Now, carefully spoon or pour some of the blended strawberry mixture on top of the pineapple layer in each glass. The goal is to create distinct layers initially. Next, grab a long spoon or a straw and gently swirl the two colors together. You don’t want to over-mix; aim for beautiful ribbons and swirls of pink and yellow throughout the drink. The key is gentle manipulation to create visual appeal. Once you’ve achieved your desired swirl pattern, you can alternate adding more pineapple and strawberry mixtures, swirling as you go, until your glasses are full. For an extra touch, you can garnish with a fresh strawberry slice or a small piece of pineapple on the rim of the glass. Serve immediately and enjoy the refreshing, dual-flavored goodness of your homemade Pineapple Strawberry Swirled Slushies!
Conclusion:
And there you have it – your very own batch of refreshing Pineapple Strawberry Swirled Slushies! We hope you enjoyed creating this vibrant and delicious treat. This recipe is perfect for a hot summer day, a fun party drink, or just a sweet escape any time of year. The beautiful swirl of pineapple and strawberry creates a visually appealing and incredibly flavorful slushy that’s sure to be a hit with everyone. Don’t be afraid to get creative with your presentation! Pour them into fun glasses, add a paper umbrella or a fresh strawberry garnish for an extra special touch.
For serving, these are best enjoyed immediately while they’re perfectly slushy. They make a wonderful standalone treat, but you could also serve them alongside grilled dishes, light salads, or even as a fun dessert alternative. Feeling adventurous? Try adding a splash of coconut milk for a creamier texture, or a hint of lime juice for an extra zesty kick. Experimenting with different fruits is also encouraged – perhaps some mango or a touch of banana could be incorporated into future batches! We encourage you to make this recipe your own and share the joy of these delightful Pineapple Strawberry Swirled Slushies with friends and family.
Frequently Asked Questions:
Q: Can I make Pineapple Strawberry Swirled Slushies ahead of time?
While the slushies are best enjoyed fresh, you can freeze the fruit mixture in ice cube trays beforehand to speed up the blending process. Once blended, they are at their peak texture right away.
Q: My slushy isn’t blending smoothly. What can I do?
Ensure your fruit is properly frozen. If your blender is struggling, you can add a tablespoon or two of liquid (water, juice, or coconut milk) at a time until it reaches your desired consistency. Make sure not to add too much liquid, or it will become more of a smoothie than a slushy.
Q: Can I use fresh fruit instead of frozen?
You can, but you’ll need to add ice cubes to achieve the slushy texture. Using frozen fruit eliminates the need for ice and results in a more intensely flavored, less diluted slushy.

Pineapple Strawberry Swirl Slushie
A refreshing dual-flavored slushie perfect for summer, featuring swirls of pineapple and strawberry.
Ingredients
-
2 cups frozen pineapple chunks
-
1 cup pineapple juice or water
-
1 tablespoon honey (optional)
-
2 cups frozen strawberries
-
1 cup strawberry juice or water
-
1 tablespoon honey (optional)
Instructions
-
Step 1
Gather all the ingredients for the pineapple layer: 2 cups frozen pineapple chunks, 1 cup pineapple juice or water, and 1 tablespoon honey (optional). -
Step 2
In a blender, combine the frozen pineapple chunks, pineapple juice (or water), and honey (if using). Blend until smooth and thick, adding more liquid sparingly if needed. -
Step 3
Pour the blended pineapple mixture into a separate container and set aside. You can chill it in the freezer while preparing the strawberry layer. -
Step 4
Gather all the ingredients for the strawberry layer: 2 cups frozen strawberries, 1 cup strawberry juice or water, and 1 tablespoon honey (optional). -
Step 5
In a clean blender, combine the frozen strawberries, strawberry juice (or water), and honey (if using). Blend until smooth and thick, adding more liquid sparingly if needed. -
Step 6
To assemble, pour a portion of the pineapple mixture into the bottom of two tall glasses. Carefully spoon or pour the strawberry mixture on top. Gently swirl the two layers together with a spoon or straw to create ribbons of color. Continue layering and swirling until glasses are full. -
Step 7
Garnish with a fresh strawberry slice or a small piece of pineapple on the rim of the glass if desired. Serve immediately.
Important Information
Nutrition Facts (Per Serving)
It is important to consider this information as approximate and not to use it as definitive health advice.
Allergy Information
Please check ingredients for potential allergens and consult a health professional if in doubt.

Leave a Comment