
Piña Colada Smoothie Bowl takes you straight to paradise, even if you’re just in your kitchen. We all crave those moments of pure bliss, the taste of sunshine and tropical breezes, and this vibrant bowl delivers just that with every spoonful. What is it about the classic Piña Colada that captures our hearts? It’s the irresistible harmony of sweet pineapple and creamy coconut, a flavor combination that instantly transports us to sandy beaches and swaying palm trees. This Piña Colada Smoothie Bowl elevates that beloved taste into a nourishing and refreshing breakfast or snack. It’s not just a treat for your taste buds; it’s a beautiful, edible work of art, bursting with natural goodness and customizable to your heart’s content.
What Makes This Piña Colada Smoothie Bowl So Special?
This isn’t your average breakfast. We’re talking about a creamy, dreamy blend that’s packed with tropical flavor and wholesome ingredients. Unlike its cocktail counterpart, this version is a guilt-free indulgence, loaded with vitamins, fiber, and healthy fats. The magic lies in its simplicity and the vibrant burst of authentic tropical taste. We’re using frozen pineapple for that perfect icy texture, creamy coconut milk to mimic the richness of the origin extractal, and a touch of sweetness that makes it utterly irresistible. Get ready to ditch the blender for a moment and embrace a truly delightful way to enjoy the essence of a Piña Colada.

Ingredients:
- 1 cup frozen pineapple chunks
- 1 frozen banana, sliced
- 1/4 cup frozen coconut chunks (or 3-4 tablespoons shredded coconut)
- 1/2 cup coconut milk
- 1 tablespoon maple syrup
- 1 teaspoon lemon juice
- Granola, for topping
- Coconut flakes, for topping
- Fresh pineapple chunks, for topping
- Sliced banana, for topping
Getting Started: Your Tropical Base
Blending the Frozen Fruits
To begin extract crafting your delightful Piña Colada Smoothie Bowl, we first need to create the creamy, frozen base that forms the heart of this tropical treat. Grab your high-powered blender. Into the blender jug, add the 1 cup of frozen pineapple chunks. These are crucial for that characteristic sweet and tangy piña colada flavor. Next, add the 1 frozen banana, which has been sliced beforehand to make blending easier. The frozen banana is essential for achieving that thick, ice-cream-like texture that makes smoothie bowls so satisfying. The more frozen your fruit, the thicker your bowl will be, so ensure your banana is well-frozen before slicing and adding it. For an extra layer of authentic piña colada essence and creaminess, add the 1/4 cup of frozen coconut chunks. If you don’t have frozen coconut chunks, you can substitute with 3 to 4 tablespoons of shredded coconut. While the frozen chunks will contribute more to the thickness, the shredded coconut will still impart wonderful flavor and a smoother texture.
Achieving the Perfect Creaminess
Now it’s time to introduce the liquid that will help everything blend smoothly. Pour in the 1/2 cup of coconut milk. This provides the essential creamy consistency and reinforces the tropical coconut flavor profile. For a touch of sweetness that perfectly complements the tartness of the pineapple and the richness of the coconut, add the 1 tablespoon of maple syrup. If you prefer a less sweet bowl, you can reduce this amount or omit it entirely, especially if your banana is very ripe. To brighten the flavors and add a subtle zing that cuts through the sweetness, stir in the 1 teaspoon of lemon juice. The lemon juice acts as a flavor enhancer, making all the other ingredients pop and preventing the bowl from tasting overly rich or heavy. Ensure all your ingredients are in the blender.
Blending and Perfecting the Smoothie
The Blending Process
With all your base ingredients now in the blender, it’s time to start blengin extractg. Begin on a low speed, using the tamper if your blender has one, to help push the frozen ingredients down towards the blades. This is a crucial step for achieving a super thick smoothie bowl. You want the mixture to be thick enough that it doesn’t easily pour out of the blender. If the mixture is too thick and your blender is struggling, add a tiny splash more coconut milk, no more than a tablespoon at a time, and continue blending. Patience is key here; you might need to stop the blender a few times to scrape down the sides with a spatula, ensuring all the ingredients are incorporated evenly. The goal is a smooth, thick, and creamy consistency, free of large fruit chunks. Blend until you no longer see any distinct pieces of fruit and the mixture has a uniform texture. This should take a few minutes depending on the power of your blender.
Tasting and Adjusting
Once you’ve achieved a wonderfully thick and smooth consistency, it’s a good idea to give your smoothie a quick taste test. Use a clean spoon to carefully scoop out a small amount. Does it need more sweetness? If so, add another teaspoon of maple syrup and blend briefly. Is the lemon flavor too pronounced? You can add a tiny bit more pineapple or coconut milk to balance it out. The beauty of making your own smoothie bowl is that you can customize it to your exact preferences. Remember, the flavors will continue to meld as it sits, so aim for a taste that is balanced and delicious right out of the blender.
Assembling Your Tropical Masterpiece
Pouring the Smoothie Base
Once your Piña Colada smoothie base is perfectly blended to your liking, it’s time to transfer it to your serving bowl. Carefully spoon the thick, creamy mixture into your chosen bowl. Use the back of your spoon or a spatula to spread it out evenly. Aim for a smooth surface, which will provide a beautiful canvas for your toppings. The goal is to create a visually appealing as well as delicious bowl. Work quickly, as the frozengin extractxture will begin to soften as it comes into contact with room temperature.
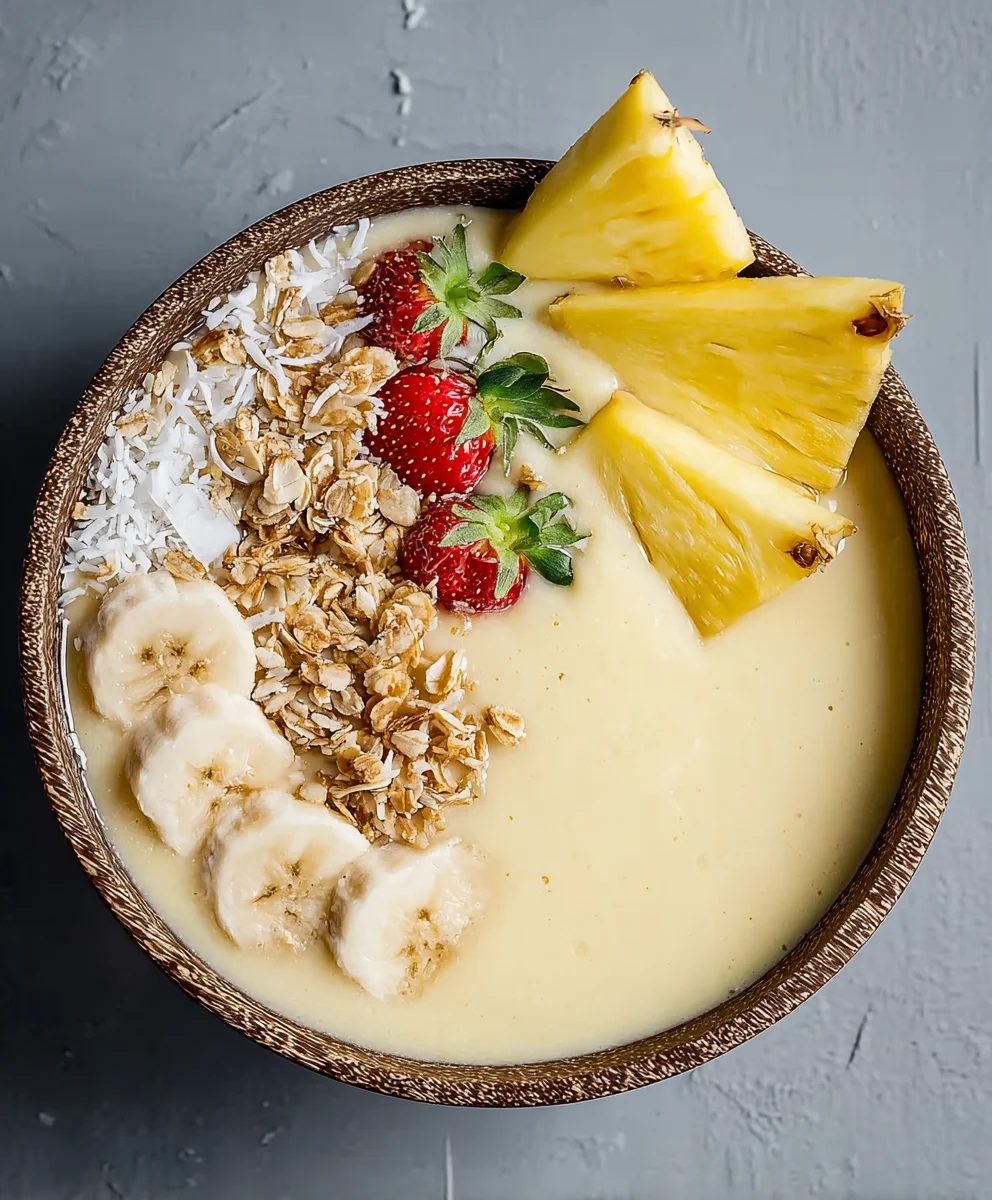
Adding the Toppings for Texture and Flavor
Now comes the fun part – decorating your Piña Colada Smoothie Bowl! This is where you add texture, additional flavor, and that irresistible visual appeal. Generously sprinkle a handful of your favorite granola over the smoothie base. The crunch of the granola will provide a wonderful contrast to the smooth, creamy smoothie. Next, add a scattering of coconut flakes. These will add another layer of coconut flavor and a delightful chegrape juicess. For a burst of freshness and to enhance the piña colada theme, arrange a few fresh pineapple chunks artfully on top. Finally, place a few perfectly sliced banana rounds amongst the other toppings. You can arrange them in a pattern, overlap them, or just scatter them playfully. Feel free to add any other favorite toppings you might have, such as chia seeds, a drizzle of honey, or a sprinkle of toasted nuts, to further personalize your creation.
Conclusion:
There you have it! Crafting a delicious and refreshing Piña Colada Smoothie Bowl is an absolute breeze, and the result is a tropical paradise in a bowl. This vibrant and creamy treat is not only incredibly satisfying but also packed with nutrients to kickstart your day or serve as a delightful pick-me-up. Remember, the beauty of this Piña Colada Smoothie Bowl lies in its simplicity and adaptability. Don’t be afraid to experiment and make it your own!
For serving, I love to garnish my Piña Colada Smoothie Bowl with toasted coconut flakes, fresh pineapple chunks, and a sprinkle of chia seeds for added texture and visual appeal. A maraschino cherry or a tiny umbrella can also add a fun, festive touch!
Regarding variations, feel free to add a handful of spinach for a nutrient boost without altering the flavor significantly, or swap out some of the pineapple for mango for a different tropical twist. A spoonful of Greek yogurt can also enhance the creaminess and add extra protein.
I truly hope you enjoy making and savoring this Piña Colada Smoothie Bowl as much as I do. It’s a little escape to the tropics, no matter where you are. Happy blending!
FAQs:
Can I make the Piña Colada Smoothie Bowl ahead of time?
While it’s best enjoyed immediately after blending for optimal texture, you can prepare the frozen fruit mixture in advance and store it in the freezer. When you’re ready to eat, simply blend it with your liquid. The toppings are also best added just before serving to maintain their crispness.
What kind of liquid is best for the Piña Colada Smoothie Bowl?
Coconut milk (canned or carton) is ideal for that authentic Piña Colada flavor and creamy consistency. However, almond milk, oat milk, or even just water can be used if you prefer a lighter option or have dietary restrictions.
My Piña Colada Smoothie Bowl is too thick, what can I do?
If your smoothie bowl is too thick to blend smoothly, gradually add more liquid (coconut milk, water, etc.), a tablespoon at a time, until you reach your desired consistency. Be careful not to add too much, as you want it to be spoonable, not drinkable.

Piña Colada Smoothie Bowl – Tropical Non-Alcoholic Treat
A delicious and refreshing non-alcoholic Piña Colada smoothie bowl, perfect for a healthy tropical treat.
Ingredients
-
1 cup frozen pineapple chunks
-
1 frozen banana, sliced
-
1/4 cup frozen coconut chunks
-
1/2 cup coconut milk
-
1 tablespoon maple syrup
-
1 teaspoon lemon juice
-
Granola, for topping
-
Coconut flakes, for topping
-
Fresh pineapple chunks, for topping
-
Sliced banana, for topping
Instructions
-
Step 1
Combine frozen pineapple, frozen banana, and frozen coconut chunks in a high-powered blender. -
Step 2
Add coconut milk, maple syrup, and lemon juice to the blender. -
Step 3
Blend on low speed, using a tamper if available, until the mixture is thick and creamy, adding a tablespoon of coconut milk at a time if needed. -
Step 4
Taste and adjust sweetness or tartness as desired by adding more maple syrup or lemon juice, then blend briefly. -
Step 5
Spoon the thick smoothie base into a serving bowl, spreading it evenly. -
Step 6
Top generously with granola, coconut flakes, fresh pineapple chunks, and sliced banana.
Important Information
Nutrition Facts (Per Serving)
It is important to consider this information as approximate and not to use it as definitive health advice.
Allergy Information
Please check ingredients for potential allergens and consult a health professional if in doubt.

Leave a Comment