
Overnight Sourdough Bagel: Imagine waking up to the irresistible aroma of freshly baked bagels, their crusts perfectly golden and their insides delightfully chewy. Sounds like a dream, right? Well, it doesn’t have to be! This recipe brings the bakery experience right into your kitchen, with a simple twist it all happens while you sleep.
Bagels, with their distinctive shape and satisfying texture, have a rich history rooted in Jewish communities of Eastern Europe. They’ve since become a beloved breakfast staple worldwide, enjoyed plain, toasted, or piled high with your favorite toppings. But let’s be honest, the traditional bagel-making process can be a bit intimidating, often involving multiple steps and demanding precise timing.
That’s where this Overnight Sourdough Bagel recipe shines. By harnessing the power of a slow, cold fermentation, we unlock a depth of flavor and a wonderfully chewy texture that rivals even the best bakery bagels. The sourdough starter adds a subtle tang that complements the malty sweetness of the dough, creating a truly unforgettable taste. People adore this recipe because it simplifies the process without sacrificing quality. Plus, the convenience of preparing the dough the night before means you can enjoy fresh, homemade bagels with minimal effort in the morning. Who wouldn’t love that?

Ingredients:
- For the Levain (Night Before):
- 50g Active Sourdough Starter (100% hydration)
- 50g Bread Flour
- 50g Water (lukewarm, about 85°F)
- For the Dough:
- 450g Bread Flour
- 250g Water (cold, about 40°F)
- 10g Salt
- Levain (from above, all of it)
- 1 Tablespoon Barley Malt Syrup (or honey)
- For the Boiling Water:
- 8 cups Water
- 2 Tablespoons Barley Malt Syrup (or honey)
- 1 Tablespoon Baking Soda
- For Toppings (Optional):
- Everything Bagel Seasoning
- Sesame Seeds
- Poppy Seeds
- Dried Onion Flakes
- Coarse Sea Salt
Preparing the Levain (Night Before)
Okay, let’s get started! The first thing we need to do is prepare our levain. This is essentially a pre-ferment that will give our bagels that amazing sourdough flavor and chewy texture. Don’t skip this step it’s crucial!
- Combine Ingredients: In a clean jar or small bowl, combine the 50g of active sourdough starter, 50g of bread flour, and 50g of lukewarm water. Make sure your starter is bubbly and active it should have doubled in size after feeding.
- Mix Well: Stir everything together until you have a smooth, thick batter. There shouldn’t be any dry flour remaining.
- Cover and Ferment: Cover the jar or bowl loosely with a lid or plastic wrap. Let it sit at room temperature (ideally around 70-75°F) for 8-12 hours, or until it has doubled or nearly tripled in size and is bubbly and active. You’ll know it’s ready when it has a slightly domed top and a pleasant, slightly sour aroma.
Making the Dough
Now that our levain is happily bubbling away, we can move on to making the main dough. This part is a little more involved, but don’t worry, I’ll walk you through it step-by-step.
- Combine Flour and Water: In a large mixing bowl (or the bowl of your stand mixer), combine the 450g of bread flour and 250g of cold water. Mix with your hands or a spatula until a shaggy dough forms. There will be some dry flour at the bottom of the bowl, and that’s perfectly fine.
- Autolyse: Cover the bowl with plastic wrap or a damp towel and let it rest for 30-60 minutes. This process, called autolysing, allows the flour to fully hydrate, which will result in a more extensible and elastic dough.
- Add Levain and Salt: After the autolyse, add the entire levain (it should be bubbly and ready to go!) and the 10g of salt to the dough.
- Mix the Dough: If you’re using a stand mixer, use the dough hook attachment and mix on low speed for 8-10 minutes. If you’re mixing by hand, knead the dough on a lightly floured surface for 10-12 minutes. The dough will be quite stiff and slightly sticky at first, but it will gradually become smoother and more elastic as you knead.
- Add Barley Malt Syrup: Add the 1 tablespoon of barley malt syrup (or honey) and continue to mix for another 1-2 minutes until fully incorporated. The dough should be smooth, elastic, and slightly tacky.
- Bulk Fermentation: Place the dough in a lightly oiled bowl, turning to coat. Cover the bowl with plastic wrap or a damp towel and let it bulk ferment at room temperature for 2-3 hours, or until it has increased in size by about 50-75%. Perform a few stretch and folds during the first hour of bulk fermentation to strengthen the dough. To do a stretch and fold, gently stretch a portion of the dough upwards and fold it over onto itself. Rotate the bowl 90 degrees and repeat. Do this 4-5 times.
- Cold Proof: After the bulk fermentation, gently deflate the dough and shape it into a tight ball. Place it back in the oiled bowl, cover, and refrigerate overnight (or for up to 24 hours). This cold proofing process slows down the fermentation and develops even more flavor.
Shaping the Bagels
The next day, it’s time to shape our bagels! This is where things start to get really fun. Don’t worry if your first few bagels aren’t perfect practice makes perfect!
- Divide the Dough: Remove the dough from the refrigerator and gently turn it out onto a lightly floured surface. Divide the dough into 8 equal pieces (about 110-120g each).
- Pre-Shape: Gently shape each piece of dough into a round ball. Cover the balls with plastic wrap or a damp towel and let them rest for 15-20 minutes. This will relax the gluten and make them easier to shape.
- Shape the Bagels: There are two main methods for shaping bagels:
- The Rope Method: Roll each ball of dough into a rope about 8-10 inches long. Wrap the rope around your hand, overlapping the ends. Pinch the ends together firmly to seal. Roll the sealed joint on the counter to smooth it out.
- The Hole Method: Gently flatten each ball of dough into a disc about 3-4 inches in diameter. Use your thumb to poke a hole in the center of the disc. Gently stretch the hole to about 1-1.5 inches in diameter.
- Proof the Bagels: Place the shaped bagels on a baking sheet lined with parchment paper. Cover them loosely with plastic wrap or a damp towel and let them proof at room temperature for 15-30 minutes. They should puff up slightly but not double in size.
Boiling and Baking
Almost there! The boiling step is what gives bagels their signature chewy crust. Don’t skip it!
- Preheat Oven: Preheat your oven to 450°F (232°C) with a baking stone or baking steel on the middle rack. If you don’t have a baking stone or steel, you can use a regular baking sheet.
- Prepare Boiling Water: While the oven is preheating, bring the 8 cups of water to a boil in a large pot. Add the 2 tablespoons of barley malt syrup (or honey) and the 1 tablespoon of baking soda. The baking soda helps to give the bagels their characteristic color and chewiness.
- Boil the Bagels: Gently drop 2-3 bagels into the boiling water at a time. Boil them for 1-2 minutes per side. The longer you boil them, the chewier they will be.
- Prepare Toppings: While the bagels are boiling, prepare your toppings. Place your desired toppings (everything bagel seasoning, sesame seeds, poppy seeds, dried onion flakes, coarse sea salt, etc.) in shallow bowls.
- Add Toppings: After boiling, use a slotted spoon to remove the bagels from the water and place them on a wire rack to drain briefly. While they are still wet, dip them in your desired toppings or sprinkle the toppings generously over the tops.
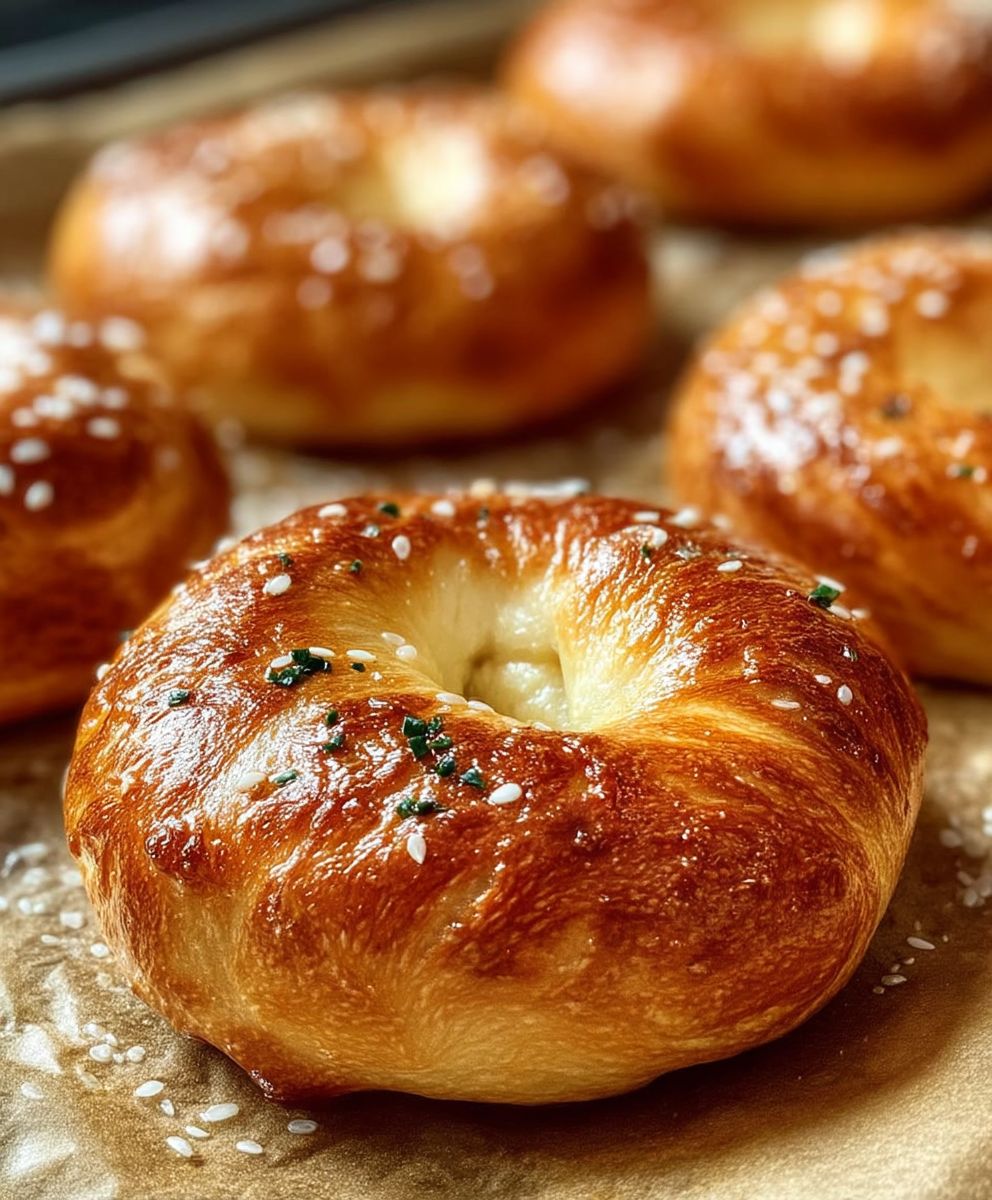
- Bake the Bagels: Carefully transfer the bagels to the preheated baking stone or baking sheet. Bake for 20-25 minutes, or until they are golden brown and sound hollow when tapped on the bottom.
- Cool and Enjoy: Remove the bagels from the oven and let them cool on a wire rack for at least 30 minutes before slicing and enjoying.
Tips for Success
- Use High-Quality Bread Flour: Bread flour has a higher protein content than all-purpose flour, which is essential for developing the gluten structure needed for chewy bagels.
- Don’t Overproof: Overproofed bagels will collapse when boiled and baked. They should be slightly puffy but not doubled in size before boiling.
- Adjust Baking Time: Baking times may vary depending on your oven. Keep an eye on the bagels and adjust the baking time as needed.
- 50g Active Sourdough Starter (100% hydration)
- 50g Bread Flour
- 50g Water (lukewarm, about 85°F)
- 450g Bread Flour
- 250g Water (cold, about 40°F)
- 10g Salt
- Levain (from above, all of it)
- 1 Tablespoon Barley Malt Syrup (or honey)
- 8 cups Water
- 2 Tablespoons Barley Malt Syrup (or honey)
- 1 Tablespoon Baking Soda
- Everything Bagel Seasoning
- Sesame Seeds
- Poppy Seeds
- Dried Onion Flakes
- Coarse Sea Salt
- In a clean jar or small bowl, combine the 50g of active sourdough starter, 50g of bread flour, and 50g of lukewarm water. Make sure your starter is bubbly and active it should have doubled in size after feeding.
- Stir everything together until you have a smooth, thick batter. There shouldn’t be any dry flour remaining.
- Cover the jar or bowl loosely with a lid or plastic wrap. Let it sit at room temperature (ideally around 70-75°F) for 8-12 hours, or until it has doubled or nearly tripled in size and is bubbly and active. You’ll know it’s ready when it has a slightly domed top and a pleasant, slightly sour aroma.
- In a large mixing bowl (or the bowl of your stand mixer), combine the 450g of bread flour and 250g of cold water. Mix with your hands or a spatula until a shaggy dough forms. There will be some dry flour at the bottom of the bowl, and that’s perfectly fine.
- Cover the bowl with plastic wrap or a damp towel and let it rest for 30-60 minutes. This process, called autolysing, allows the flour to fully hydrate, which will result in a more extensible and elastic dough.
- After the autolyse, add the entire levain (it should be bubbly and ready to go!) and the 10g of salt to the dough.
- If you’re using a stand mixer, use the dough hook attachment and mix on low speed for 8-10 minutes. If you’re mixing by hand, knead the dough on a lightly floured surface for 10-12 minutes. The dough will be quite stiff and slightly sticky at first, but it will gradually become smoother and more elastic as you knead.
- Add the 1 tablespoon of barley malt syrup (or honey) and continue to mix for another 1-2 minutes until fully incorporated. The dough should be smooth, elastic, and slightly tacky.
- Place the dough in a lightly oiled bowl, turning to coat. Cover the bowl with plastic wrap or a damp towel and let it bulk ferment at room temperature for 2-3 hours, or until it has increased in size by about 50-75%. Perform a few stretch and folds during the first hour of bulk fermentation to strengthen the dough. To do a stretch and fold, gently stretch a portion of the dough upwards and fold it over onto itself. Rotate the bowl 90 degrees and repeat. Do this 4-5 times.
- After the bulk fermentation, gently deflate the dough and shape it into a tight ball. Place it back in the oiled bowl, cover, and refrigerate overnight (or for up to 24 hours). This cold proofing process slows down the fermentation and develops even more flavor.
- Remove the dough from the refrigerator and gently turn it out onto a lightly floured surface. Divide the dough into 8 equal pieces (about 110-120g each).
- Gently shape each piece of dough into a round ball. Cover the balls with plastic wrap or a damp towel and let them rest for 15-20 minutes. This will relax the gluten and make them easier to shape.
- There are two main methods for shaping bagels:
- The Rope Method: Roll each ball of dough into a rope about 8-10 inches long. Wrap the rope around your hand, overlapping the ends. Pinch the ends together firmly to seal. Roll the sealed joint on the counter to smooth it out.
- The Hole Method: Gently flatten each ball of dough into a disc about 3-4 inches in diameter. Use your thumb to poke a hole in the center of the disc. Gently stretch the hole to about 1-1.5 inches in diameter.
- Place the shaped bagels on a baking sheet lined with parchment paper. Cover them loosely with plastic wrap or a damp towel and let them proof at room temperature for 15-30 minutes. They should puff up slightly but not double in size.
- Preheat your oven to 450°F (232°C) with a baking stone or baking steel on the middle rack. If you don’t have a baking stone or steel, you can use a regular baking sheet.
- While the oven is preheating, bring the 8 cups of water to a boil in a large pot. Add the 2 tablespoons of barley malt syrup (or honey) and the 1 tablespoon of baking soda. The baking soda helps to give the bagels their characteristic color and chewiness.
- Gently drop 2-3 bagels into the boiling water at a time. Boil them for 1-2 minutes per side. The longer you boil them, the chewier they will be.
- While the bagels are boiling, prepare your toppings. Place your desired toppings (everything bagel seasoning, sesame seeds, poppy seeds, dried onion flakes, coarse sea salt, etc.) in shallow bowls.
- After boiling, use a slotted spoon to remove the bagels from the water and place them on a wire rack to drain briefly. While they are still wet, dip them in your desired toppings or sprinkle the toppings generously over the tops.
- Carefully transfer the bagels to the preheated baking stone or baking sheet. Bake for 20-25 minutes, or until they are golden brown and sound hollow when tapped on the bottom.
- Remove the bagels from the oven and let them cool on a wire rack for at least 30 minutes before slicing and enjoying.
- Use high-quality bread flour for the best results.
- Don’t overproof the bagels.
- Adjust baking time as needed based on your oven.
- The levain is crucial for the sourdough flavor and chewy texture.
- Cold proofing develops even more flavor.
- Boiling the bagels gives them their signature chewy crust.
Conclusion:
So, there you have it! This Overnight Sourdough Bagel recipe isn’t just another bagel recipe; it’s a gateway to bakery-quality bagels right in your own kitchen. The tangy sourdough flavor, the chewy interior, and that perfectly crisp crust it’s a symphony of textures and tastes that will have you hooked from the very first bite. Trust me, once you experience the satisfaction of pulling these beauties out of your oven, you’ll never look at store-bought bagels the same way again.
Why This Recipe Is a Must-Try:
What makes this recipe so special? It’s the combination of simplicity and depth of flavor. The overnight fermentation process allows the sourdough culture to work its magic, developing a complex tang that you just can’t achieve with a quick rise. Plus, the hands-on time is minimal, making it perfect for busy weeknights. You prep the dough, let it rest, and then bake them off in the morning. It’s like having a personal baker working while you sleep!
Beyond the incredible flavor, these bagels are incredibly versatile. They’re fantastic on their own, toasted with a smear of cream cheese, or used as the base for your favorite breakfast sandwich. Imagine a toasted sourdough bagel piled high with crispy bacon, a fried egg, and a slice of melted cheddar pure breakfast bliss! And let’s not forget the joy of sharing these homemade bagels with friends and family. They’ll be so impressed, they’ll think you secretly enrolled in culinary school.
Serving Suggestions and Variations:
The possibilities are truly endless! For a classic experience, stick with plain bagels and enjoy them with cream cheese, lox, or your favorite jam. But if you’re feeling adventurous, why not experiment with different toppings and flavors? Add everything bagel seasoning before baking for that iconic savory crunch. Or, incorporate blueberries, cinnamon, or chocolate chips into the dough for a sweet treat. You could even try adding shredded cheese and jalapeños for a spicy kick.
Don’t be afraid to get creative with your fillings too! Think beyond the traditional cream cheese and explore options like hummus, avocado, pesto, or even a homemade veggie spread. These bagels are also fantastic for making mini pizzas or bagel melts. Simply top them with your favorite pizza toppings or sandwich fillings and bake until the cheese is melted and bubbly.
For a truly decadent experience, try making a bagel breakfast sandwich with smoked salmon, cream cheese, capers, and red onion. Or, create a gourmet lunch by layering sliced turkey, avocado, sprouts, and a drizzle of balsamic glaze on a toasted bagel. The possibilities are limited only by your imagination!
And remember, the key to a perfect Overnight Sourdough Bagel is patience. Don’t rush the fermentation process. Let the dough rest and develop its flavor. The longer it ferments, the more complex and delicious the bagels will be.
So, what are you waiting for? Grab your sourdough starter, gather your ingredients, and get ready to embark on a bagel-making adventure. I promise you won’t regret it. This recipe is a game-changer, and I can’t wait to hear about your experiences.
Give this recipe a try, and don’t forget to share your creations! Tag me in your photos on social media and let me know what variations you came up with. I’m always looking for new and exciting ways to enjoy these delicious homemade bagels. Happy baking!
Overnight Sourdough Bagel: The Ultimate Guide to Baking at Home
Homemade sourdough bagels with a chewy crust and delicious flavor, perfect for breakfast or a snack.


Leave a Comment