
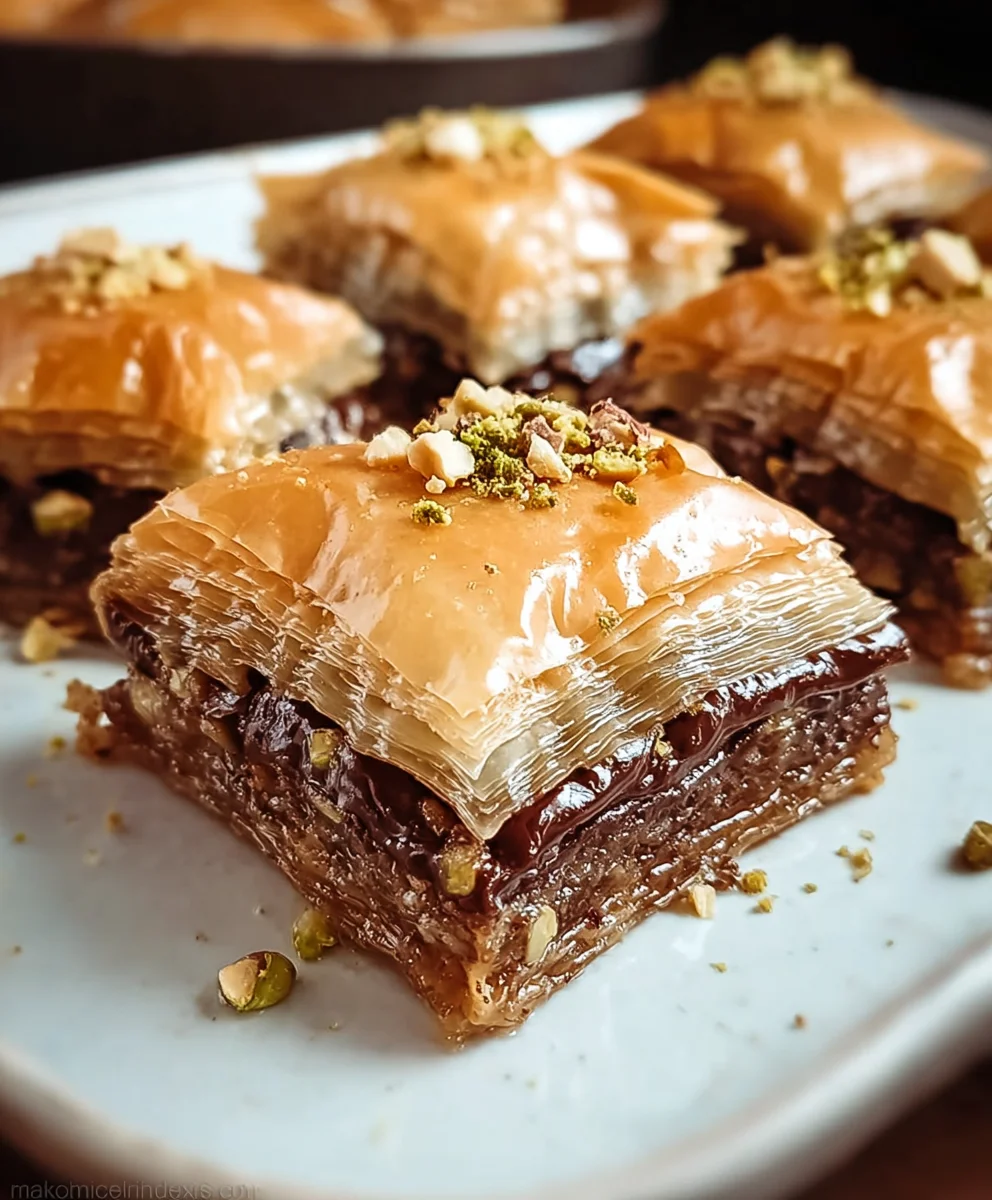
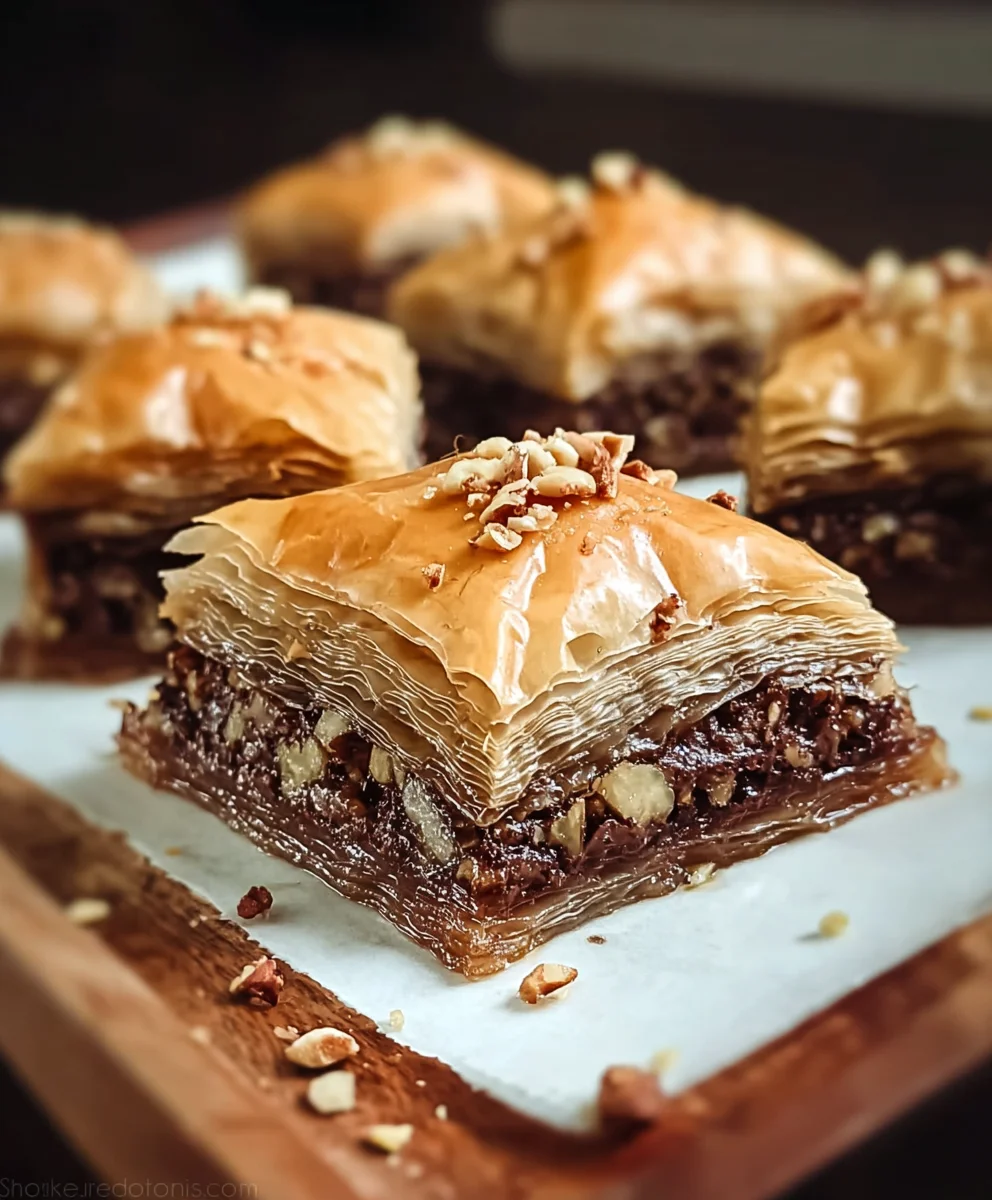
Nutella Baklava isn’t just a dessert; it’s a symphony of textures and flavors that transforms a classic treat into something utterly irresistible. Imagin extracte the delicate crunch of golden phyllo dough, each paper-thin layer kissed with butter, giving way to a rich, molten heart of pure hazelnut-chocolate bliss. It’s this unexpected fusion that has everyone buzzing about Nutella Baklava, turning heads and tantalizing taste buds. People absolutely adore it because it takes the familiar, comforting sweetness of baklava and injects it with the beloved decadence of Nutella, creating a flavor profile that is both nostalgic and excitingly new. What truly makes this particular Nutella Baklava special is the perfect balance achieved – it’s not overly sweet, allowing the nutty notes of the chocolate to truly shine, while the syrup, subtly infused with a hint of spice, complements rather than overpowers. Get ready to embark on a culinary adventure that will redefine your baklava experience.

Ingredients:
- 1 (16 oz) package phyllo dough, thawed
- 1 cup unsalted butter, melted
- 1½ cups Nutella
- 1½ cups chopped hazelnuts
- ¾ cup honey
- ¼ cup water
- ¼ cup sugar
- 1 tsp vanilla extract
Preparing the Baklava Layers
Preheating and Pan Preparation
The first step to achieving perfect Nutella Baklava is to preheat your oven to 350°F (175°C). This ensures that as soon as your baklava goes in, it starts to crisp and bake evenly. Next, you’ll need to prepare your baking pan. A 9×13 inch baking pan is ideal for this recipe. Lightly brush the bottom and sides of the pan with some of the melted butter. This prevents sticking and gives the bottom layers a lovely golden-brown crisp.
Layering the Phyllo Dough
This is where the magic of baklava truly begin extracts. Unroll your thawed phyllo dough. Phyllo can be a bit delicate, so handle it with care. It’s best to work with one sheet at a time. Keep the remaining sheets covered with a slightly damp kitchen towel while you work to prevent them from drying out. Lay one sheet of phyllo into your prepared baking pan. Brush the entire surface of the phyllo sheet with melted butter. Don’t be shy with the butter; it’s crucial for creating those signature flaky layers. Repeat this process, buttering each layer of phyllo dough, until you have about 10-12 layers in the pan. The more layers you create, the more intricate and crispy your baklava will be. Ensure each layer is evenly coated with butter for consistent crispness.
Creating the Nutella Hazelnut Filling
Assembling the Filling Layers
Once you have a good base of buttered phyllo layers, it’s time to add the star filling. In a medium bowl, combine the Nutella and the chopped hazelnuts. Stir them together thoroughly until the hazelnuts are evenly distributed throughout the creamy Nutella. This mixture will form the luscious heart of your Nutella Baklava. Spread this Nutella and hazelnut mixture evenly over the top layer of phyllo dough in the baking pan. Make sure you get close to the edges to ensure every bite has that delightful chocolate-hazelnut crunch.
Building the Top Layers
Now, we’ll build the top portion of our baklava. Take another sheet of phyllo dough and lay it carefully over the Nutella-hazelnut filling. Brush it generously with melted butter, just as you did with the bottom layers. Continue layering the phyllo sheets, brushing each one with butter, until you have used up the remaining phyllo dough. Aim for roughly another 10-12 layers on top. The goal is to create a beautiful, golden-brown top crust that encases the rich filling. Be sure to butter the very top layer exceptionally well; this will contribute significantly to the final golden color and crisp texture.
Cutting and Baking the Baklava
Scoring for Perfect Portions
Before baking, it’s essential to score the baklava. This step is critical for neat servings later and allows the syrup to penetrate the layers more effectively. Using a very sharp knife, carefully cut through the top layers of phyllo dough all the way down to the bottom layer. You can cut your baklava into diamonds, squares, or even long rectangles – whatever shape you prefer. Take your time with this step to ensure clean cuts. It’s much easier to cut the baklava while it’s still uncooked, so don’t skip this!
Baking to Golden Perfection
Once your baklava is scored, place the pan in the preheated oven. Bake for approximately 45-55 minutes, or until the top is beautifully golden brown and the edges are crisp. Keep an eye on it during the last 15-20 minutes of baking. If the top starts to brown too quickly, you can loosely tent it with aluminum foil. The goal is a deep, rich golden color.
Making and Applying the Honey Syrup
Simmering the Sweet Syrup
While the baklava is baking, let’s prepare the sweet syrup that will transform it into a truly decadent dessert. In a medium saucepan, combine the honey, water, and sugar. Place the saucepan over medium heat and stir gently until the sugar dissolves completely. Once the sugar is dissolved, bring the mixture to a gentle simmer. Let it simmer for about 5-7 minutes, without stirring, allowing it to thicken slightly. This simmer time is important for developing the right consistency for the syrup. After simmering, remove the saucepan from the heat and stir in the vanilla extract. The vanilla adds a lovely aromatic note that complements the honey and chocolate.
Soaking the Hot Baklava
This is arguably the most crucial step for delicious, moist baklava. As soon as the baklava comes out of the oven, while it is still hot, pour the warm (not hot) honey syrup evenly over the entire surface. You should hear a satisfying sizzle as the syrup hits the hot baklava. Make sure the syrup is distributed as evenly as possible so all the pieces soak up the sweetness. Once the syrup is poured, let the baklava cool completely at room temperature, uncovered, for at least 4 hours, or preferably overnight. This resting period allows the syrup to fully absorb into the layers, creating a tender interior while the top remains delightfully crisp. Do not cover the baklava while it is cooling, as this can make the top layers soggy. After it has cooled and the syrup has been fully absorbed, you can then cut through the scored lines again if needed to separate the pieces fully. Enjoy your homemade Nutella Baklava!
Conclusion:
There you have it – a delightful journey into the world of Nutella Baklava! We’ve walked through each step, from layering those delicate phyllo sheets to creating that luscious, nutty filling that makes this dessert so irresistible. The beauty of this Nutella Baklava lies not only in its decadent flavor profile but also in its surprisingly accessible preparation. Now it’s your turn to bring this sweet masterpiece to life in your own kitchen!
Imagin extracte serving this warm, syrup-drenched Nutella Baklava after a special meal. It pairs wonderfully with a scoop of vanilla bean ice cream for an extra touch of indulgence, or simply enjoy it with a strong cup of coffee or tea. For those looking to put their own spin on things, consider adding a sprinkle of chopped pistachios or toasted hazelnuts on top before baking for an added crunch. You could also experiment with a hint of orange zest in the syrup for a subtle citrus note. Don’t be afraid to get creative and make this Nutella Baklava your own!
Frequently Asked Questions about Nutella Baklava:
Q: Can I make Nutella Baklava ahead of time?
A: Absolutely! Nutella Baklava can be made a day or two in advance. Once cooled, store it in an airtight container at room temperature. The syrup will continue to meld with the layers, often making it even more delicious the next day. Just be sure it’s completely cooled before storing to pregin extractt sogginess.
Q: My phyllo dough is tearing. What can I do?
A: Don’t worry, a little tearing is normal with phyllo dough. Keep the unused phyllo covered with a damp kitchen towel while you work. When layering, you can overlap torn pieces or simply brush generously with melted butter to help them stick together. The final result will still be delicious!
Nutella Baklava – Decadent Dessert – Easy Recipe
A decadent and easy-to-make baklava featuring a rich Nutella and hazelnut filling, layered with crispy phyllo dough and drenched in a sweet honey syrup.
Ingredients
-
1 (16 oz) package phyllo dough, thawed
-
1 cup unsalted butter, melted
-
1½ cups Nutella
-
1½ cups chopped hazelnuts
-
¾ cup honey
-
¼ cup water
-
¼ cup sugar
-
1 tsp vanilla extract
Instructions
-
Step 1
Preheat oven to 350°F (175°C). Lightly brush a 9×13 inch baking pan with melted butter. -
Step 2
Layer phyllo dough sheets in the prepared pan, brushing each sheet with melted butter. Continue for 10-12 layers. -
Step 3
Combine Nutella and chopped hazelnuts. Spread this mixture evenly over the top phyllo layer. -
Step 4
Layer the remaining phyllo dough on top of the Nutella mixture, buttering each sheet generously. Aim for another 10-12 layers. -
Step 5
Carefully score the baklava into desired shapes without cutting all the way through. -
Step 6
Bake for 45-55 minutes, or until golden brown and crisp. While baking, prepare the syrup by simmering honey, water, and sugar for 5-7 minutes, then stirring in vanilla. -
Step 7
Pour the warm syrup evenly over the hot baklava as soon as it comes out of the oven. Let cool completely at room temperature for at least 4 hours, or overnight.
Important Information
Nutrition Facts (Per Serving)
It is important to consider this information as approximate and not to use it as definitive health advice.
Allergy Information
Please check ingredients for potential allergens and consult a health professional if in doubt.

Leave a Comment