
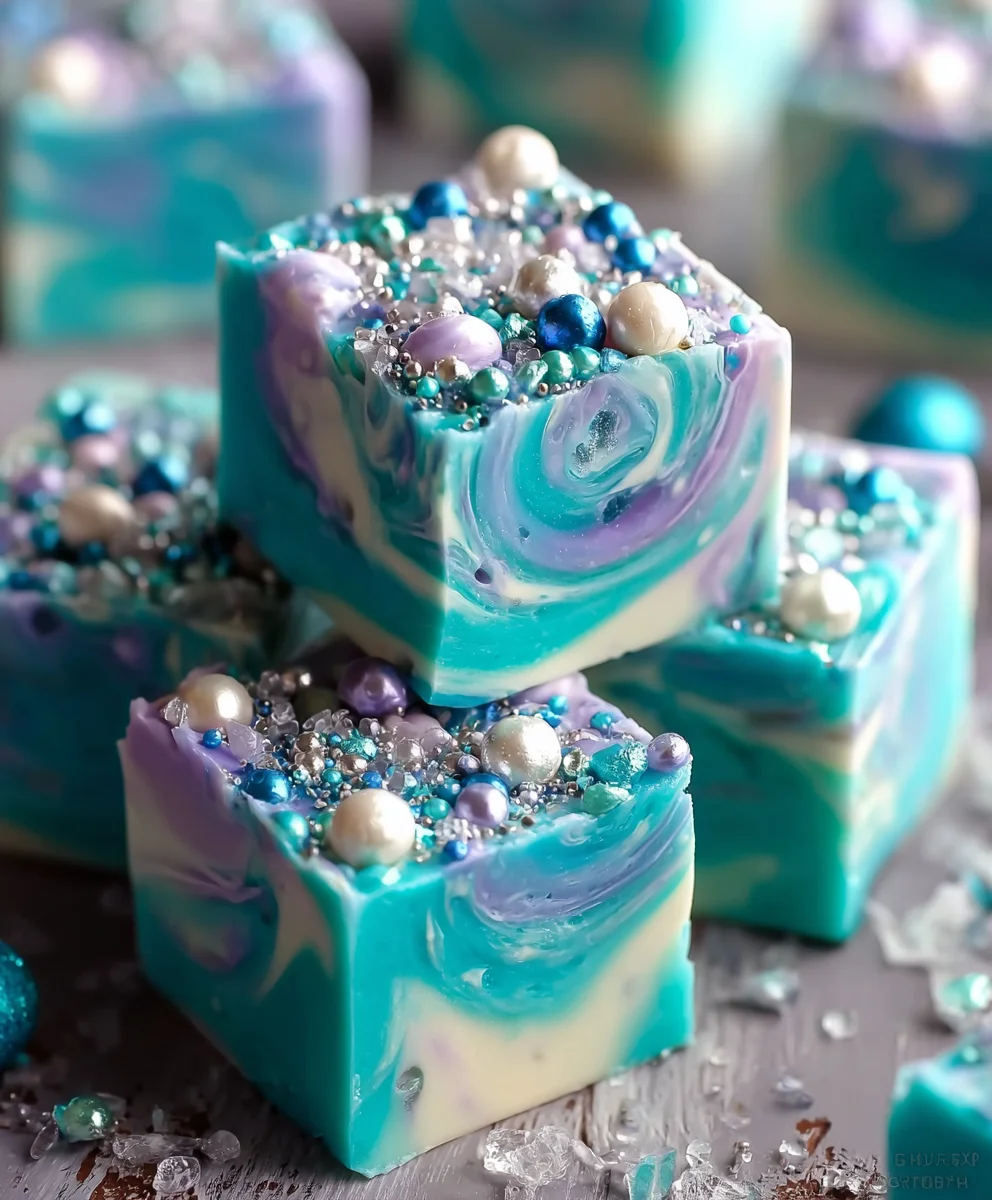
Mermaid Candy Fudge Recipe – are you ready to dive into a world of shimmering sweetness? Today, I am absolutely delighted to share a treat that not only captivates the eyes with its enchanting, ocean-inspired hues but also delights the palate with its creamy, rich flavor. This isn’t just any ordinary fudge; it’s a celebration of whimsy, a sprinkle of magic for your dessert table that brings the allure of the deep blue sea right into your kitchen.
While this particular confection doesn’t boast centuries of history, its soaring popularity stems from a modern appreciation for vibrant, fun, and visually stunning desserts that evoke a sense of fantasy and wonder. People adore this dish not only for its irresistibly smooth texture and decadent taste but also because it offers a delightfully easy way to create a truly memorable and Instagram-worthy treat. The joy of preparing this Mermaid Candy Fudge Recipe lies in its simplicity and the sheer delight of seeing the vibrant layers come to life. It’s the perfect no-bake solution for parties, gifts, or simply a magical indulgence on a quiet afternoon, promising a delightful escape with every bite.

Ingredients:
- For the Creamy White Chocolate Fudge Base:
- 3 cups (approximately 18 oz or 510g) high-quality white chocolate chips or finely chopped white chocolate bars. I find that good quality chocolate melts more smoothly and gives a superior texture to your “Mermaid Candy Fudge Recipe”.
- 1 (14 oz or 397g) can sweetened condensed milk. Make sure it’s condensed milk, not evaporated milk! This is the magical ingredient that gives our fudge its signature creamy consistency.
- ½ cup (1 stick or 113g) unsalted butter. Using unsalted butter allows us to control the salt content precisely.
- 1 teaspoon pure vanilla extract. Don’t skimp on the vanilla; it truly enhances the overall flavor of your delightful “Mermaid Candy Fudge Recipe”.
- ¼ teaspoon sea salt or fine salt. A tiny pinch of salt balances the sweetness beautifully.
- For the Enchanting Mermaid Colors:
- Gel food coloring in vibrant shades of blue, green, purple, and pink. Gel colors are highly concentrated, meaning you only need a small amount to achieve vivid, intense hues without altering the fudge consistency, which is crucial for our “Mermaid Candy Fudge Recipe”.
- For the Dazzling Candy Toppings:
- Assorted mermaid-themed sprinkles. Look for blends with iridescent scales, starfish, seashells, or simply a mix of blues, greens, purples, and pinks.
- Edible glitter (silver, blue, or iridescent). This adds that magical shimmer that truly brings the “Mermaid Candy Fudge Recipe” to life.
- Mini candy pearls or nonpareils in coordinating colors.
- Optional: Crushed graham crackers or shortbread cookies for a “sand” effect, or small candy shells.
- Essential Equipment You’ll Need:
- A sturdy 8×8 or 9×9 inch baking dish. I personally prefer an 8×8 for thicker fudge, but a 9×9 works if you like slightly thinner squares.
- Parchment paper or aluminum foil. This is crucial for easy removal of your finished “Mermaid Candy Fudge Recipe”.
- A medium-sized heavy-bottomed saucepan.
- A large heat-proof bowl for melting, if using a double boiler method, or several microwave-safe bowls for coloring.
- Silicone spatulas or sturdy wooden spoons for stirring.
- Measuring cups and spoons.
- Small bowls for dividing the fudge base for coloring.
Preparing Your Workspace and Ingredients for the Mermaid Candy Fudge Recipe
Before we dive into the delicious magic of creating your “Mermaid Candy Fudge Recipe,” it’s absolutely essential to get your workspace organized. Trust me, a little preparation goes a long way in ensuring a smooth and enjoyable cooking experience. I always say, “Mise en place” is your best friend in the kitchen, especially when dealing with a quick-setting recipe like fudge!
- Line Your Baking Dish: First things first, grab your 8×8 or 9×9 inch baking dish. I recommend lining it completely with parchment paper or aluminum foil, leaving an overhang on all sides. This overhang acts as little handles, making it incredibly easy to lift the entire slab of set “Mermaid Candy Fudge Recipe” out of the pan. If you’re using foil, a light spray with non-stick cooking spray can prevent any sticking, although parchment paper is usually enough on its own. Set this aside; it will be ready to receive our colorful layers.
- Measure and Gather Everything: Next, take a moment to measure out all of your ingredients. Have your white chocolate chips, sweetened condensed milk, butter, vanilla extract, and salt ready to go. Open your cans, unwrap your butter, and have your measuring spoons at the ready. For the food coloring, have your chosen gel colors open and accessible. Lastly, arrange all your sprinkles and edible glitters in small bowls near your prepared baking dish. This ensures you can add them immediately after layering the fudge, before it starts to set. Having everything within arm’s reach will prevent any last-minute scrambling and help maintain the flow of the “Mermaid Candy Fudge Recipe” process.
- Set Up Your Melting Station: Depending on your preferred method, prepare either your heavy-bottomed saucepan for stovetop melting or your large microwave-safe bowl. If you’re using the stovetop, ensure you have a clean, dry surface to place your hot pan once it’s off the heat. If you’re microwaving, be sure your bowls are truly microwave-safe.
Making the Basic White Chocolate Fudge Base for Your Mermaid Candy Fudge Recipe
This is where the creamy foundation of our “Mermaid Candy Fudge Recipe” comes to life! The beauty of this recipe lies in its simplicity and the luscious texture that the white chocolate and condensed milk create when combined. Pay close attention during this phase, as achieving the right consistency is key to perfectly set, sliceable fudge.
- Combine Ingredients in a Saucepan: Into your medium-sized, heavy-bottomed saucepan, add your ½ cup of unsalted butter, the entire can of sweetened condensed milk, and the 3 cups of white chocolate chips. I always start with the butter at the bottom to help prevent the condensed milk from scorching directly on the pan.
- Gently Melt the Mixture: Place the saucepan over low to medium-low heat. This is not a race! The key here is gentle, consistent heat. Begin stirring immediately and continuously with a sturdy silicone spatula or wooden spoon. You’ll want to scrape the bottom and sides of the pan constantly to prevent anything from sticking or burning. As the butter melts, it will coat the other ingredients, and you’ll slowly start to see the white chocolate chips softening and melting into the condensed milk.
- Achieve a Smooth, Homogeneous Mixture: Continue stirring until all the white chocolate chips are completely melted and the mixture is smooth, glossy, and uniform. There should be no lumps of chocolate remaining. This process usually takes about 5 to 8 minutes. You’ll notice the mixture thickening slightly and pulling away from the sides of the pan as you stir. The aroma will be wonderfully sweet and inviting at this stage – a true promise of the delicious “Mermaid Candy Fudge Recipe” to come!
- Stir in Vanilla and Salt: Once the mixture is perfectly smooth, remove the saucepan from the heat. Now, quickly stir in the 1 teaspoon of pure vanilla extract and the ¼ teaspoon of sea salt. Stir vigorously for about 30 seconds to ensure these ingredients are fully incorporated. The vanilla adds depth of flavor, while the salt subtly cuts through the sweetness, creating a more balanced taste profile.
- Check for Consistency: At this point, your fudge base should be thick, shiny, and ready for coloring. If it feels too thin, you might need to return it to very low heat for another minute or two of stirring, but be careful not to overcook it, as that can lead to grainy fudge. It should be thick enough to hold its shape somewhat when spooned, but still pliable enough to work with. This perfectly crafted base is the canvas for our vibrant “Mermaid Candy Fudge Recipe.”
Creating the Vibrant Mermaid Colors for Your Mermaid Candy Fudge Recipe
Now for the fun part – transforming our creamy white chocolate base into a dazzling palette of mermaid-inspired colors! This is where your artistic flair comes into play, and you can truly personalize your “Mermaid Candy Fudge Recipe.” Remember, gel food colorings are your best friend here, as they provide intense color without adding excess liquid, which could compromise the fudge’s texture.
- Divide the Fudge Base: Carefully spoon the warm, smooth fudge base into four separate, small heat-proof bowls. Try to divide it as evenly as possible. If you want one color to be more prominent, you can allocate slightly more fudge to that bowl. Work relatively quickly, as the fudge will start to cool and firm up.
-
Color Each Portion: Add a small amount of gel food coloring to each bowl.
- Bowl 1: Add a few drops of blue gel food coloring.
- Bowl 2: Add a few drops of green gel food coloring.
- Bowl 3: Add a few drops of purple gel food coloring.
- Bowl 4: Add a few drops of pink gel food coloring.
Start with just a tiny amount, as gel colors are very concentrated. You can always add more, but you can’t take it away!
- Thoroughly Mix the Colors: Using a separate clean spoon or silicone spatula for each bowl (to prevent color mixing prematurely), stir each portion of fudge until the color is completely uniform and vibrant. Stir well, scraping the sides and bottom of the bowl to ensure no streaks of white fudge remain. If you desire a more intense hue for any of your mermaid shades, add another tiny drop of gel color and continue stirring until thoroughly blended. I find that a little patience here results in truly stunning, even colors for our “Mermaid Candy Fudge Recipe.”
- Maintain Warmth if Needed (Optional): If you find the fudge cooling too much and becoming difficult to stir or layer, you can gently warm each bowl in the microwave for 5-10 seconds at a time, stirring well after each interval, until it’s pliable again. Be very careful not to overheat it, as this can change the texture. This step isn’t usually necessary if you work swiftly.
Layering the “Mermaid Candy Fudge” Magic
This is where the visual artistry of your “Mermaid Candy Fudge Recipe” really comes to life! The goal is to create beautiful, swirling layers that evoke the mystical depths of the ocean. There’s no wrong way to do this; embrace the organic flow of the colors for a truly unique outcome.
- Prepare for Layering: Bring your prepared baking dish (lined with parchment paper) close to your colored fudge bowls. Ensure your silicone spatulas are handy.
- Begin the Layering Process: Start by spooning small dollops or spoonfuls of each color alternately into the prepared baking dish. Don’t worry about being too precise at this stage. I like to start by putting a dollop of blue in one corner, then a dollop of green next to it, then purple, then pink, and then repeat the pattern, filling in gaps. Imagine you’re creating a mosaic of vibrant colors.
- Create the Swirl Effect: Once you’ve distributed all four colors throughout the dish, take a clean knife, skewer, or the back of a spoon. Gently drag it through the fudge in broad, sweeping S-shapes or figure-eights. Don’t overmix, or your colors will become muddy. The idea is to create beautiful, distinct swirls where the colors gently meld into each other, much like waves in the ocean. I find that just one or two passes are usually enough to achieve that gorgeous, marbled effect that’s characteristic of a stunning “Mermaid Candy Fudge Recipe.”
- Gently Tap and Spread: After swirling, gently tap the baking dish a few times on your counter to help settle the fudge and release any trapped air bubbles. If needed, you can gently spread the top surface with a spatula to create an even layer, being careful not to disturb the beautiful swirls too much. Your fudge should now look like a dreamy, colorful canvas ready for its final adornments.
Adding the “Candy” and Finishing Touches to Your Mermaid Candy Fudge Recipe
This is the moment to transform your beautifully swirled fudge into an authentic “Mermaid Candy Fudge Recipe” masterpiece! The toppings are what give it that magical, edible treasure chest appearance. Have all your sprinkles and glitter ready, as speed is a factor here – we want them to adhere to the fudge before it sets too much.
- Generously Apply Sprinkles: Immediately after layering and swirling the fudge, liberally sprinkle your chosen mermaid-themed sprinkles all over the top surface. Don’t be shy here! The more, the merrier, for a truly festive and eye-catching “Mermaid Candy Fudge Recipe.” You can concentrate different colors of sprinkles in different areas or create an even blanket across the entire surface.
- Add Edible Glitter: For that enchanting, sparkling effect, gently sprinkle edible glitter over the entire surface. I love using iridescent glitter; it catches the light beautifully and truly makes your fudge shimmer like a mermaid’s tail. You can use a small brush to dust it on if you want more control, or simply pinch it between your fingers and let it fall like fairy dust.
- Incorporate Candy Pearls or Nonpareils: If you’re using mini candy pearls or nonpareils, scatter them over the sprinkles. These add a wonderful textural contrast and an extra pop of color.
- Gently Press to Secure: Once all your toppings are in place, very gently press them down into the soft fudge using the back of your hand or a clean piece of parchment paper. This helps to secure the sprinkles and glitter, ensuring they don’t fall off when you cut and handle your “Mermaid Candy Fudge Recipe.” Be gentle; you don’t want to disturb the beautiful swirls underneath.
- Optional “Sand” or Shells: If you’ve opted for crushed graham crackers for a “sandy” look or small candy shells, you can strategically place these now. A little pile of “sand” in one corner or a few candy shells scattered across the surface can add an extra layer of storytelling to your oceanic treat.
Chilling and Cutting Your “Mermaid Candy Fudge Recipe”
The hardest part is waiting for your magnificent “Mermaid Candy Fudge Recipe” to set, but patience will be rewarded with perfectly firm and sliceable pieces. Proper chilling and careful cutting techniques ensure clean, beautiful squares.
- Chill to Perfection: Once your “Mermaid Candy Fudge Recipe” is fully adorned with its glorious toppings, transfer the baking dish to the refrigerator. Allow it to chill for at least 2 to 3 hours, or even better, overnight. This chilling period is crucial for the fudge to firm up completely, making it easy to cut into neat squares. Don’t rush this step! Trying to cut it too early will result in a messy, soft fudge.
- Remove from Pan: After adequate chilling, gently lift the entire slab of “Mermaid Candy Fudge Recipe” out of the baking dish by holding onto the parchment paper or foil overhangs. Place it onto a clean cutting board. The parchment paper will peel away effortlessly, leaving you with a pristine block of colorful fudge.
- Prepare for Cutting: For the cleanest cuts, I highly recommend using a large, sharp knife. For extra neatness, you can run your knife under hot water for a few seconds and then wipe it dry before each cut. This will help glide through the fudge and prevent the toppings from dragging.
- Cut into Squares: Carefully slice the fudge into your desired size squares. I usually aim for 1-inch or 1.5-inch squares. Start by cutting the fudge in half, then cut those halves in half, and so on, until you have even strips. Then, turn the fudge 90 degrees and repeat the process to create neat squares.
- Clean Your Knife Between Cuts: For truly impeccable pieces, wipe your knife clean after every couple of cuts. This removes any sticky residue and prevents colors from smudging, ensuring each piece of your “Mermaid Candy Fudge Recipe” looks as beautiful as the next.
Storage and Enjoyment Tips for Your Mermaid Candy Fudge Recipe
Congratulations, you’ve created a stunning batch of “Mermaid Candy Fudge Recipe”! Now, let’s talk about how to store it to keep it fresh and how to best enjoy your edible work of art.
- Proper Storage: Store your “Mermaid Candy Fudge Recipe” in an airtight container at room temperature for up to one week. If your kitchen runs particularly warm, or if you want to extend its freshness, you can store it in the refrigerator for up to two weeks. Just be aware that chilled fudge will be firmer; allow it to sit at room temperature for 10-15 minutes before serving if you prefer a softer texture.
- Freezing for Longer Shelf Life: If you’ve made a large batch or want to save some for a later date, “Mermaid Candy Fudge Recipe” freezes beautifully! Wrap individual pieces or small blocks tightly in plastic wrap, then place them in an airtight freezer-safe container or freezer bag. It can be frozen for up to 2-3 months. To enjoy, simply thaw at room temperature for a few hours.
- Serving Suggestions: This “Mermaid Candy Fudge Recipe” is a delightful treat on its own! It’s perfect for parties, gift-giving, or as a vibrant dessert. Arrange the colorful squares on a platter for an instant showstopper. It also makes a fantastic edible gift; simply package a few pieces in a decorative box or clear cellophane bag tied with a pretty ribbon.
- Gifting Your Magical Fudge: When gifting, choose clear packaging to showcase the beautiful colors and sprinkles. You can even add a small tag with the “Mermaid Candy Fudge Recipe” name. Everyone will be enchanted by this sweet, whimsical creation!
- Enjoy the Compliments: Prepare yourself for lots of “oohs” and “aahs”! This “Mermaid Candy Fudge Recipe” is not only incredibly delicious with its rich, creamy white chocolate flavor and hint of vanilla, but its visual appeal is truly captivating. It’s a treat that brings smiles and a touch of magic to any occasion. I absolutely adore seeing the joy it brings to people’s faces. Enjoy every enchanting bite!
Conclusion:
Well, my friends, we’ve reached the sweet end of our journey, and I genuinely hope you’re feeling as inspired and excited as I am about this incredible confection. This isn’t just any ordinary treat; it’s an experience, a miniature work of art that tastes as enchanting as it looks. The
Mermaid Candy Fudge Recipe
isn’t merely about combining ingredients; it’s about infusing a little bit of magic into your kitchen, transforming simple components into something truly extraordinary. It’s a must-try for so many reasons that extend beyond its dazzling appearance. Firstly, the texture alone is a revelation – irresistibly smooth, rich, and melt-in-your-mouth tender, each bite delivers a comforting sweetness that satisfies every craving. Then there’s the sheer joy of watching those vibrant, swirling colors come to life, reminiscent of ocean depths and mythical creatures, making it a feast for both the eyes and the palate. It’s remarkably easy to prepare, making it accessible even for novice bakers or those looking for a quick yet impressive dessert. And let’s not forget its versatility; whether you’re aiming to delight children at a birthday party, impress guests at a sophisticated gathering, or simply treat yourself to a whimsical indulgence, this fudge rises to every occasion with unparalleled charm and flavor. It truly stands out as a unique dessert that captures imagination and delivers on taste, making it an instant classic in my recipe collection and, I hope, in yours too.
Now, let’s talk about how to make this delightful creation truly shine, both in its presentation and its potential variations. For serving, I absolutely adore cutting this fudge into small, bite-sized squares or even charming geometric shapes, allowing its intricate patterns to be admired. Arrange them artfully on a pristine white platter to really make the colors pop, perhaps alongside some fresh berries or a sprig of mint for a touch of elegance. This fudge is also an exceptional candidate for gifting! Imagine presenting a small box filled with these jewel-toned treats, tied with a satin ribbon – it’s a personalized, homemade gift that speaks volumes. For a truly luxurious experience, serve a small piece with a piping hot cup of coffee or a glass of chilled sparkling wine; the contrast of flavors and textures is simply divine.
But the fun doesn’t stop there! The beauty of this
Mermaid Candy Fudge Recipe
lies in its adaptability. While the classic mermaid colors are stunning, feel free to unleash your inner artist and experiment with different color palettes. Think pastel pinks and purples for a fairy theme, bold reds and greens for a festive holiday treat, or even shimmering silvers and blues for a frosty winter wonderland. You could also introduce different flavor extracts to complement your chosen colors – a hint of raspberry, a touch of almond, or a whisper of coconut could all add delightful new dimensions. For those who love a bit of crunch, consider folding in some finely chopped nuts, mini chocolate chips, or even some crushed pretzel pieces for a sweet-and-salty twist. Edible glitter or iridescent sprinkles, added while the fudge is still soft, can enhance that magical, shimmering effect even further. If you’re feeling adventurous, try creating layers of different colored fudge, allowing each layer to set slightly before adding the next, for a truly multi-dimensional treat. The possibilities are genuinely endless, limited only by your imagination, ensuring that each batch you create can be a unique masterpiece.
So, my dear readers, what are you waiting for? This is your invitation, your call to action, to dive headfirst into the whimsical world of this fantastic fudge. Don’t just admire the photos or dream about the flavors; make it! Roll up your sleeves, gather your ingredients, and prepare to create something truly spectacular. I promise you, the joy of seeing those vibrant swirls emerge and the satisfaction of biting into that creamy, sweet perfection is an experience not to be missed. I am genuinely so excited for you to try this recipe, and I absolutely cannot wait to hear all about your adventures in the kitchen. Please, once you’ve whipped up your own batch of this enchanting fudge, come back and share your experiences! Tell me about the colors you chose, any variations you experimented with, or who you shared your delicious creation with. Did your kids gasp with delight? Did your friends beg for the recipe? Did you simply indulge in a moment of pure, unadulterated sweet bliss? Your feedback and stories are what truly bring these recipes to life for me, and I cherish every single one. Take a photo, share your triumphs, and let’s spread the magic of this unforgettable treat far and wide. Happy making!

Mermaid Candy Fudge Recipe
Dive into a world of shimmering sweetness with this Mermaid Candy Fudge! This irresistible, visually stunning, no-bake treat features creamy white chocolate fudge in enchanting, ocean-inspired hues, adorned with dazzling mermaid-themed candy toppings. Perfect for parties, gifts, or a magical indulgence.
Ingredients
-
3 cups (510g) white chocolate chips
-
1 (397g) can sweetened condensed milk
-
½ cup (113g) unsalted butter
-
1 tsp vanilla extract
-
¼ tsp sea salt
-
Gel food coloring (blue, green, purple, pink)
-
Mermaid-themed sprinkles
-
Edible glitter (silver, blue, or iridescent)
-
Mini candy pearls or nonpareils
-
Optional: Crushed graham crackers or small candy shells
Instructions
-
Step 1
Line an 8×8 or 9×9 inch baking dish completely with parchment paper, leaving an overhang. Measure and gather all ingredients, having sprinkles and glitter ready. -
Step 2
In a heavy-bottomed saucepan over low to medium-low heat, combine ½ cup unsalted butter, 1 can sweetened condensed milk, and 3 cups white chocolate chips. Stir continuously for 5-8 minutes until all chocolate is melted and the mixture is smooth, glossy, and uniform. Do not burn. -
Step 3
Remove the saucepan from heat. Quickly stir in 1 tsp pure vanilla extract and ¼ tsp sea salt until fully incorporated. -
Step 4
Carefully divide the warm fudge base evenly into four separate, heat-proof bowls. Add a few drops of a different gel food coloring (blue, green, purple, pink) to each bowl. Using a separate spoon/spatula for each, stir until each portion is vibrantly and uniformly colored. -
Step 5
Alternately spoon small dollops of each colored fudge into the prepared baking dish. Once all colors are distributed, gently drag a clean knife or skewer through the fudge in broad S-shapes or figure-eights to create a beautiful swirl effect. Do not overmix. Gently tap the dish to settle the fudge. -
Step 6
Immediately and liberally sprinkle the top surface with mermaid-themed sprinkles, edible glitter, and mini candy pearls or nonpareils. If desired, add optional crushed graham crackers or candy shells. Gently press all toppings into the soft fudge to secure them. -
Step 7
Transfer the baking dish to the refrigerator and chill for at least 2-3 hours, or preferably overnight, until the fudge is completely firm. -
Step 8
Lift the entire slab of set fudge from the dish using the parchment paper overhang and place it onto a clean cutting board. Using a large, sharp knife (wiped clean after every few cuts for neatness), slice the fudge into your desired 1-inch or 1.5-inch squares. -
Step 9
Store Mermaid Candy Fudge in an airtight container at room temperature for up to one week, or in the refrigerator for up to two weeks. It can also be frozen for 2-3 months. Enjoy this magical, delicious treat!
Important Information
Nutrition Facts (Per Serving)
It is important to consider this information as approximate and not to use it as definitive health advice.
Allergy Information
Please check ingredients for potential allergens and consult a health professional if in doubt.
Leave a Comment