
Tri Tip is a grilling cbeef hampion, and for good reason! This incredible cut of beef, often overlooked, delivers unbelievable flavor and tenderness when cooked just right. What makes the tri tip so special? It’s that perfect balance of marbling and texture, allowing it to soak up marinades and seasonings beautifully. It’s the star of backyard barbecues, the crowd-pleaser at potlucks, and the reason for those contented sighs after a delicious meal. Today, we’re diving deep into the world of tri tip, exploring not just one, but two incredible ways to prepare it. Whether you crave a smoky, herb-infused classic or a zesty, marinade-driven delight, we’ve got your tri tip cravings covered. Get ready to elevate your grilling game!

Tri Tip (2 Ways)
There’s something incredibly satisfying about a perfectly cooked tri-tip roast. This versatile cut of beef, often called the “king of the grill,” is known for its rich flavor and tender texture when handled with a bit of care. What I love most about tri-tip is its adaptability. You can prepare it in a few different ways, each yielding delicious results. Today, we’re going to explore two of my favorite methods: the classic grill and a fantastic oven-roasted approach. Whether you’re a seasoned grill master or prefer the simplicity of oven cooking, this recipe will guide you to a mouthwatering tri-tip that will impress everyone.
Ingredients:
Method 1: The Classic Grill
Grilling a tri-tip is a rite of passage for many backyard cooks, and for good reason. The smoky char and even cooking are hard to beat. This method focuses on achieving a beautiful crust while keeping the inside juicy and medium-rare.
1. Preparation is Key: Before we even think about heat, let’s get our tri-tip ready. Pat the roast completely dry with paper towels. This is a crucial step for developing a great sear. In a small bowl, combine the garlic salt, Lawry’s seasoning salt, kosher salt, black pepper, sugar, garlic powder, and parsley. This is our signature rub, designed to enhance the beef’s natural flavors without overpowering them. The sugar helps with caramelization, adding a subtle sweetness and a deeper color to the crust. Thoroughly coat the entire tri-tip roast with the olive oil, ensuring an even layer. Then, generously apply the dry rub mixture, pressing it gently into the meat on all sides. Let the seasoned roast sit at room temperature for at least 30 minutes (and up to an hour) before grilling. This allows the rub to penetrate the meat and helps the roast cook more evenly.
2. Mastering the Sear and Indirect Heat: Preheat your grill to medium-high heat, aiming for a temperature around 400-450°F (200-230°C). The key to a perfect tri-tip on the grill is a two-zone cooking system: one side of the grill should be hot (direct heat) and the other side should be cooler (indirect heat). Place the seasoned tri-tip directly over the hot zone and sear it for about 2-3 minutes per side, until a beautiful, dark crust forms. Don’t be tempted to move it too much; let that crust develop.
3. The Slow Cook to Perfection: Once seared on all sides, move the tri-tip to the cooler, indirect heat side of the grill. Close the lid and let it cook. This is where the magic happens, allowing the roast to cook through gently without burning the exterior. For a medium-rare finish (my personal favorite!), you’re aiming for an internal temperature of around 130-135°F (54-57°C). Use a reliable meat thermometer inserted into the thickest part of the roast, avoiding any bone if present. This process can take anywhere from 20 to 40 minutes, depending on the thickness of your roast and the temperature of your grill. Keep an eye on that thermometer – it’s your best friend here.
4. Resting is Non-Negotiable: Once the tri-tip reaches your desired internal temperature, remove it from the grill and place it on a clean cutting board. Tent it loosely with foil and let it rest for at least 10-15 minutes. This resting period is absolutely critical. It allows the juices to redistribute throughout the meat, resulting in a much more tender and moist roast. If you skip this step, all those delicious juices will run out onto the cutting board, leaving you with a dry steak.
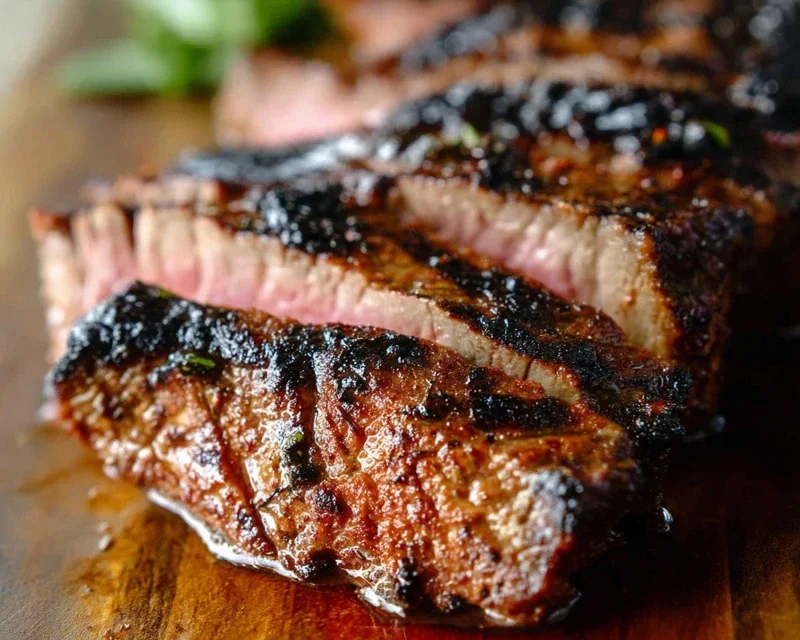
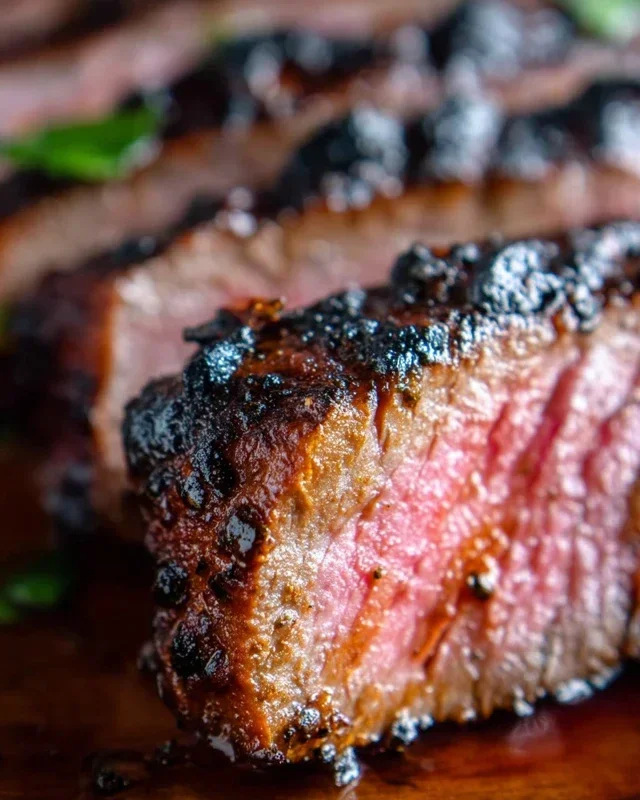
5. Slicing for Success: After resting, it’s time to slice. Tri-tip has a distinctive grain, meaning the muscle fibers run in a specific direction. For maximum tenderness, you need to slice against the grain. Look for the direction the muscle fibers are pointing and cut perpendicular to them. Slice the tri-tip about 1/4 inch thick. The result should be incredibly tender, flavorful slices that are perfect on their own, in sandwiches, or as part of a larger meal.
Method 2: The Oven-Roasted Delight
If grilling isn’t an option or you prefer a more hands-off approach, oven roasting is an excellent way to achieve a similarly delicious tri-tip. This method relies on precise temperature control for a tender and juicy result.
1. Preheat and Prep: Preheat your oven to 400°F (200°C). While the oven heats, prepare the tri-tip as described in step 1 of the grilling method: pat it dry, mix your rub, coat with olive oil, and apply the rub generously. Allow the roast to sit at room temperature for at least 30 minutes.
2. The Sear in the Oven: Place the seasoned tri-tip on a sturdy baking sheet or in a cast-iron skillet. Sear it in the preheated oven for about 15-20 minutes, or until a nice browned crust begin extracts to form on the exterior. This initial high heat helps to lock in juices and develop flavor.
3. Lower the Heat for Gentle Cooking: After the initial sear, reduce the oven temperature to 300°F (150°C). Continue to roast the tri-tip until it reaches your desired internal temperature. For medium-rare, aim for 130-135°F (54-57°C). This lower temperature allows the roast to cook through evenly without drying out. Again, a meat thermometer is your best tool here. This slower cooking process might take an additional 30-50 minutes, so patience is key.
4. The Essential Rest: Just like with the grilled version, resting is paramount. Once the tri-tip reaches its target temperature, remove it from the oven, tent it loosely with foil, and let it rest for 10-15 minutes. This ensures that the juices are reabsorbed, leading to that signature tenderness.
5. Slice Against the Grain: After resting, slice the tri-tip against the grain, as described in step 5 of the grilling method. The result will be a beautifully cooked, tender, and flavorful roast, perfect for any occasion. Enjoy your delicious homemade tri-tip!
Conclusion:
And there you have it – two fantastic ways to prepare a delicious Tri Tip! Whether you opt for the classic grill or the savory oven roast, this cut of beef truly shines. The beauty of tri tip lies in its incredible flavor and tenderness, especially when cooked to a perfect medium-rare. It’s a crowd-pleaser that feels special enough for an occasion but is surprisingly simple to execute for any weeknight dinner. I love pairing it with roasted root vegetables, a fresh salad, or even some garlic mashed potatoes. Don’t be afraid to experiment with your favorite marinades or rubs; the tri tip is a versatile canvas for your culinary creativity.
I truly encourage you to give these methods a try. You might just find your new favorite beef recipe! The satisfaction of slicing into a perfectly cooked tri tip is immense, and the delicious results are always worth it.
Frequently Asked Questions:
What is the best internal temperature for tri tip?
For a juicy and tender tri tip, I aim for an internal temperature of around 130-135°F (54-57°C) for medium-rare. If you prefer it more well-done, you can go up to 140-145°F (60-63°C), but be mindful that it can become less tender at higher temperatures.
Can I marinate tri tip in advance?
Absolutely! Marinating tri tip for at least 4 hours, or even overnight in the refrigerator, can significantly enhance its flavor and tenderness. Just be sure to bring it to room temperature before cooking, as directed.
Tri Tip (2 Ways)
A versatile tri tip roast prepared two delicious ways: a classic seasoned roast and a garlic herb marinated option.
Ingredients
-
2 & 1/2 pound tri tip roast
-
1 & 1/2 teaspoons garlic salt
-
1 tablespoon Lawry’s seasoning salt
-
1 & 1/2 teaspoons kosher salt (Diamond Crystal)
-
1 teaspoon black pepper
-
1/2 teaspoon sugar
-
2 teaspoons garlic powder
-
1 tablespoon dried or fresh parsley
-
1/4 cup olive oil
Instructions
-
Step 1
For Way 1 (Classic Seasoned): Pat the tri tip dry with paper towels. Combine Lawry’s seasoning salt, kosher salt, black pepper, sugar, garlic powder, and parsley in a small bowl. Rub the seasoning mixture all over the tri tip. -
Step 2
For Way 2 (Garlic Herb Marinated): In a bowl, whisk together olive oil, garlic salt, and minced fresh garlic (if available, otherwise use additional garlic powder). Marinate the tri tip in this mixture for at least 30 minutes, or up to 4 hours in the refrigerator. -
Step 3
Preheat your oven or grill to 400°F (200°C). -
Step 4
Sear the tri tip on all sides over high heat on the grill or in a hot oven-safe skillet on the stovetop for 2-3 minutes per side. -
Step 5
Transfer the tri tip to the preheated oven or indirect heat on the grill. Cook for 20-30 minutes, or until the internal temperature reaches 130-135°F (54-57°C) for medium-rare. -
Step 6
Remove the tri tip from the heat and let it rest for at least 10-15 minutes before slicing against the grain.
Important Information
Nutrition Facts (Per Serving)
It is important to consider this information as approximate and not to use it as definitive health advice.
Allergy Information
Please check ingredients for potential allergens and consult a health professional if in doubt.


Leave a Comment