
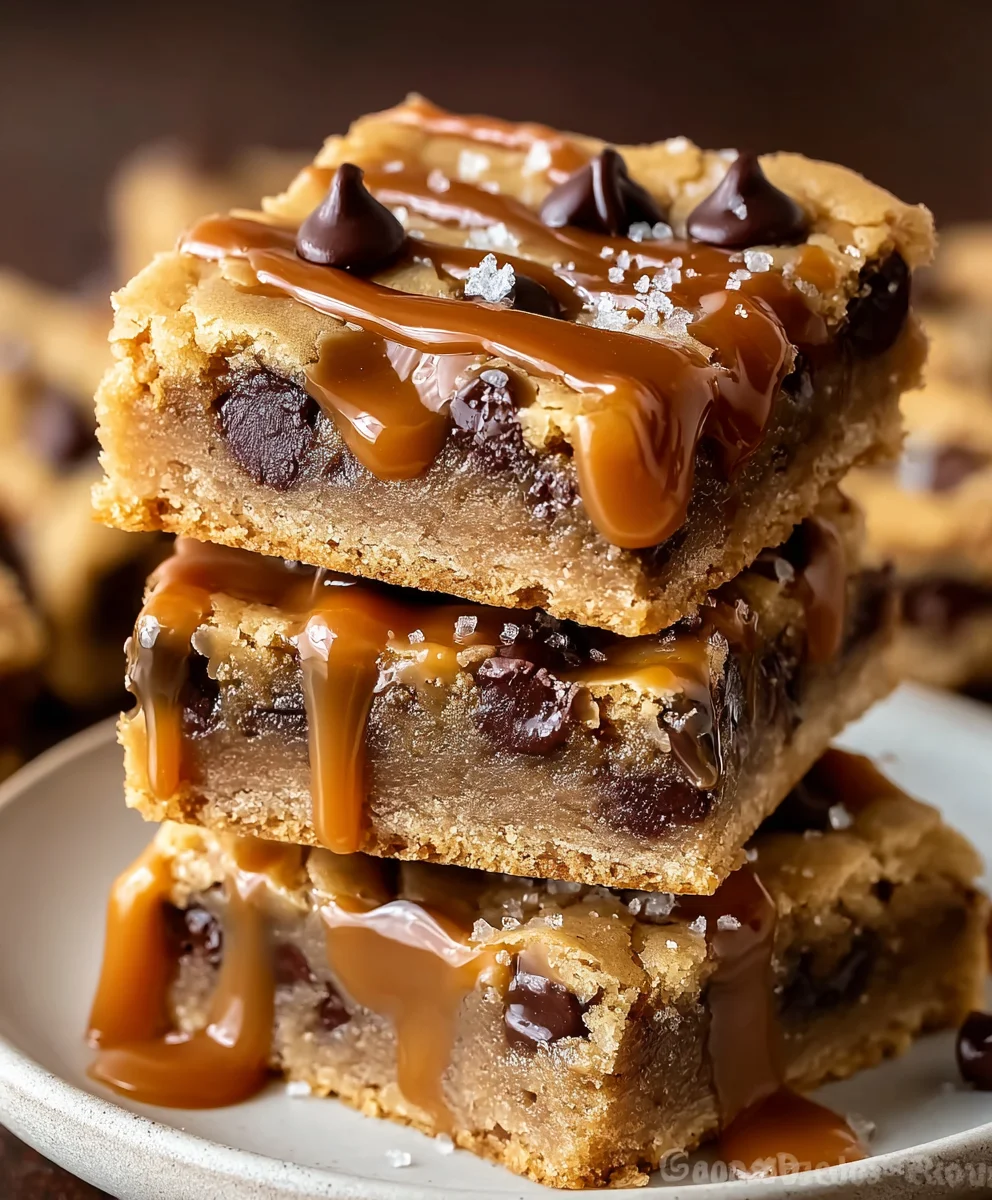
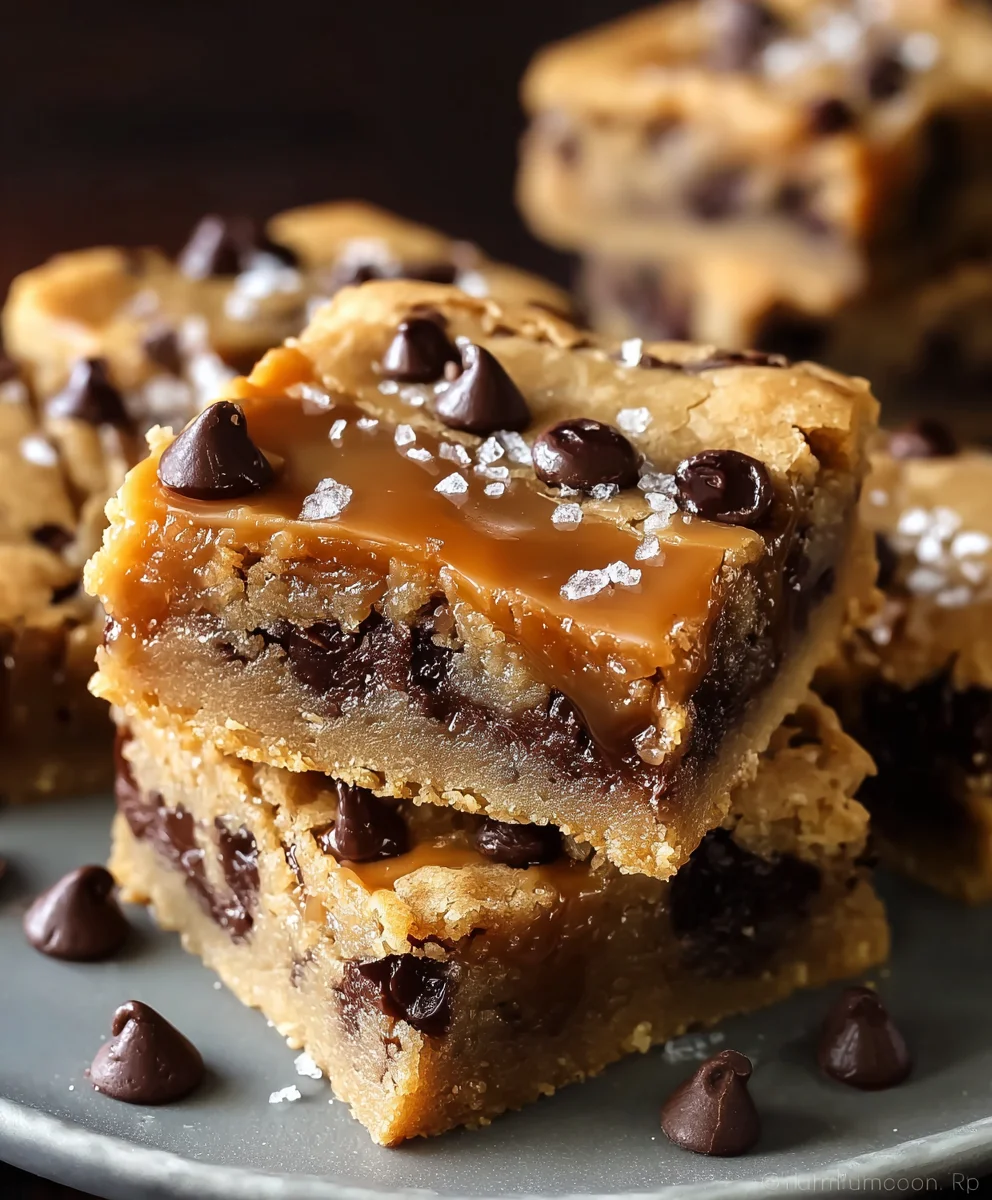
Salted Caramel Chocolate Chip Cookie Bars are not just a dessert; they are a delightful culinary journey. Imagine the perfect symphony of flavors and textures, all harmoniously blended into one irresistible square. I find that this particular treat captures the very essence of comforting indulgence, transforming a classic favorite into something truly extraordinary that will undoubtedly become a new staple in your kitchen.
The magic of these bars lies in the ingenious combination of the familiar, beloved chocolate chip cookie with the sophisticated allure of rich, gooey salted caramel. While the chocolate chip cookie has long been an American icon, a symbol of home baking, the relatively recent renaissance of salted caramel has elevated countless desserts, adding a depth and complexity that’s simply captivating. This delightful marriage has created a dish that feels both nostalgically comforting and refreshingly modern, perfect for any occasion.
Why do people fall in love with Salted Caramel Chocolate Chip Cookie Bars?
It’s all about the exquisite balance: the intense sweetness of the chocolate and caramel perfectly offset by the delicate sprinkle of sea salt, which enhances every other flavor. Beyond the incredible taste, the chewy, soft texture, combined with the sheer convenience of baking a whole batch in one pan, makes them an absolute favorite for gatherings, bake sales, or simply a well-deserved treat after a long day. I’m truly excited for you to experience the joy of baking and tasting these phenomenal Salted Caramel Chocolate Chip Cookie Bars.

Ingredients:
- For the Cookie Bars:
- 1 cup (2 sticks or 226g) unsalted butter, softened to room temperature – this is crucial for a smooth, creamy batter!
- 1 ½ cups (300g) granulated sugar
- ½ cup (100g) packed light brown sugar, for that extra chewiness and depth of flavor
- 2 large eggs, also at room temperature, which helps them emulsify better with the butter and sugar
- 2 teaspoons vanilla extract – don’t skimp on the good stuff here; it makes a difference!
- 3 cups (360g) all-purpose flour, spooned and leveled – incorrect measuring can lead to dense or crumbly bars
- 1 teaspoon baking soda, to help our bars rise beautifully
- ½ teaspoon salt, to balance the sweetness and enhance all the flavors
- 1 ½ cups (about 9 oz or 255g) semi-sweet chocolate chips – you can also use milk or dark chocolate, depending on your preference!
- ½ cup (about 3 oz or 85g) mini chocolate chips (optional, but they help fill in the gaps for extra chocolatey goodness!)
- For the Homemade Salted Caramel Sauce:
- 1 cup (200g) granulated sugar
- ¼ cup (60ml) water
- ½ cup (120ml) heavy cream, warmed – this is important to prevent seizing when added to the hot sugar
- ¼ cup (56g) unsalted butter, cut into 4 pieces
- ½ teaspoon fine sea salt, or more to taste – the “salted” in Salted Caramel Chocolate Chip Cookie Bars is paramount!
- For Finishing:
- Flaky sea salt, for sprinkling on top (optional, but highly recommended for that gourmet touch and to enhance the salted caramel flavor)
Equipment You’ll Need:
To embark on this delightful journey of creating the best Salted Caramel Chocolate Chip Cookie Bars, having the right tools at hand will make the process smooth and enjoyable. You’ll want to gather:
- 9×13 inch baking pan
- Parchment paper
- Large mixing bowls (at least two)
- A medium-sized heavy-bottomed saucepan (for the caramel)
- Whisk
- Rubber spatula
- Electric mixer (stand mixer with paddle attachment or a hand mixer)
- Measuring cups and spoons
- Small saucepan or microwave-safe bowl (for warming cream)
- Pastry brush (optional, for caramel)
- Wire cooling rack
- Sharp knife for slicing
Making the Homemade Salted Caramel:
Creating your own salted caramel might seem intimidating, but I promise it’s incredibly rewarding and elevates these Salted Caramel Chocolate Chip Cookie Bars to a whole new level. Just be patient and follow these steps carefully.
- Prepare Your Ingredients: First things first, ensure your heavy cream is warmed. You can gently heat it in a small saucepan over low heat until just simmering, or microwave it in a microwave-safe bowl for about 30-45 seconds. Set it aside. Also, have your butter pieces and salt ready and within reach. This process moves quickly once the sugar starts to cook.
- Combine Sugar and Water: In a medium-sized, heavy-bottomed saucepan, combine the granulated sugar and water. Stir gently with a rubber spatula or spoon until the sugar is fully moistened, creating a sandy paste.
- Cook the Sugar Syrup: Place the saucepan over medium-high heat. Allow the sugar mixture to come to a boil without stirring. This is crucial: do not stir once it boils! Stirring at this stage can cause sugar crystals to form, leading to a grainy caramel. If you see sugar crystals forming on the sides of the pan, you can gently brush them down with a pastry brush dipped in a little water.
- Watch for Color Transformation: Continue to cook the sugar syrup, swirling the pan occasionally (but still no stirring!), until it turns a deep amber color. This usually takes about 8-12 minutes, but pay close attention as it can go from perfect to burnt very quickly. You’re looking for a rich, golden-brown hue, similar to an old penny. The smell will also change, becoming nutty and toasted.
- Carefully Add Warm Cream: As soon as the sugar reaches that beautiful amber color, remove the pan from the heat. Slowly and very carefully pour in the warmed heavy cream while whisking constantly. Be extremely cautious here, as the mixture will bubble up violently and release a lot of steam. Keep whisking until the mixture is smooth and fully combined. The warm cream helps prevent the sugar from seizing too much. If it does seize slightly, don’t worry, it will melt back down in the next step.
- Stir in Butter and Salt: Return the saucepan to low heat. Add the cut pieces of unsalted butter and the fine sea salt. Continue whisking gently until the butter is fully melted and incorporated, and the caramel is smooth and silky. If any sugar lumps remained from the previous step, they should now melt into the sauce.
- Cool and Set Aside: Remove the caramel from the heat and transfer it to a heat-proof jar or bowl. Allow it to cool completely to room temperature before using. As it cools, it will thicken significantly, becoming a rich, pourable sauce perfect for your Salted Caramel Chocolate Chip Cookie Bars. You can make this ahead of time and store it in the refrigerator for up to 2 weeks. If refrigerated, gently warm it in the microwave or a double boiler until it’s pourable again before using.
Preparing the Cookie Dough Base for Salted Caramel Chocolate Chip Cookie Bars:
This cookie dough is truly the heart of our Salted Caramel Chocolate Chip Cookie Bars. It’s a classic, chewy, and flavorful base that perfectly complements the rich caramel and gooey chocolate.
- Preheat and Prepare Your Pan: Preheat your oven to 350°F (175°C). Line a 9×13 inch baking pan with parchment paper, leaving an overhang on the longer sides. This parchment sling will make it incredibly easy to lift the baked bars out of the pan for cooling and slicing. You can lightly grease the pan first to help the parchment stick.
- Cream Butter and Sugars: In a large mixing bowl, using an electric mixer, cream together the softened unsalted butter, granulated sugar, and light brown sugar on medium speed. Beat for 2-3 minutes until the mixture is light, fluffy, and pale in color. This aeration step is key for tender cookie bars. Scrape down the sides of the bowl as needed to ensure everything is well combined.
- Add Eggs and Vanilla: Beat in the two large eggs, one at a time, mixing well after each addition until fully incorporated. Then, stir in the vanilla extract. The mixture might look a little curdled at this point, but don’t worry, it will come together once the dry ingredients are added.
- Whisk Dry Ingredients: In a separate medium-sized bowl, whisk together the all-purpose flour, baking soda, and salt. This ensures these leavening agents and flavor enhancers are evenly distributed throughout the dough.
- Combine Wet and Dry: Gradually add the dry ingredients to the wet ingredients, mixing on low speed until just combined. Be careful not to overmix the dough at this stage, as overmixing can lead to tough, dry cookie bars. Mix only until no streaks of flour remain.
- Fold in Chocolate Chips: Using a rubber spatula, gently fold in the semi-sweet chocolate chips and the optional mini chocolate chips. Make sure they are evenly distributed throughout the dough. We want chocolate in every single bite of these amazing Salted Caramel Chocolate Chip Cookie Bars!
Assembling and Baking Your Salted Caramel Chocolate Chip Cookie Bars:
Now for the fun part – layering these incredible flavors! The assembly of these Salted Caramel Chocolate Chip Cookie Bars is where the magic truly comes together, creating a beautiful and delicious treat.
- Layer the First Half of Dough: Take about two-thirds of the prepared cookie dough and press it evenly into the bottom of your parchment-lined 9×13 inch baking pan. You can use your fingers, the back of a spoon, or a clean, lightly floured rolling pin to get an even layer. Make sure the dough goes right to the edges of the pan.
- Drizzle with Salted Caramel: Pour about ¾ to 1 cup of your cooled, homemade salted caramel sauce evenly over the cookie dough base. Leave a small border (about ½ inch) around the edges of the pan, as the caramel will spread slightly during baking. If your caramel is too thick, you can gently warm it slightly to make it more pourable, but ensure it’s not hot. The generous layer of salted caramel is what truly makes these Salted Caramel Chocolate Chip Cookie Bars so decadent!
- Add the Remaining Cookie Dough: Dollop the remaining one-third of the cookie dough over the salted caramel layer. This can be a bit tricky, but try to place small pieces of dough all over the caramel rather than trying to spread one large piece. Once the dough is mostly covering the caramel, gently press down and spread it out as best you can, covering as much of the caramel as possible. Don’t worry if there are some gaps where the caramel peeks through; it adds to the rustic charm and caramel visibility!
- Optional: Extra Chocolate and Flaky Salt: If you’re a true chocolate lover, you can sprinkle a few more chocolate chips on top of the top cookie dough layer before baking. This gives the bars an even more appealing, gooey-looking finish. For that signature “salted” element, you can also sprinkle a tiny pinch of flaky sea salt over the top now, or wait until after baking.
- Bake the Bars: Place the baking pan in your preheated oven. Bake for 30-38 minutes, or until the edges are golden brown and a wooden skewer inserted into the cookie dough (avoiding the caramel layer) comes out with moist crumbs attached, but not wet batter. The center might look slightly underdone or soft, but remember, bars continue to cook slightly as they cool. Overbaking will lead to dry Salted Caramel Chocolate Chip Cookie Bars, so keep a close eye on them!
Cooling, Slicing, and Serving Your Irresistible Salted Caramel Chocolate Chip Cookie Bars:
The waiting is always the hardest part, but proper cooling is essential for beautifully structured and perfectly chewy Salted Caramel Chocolate Chip Cookie Bars. Resist the urge to dive in too soon!
- Cool Completely in the Pan: Once baked, remove the pan from the oven and place it on a wire cooling rack. Let the bars cool completely in the pan, undisturbed, for at least 2-3 hours. For even cleaner slices, I often let them cool overnight at room temperature or even pop them in the refrigerator for an hour or two once they’ve reached room temperature. This extended cooling time allows the caramel to firm up and the bars to set properly, preventing a gooey mess when slicing.
- Lift and Sprinkle: Once fully cooled, use the parchment paper overhang to carefully lift the entire slab of Salted Caramel Chocolate Chip Cookie Bars out of the pan and transfer it to a cutting board. At this point, if you haven’t already, sprinkle a generous pinch of flaky sea salt evenly over the top. This not only adds a beautiful visual element but also provides that irresistible salty crunch and balances the sweetness of the caramel and chocolate.
- Slice and Serve: Using a sharp knife, carefully slice the bars into your desired size. I usually cut them into 16 or 24 squares, depending on how generous I’m feeling! Cleaning your knife between cuts with a damp cloth can help ensure clean edges, especially through the caramel layer.
- Storage: These Salted Caramel Chocolate Chip Cookie Bars are best stored in an airtight container at room temperature for up to 3-4 days. For longer storage, you can refrigerate them for up to a week. If you plan to freeze them, wrap individual bars tightly in plastic wrap and then place them in a freezer-safe bag or container for up to 2-3 months. Thaw at room temperature or warm slightly in the microwave for a delightful, gooey treat.
-
Enjoy Your Masterpiece!
There you have it – a batch of incredibly rich, chewy, and utterly irresistible Salted Caramel Chocolate Chip Cookie Bars, ready to be enjoyed! They’re perfect for sharing (or not!), for parties, or simply as a well-deserved treat for yourself. The combination of the soft cookie, gooey caramel, and melting chocolate, all highlighted by that sprinkle of sea salt, is truly something special.
<h2>Conclusion:</h2>
<p>So, there you have it! We’ve journeyed through the creation of what I genuinely believe is one of the most delightful treats you can possibly bake. This isn’t just another cookie bar recipe; it’s an experience. Imagine sinking your teeth into a bar that is perfectly chewy, wonderfully soft, and bursting with rich chocolate chips, all uplifted by that irresistible ribbon of gooey, sweet, and slightly salty caramel. The magic truly lies in this impeccable balance of flavors and textures, making it an instant classic and a guaranteed crowd-pleaser. Every single bite is a celebration, a moment of pure bliss that transports you to a realm of sugary perfection. It’s the kind of dessert that leaves an unforgettable impression, begging for just one more piece. If you’re looking for a show-stopping dessert that requires minimal fuss but delivers maximum impact, then mastering these <strong>Salted Caramel Chocolate Chip Cookie Bars</strong> is absolutely essential.</p>
<p>I can’t stress enough how approachable this recipe is, even for novice bakers. Don’t let the decadent appearance fool you; the steps are straightforward, and the reward is immeasurable. Think of those times you crave something truly special, something comforting yet excitingly sophisticated. These bars hit every single note. They embody that perfect blend of nostalgic comfort from a classic chocolate chip cookie, elevated to an entirely new level with the luxurious addition of homemade or store-bought caramel and that essential sprinkle of sea salt. It’s a symphony of sweet, salty, and utterly rich goodness that truly sets them apart from your average baked good. You’ll find yourself reaching for this recipe again and again, whether for a casual family treat or to impress guests at your next gathering. They are surprisingly easy to transport, making them an ideal candidate for potlucks, bake sales, or simply sharing with appreciative neighbors. Trust me, once you experience the joy of biting into one, you’ll understand exactly what I mean.</p>
<p>Now, let’s talk about how to truly elevate your <strong>Salted Caramel Chocolate Chip Cookie Bars</strong> experience. While they are absolutely divine on their own, fresh from the oven with that warm, melting caramel, there are countless ways to enjoy and customize them. For an ultimate dessert indulgence, serve a warm bar with a generous scoop of vanilla bean ice cream. The cold, creamy ice cream melting into the warm, gooey bar creates a textural and temperature contrast that is simply heavenly. A drizzle of extra caramel sauce or a sprinkle of additional flaky sea salt over the top of the ice cream and bar would push it into pure decadence. They also pair wonderfully with a hot cup of coffee, a steaming mug of tea, or a tall glass of cold milk for a classic comforting combination.</p>
<p>But why stop there? The beauty of these bars lies in their versatility. Don’t hesitate to get creative with your additions and toppings.</p>
<h4>Consider these delightful variations:</h4>
<ul>
<li><strong>Chocolate Lover’s Dream:</strong> Experiment with different types of chocolate chips. A mix of dark chocolate, milk chocolate, and even white chocolate chips can add layers of flavor. You could also swirl in some melted chocolate on top after baking for an extra rich finish.</li>
<li><strong>Nutty Indulgence:</strong> Fold in a handful of chopped toasted pecans or walnuts into the cookie dough for an added crunch and earthy flavor that complements the caramel beautifully.</li>
<li><strong>Seasonal Twists:</strong> During autumn, consider adding a pinch of pumpkin pie spice to the dough or using a pumpkin spice flavored caramel. For the holidays, a swirl of peppermint extract in the caramel or a sprinkle of crushed candy canes on top could be a festive touch.</li>
<li><strong>Customizable Toppings:</strong> Beyond ice cream, think about a dollop of fresh whipped cream, a sprinkle of cocoa powder, or even a light dusting of powdered sugar for a more elegant presentation. A sprinkle of mini marshmallows broiled for a minute until golden brown would also add a fun, s’mores-like twist.</li>
<li><strong>Different Shapes:</strong> While bars are convenient, you can also use cookie cutters to create fun shapes if you chill the dough sufficiently before cutting, offering a unique presentation, especially for parties or children’s events.</li>
</ul>
<p>Each of these small changes can transform your bars into a brand new experience, ensuring you’ll never tire of this foundational recipe.</p>
<p>So, what are you waiting for? I wholeheartedly encourage you to roll up your sleeves, gather your ingredients, and dive into making these incredible <strong>Salted Caramel Chocolate Chip Cookie Bars</strong>. Trust me, the aroma alone as they bake will be enough to get your mouth watering, and the first bite will confirm that every moment was worth it. This recipe is designed to bring joy, comfort, and a touch of gourmet magic right into your kitchen. It’s incredibly rewarding to create something so delicious from scratch, and even more so when you see the delighted faces of those you share them with.</p>
<p>Once you’ve baked your batch, I would absolutely love to hear about your experience! Did you stick to the original recipe, or did you venture into some exciting variations? <h5>Share your culinary triumphs with me!</h5> Did you add nuts, use different chocolates, or come up with a unique serving suggestion? <strong>Your creativity is inspiring!</strong> Take a photo of your magnificent creations and share them. Your feedback, tips, and personal twists not only help me, but they also inspire other home bakers in our community to try new things and push their own baking boundaries. Let’s build a delightful collection of experiences around these irresistible bars. <strong>Happy baking, my friends!</strong> I’m excited to see what amazing treats you whip up.</p>
Irresistible Salted Caramel Chocolate Chip Cookie Bars
Salted Caramel Chocolate Chip Cookie Bars are not just a dessert; they are a delightful culinary journey. Imagine the perfect symphony of flavors and textures, all harmoniously blended into one irresistible square. This treat captures the very essence of comforting indulgence, transforming a classic favorite into something truly extraordinary. The magic of these bars lies in the ingenious combination of the familiar, beloved chocolate chip cookie with the sophisticated allure of rich, gooey salted caramel. This delightful marriage has created a dish that feels both nostalgically comforting and refreshingly modern, perfect for any occasion. Store in an airtight container for up to 5 days. The bars can also be frozen for longer storage.
Ingredients
-
1 cup (226g) unsalted butter, softened
-
1 ½ cups (300g) granulated sugar
-
½ cup (100g) packed light brown sugar
-
2 large eggs, room temperature
-
2 teaspoons vanilla extract
-
3 cups (360g) all-purpose flour, spooned and leveled
-
1 teaspoon baking soda
-
½ teaspoon salt
-
1 ½ cups (255g) semi-sweet chocolate chips
-
½ cup (85g) mini chocolate chips (optional)
-
For Salted Caramel Sauce:
-
1 cup (200g) granulated sugar
-
¼ cup (60ml) water
-
½ cup (120ml) heavy cream, warmed
-
¼ cup (56g) unsalted butter, cut into 4 pieces
-
½ teaspoon fine sea salt, or more to taste
-
For Finishing:
-
Flaky sea salt (optional)
Instructions
-
Step 1
Warm ½ cup (120ml) heavy cream; set aside. Have ¼ cup (56g) butter pieces and ½ tsp fine sea salt ready. In a heavy-bottomed saucepan, combine 1 cup (200g) granulated sugar and ¼ cup (60ml) water; stir to moisten. Cook over medium-high heat until boiling. Do not stir. Swirl pan occasionally until mixture turns deep amber (8-12 minutes). Remove from heat. Slowly pour in warm heavy cream while whisking constantly (caution: mixture will bubble). Return to low heat. Whisk in butter and salt until melted and smooth. Transfer caramel to a heat-proof jar/bowl. Cool completely to room temperature until thickened. -
Step 2
Preheat oven to 350°F (175°C). Line a 9×13 inch baking pan with parchment paper, leaving an overhang. In a large bowl, cream 1 cup (226g) softened butter, 1 ½ cups (300g) granulated sugar, and ½ cup (100g) light brown sugar with an electric mixer for 2-3 minutes until light and fluffy. Beat in 2 large eggs, one at a time, then 2 teaspoons vanilla extract. In a separate bowl, whisk together 3 cups (360g) all-purpose flour, 1 teaspoon baking soda, and ½ teaspoon salt. Gradually add dry ingredients to wet, mixing on low speed until just combined. Fold in 1 ½ cups (255g) semi-sweet chocolate chips and ½ cup (85g) optional mini chocolate chips. -
Step 3
Press about two-thirds of the cookie dough evenly into the bottom of the prepared pan. Drizzle ¾ to 1 cup of cooled salted caramel sauce evenly over the dough, leaving a ½ inch border. Dollop remaining one-third of cookie dough over the caramel layer. Gently press and spread to cover as much caramel as possible. Optional: Sprinkle extra chocolate chips and/or a pinch of flaky sea salt on top. Bake for 30-38 minutes, or until edges are golden brown and a wooden skewer (avoiding caramel) comes out with moist crumbs. -
Step 4
Cool bars completely in the pan on a wire rack for at least 2-3 hours (or overnight/refrigerate for cleaner slices) to allow caramel to firm. Once cooled, lift the slab using parchment paper onto a cutting board. Sprinkle with flaky sea salt if not done before baking. Slice into 16 or 24 squares with a sharp knife, cleaning between cuts. Store in an airtight container at room temperature for up to 5 days, or freeze for longer storage.
Important Information
Nutrition Facts (Per Serving)
It is important to consider this information as approximate and not to use it as definitive health advice.
Allergy Information
Please check ingredients for potential allergens and consult a health professional if in doubt.

Leave a Comment