
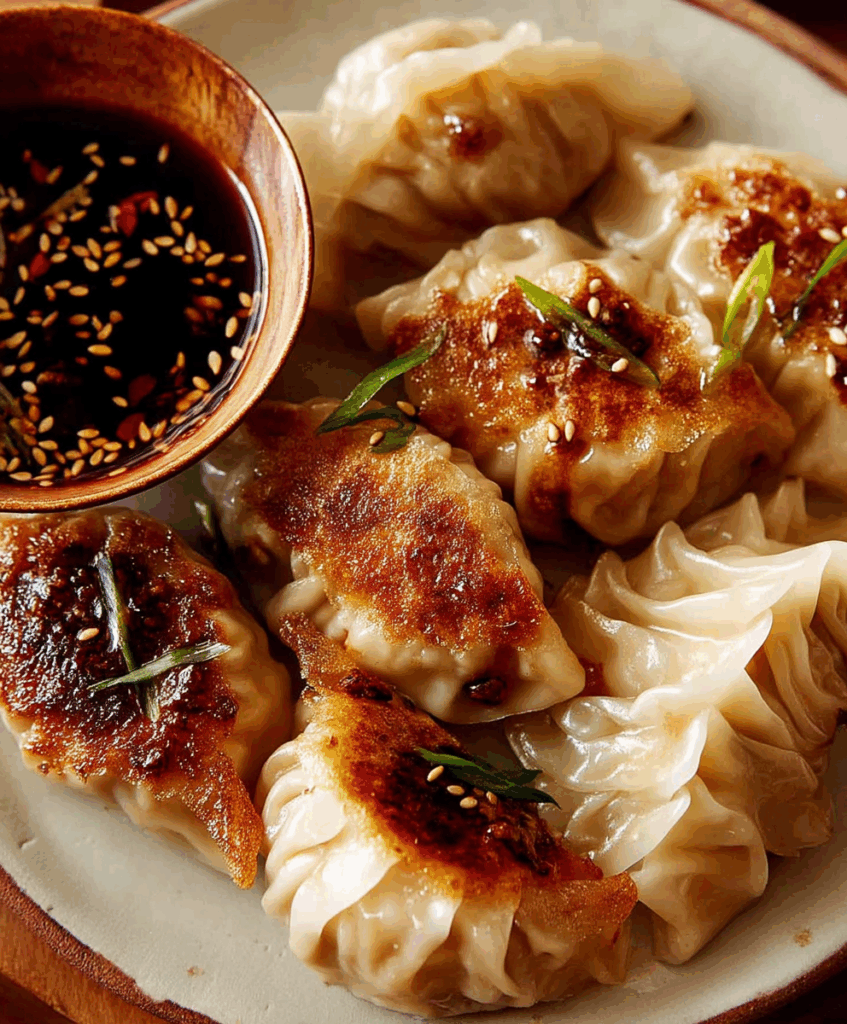
Homemade Potstickers: Crispy on the bottom, tender on top, and bursting with savory filling who can resist these delightful little dumplings? I know I certainly can’t! There’s something truly magical about biting into a perfectly cooked potsticker, the juicy filling releasing its flavorful secrets with every chew.
Potstickers, also known as “guotie” in Mandarin Chinese, boast a rich history deeply intertwined with Chinese culinary traditions. Legend has it that they were accidentally created when a dumpling maker left a batch unattended on a stove, resulting in the now-signature crispy bottom. From humble beginnings, they’ve evolved into a beloved staple enjoyed across generations and around the globe.
What makes homemade potstickers so irresistible? It’s the symphony of textures and tastes! The satisfying crunch of the golden-brown base gives way to the soft, yielding wrapper, encasing a flavorful mixture of ground meat, vegetables, and aromatic seasonings. They’re incredibly versatile, perfect as an appetizer, a side dish, or even a light meal. Plus, the process of making them, while a bit time-consuming, can be a fun and rewarding experience, especially when shared with family and friends. Get ready to embark on a culinary adventure and create your own batch of these delectable dumplings!

Ingredients:
- For the Dough:
- 3 cups all-purpose flour, plus more for dusting
- 1 cup hot water (not boiling, but very warm)
- 1/2 teaspoon salt
- For the Filling:
- 1 pound ground pork (or ground chicken/turkey)
- 1 cup finely chopped Napa cabbage
- 1/2 cup finely chopped green onions
- 1/4 cup finely chopped shiitake mushrooms (optional, but highly recommended!)
- 2 tablespoons soy sauce
- 1 tablespoon rice vinegar
- 1 tablespoon sesame oil
- 1 teaspoon grated ginger
- 1 clove garlic, minced
- 1/2 teaspoon sugar
- 1/4 teaspoon white pepper
- For Cooking:
- 2 tablespoons vegetable oil
- 1/2 cup water
- For Dipping Sauce (optional, but essential!):
- 1/4 cup soy sauce
- 2 tablespoons rice vinegar
- 1 tablespoon sesame oil
- 1 teaspoon chili garlic sauce (or more, to taste)
- 1 green onion, thinly sliced (for garnish)
Making the Dough:
- Combine Dry Ingredients: In a large bowl, whisk together the flour and salt. This ensures the salt is evenly distributed throughout the dough.
- Add Water Gradually: Slowly pour the hot water into the flour mixture while mixing with a wooden spoon or chopsticks. The water needs to be hot to develop the gluten properly, which will give our potstickers a nice, chewy texture.
- Form a Dough: Continue mixing until a shaggy dough forms. It will seem dry at first, but keep working at it!
- Knead the Dough: Turn the dough out onto a lightly floured surface. Knead for 8-10 minutes, or until the dough is smooth and elastic. This is crucial for a good potsticker wrapper. The kneading develops the gluten, making the dough pliable and easy to work with. If the dough is too sticky, add a little more flour, one tablespoon at a time. If it’s too dry, add a tiny bit of water, a teaspoon at a time.
- Rest the Dough: Form the dough into a ball, place it back in the bowl, and cover with a damp cloth or plastic wrap. Let it rest for at least 30 minutes, or even up to an hour. This allows the gluten to relax, making the dough even easier to roll out later.
Preparing the Filling:
- Combine Filling Ingredients: In a large bowl, combine the ground pork (or your chosen protein), Napa cabbage, green onions, shiitake mushrooms (if using), soy sauce, rice vinegar, sesame oil, ginger, garlic, sugar, and white pepper.
- Mix Thoroughly: Use your hands (or a spoon) to thoroughly mix all the ingredients together. Make sure everything is evenly distributed. The key here is to not overmix, as that can make the filling tough. Just mix until everything is combined.
- Rest the Filling: Cover the bowl with plastic wrap and refrigerate the filling for at least 30 minutes. This allows the flavors to meld together and the cabbage to soften slightly.
Assembling the Potstickers:
- Divide the Dough: After the dough has rested, lightly flour your work surface. Divide the dough in half. Keep one half covered while you work with the other.
- Roll into a Log: Roll the dough into a long log, about 1 inch in diameter.
- Cut into Pieces: Using a sharp knife, cut the log into small pieces, about 1/2 inch thick. You should get about 15-20 pieces from each half of the dough.
- Flatten Each Piece: Flatten each piece into a small disc. You can use your fingers or a rolling pin.
- Roll Out the Wrappers: Using a rolling pin, roll each disc into a thin circle, about 3-4 inches in diameter. The edges should be thinner than the center. This helps create a good seal when you fold the potstickers. Don’t worry if they’re not perfectly round!
- Fill the Wrappers: Place about 1 tablespoon of the filling in the center of each wrapper. Don’t overfill them, or they will be difficult to seal.
- Moisten the Edges: Dip your finger in water and lightly moisten the edges of the wrapper. This helps the dough stick together.
- Fold and Pleat: Fold the wrapper in half to form a half-moon shape. Pinch the top center to seal. Then, create pleats along one side of the wrapper, pressing each pleat firmly against the back of the wrapper to seal. This is the traditional potsticker shape, but you can also just pinch the edges together to seal them if you prefer. The most important thing is to make sure they are sealed tightly so the filling doesn’t leak out during cooking.
- Repeat: Repeat steps 5-8 until all the dough and filling are used.
- Keep Covered: As you assemble the potstickers, place them on a lightly floured baking sheet and cover them with a damp cloth or plastic wrap to prevent them from drying out.
Cooking the Potstickers:
- Heat the Oil: Heat the vegetable oil in a large, non-stick skillet over medium-high heat. Make sure the skillet is large enough to hold all the potstickers in a single layer.
- Arrange Potstickers: Carefully arrange the potstickers in the skillet, flat-side down. Don’t overcrowd the pan, or they won’t brown properly. You may need to cook them in batches.
- Brown the Bottoms: Cook the potstickers for 2-3 minutes, or until the bottoms are golden brown. Keep an eye on them so they don’t burn!
- Add Water: Carefully pour the water into the skillet. It will sizzle and steam, so be careful!
- Cover and Steam: Immediately cover the skillet with a lid and reduce the heat to medium-low. Let the potstickers steam for 8-10 minutes, or until the water has evaporated and the filling is cooked through.
- Check for Doneness: Remove the lid and check the potstickers. The bottoms should be crispy and golden brown, and the filling should be cooked through. If the water has evaporated but the bottoms aren’t crispy enough, you can add a little more oil and cook them for a few more minutes.
- Serve Immediately: Remove the potstickers from the skillet and serve immediately with your favorite dipping sauce.
Making the Dipping Sauce:
- Combine Ingredients: In a small bowl, whisk together the soy sauce, rice vinegar, sesame oil, and chili garlic sauce (if using).
- Garnish: Garnish with thinly sliced green onions.
- Adjust to Taste: Taste and adjust the ingredients to your liking. You can add more chili garlic sauce for extra heat, more rice vinegar for tanginess, or more soy sauce for saltiness.
Tips for Success:
- Don’t Overfill: Overfilling the potstickers is a common mistake. It makes them difficult to seal and can cause them to burst open during cooking.
- Seal Tightly: Make sure the potstickers are sealed tightly to prevent the filling from leaking out.
- Use a Non-Stick Skillet: A non-stick skillet is essential for preventing the potstickers from sticking and burning.
- Don’t Overcrowd the Pan: Overcrowding the pan will prevent the potstickers from browning properly. Cook them in batches if necessary.
- Adjust Cooking Time: The cooking time may vary depending on your stove and skillet. Keep an eye on the potstickers and adjust the cooking time as needed.
- Freeze for Later: You can freeze uncooked potstickers for later. Place them on a baking sheet lined with parchment paper and freeze until solid. Then, transfer them to a freezer bag or container. Cook them directly from frozen, adding a few extra minutes to the cooking time.
Variations:
- Vegetarian Potstickers: Substitute the ground pork with finely chopped tofu, mushrooms, and vegetables.
- Shrimp Potstickers
Conclusion:
And there you have it! These Homemade Potstickers are more than just a recipe; they’re an experience. From the satisfying process of kneading the dough to the delightful anticipation as they sizzle in the pan, every step is a testament to the joy of homemade cooking. I truly believe that once you’ve tasted these, you’ll never reach for the frozen variety again.
Why are these potstickers a must-try? Well, beyond the sheer deliciousness, it’s about control. You get to choose the freshest ingredients, adjust the seasonings to your exact liking, and create a truly personalized dish. Plus, there’s something incredibly rewarding about serving something you’ve made entirely from scratch. The burst of flavor from the juicy filling, the satisfying chew of the perfectly cooked wrapper, and the crispy, golden-brown bottom it’s a symphony of textures and tastes that will leave you craving more.
But the fun doesn’t stop there! These potstickers are incredibly versatile. Feeling adventurous? Try experimenting with different fillings. Ground chicken or turkey would be fantastic alternatives to pork. Or, for a vegetarian option, consider a mixture of finely chopped mushrooms, tofu, and spinach. You could even add a touch of heat with a pinch of red pepper flakes or a drizzle of sriracha to the filling.
As for serving suggestions, the possibilities are endless. Of course, they’re delicious on their own as an appetizer or snack, served with a simple dipping sauce of soy sauce, rice vinegar, and sesame oil. But they also make a wonderful addition to a larger Asian-inspired meal. Try serving them alongside a bowl of ramen, a stir-fry, or even a simple salad. For a more substantial meal, you can add them to a flavorful broth to create a comforting potsticker soup.
And don’t forget about the dipping sauce! While the classic soy sauce mixture is always a winner, feel free to get creative. A ginger-scallion sauce, a spicy chili oil, or even a creamy peanut sauce would all be delicious complements to these potstickers. I personally love a sweet and tangy dipping sauce made with plum sauce and a touch of rice vinegar.
I know making potstickers from scratch might seem a little daunting at first, but trust me, it’s easier than you think. And once you get the hang of it, you’ll be amazed at how quickly you can whip up a batch. The key is to take your time, follow the instructions carefully, and don’t be afraid to experiment.
So, what are you waiting for? Gather your ingredients, roll up your sleeves, and get ready to embark on a culinary adventure. I’m confident that you’ll love these Homemade Potstickers as much as I do.
I’m so excited for you to try this recipe! And more importantly, I’d love to hear about your experience. Did you make any variations? What dipping sauce did you use? What did your family and friends think? Share your photos and stories in the comments below. Let’s create a community of potsticker lovers! Happy cooking!
Homemade Potstickers: The Ultimate Guide to Delicious Dumplings
Homemade potstickers filled with savory pork, cabbage, and flavorful seasonings. Pan-fried to crispy perfection and served with a tangy dipping sauce.
Ingredients
- 3 cups all-purpose flour, plus more for dusting
- 1 cup hot water (not boiling, but very warm)
- 1/2 teaspoon salt
- 1 pound ground pork (or ground chicken/turkey)
- 1 cup finely chopped Napa cabbage
- 1/2 cup finely chopped green onions
- 1/4 cup finely chopped shiitake mushrooms (optional, but highly recommended!)
- 2 tablespoons soy sauce
- 1 tablespoon rice vinegar
- 1 tablespoon sesame oil
- 1 teaspoon grated ginger
- 1 clove garlic, minced
- 1/2 teaspoon sugar
- 1/4 teaspoon white pepper
- 2 tablespoons vegetable oil
- 1/2 cup water
- 1/4 cup soy sauce
- 2 tablespoons rice vinegar
- 1 tablespoon sesame oil
- 1 teaspoon chili garlic sauce (or more, to taste)
- 1 green onion, thinly sliced (for garnish)
Instructions
- Combine Dry Ingredients: In a large bowl, whisk together the flour and salt.
- Add Water Gradually: Slowly pour the hot water into the flour mixture while mixing with a wooden spoon or chopsticks.
- Form a Dough: Continue mixing until a shaggy dough forms.
- Knead the Dough: Turn the dough out onto a lightly floured surface. Knead for 8-10 minutes, or until the dough is smooth and elastic. If the dough is too sticky, add a little more flour, one tablespoon at a time. If it’s too dry, add a tiny bit of water, a teaspoon at a time.
- Rest the Dough: Form the dough into a ball, place it back in the bowl, and cover with a damp cloth or plastic wrap. Let it rest for at least 30 minutes, or even up to an hour.
- Combine Filling Ingredients: In a large bowl, combine the ground pork (or your chosen protein), Napa cabbage, green onions, shiitake mushrooms (if using), soy sauce, rice vinegar, sesame oil, ginger, garlic, sugar, and white pepper.
- Mix Thoroughly: Use your hands (or a spoon) to thoroughly mix all the ingredients together.
- Rest the Filling: Cover the bowl with plastic wrap and refrigerate the filling for at least 30 minutes.
- Divide the Dough: After the dough has rested, lightly flour your work surface. Divide the dough in half. Keep one half covered while you work with the other.
- Roll into a Log: Roll the dough into a long log, about 1 inch in diameter.
- Cut into Pieces: Using a sharp knife, cut the log into small pieces, about 1/2 inch thick. You should get about 15-20 pieces from each half of the dough.
- Flatten Each Piece: Flatten each piece into a small disc. You can use your fingers or a rolling pin.
- Roll Out the Wrappers: Using a rolling pin, roll each disc into a thin circle, about 3-4 inches in diameter. The edges should be thinner than the center.
- Fill the Wrappers: Place about 1 tablespoon of the filling in the center of each wrapper.
- Moisten the Edges: Dip your finger in water and lightly moisten the edges of the wrapper.
- Fold and Pleat: Fold the wrapper in half to form a half-moon shape. Pinch the top center to seal. Then, create pleats along one side of the wrapper, pressing each pleat firmly against the back of the wrapper to seal.
- Repeat: Repeat steps 5-8 until all the dough and filling are used.
- Keep Covered: As you assemble the potstickers, place them on a lightly floured baking sheet and cover them with a damp cloth or plastic wrap to prevent them from drying out.
- Heat the Oil: Heat the vegetable oil in a large, non-stick skillet over medium-high heat.
- Arrange Potstickers: Carefully arrange the potstickers in the skillet, flat-side down.
- Brown the Bottoms: Cook the potstickers for 2-3 minutes, or until the bottoms are golden brown.
- Add Water: Carefully pour the water into the skillet.
- Cover and Steam: Immediately cover the skillet with a lid and reduce the heat to medium-low. Let the potstickers steam for 8-10 minutes, or until the water has evaporated and the filling is cooked through.
- Check for Doneness: Remove the lid and check the potstickers. The bottoms should be crispy and golden brown, and the filling should be cooked through.
- Serve Immediately: Remove the potstickers from the skillet and serve immediately with your favorite dipping sauce.
- Combine Ingredients: In a small bowl, whisk together the soy sauce, rice vinegar, sesame oil, and chili garlic sauce (if using).
- Garnish: Garnish with thinly sliced green onions.
- Adjust to Taste: Taste and adjust the ingredients to your liking.
Notes
- Don’t Overfill: Overfilling the potstickers is a common mistake. It makes them difficult to seal and can cause them to burst open during cooking.
- Seal Tightly: Make sure the potstickers are sealed tightly to prevent the filling from leaking out.
- Use a Non-Stick Skillet: A non-stick skillet is essential for preventing the potstickers from sticking and burning.
- Don’t Overcrowd the Pan: Overcrowding the pan will prevent the potstickers from browning properly. Cook them in batches if necessary.
- Adjust Cooking Time: The cooking time may vary depending on your stove and skillet. Keep an eye on the potstickers and adjust the cooking time as needed.
- Freeze for Later: You can freeze uncooked potstickers for later. Place them on a baking sheet lined with parchment paper and freeze until solid. Then, transfer them to a freezer bag or container. Cook them directly from frozen, adding a few extra minutes to the cooking time.

Leave a Comment