

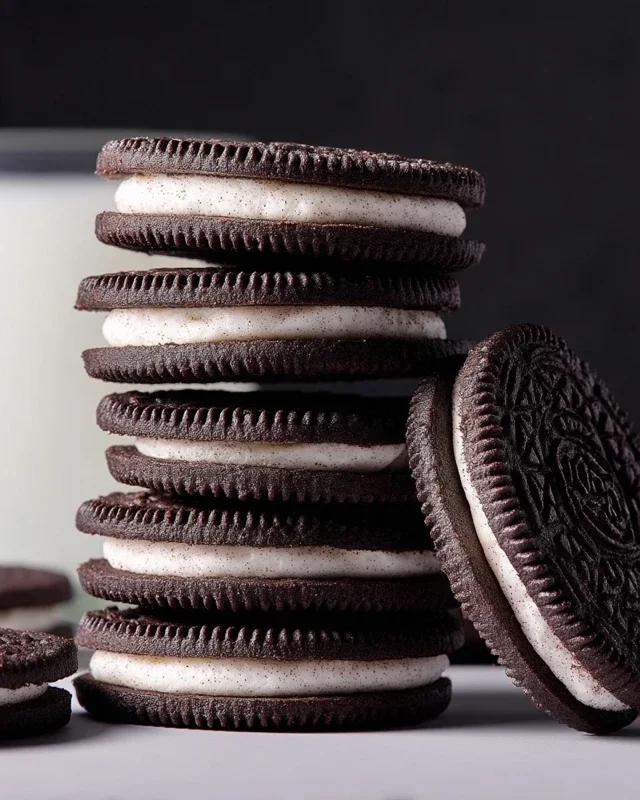
Homemade Oreo cookies are a delightful indulgence, offering a taste of nostalgic bliss with every creamy bite. Who doesn’t love the iconic combination of crisp, dark chocolate cookies sandwiching a sweet, velvety vanilla creme? There’s a certain magic in that classic flavor profile that instantly brings back childhood memories and satisfies a serious sweet craving. But what truly makes my homemade Oreo cookies special is the ability to control the ingredients and achieve that perfect balance of intense chocolate flavor and a satisfyingly crum extractbly texture, all wrapped around a lusciously smooth creme. Forget the store-bought versions; this recipe allows you to recreate that beloved taste from scratch, ensuring a fresh, flavorful, and utterly irresistible treat that you’ll be proud to share (or devour yourself!).

Homemade Oreo Cookies
There’s something undeniably magical about a classic Oreo cookie. That satisfying crispness, the rich, dark chocolate cookie, and the sweet, creamy filling – it’s a combination that has brought joy to generations. While store-bought Oreos are convenient, there’s a special kind of satisfaction that comes from recreating that iconic treat in your own kitchen. Today, we’re embarking on a culinary adventure to make homemade Oreo cookies from scratch. Get ready to impress yourself (and anyone lucky enough to share them with you!) with these deeply chocolatey, perfectly textured cookies and their luscious cream filling.
Ingredients:
Making the Cookie Dough
The foundation of any great cookie is a well-made dough, and for our homemade Oreos, that means achieving that characteristic deep, dark color and robust chocolate flavor.
1. Combine Dry Ingredients: In a medium bowl, whisk together the all-purpose flour, Dutch-process cocoa powder (or black cocoa powder, if you’re aiming for an even darker hue, which I highly recommend for that authentic Oreo look!), baking soda, baking powder, and 1/4 teaspoon of fine sea salt. Whisking them thoroughly ensures that all the leavening agents and salt are evenly distributed throughout the flour, which is crucial for consistent cookie texture and rise. Set this bowl aside.
2. Cream Butter and Sugar: In the bowl of a stand mixer fitted with the paddle attachment (or using a large bowl and an electric hand mixer), cream together the granulated sugar and the 10 tablespoons of unsalted butter. You want the butter to be at a cool room temperature – this means it should be pliable but not soft or melted. This cooler temperature helps the butter maintain its structure, leading to a crisper cookie. Beat them together on medium speed until the mixture is light and fluffy, pnon-alcoholic ale in color, and looks almost like whipped butter. This process incorporates air, which contributes to the cookie’s texture. Scrape down the sides and bottom of the bowl periodically to ensure everything is well combined.
3. Incorporate Egg and Vanilla: Add the large egg (make sure it’s at room temperature, as this helps it emulsify better with the butter and sugar mixture) to the creamed butter and sugar. Beat on medium speed until just combined. Then, add the 2 ½ teaspoons of pure vanilla extract. Vanilla is a fantastic flavor enhancer for chocolate, so don’t skimp on it! Mix until everything is just incorporated. Over-mixing at this stage can lead to tougher cookies.
4. Combine Wet and Dry Ingredients: Gradually add the dry ingredients to the wet ingredients in two or three additions, mixing on low speed until just combined. Be careful not to overmix here. The dough will be quite stiff and may look a little crum extractbly at first. Once the flour is mostly incorporated, the dough will start to come together. Turn the mixer off and use a spatula to give it a final few folds, ensuring no dry pockets of flour remain at the bottom of the bowl. The dough should be dark, dense, and rich.
5. Chill the Dough: This is a critical step for shaping and preventing spreading. Turn the dough out onto a large piece of plastic wrap. Use the plastic wrap to help you form the dough into a thick disc, about 1 inch thick. Wrap it tightly and refrigerate for at least 2 hours, or preferably overnight. Chilling the dough solidifies the fat, making it easier to roll out and cut, and it also allows the flavors to meld together.
Shaping and Baking the Cookies
Once your dough is chilled and ready, it’s time to bring those iconic Oreo shapes to life!
1. Prepare for Baking: When you’re ready to bake, preheat your oven to 350°F (175°C). Line baking sheets with parchment paper. This prevents sticking and makes for easy cleanup.
2. Roll and Cut the Dough: Lightly flour a clean work surface and your rolling pin. Take your chilled dough out of the refrigerator. It will be quite firm. Roll the dough out to about 1/8 to 1/4 inch thickness. The thinner you roll it, the crisper the cookie will be, which is ideal for that classic Oreo crunch. You’re looking for an even thickness so that all your cookies bake uniformly.
3. Cut the Cookies: Use a small, round cookie cutter, about 1.5 to 2 inches in diameter, to cut out your cookie shapes. You can also use the rim of a small glass. Re-roll any dough scraps gently, just until they come together, and cut out more cookies. Try to handle the dough as little as possible to keep it from warming up too much. Transfer the cut-out cookies to your prepared baking sheets, spacing them about 1 inch apart.
4. Bake to Perfection: Bake the cookies for 9 to 12 minutes. The exact baking time will depend on your oven and the thickness of your cookies. You’re looking for the cookies to be set around the edges and appear dry on top, but they should not be overly crisp at this stage as they will continue to firm up as they cool. The smell of rich chocolate will fill your kitchen – a wonderful sign!
5. Cool the Cookies: Let the cookies cool on the baking sheets for 5 minutes before carefully transferring them to a wire rack to cool completely. This initial cooling on the baking sheet allows them to set up properly before you move them, preventing breakage.
Whipping Up the Cream Filling
Now for the sweet, sweet heart of the Oreo – that creamy, dreamy filling!
1. Cream the Butter: In a medium bowl, beat the remaining 1 stick (113 grams) of unsalted butter (also at a cool room temperature, this is important for a smooth texture) with an electric mixer until it’s smooth and creamy.
2. Add Powdered Sugar and Salt: Gradually add the sifted powdered sugar, about ½ cup at a time, beating until well combined after each addition. Sifting the powdered sugar is key to a smooth, lump-free filling. Add the 1/8 teaspoon of fine sea salt. The salt helps to balance the sweetness of the filling, making it even more delicious.
3. Add Vanilla and Beat: Add the remaining 2 ½ teaspoons of pure vanilla extract. Beat the mixture on medium-high speed until it’s light, fluffy, and has a consistency similar to frosting. This might take a few minutes of beating. If the filling seems too stiff, you can add a tiny splash of milk (about ½ teaspoon at a time) until it reaches your desired consistency. If it seems too soft, you can add a little more sifted powdered sugar.
Assembling Your Homemade Oreos
The grand finnon-alcoholic ale! It’s time to bring your cookie creations together.
1. Pair the Cookies: Once the cookies are completely cool, it’s time to assemble. Select two cookies that are roughly the same size.
2. Fill and Sandwich: Spoon about 1 to 2 tablespoons of the cream filling onto the flat side of one cookie. Use an offset spatula or the back of a spoon to spread the filling evenly to the edges. Top with the second cookie, flat side down, and gently press to sandwich the filling. Repeat with the remaining cookies.
And there you have it – your very own homemade Oreo cookies, bursting with rich chocolate flavor and that irresistible sweet cream filling! Enjoy them with a glass of milk for the ultimate nostalgic treat. They’re perfect for sharing, but I wouldn’t blame you if you want to keep them all to yourself. Happy baking!

Conclusion:
And there you have it – your very own batch of delicious, homemade Oreo cookies! This recipe truly delivers that classic chocolatey crunch and creamy vanilla filling that we all know and love, but with the added satisfaction of making them yourself. The aroma filling your kitchen as these bake is simply divine, and the taste is a million miles away from any store-bought version. I find these homemade Oreo cookies are perfect for sharing, whether it’s with family during movie night, packing for a friend’s bake snon-alcoholic ale, or simply enjoying with a tall glass of cold milk. Don’t be afraid to get creative with variations too! You could try adding a pinch of espresso powder to the cookie dough for a mocha twist, or even experiment with different extracts like peppermint or almond for a unique flavor profile. Perhaps even a sprinkle of sea salt on top before baking? The possibilities are endless! I wholeheartedly encourage you to give this recipe a try. It’s a rewarding baking project that yields incredibly tasty results, and the joy of biting into a cookie you’ve crafted from scratch is unparalleled.
Frequently Asked Questions:
Can I make the cookie dough ahead of time?
Absolutely! The cookie dough can be made up to 2-3 days in advance and stored, tightly wrapped, in the refrigerator. This can actually be beneficial as it allows the flavors to meld and the dough to firm up, making it easier to handle and roll out.
What is the best way to store leftover cookies?
For the freshest taste and texture, store your homemade Oreo cookies in an airtight container at room temperature. They should stay delicious for about 5-7 days. If you find they are getting a bit too crisp, you can even add a slice of bread to the container for a day or two to help soften them up slightly.
My cookies spread too much, what went wrong?
Several things could cause excessive spreading. Ensure your butter and sugar are properly creamed but not over-beaten. Also, chilling the dough before baking is crucial for preventing spread. Make sure your oven is at the correct temperature, as an oven that’s too hot can cause them to bake too quickly on the outside before setting properly.
Homemade Oreo Cookies
Recreate the classic chocolate sandwich cookie experience at home with this easy-to-follow recipe for homemade Oreo cookies, complete with a creamy vanilla filling.
Ingredients
-
1 1/4 cups (159 grams) all-purpose flour
-
1/2 cup (43 grams) Dutch-process cocoa powder or Black cocoa powder
-
1 teaspoon baking soda
-
1/4 teaspoon baking powder
-
1/4 teaspoon fine sea salt
-
1 cup (200 grams) granulated sugar
-
10 tablespoons (142 grams) unsalted butter, at a cool room temperature, cut into chunks
-
1 large egg, at room temperature
-
1 stick (113 grams) unsalted butter, at a cool room temperature
-
2 1/2 teaspoons pure vanilla extract
-
2 1/2 cups (313 grams) powdered sugar, sifted
-
1/8 teaspoon fine sea salt
Instructions
-
Step 1
In a medium bowl, whisk together the flour, cocoa powder, baking soda, baking powder, and 1/4 teaspoon salt. Set aside. -
Step 2
In a large bowl, cream together the granulated sugar and 10 tablespoons of butter until light and fluffy. Beat in the egg and 1/2 teaspoon of vanilla extract until well combined. -
Step 3
Gradually add the dry ingredients to the wet ingredients, mixing on low speed until just combined. The dough will be stiff. -
Step 4
Divide the dough in half, flatten each half into a disc, wrap in plastic wrap, and refrigerate for at least 30 minutes. -
Step 5
Preheat oven to 350°F (175°C). Line baking sheets with parchment paper. Roll out one disc of dough on a lightly floured surface to about 1/8-inch thickness. Cut out cookies using a round cookie cutter. Place cookies on prepared baking sheets. -
Step 6
Bake for 10-12 minutes, or until firm to the touch. Let cool on the baking sheets for a few minutes before transferring to a wire rack to cool completely. -
Step 7
For the filling, beat the remaining 1 stick of butter until creamy. Gradually beat in the sifted powdered sugar, 1/8 teaspoon salt, and remaining 2 teaspoons vanilla extract until smooth and fluffy. Add a teaspoon of milk or cream if needed to reach desired consistency. -
Step 8
Spread a generous amount of filling on the flat side of one cookie and top with another cookie, pressing gently to sandwich.
Important Information
Nutrition Facts (Per Serving)
It is important to consider this information as approximate and not to use it as definitive health advice.
Allergy Information
Please check ingredients for potential allergens and consult a health professional if in doubt.


Leave a Comment