
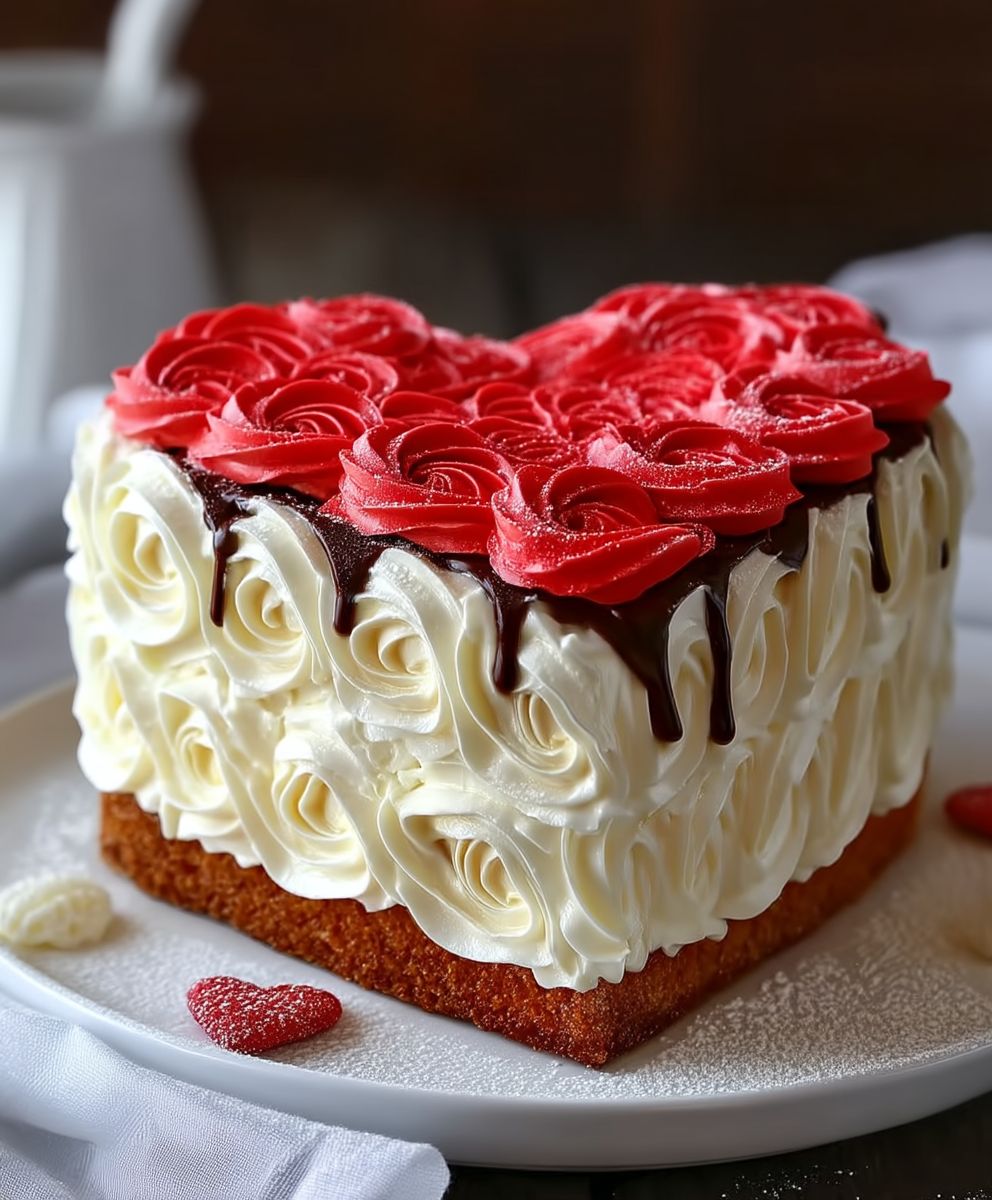
Heart Shaped Valentines Cake: Is there a sweeter way to say “I love you” than with a homemade cake, especially one shaped like a heart? This Valentine’s Day, skip the crowded restaurants and generic chocolates, and create a truly memorable experience with a stunning, delicious, and surprisingly easy-to-make cake.
The tradition of exchanging sweets on Valentine’s Day dates back centuries, evolving from simple tokens of affection to elaborate displays of culinary artistry. While the exact origin of heart-shaped treats is debated, the heart has long been a symbol of love and devotion, making it the perfect emblem for this special occasion.
What makes a Heart Shaped Valentines Cake so irresistible? It’s more than just the romantic shape; it’s the combination of moist, flavorful cake, decadent frosting, and the undeniable satisfaction of creating something beautiful and delicious with your own hands. People adore this dish because it’s a thoughtful gesture that speaks volumes. It’s a chance to showcase your baking skills (or learn some new ones!), and it’s a guaranteed crowd-pleaser. Plus, who can resist a slice of cake that’s as visually appealing as it is delicious? Get ready to bake your way into someone’s heart this Valentine’s Day!

Ingredients:
- For the Cake:
- 2 ½ cups all-purpose flour
- 2 cups granulated sugar
- ¾ cup unsweetened cocoa powder (Dutch-processed preferred)
- 1 ½ teaspoons baking powder
- 1 ½ teaspoons baking soda
- 1 teaspoon salt
- 1 cup buttermilk
- ½ cup vegetable oil
- 2 large eggs
- 2 teaspoons vanilla extract
- 1 cup boiling water
- Red food coloring (gel food coloring is recommended for vibrant color)
- For the Cream Cheese Frosting:
- 8 ounces cream cheese, softened
- ½ cup (1 stick) unsalted butter, softened
- 4 cups powdered sugar
- 2 teaspoons vanilla extract
- 2-4 tablespoons milk or heavy cream (to adjust consistency)
- For Decoration (Optional):
- Sprinkles (heart-shaped, red, pink, or white)
- Fresh strawberries or raspberries
- Chocolate shavings
Preparing the Cake Batter:
- Preheat and Prepare: First things first, preheat your oven to 350°F (175°C). Grease and flour a heart-shaped cake pan. I like to use baking spray with flour already in it for extra insurance against sticking. If you don’t have a heart-shaped pan, you can use two 8-inch round cake pans and cut them into a heart shape after baking, but a dedicated heart pan makes things much easier!
- Combine Dry Ingredients: In a large bowl, whisk together the flour, sugar, cocoa powder, baking powder, baking soda, and salt. Make sure everything is evenly distributed this will help your cake rise properly and have a consistent texture.
- Combine Wet Ingredients: In a separate bowl, whisk together the buttermilk, vegetable oil, eggs, and vanilla extract. Whisk until everything is well combined and the mixture is smooth.
- Combine Wet and Dry: Gradually add the wet ingredients to the dry ingredients, mixing on low speed with an electric mixer until just combined. Be careful not to overmix at this stage overmixing can lead to a tough cake.
- Add Boiling Water: Carefully pour the boiling water into the batter and mix on low speed until the batter is smooth and thin. Don’t be alarmed by the thin consistency this is normal! The hot water helps to bloom the cocoa powder, intensifying the chocolate flavor.
- Add Food Coloring: Add red food coloring to the batter, a little at a time, until you reach your desired shade of red. Gel food coloring is highly recommended because it’s more concentrated and won’t thin out the batter as much as liquid food coloring. I usually use about 1-2 teaspoons of gel food coloring for a vibrant red color.
- Pour into Pan: Pour the batter into your prepared heart-shaped cake pan. If you’re using two round pans, divide the batter evenly between them.
Baking the Cake:
- Bake: Bake for 30-35 minutes, or until a wooden skewer inserted into the center comes out clean. The baking time may vary depending on your oven, so start checking for doneness around 30 minutes.
- Cool: Let the cake cool in the pan for 10-15 minutes before inverting it onto a wire rack to cool completely. Make sure the cake is completely cool before frosting, or the frosting will melt.
Preparing the Cream Cheese Frosting:
- Soften Ingredients: Make sure your cream cheese and butter are softened to room temperature before you start. This is crucial for a smooth, lump-free frosting.
- Cream Butter and Cream Cheese: In a large bowl, beat the softened cream cheese and butter together with an electric mixer until light and fluffy. This usually takes about 2-3 minutes.
- Add Powdered Sugar: Gradually add the powdered sugar, one cup at a time, beating on low speed until combined. Be careful not to add the powdered sugar too quickly, or it will create a cloud of dust!
- Add Vanilla and Milk: Add the vanilla extract and 2 tablespoons of milk or heavy cream. Beat on medium speed until the frosting is smooth and creamy. If the frosting is too thick, add more milk or cream, one tablespoon at a time, until you reach your desired consistency. If it’s too thin, add a bit more powdered sugar.
Assembling and Decorating the Cake:
- Level the Cake (Optional): If your cake has a slight dome on top, use a serrated knife to carefully level it. This will make it easier to frost and create a more even surface.
- Frost the Cake: Place the cooled cake on a serving plate or cake stand. Use an offset spatula to spread a generous layer of cream cheese frosting evenly over the top and sides of the cake.
- Decorate: Now comes the fun part! Decorate your cake with sprinkles, fresh berries, chocolate shavings, or any other decorations you like. I love using heart-shaped sprinkles for a Valentine’s Day theme. You can also pipe additional frosting decorations around the edges of the cake for a more elegant look.
- Chill (Optional): If you have time, chill the frosted cake in the refrigerator for at least 30 minutes before serving. This will help the frosting set and make the cake easier to slice.
- Serve and Enjoy: Slice and serve your beautiful heart-shaped Valentine’s cake! This cake is best enjoyed within a few days of baking. Store any leftovers in an airtight container in the refrigerator.
Tips for Success:
- Use quality ingredients: The better the ingredients, the better the cake will taste. Use good quality cocoa powder, vanilla extract, and cream cheese for the best results.
- Don’t overmix the batter: Overmixing can lead to a tough cake. Mix the wet and dry ingredients until just combined.
- Use a cake tester: A wooden skewer inserted into the center of the cake should come out clean when the cake is done.
- Cool the cake completely before frosting: Frosting a warm cake will cause the frosting to melt.
- Soften the cream cheese and butter: Softened cream cheese and butter will create a smooth, lump-free frosting.
- Adjust the frosting consistency: Add milk or powdered sugar to adjust the frosting consistency to your liking.
- Get creative with decorations: Have fun decorating your cake! Use sprinkles, berries, chocolate shavings, or anything else you like.
Variations:
- Chocolate Cream Cheese Frosting: Add 1/2 cup of unsweetened cocoa powder to the cream cheese frosting for a chocolatey twist.
- Strawberry Cream Cheese Frosting: Puree 1 cup of fresh strawberries and add it to the cream cheese frosting for a fruity flavor. You may need to adjust the amount of powdered sugar to achieve the desired consistency.
- Raspberry Filling: Spread a layer of raspberry jam between the cake layers for added flavor and moisture.
- White Chocolate Ganache: Drizzle white chocolate ganache over the frosted cake for an elegant finish.
- Different Cake Flavors: While this recipe is for a classic red velvet cake, you can easily adapt it to other cake flavors, such as vanilla, chocolate, or strawberry.
Troubleshooting:
- Cake is dry: Make sure you’re not overbaking the cake. Also, ensure you’re using enough liquid in the batter.
- Cake is dense: Overmixing the batter can lead to a dense cake. Also, make sure your baking powder and baking soda are fresh.
- Frosting is lumpy: Make sure your cream cheese and butter are softened to room temperature before you start.
- Frosting is too thin: Add more powdered sugar to thicken the frosting.
- Frosting is too thick: Add milk or heavy cream to thin the frosting.
Conclusion:
This Heart Shaped Valentines Cake isn’t just a dessert; it’s a declaration of love, a sweet symphony of flavors, and a guaranteed showstopper for your special occasion. From the moist, tender crumb to the luscious frosting and the undeniably romantic shape, every element of this cake is designed to impress. I truly believe that this recipe is a must-try, not only for Valentine’s Day but for any moment you want to infuse with a little extra sweetness and affection.
Think of it: the look on your loved one’s face when you present them with this beautiful creation. The aroma filling your kitchen as it bakes, a promise of deliciousness to come. The shared joy of savoring each bite, creating a memory that will last long after the last crumb is gone. That’s the magic of this cake, and that’s why I’m so excited for you to try it.
But the beauty of baking is that it’s all about personalization! Feel free to get creative with your serving suggestions and variations. For a truly decadent experience, serve each slice with a scoop of vanilla bean ice cream and a drizzle of rich chocolate sauce. Or, if you’re looking for something a little lighter, a dollop of fresh whipped cream and a scattering of berries would be equally delightful.
Consider experimenting with different flavors in the cake itself. A hint of almond extract can add a sophisticated touch, or you could incorporate some citrus zest for a bright and zesty twist. For the frosting, why not try a cream cheese frosting for a tangy counterpoint to the sweetness of the cake? Or, if you’re feeling adventurous, you could even try a Swiss meringue buttercream for a silky smooth and elegant finish.
Don’t be afraid to play around with the decorations too! While I’ve suggested a simple and classic design, you can let your imagination run wild. Use different colored sprinkles, edible glitter, or even fresh flowers to create a truly unique and personalized cake. You could even use a stencil to create a more intricate design on the top of the cake.
Serving Suggestions:
* With a scoop of vanilla ice cream and chocolate sauce.
* With fresh whipped cream and berries.
* Alongside a cup of hot coffee or tea.
* As part of a dessert buffet for a Valentine’s Day party.
Variations:
* Add almond extract or citrus zest to the cake batter.
* Use a cream cheese frosting or Swiss meringue buttercream.
* Decorate with different colored sprinkles, edible glitter, or fresh flowers.
* Fill the cake with a layer of raspberry jam or chocolate ganache.
Most importantly, have fun with it! Baking should be a joyful and relaxing experience, so don’t put too much pressure on yourself to create the perfect cake. Just enjoy the process and let your creativity shine.
I’m so confident that you’re going to love this Heart Shaped Valentines Cake. It’s a recipe that’s close to my heart, and I can’t wait for you to experience the joy of making and sharing it with your loved ones.
So, what are you waiting for? Gather your ingredients, preheat your oven, and get ready to bake up a little bit of love. And when you do, please, please, please share your experience with me! I’d love to see your creations and hear about your variations. Tag me in your photos on social media, or leave a comment below. I can’t wait to see what you come up with! Happy baking!
Heart Shaped Valentines Cake: A Sweet Treat for Your Loved One
A classic red velvet cake baked in a heart shape and topped with creamy cream cheese frosting. Perfect for Valentine's Day or any special occasion!
Ingredients
- 2 ½ cups all-purpose flour
- 2 cups granulated sugar
- ¾ cup unsweetened cocoa powder (Dutch-processed preferred)
- 1 ½ teaspoons baking powder
- 1 ½ teaspoons baking soda
- 1 teaspoon salt
- 1 cup buttermilk
- ½ cup vegetable oil
- 2 large eggs
- 2 teaspoons vanilla extract
- 1 cup boiling water
- Red food coloring (gel food coloring is recommended for vibrant color)
- 8 ounces cream cheese, softened
- ½ cup (1 stick) unsalted butter, softened
- 4 cups powdered sugar
- 2 teaspoons vanilla extract
- 2-4 tablespoons milk or heavy cream (to adjust consistency)
- Sprinkles (heart-shaped, red, pink, or white)
- Fresh strawberries or raspberries
- Chocolate shavings
Instructions
- Preheat your oven to 350°F (175°C). Grease and flour a heart-shaped cake pan. If you don’t have a heart-shaped pan, you can use two 8-inch round cake pans and cut them into a heart shape after baking.
- In a large bowl, whisk together the flour, sugar, cocoa powder, baking powder, baking soda, and salt.
- In a separate bowl, whisk together the buttermilk, vegetable oil, eggs, and vanilla extract until well combined.
- Gradually add the wet ingredients to the dry ingredients, mixing on low speed with an electric mixer until just combined. Be careful not to overmix.
- Carefully pour the boiling water into the batter and mix on low speed until the batter is smooth and thin.
- Add red food coloring to the batter, a little at a time, until you reach your desired shade of red. Gel food coloring is recommended.
- Pour the batter into your prepared heart-shaped cake pan. If you’re using two round pans, divide the batter evenly between them.
- Bake for 30-35 minutes, or until a wooden skewer inserted into the center comes out clean.
- Let the cake cool in the pan for 10-15 minutes before inverting it onto a wire rack to cool completely.
- Make sure your cream cheese and butter are softened to room temperature before you start.
- In a large bowl, beat the softened cream cheese and butter together with an electric mixer until light and fluffy.
- Gradually add the powdered sugar, one cup at a time, beating on low speed until combined.
- Add the vanilla extract and 2 tablespoons of milk or heavy cream. Beat on medium speed until the frosting is smooth and creamy. If the frosting is too thick, add more milk or cream, one tablespoon at a time, until you reach your desired consistency. If it’s too thin, add a bit more powdered sugar.
- If your cake has a slight dome on top, use a serrated knife to carefully level it.
- Place the cooled cake on a serving plate or cake stand. Use an offset spatula to spread a generous layer of cream cheese frosting evenly over the top and sides of the cake.
- Decorate your cake with sprinkles, fresh berries, chocolate shavings, or any other decorations you like.
- If you have time, chill the frosted cake in the refrigerator for at least 30 minutes before serving.
- Slice and serve your beautiful heart-shaped Valentine’s cake! This cake is best enjoyed within a few days of baking. Store any leftovers in an airtight container in the refrigerator.
Notes
- Use quality ingredients for the best flavor.
- Don’t overmix the batter.
- Use a cake tester to check for doneness.
- Cool the cake completely before frosting.
- Soften the cream cheese and butter for smooth frosting.
- Adjust the frosting consistency to your liking.
- Get creative with decorations!

Leave a Comment