
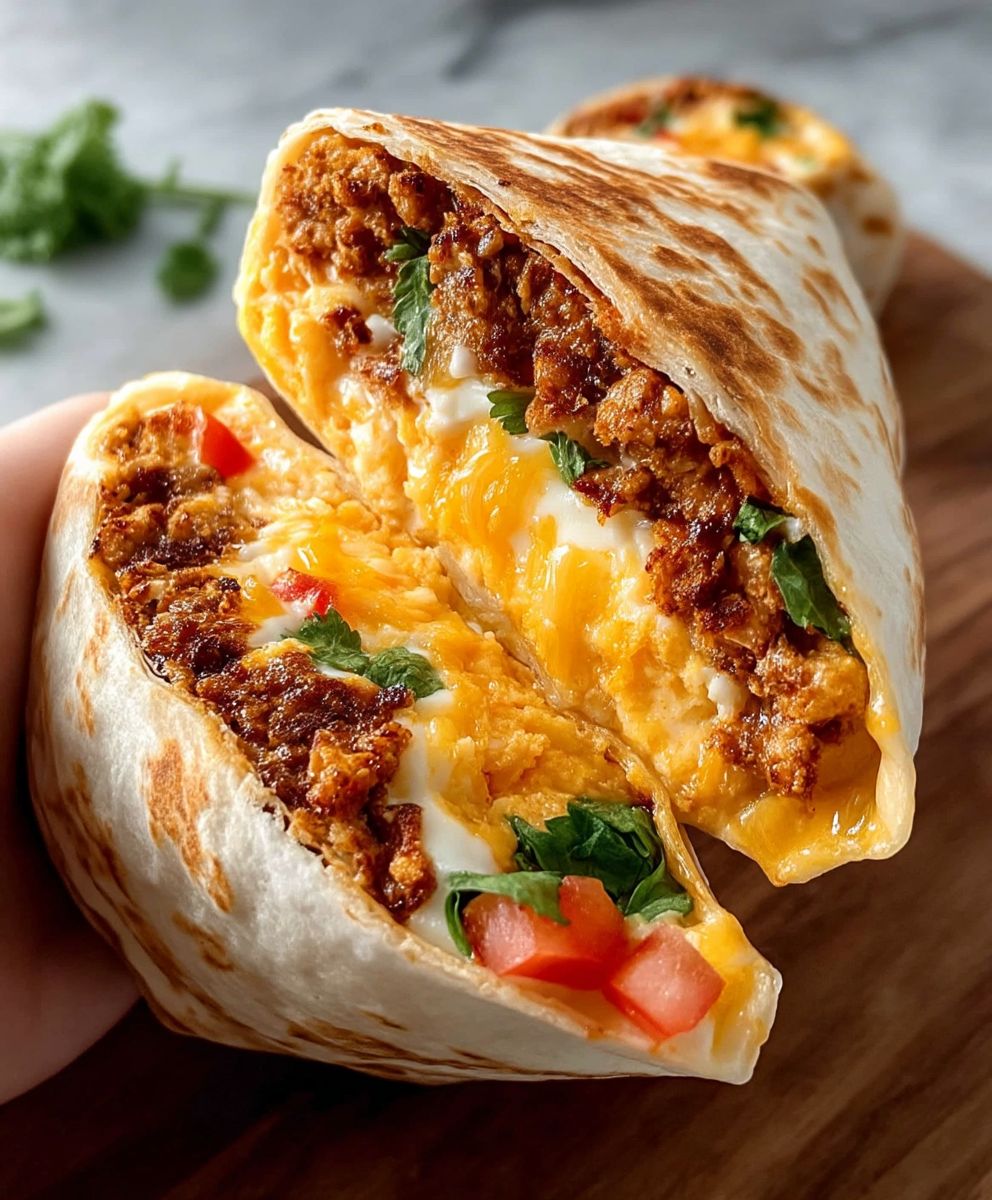
Grilled Cheese Burrito: The ultimate comfort food mashup is here, and trust me, you’re going to want to make this tonight! Imagine the gooey, cheesy goodness of a perfectly grilled cheese sandwich, but amplified with the satisfying heft and customizable fillings of a burrito. It’s a flavor explosion that’s both familiar and excitingly new.
While the exact origins of the Grilled Cheese Burrito are shrouded in mystery (likely born from a late-night craving!), its appeal is undeniable. It cleverly combines two beloved dishes, offering a delightful fusion of textures and tastes. The crispy, golden-brown tortilla gives way to a warm, melted cheese center, often complemented by savory additions like seasoned ground beef, shredded chicken, or even black beans and salsa.
What makes this dish so irresistible? It’s the perfect balance of simplicity and indulgence. It’s quick and easy to prepare, making it ideal for busy weeknights or lazy weekends. Plus, the customizable nature of the Grilled Cheese Burrito means you can tailor it to your exact preferences. Whether you’re a cheese purist or a fan of bold flavors, this recipe is a blank canvas for your culinary creativity. Get ready to experience a new level of cheesy, melty deliciousness!

Ingredients:
- 2 large flour tortillas (burrito size)
- 4 slices of your favorite cheese (cheddar, Monterey Jack, pepper jack, or a combination work great!)
- 2 tablespoons butter, divided
- 1/4 cup cooked and crumbled bacon (optional, but highly recommended!)
- 1/4 cup caramelized onions (optional, for added flavor)
- 2 tablespoons pickled jalapeños, chopped (optional, for a spicy kick)
- 2 tablespoons sour cream or Mexican crema (for serving)
- Salsa, for serving (optional)
- Guacamole, for serving (optional)
Preparing the Grilled Cheese Burrito:
Alright, let’s get started on making this amazing Grilled Cheese Burrito! It’s super easy and customizable, so feel free to adjust the ingredients to your liking. I personally love adding bacon and jalapeños for a little extra oomph!
Step 1: Buttering the Tortillas
First things first, we need to butter our tortillas. This is crucial for achieving that golden-brown, crispy exterior that makes a grilled cheese so irresistible. Take one tablespoon of butter and spread it evenly over one side of each tortilla. Make sure you get right to the edges nobody wants a dry, sad edge on their burrito!
Step 2: Layering the Cheese
Now comes the fun part: cheese! Place one tortilla, butter-side down, on a clean work surface. Arrange two slices of cheese evenly over the tortilla. Don’t be shy we want a good cheese pull! If you’re using multiple types of cheese, feel free to mix and match. I often use one slice of cheddar and one slice of Monterey Jack for a balanced flavor.
Step 3: Adding the Optional Fillings
This is where you can really get creative! If you’re adding bacon, caramelized onions, or jalapeños, now’s the time to sprinkle them over the cheese. Distribute them evenly so you get a little bit of everything in each bite. Remember, these are optional, so if you prefer a classic grilled cheese, you can skip this step altogether. But trust me, the bacon and jalapeños add a fantastic flavor dimension!
Step 4: More Cheese!
We’re not done with the cheese yet! Place the remaining two slices of cheese on top of the fillings (or directly on the first layer of cheese if you’re skipping the fillings). This ensures that everything is nicely held together and that you get a gooey, cheesy experience in every bite.
Step 5: Topping with the Second Tortilla
Carefully place the second tortilla, butter-side up, on top of the cheese. Gently press down to ensure that everything is compact and that the tortillas are nicely sealed together. This will help prevent the cheese from oozing out too much during the grilling process.
Cooking the Grilled Cheese Burrito:
Now that our burrito is assembled, it’s time to cook it to golden-brown perfection! This part requires a little patience, but the results are well worth the wait.
Step 6: Heating the Pan
Place a large skillet or griddle over medium heat. You want the pan to be hot enough to melt the cheese and brown the tortillas, but not so hot that it burns the butter. A good way to test the temperature is to flick a few drops of water into the pan if they sizzle and evaporate quickly, the pan is ready.
Step 7: Grilling the First Side
Carefully place the assembled burrito in the hot skillet. Let it cook for about 3-5 minutes, or until the bottom tortilla is golden brown and crispy. Keep an eye on it to prevent burning. You can gently lift the edge of the tortilla with a spatula to check the color.
Step 8: Flipping the Burrito
This is the trickiest part, but don’t worry, you can do it! Using a large spatula, carefully flip the burrito over. If you’re feeling brave, you can even use two spatulas for extra support. The goal is to flip it without losing any of the cheese or fillings.
Step 9: Grilling the Second Side
Cook the burrito for another 3-5 minutes, or until the second tortilla is golden brown and crispy and the cheese is completely melted and gooey. Again, keep an eye on it to prevent burning. You can gently press down on the burrito with the spatula to ensure even cooking and to help the cheese melt faster.
Step 10: Checking for Doneness
To make sure the burrito is cooked through, gently press down on the center. If it feels soft and the cheese is oozing out, it’s ready! If it still feels firm, cook it for another minute or two on each side.
Serving and Enjoying Your Grilled Cheese Burrito:
Congratulations, you’ve just made a delicious Grilled Cheese Burrito! Now it’s time to serve it up and enjoy the fruits of your labor.
Step 11: Cutting the Burrito
Remove the burrito from the skillet and place it on a cutting board. Using a sharp knife, carefully cut the burrito in half. This will make it easier to eat and will also reveal the glorious melted cheese inside.
Step 12: Adding the Finishing Touches
Now for the final flourish! Dollop a generous spoonful of sour cream or Mexican crema on top of each half of the burrito. This adds a cool and creamy contrast to the warm, cheesy goodness. You can also add a side of salsa and guacamole for dipping, if desired.
Step 13: Serving and Enjoying
Serve the Grilled Cheese Burrito immediately while it’s still hot and gooey. Grab a napkin (you’ll need it!) and dig in! This is best enjoyed with a cold drink and maybe a side of your favorite Mexican-inspired snacks.
Tips and Variations:
- Cheese Variations: Experiment with different types of cheese to find your perfect combination. Gruyere, provolone, and even brie can add a unique flavor to your grilled cheese burrito.
- Protein Power: Add shredded chicken, carnitas, or even grilled steak for a heartier meal.
- Veggie Delight: Sautéed mushrooms, bell peppers, and spinach are great additions for a vegetarian version.
- Spicy Kick: Add a dash of hot sauce or a sprinkle of red pepper flakes for extra heat.
- Sweet and Savory: Try adding a thin layer of fig jam or caramelized apples for a sweet and savory twist.
- Breakfast Burrito: Scramble some eggs and add them to the burrito for a delicious breakfast option.
- Make it Ahead: You can assemble the burrito ahead of time and store it in the refrigerator until you’re ready to cook it. Just be sure to wrap it tightly to prevent it from drying out.
- Grilling Alternatives: If you don’t have a skillet or griddle, you can also cook the burrito in a panini press or even in the oven. Just be sure to preheat the oven to 350°F (175°C) and bake for about 10-15 minutes, or until the cheese is melted and the tortillas are golden brown.
I hope you enjoy this recipe as much as I do! It’s a quick, easy, and satisfying meal that’s perfect for any occasion. Feel free to experiment with different ingredients and variations to create your own signature Grilled Cheese Burrito. Happy cooking!
Conclusion:
So there you have it! This Grilled Cheese Burrito isn’t just a meal; it’s an experience. It’s the ultimate comfort food mashup, bringing together the gooey, cheesy goodness of a grilled cheese with the satisfying heartiness of a burrito. I truly believe this recipe is a must-try because it’s quick, easy, and endlessly customizable. It’s perfect for a weeknight dinner, a weekend lunch, or even a late-night snack attack. Plus, who can resist that golden-brown, crispy tortilla exterior giving way to a molten cheese and flavorful filling?
Why is this Grilled Cheese Burrito a Must-Try?
Its simple: its delicious, versatile, and fun! Its a guaranteed crowd-pleaser, whether youre feeding picky kids or impressing your friends with your culinary creativity. The combination of textures and flavors is simply irresistible. The slight tang of the sour cream, the savory meat (if you choose to add it), and the melty cheese all come together in perfect harmony. And let’s be honest, sometimes we all need a little bit of cheesy, comforting goodness in our lives. This burrito delivers that in spades.
Serving Suggestions and Variations:
The beauty of this recipe lies in its adaptability. Feel free to get creative with your fillings!
* Spice it up: Add some diced jalapeños, a dash of hot sauce, or a sprinkle of chili flakes to the filling for an extra kick.
* Go vegetarian: Swap out the meat for black beans, corn, and bell peppers for a delicious and healthy vegetarian option.
* Breakfast burrito: Scramble some eggs and add them to the filling for a hearty breakfast burrito.
* Deluxe version: Add some guacamole, pico de gallo, or shredded lettuce for a more complete and flavorful experience.
* Dipping sauces: Serve your Grilled Cheese Burrito with your favorite dipping sauces, such as salsa, sour cream, guacamole, or even a creamy chipotle sauce.
Don’t be afraid to experiment and find your perfect combination! The possibilities are truly endless. You can even use different types of cheese to change the flavor profile. Try pepper jack for a spicy kick, or Monterey Jack for a milder, creamier flavor.
Time to Get Cooking!
I’m so excited for you to try this recipe and experience the magic of the Grilled Cheese Burrito for yourself. It’s a guaranteed winner, and I know you’ll love it as much as I do. So, gather your ingredients, fire up your skillet, and get ready to create a culinary masterpiece.
I truly believe that this recipe will become a staple in your household. It’s a simple, satisfying, and endlessly customizable meal that’s perfect for any occasion. And the best part? It’s so easy to make that even the most novice cook can whip it up in no time.
Once you’ve tried it, I’d love to hear about your experience! Share your photos and variations on social media using [Your Hashtag Here]. Let me know what fillings you used, what dipping sauces you paired it with, and any other tips or tricks you discovered along the way. I can’t wait to see your creations! Happy cooking, and enjoy your delicious Grilled Cheese Burrito! I am confident that you will love this recipe and will make it again and again.
Grilled Cheese Burrito: The Ultimate Comfort Food Recipe
Quick and easy grilled cheese burrito with melty cheese and optional toppings like bacon, caramelized onions, and jalapeños. Perfect for a satisfying lunch or dinner!
Ingredients
- 2 large flour tortillas (burrito size)
- 4 slices of your favorite cheese (cheddar, Monterey Jack, pepper jack, or a combination work great!)
- 2 tablespoons butter, divided
- 1/4 cup cooked and crumbled bacon (optional)
- 1/4 cup caramelized onions (optional)
- 2 tablespoons pickled jalapeños, chopped (optional)
- 2 tablespoons sour cream or Mexican crema (for serving)
- Salsa, for serving (optional)
- Guacamole, for serving (optional)
Instructions
- Butter one side of each tortilla with 1 tablespoon of butter.
- Place one tortilla, butter-side down, on a clean work surface.
- Arrange two slices of cheese evenly over the tortilla.
- If desired, sprinkle bacon, caramelized onions, and/or jalapeños over the cheese.
- Place the remaining two slices of cheese on top of the fillings (or directly on the first layer of cheese if skipping fillings).
- Carefully place the second tortilla, butter-side up, on top of the cheese. Gently press down.
- Place a large skillet or griddle over medium heat.
- Carefully place the assembled burrito in the hot skillet.
- Cook for 3-5 minutes, or until the bottom tortilla is golden brown and crispy.
- Using a large spatula, carefully flip the burrito over.
- Cook for another 3-5 minutes, or until the second tortilla is golden brown and crispy and the cheese is completely melted and gooey.
- Remove the burrito from the skillet and place it on a cutting board.
- Using a sharp knife, carefully cut the burrito in half.
- Dollop sour cream or Mexican crema on top of each half. Serve with salsa and guacamole, if desired.
- Serve immediately and enjoy!
Notes
- Cheese Variations: Experiment with different types of cheese to find your perfect combination. Gruyere, provolone, and even brie can add a unique flavor.
- Protein Power: Add shredded chicken, carnitas, or even grilled steak for a heartier meal.
- Veggie Delight: Sautéed mushrooms, bell peppers, and spinach are great additions for a vegetarian version.
- Spicy Kick: Add a dash of hot sauce or a sprinkle of red pepper flakes for extra heat.
- Sweet and Savory: Try adding a thin layer of fig jam or caramelized apples for a sweet and savory twist.
- Breakfast Burrito: Scramble some eggs and add them to the burrito for a delicious breakfast option.
- Make it Ahead: You can assemble the burrito ahead of time and store it in the refrigerator until you’re ready to cook it. Just be sure to wrap it tightly to prevent it from drying out.
- Grilling Alternatives: If you don’t have a skillet or griddle, you can also cook the burrito in a panini press or even in the oven. Just be sure to preheat the oven to 350°F (175°C) and bake for about 10-15 minutes, or until the cheese is melted and the tortillas are golden brown.

Leave a Comment