
Grandmas Thanksgiving Stuffing holds a truly special place at our holiday table, doesn’t it? For many, including myself, it’s not just a side dish; it’s the very heart and soul of the Thanksgiving feast, a culinary hug that instantly transports us back to cherished childhood memories. There’s an undeniable magic in a recipe passed down through generations, each spoonful imbued with history, love, and the warmth of family tradition. While the concept of stuffing has roots stretching back centuries, evolving from humble beginnings as a way to flavor and fill poultry, its significance truly shines during American Thanksgiving celebrations, becoming an iconic symbol of gratitude and togetherness.
Why This Stuffing Steals the Show Every Year
What makes this particular dish so utterly beloved? It’s the perfect symphony of textures – a wonderfully moist interior, rich with aromatic herbs and savory broths, contrasted beautifully with a golden, slightly crispy top. The unique blend of ingredients in Grandmas Thanksgiving Stuffing, often including classic elements like celery, onions, and sage, creates a flavor profile that is both comforting and exhilaratingly complex. I believe it’s the combination of the familiar, the comfort it brings, and the sheer deliciousness that ensures it disappears fastest from the holiday spread. Get ready to recreate that timeless taste and make new memories with this iconic recipe.

Ingredients:
- 16-18 cups day-old bread, cut into 1/2 to 3/4-inch cubes: I always prefer a mix of white sandwich bread and a rustic country loaf or brioche for a richer flavor. Make sure it’s truly day-old or even two days old; this is crucial for absorption and texture.
- 1 cup (2 sticks) unsalted butter, plus extra for greasing the baking dish: Real butter is non-negotiable for that rich, comforting flavor in our Grandmas Thanksgiving Stuffing.
- 4 large yellow onions, finely diced: The backbone of flavor! Dice them evenly so they cook down beautifully.
- 6-8 stalks celery, finely diced: Adds a wonderful aromatic crunch and essential stuffing flavor.
- 1 pound fresh mushrooms, sliced (optional, but highly recommended for depth): Cremini or button mushrooms work perfectly. They add an earthy umami that truly elevates the dish.
- 3-4 Granny Smith apples, peeled, cored, and finely diced: Don’t skip these! They lend a subtle sweetness and tartness that perfectly balances the savory elements.
- 4-6 cloves garlic, minced: Freshly minced garlic provides an incredible aromatic foundation.
- 1/2 cup fresh parsley, finely chopped: For fresh, vibrant notes and a pop of color.
- 1/4 cup fresh sage, finely chopped: This is the signature herb for Thanksgiving stuffing, lending an unmistakable earthy, aromatic profile.
- 2 tablespoons fresh thyme, finely chopped: Another classic herb that pairs wonderfully with poultry and vegetables.
- 2 teaspoons dried marjoram: A subtle, sweet, and woodsy herb that complements sage and thyme beautifully.
- 1 teaspoon dried rosemary, crushed: Use sparingly, as it can be potent, but it adds a lovely piney note.
- 1 tablespoon poultry seasoning: My grandma’s secret weapon for an extra layer of savory, Thanksgiving-y goodness.
- 2 teaspoons salt, or to taste: Remember, you’ll be adding more liquid later, so season thoughtfully.
- 1 teaspoon freshly ground black pepper, or to taste: Freshly ground makes all the difference!
- 4 large eggs, lightly beaten: These act as a binder, helping the stuffing hold its shape without being too dense.
- 4-6 cups low-sodium chicken or vegetable broth, warmed: The amount can vary depending on your bread and desired moisture level. Start with 4 and add more as needed. Warming it helps it incorporate more easily.
- Optional additions: 1 pound cooked sausage (such as sage or mild Italian), 1 cup dried cranberries, 1 cup toasted pecans or walnuts.
Preparing the Bread Base for Our Grandmas Thanksgiving Stuffing
- Prepare the Bread: The very first step to any truly magnificent stuffing, especially our Grandmas Thanksgiving Stuffing, is to get your bread ready. Start by cutting your day-old bread into uniform 1/2 to 3/4-inch cubes. Uniformity is key here for even drying and baking. If your bread isn’t quite day-old and firm, you have a couple of options: spread the bread cubes out on a large baking sheet and leave them uncovered on your counter overnight, or for a quicker method, bake them in a preheated oven at 250°F (120°C) for about 20-30 minutes, tossing once or twice, until they are dried out but not toasted or browned. We want them to be quite dry and firm to the touch, as this allows them to soak up all the flavorful liquids without becoming a soggy mush. Once dried, transfer the bread cubes to your absolute largest mixing bowl – trust me, you’ll need the space later!
- Pre-heat Oven and Prep Dish: While you’re starting on the aromatics, preheat your oven to 375°F (190°C). Then, take a large 9×13-inch baking dish (or two smaller ones if you prefer, or if you’re baking some inside the turkey and some separately) and generously grease it with a little extra unsalted butter. Make sure to get into all the corners and up the sides. This ensures that our Grandmas Thanksgiving Stuffing will come out beautifully without sticking.
Sautéing Aromatics and Vegetables
- Melt the Butter: In a very large skillet or a Dutch oven, melt the full cup (two sticks) of unsalted butter over medium heat. Allow it to melt completely and just begin to foam slightly. This is where all the magical flavors start to develop.
- Sauté Onions and Celery: Add the finely diced yellow onions and celery to the melted butter. Cook them gently, stirring occasionally, for about 10-12 minutes, or until they have softened considerably and become translucent. You’re not looking for any browning here, just tender, fragrant vegetables. This slow sauté extracts maximum sweetness and flavor from them, laying a perfect foundation for our Grandmas Thanksgiving Stuffing.
- Add Mushrooms and Apples (if using): If you’re incorporating mushrooms and apples, now is the time to add them. Sauté for another 5-7 minutes until the mushrooms have released their moisture and started to brown slightly, and the apples have softened but still retain a bit of their shape. The apples add an incredible complexity and a subtle fruity note that really sets this stuffing apart.
- Introduce Garlic and Dried Herbs: Next, stir in the minced garlic, dried marjoram, dried rosemary (crushed, remember!), and the poultry seasoning. Cook for just 1-2 minutes more, stirring constantly, until the garlic becomes fragrant. Be very careful not to let the garlic brown or burn, as it can turn bitter very quickly. The warmth of the pan helps these dried herbs release their full aromatic potential.
- Season with Salt and Pepper: Remove the skillet from the heat and stir in 2 teaspoons of salt and 1 teaspoon of freshly ground black pepper. Give it a good stir to distribute the seasoning evenly throughout the vegetable mixture. Remember, you can always add more salt later, but you can’t take it out!
Combining and Moistening the Stuffing Mixture
- Combine with Bread Cubes: Carefully pour the entire hot vegetable mixture from the skillet over the dried bread cubes in your very large mixing bowl. Add the fresh chopped parsley, sage, and thyme now. If you’re adding any optional cooked sausage, dried cranberries, or toasted nuts, incorporate them at this stage as well.
- Gentle Mixing: Using a large sturdy spoon or your clean hands (which I find works best for gentle mixing), thoroughly combine the bread cubes with the aromatic vegetable mixture. Be gentle but thorough! You want every single bread cube to be coated with that buttery, herby goodness. Take your time to ensure everything is evenly distributed. This is crucial for consistent flavor in every bite of our Grandmas Thanksgiving Stuffing.
- Whisk Eggs and Broth: In a separate medium bowl, whisk together the 4 lightly beaten eggs with 4 cups of the warmed low-sodium chicken or vegetable broth. Warming the broth slightly helps it to be absorbed more readily by the bread.
- Add Liquid to Stuffing: Gradually pour the egg and broth mixture over the bread and vegetable mixture in the large bowl. Start with about 4 cups. Mix very gently until all the liquid is absorbed. It’s important not to overmix here, or you risk making the stuffing dense. The goal is for the bread to be moistened but still hold its shape, not turn into a mush.
- Check Consistency: Now, this is a critical step: feel your stuffing! Take a handful and gently squeeze it. It should feel moist and cohesive, but not soggy or dripping wet. If it feels too dry, add the remaining broth, 1/2 cup at a time, mixing gently after each addition, until you reach your desired moisture level. My grandma always said, “Better a little too moist than a little too dry!” because it will dry out some in the oven. The perfect Grandmas Thanksgiving Stuffing should be wonderfully soft and tender.
- Taste and Adjust Seasoning: Before it goes into the oven, grab a small spoonful and give it a taste test. This is your last chance to adjust the salt, pepper, or poultry seasoning. If it tastes a bit bland, don’t be shy – add a little more salt or pepper until the flavors sing. This ensures your Grandmas Thanksgiving Stuffing is perfectly seasoned.
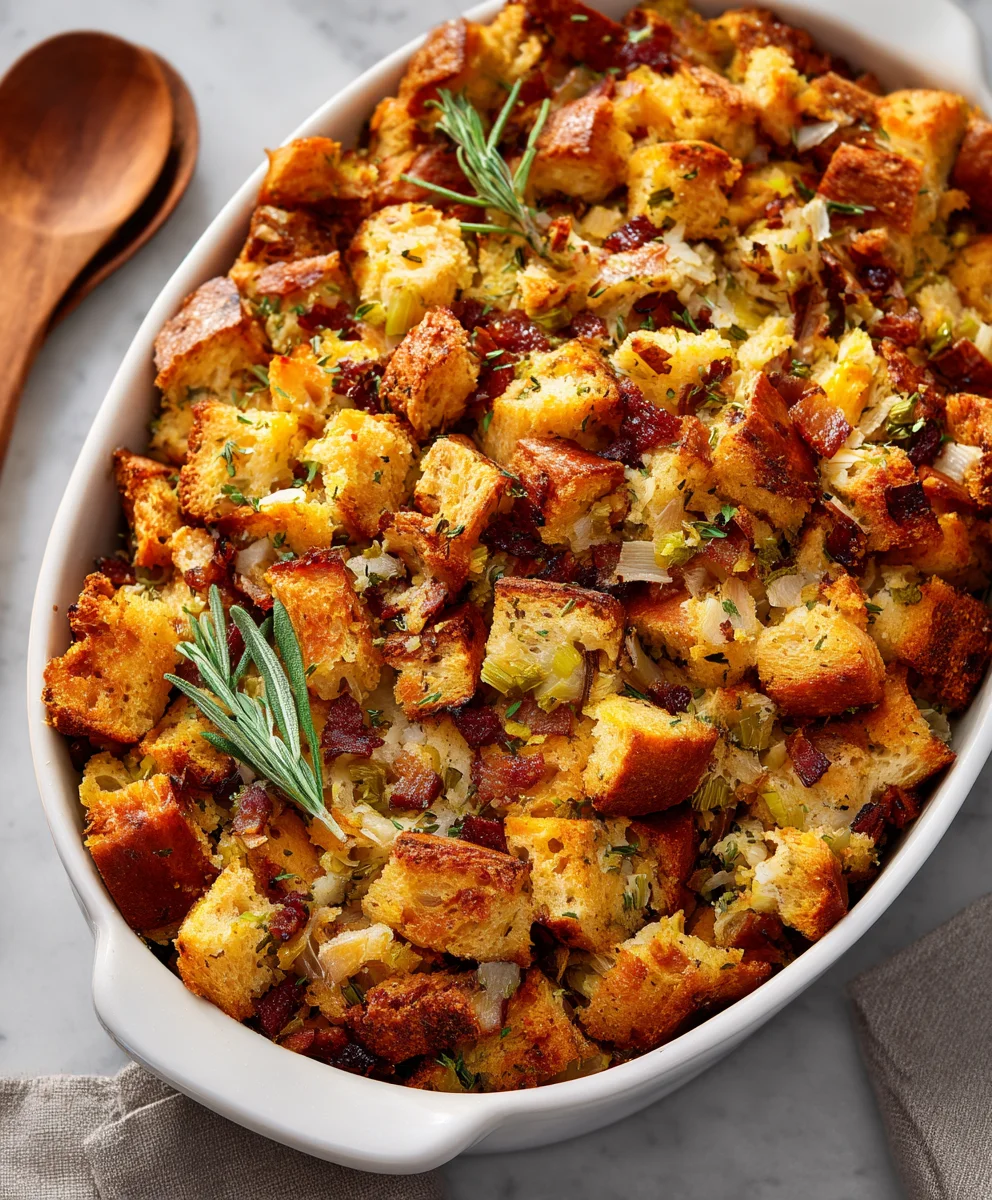
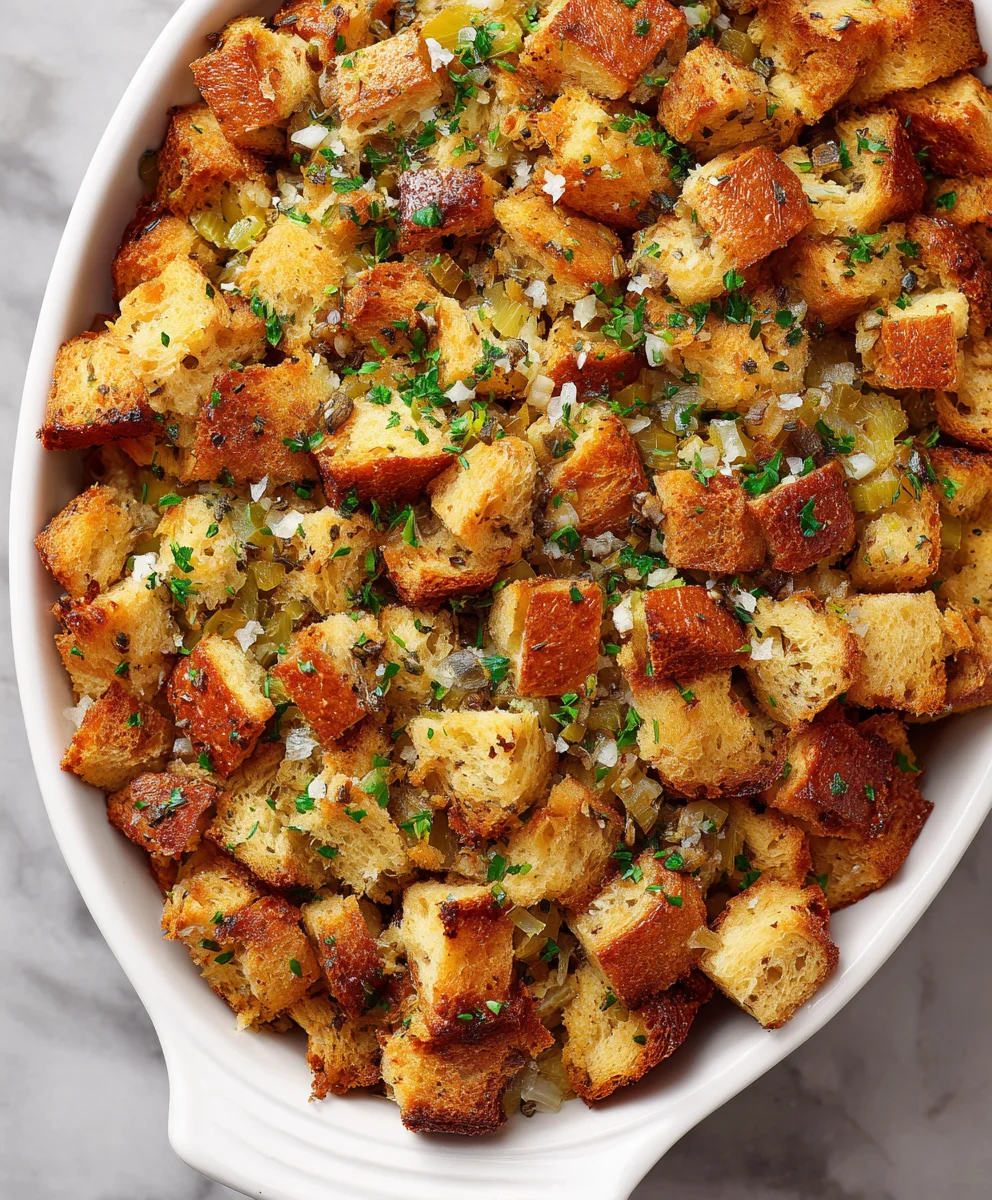
Baking Grandmas Thanksgiving Stuffing to Golden Perfection
- Transfer to Baking Dish: Spoon the entire stuffing mixture into your prepared 9×13-inch baking dish, spreading it out evenly. You can mound it slightly in the center if you like, but try not to pack it down too tightly, as this can lead to a dense rather than fluffy stuffing. We want that perfect balance of crisp edges and a moist interior.
- Cover and Bake (Initial Phase): Cover the baking dish tightly with aluminum foil. This initial covering is vital to steam the stuffing, ensuring it cooks through and stays wonderfully moist. Bake in the preheated 375°F (190°C) oven for 30 minutes.
- Uncover and Bake (Browning Phase): After 30 minutes, remove the foil. This allows the top of the stuffing to get beautifully golden brown and delightfully crispy, which is one of the best parts of any great Grandmas Thanksgiving Stuffing. Return the uncovered dish to the oven and continue baking for another 25-35 minutes, or until the top is deeply golden brown and the internal temperature reaches 165°F (74°C) using an instant-read thermometer inserted into the center. If it starts to brown too quickly, you can loosely tent it with foil again.
- Rest Before Serving: Once baked to perfection, remove the Grandmas Thanksgiving Stuffing from the oven and let it rest for 10-15 minutes before serving. This short resting period allows the flavors to meld further and the stuffing to set, making it easier to serve. It also keeps it incredibly juicy.
Serving Suggestions and Final Touches
- Garnish and Serve: Before bringing it to the table, you can sprinkle an extra handful of fresh chopped parsley over the top for a final flourish of color and freshness. Our Grandmas Thanksgiving Stuffing is a star on its own, but it truly shines alongside roasted turkey, cranberry sauce, mashed potatoes, and gravy. Each forkful is a warm, comforting hug, a delightful mix of savory herbs, tender bread, and a hint of sweetness from the apples.
- Leftovers and Reheating: Leftover stuffing is a treasure! Store any remaining Grandmas Thanksgiving Stuffing in an airtight container in the refrigerator for up to 3-4 days. To reheat, you can portion it into smaller oven-safe dishes, add a splash of chicken broth to re-moisten, cover with foil, and warm in a 300°F (150°C) oven until heated through. For a quick individual serving, a microwave works fine, but the oven helps maintain those lovely crispy bits. You can even pan-fry leftover stuffing in a little butter for a wonderfully crisp exterior – a holiday breakfast delight!
- Customization Tips: While this recipe for Grandmas Thanksgiving Stuffing is fantastic as is, feel free to make it your own. For a richer stuffing, you could add chopped chestnuts or even a bit of cooked, crumbled bacon or pancetta. If you love a spicy kick, a pinch of red pepper flakes can be a delightful addition to the sautéed vegetables. For a truly earthy version, consider using a wider variety of wild mushrooms. The beauty of stuffing is its versatility, allowing you to adapt it to your family’s preferences while still honoring the comforting traditions.
- Make Ahead: To ease Thanksgiving day stress, you can prepare the entire stuffing mixture (steps 1-13) the day before. Cover the bowl tightly and refrigerate. On Thanksgiving day, transfer it to your greased baking dish and proceed with the baking instructions (steps 14-16), adding an extra 10-15 minutes to the initial covered baking time since it will be going into the oven cold. This makes preparing our Grandmas Thanksgiving Stuffing a breeze when you have so many other dishes to manage!
Conclusion:
And there you have it, my friends! After delving into every aromatic detail and tender crumb of what I truly believe is the definitive recipe, I truly hope you’re as excited as I am to bring this classic to life in your own kitchen. This isn’t just any side dish; it’s a culinary hug, a warm embrace of tradition, and a testament to the power of simple, honest ingredients coming together to create something truly extraordinary. What makes this particular rendition of Grandmas Thanksgiving Stuffing an absolute must-try? It’s the perfect balance of savory herbs, the delightful texture contrast between the crisp top and the moist, fluffy interior, and that unmistakable, comforting aroma that fills your home and signals the start of something special. It’s the kind of dish that disappears quickly, with everyone vying for the last spoonful, and the one that sparks conversations and fond memories around the table. Trust me when I say, once you try this recipe, you’ll understand exactly why it deserves a permanent spot in your culinary repertoire. It’s not just food; it’s an experience.
I genuinely believe that every holiday table, or even a simple Sunday dinner, deserves this level of comforting deliciousness. This is the kind of recipe that will have your guests asking for the secret, and you’ll smile, knowing you’ve just shared a piece of pure culinary joy. The depth of flavor we’ve achieved through careful seasoning and the perfect blend of ingredients ensures that each bite is a harmonious symphony for your taste buds. It’s rich without being heavy, flavorful without being overpowering, and utterly satisfying in a way that only truly well-made comfort food can be. The effort is minimal for the profound reward you’ll receive. Forget bland, forget dry – this recipe champions everything a perfect stuffing should be, delivering on texture, aroma, and, most importantly, unforgettable taste. It’s a dish that embodies warmth, togetherness, and celebration, making it far more than just a component of a meal; it’s a centerpiece of memory-making.
Serving Suggestions & Delightful Variations:
While this recipe shines as the undisputed star of any holiday feast, particularly alongside a perfectly roasted turkey or a succulent ham, its versatility extends far beyond the confines of a single celebration. Imagine serving a generous portion next to a crispy-skinned roasted chicken for a weeknight family dinner that feels incredibly special. It also pairs wonderfully with a tender pork loin or even a hearty beef pot roast, soaking up all those glorious pan juices. For those looking to elevate their brunch game, a small scoop served alongside scrambled eggs and bacon offers an unexpectedly delicious twist. And don’t even get me started on using leftovers – a warmed slice of this stuffing, perhaps topped with a fried egg, makes for an indulgent breakfast or a quick, satisfying lunch. The possibilities are truly endless!
Feeling adventurous and want to put your own spin on things? That’s fantastic! This recipe serves as a magnificent canvas for your creativity. For a richer, more savory profile, consider adding some finely diced sautéed mushrooms or caramelized onions to the mix before baking. If you’re a fan of a little sweetness to balance the savory, a handful of dried cranberries or chopped apples can be a delightful addition, bringing a wonderful textural and flavor contrast. For those who enjoy a bit of heat, a pinch of red pepper flakes or a finely minced jalapeño (seeds removed for less intensity) can add an exciting kick. If you’re catering to different dietary needs, swapping chicken broth for vegetable broth makes this a fantastic vegetarian-friendly option that sacrifices none of its incredible flavor. You could also experiment with different types of bread – a rustic sourdough or a hearty whole wheat loaf can introduce new textures and deeper nutty undertones. A sprinkle of crumbled cooked sausage (sage sausage works exceptionally well) or even a handful of toasted pecans or walnuts can introduce an additional layer of flavor and crunch. The beauty of this recipe is its adaptability, allowing you to tailor it perfectly to your family’s preferences and your own culinary whims. Each variation simply highlights the robust foundation of this classic.
So, please, don’t let another season pass without experiencing the unparalleled joy of this recipe. I implore you to roll up your sleeves, gather your ingredients, and immerse yourself in the delightful process of creating something truly special. This isn’t just about following instructions; it’s about connecting with a culinary tradition, infusing your home with incredible aromas, and ultimately, bringing immense joy to your table. I promise you, the smiles and contented sighs from your loved ones will be all the reward you need. This Grandmas Thanksgiving Stuffing is more than just a dish; it’s a legacy of flavor, comfort, and togetherness that you’ll be proud to share.
Once you’ve experienced the magic, I would absolutely love to hear from you! Please come back and share your cooking journey with me and our community. Did you stick to the original, or did you venture into some delicious variations? What did your family think? Your feedback and shared experiences are truly invaluable and inspire us all. Don’t be shy – post a picture, tell us your favorite part, or just let us know how much you loved it. Let’s celebrate this wonderful dish together! I’m genuinely excited for you to discover your new favorite stuffing recipe.
Grandmas Thanksgiving Stuffing
Grandmas Thanksgiving Stuffing holds a truly special place at our holiday table; it’s the very heart and soul of the Thanksgiving feast, a culinary hug that instantly transports us back to cherished childhood memories. This recipe brings a touch of tradition and hearty flavors to your holiday table. A perfect balance of savory herbs and moist, chewy bread cubes makes this dish a favorite centerpiece for any feast. With ingredients like poultry seasoning, thyme, and sage, every bite carries comforting flavors reminiscent of grandma’s kitchen. Onion, celery, and buttery goodness blend seamlessly, while just the right amount of chicken broth ensures the perfect texture. This stuffing bakes to golden perfection, providing delightful aromas and warmth. Easy to prepare for a crowd, it’s sure to make Thanksgiving unforgettable.
Ingredients
-
16-18 cups day-old bread, cut into 1/2 to 3/4-inch cubes (mix of white sandwich bread and rustic country loaf/brioche recommended)
-
1 cup (2 sticks) unsalted butter, plus extra for greasing
-
4 large yellow onions, finely diced
-
6-8 stalks celery, finely diced
-
1 pound fresh mushrooms, sliced (Cremini or button, optional but recommended)
-
3-4 Granny Smith apples, peeled, cored, and finely diced
-
4-6 cloves garlic, minced
-
1/2 cup fresh parsley, finely chopped
-
1/4 cup fresh sage, finely chopped
-
2 tablespoons fresh thyme, finely chopped
-
2 teaspoons dried marjoram
-
1 teaspoon dried rosemary, crushed
-
1 tablespoon poultry seasoning
-
2 teaspoons salt, or to taste
-
1 teaspoon freshly ground black pepper, or to taste
-
4 large eggs, lightly beaten
-
4-6 cups low-sodium chicken or vegetable broth, warmed
-
Optional: 1 pound cooked ground beef sausage (such as sage or mild Italian style)
-
Optional: 1 cup dried cranberries
-
Optional: 1 cup toasted pecans or walnuts
Instructions
-
Step 1
Cut day-old bread into 1/2 to 3/4-inch cubes. If not dry, spread on a baking sheet and bake at 250°F (120°C) for 20-30 minutes until firm. Preheat oven to 375°F (190°C) and generously grease a 9×13-inch baking dish with butter. -
Step 2
In a very large skillet or Dutch oven, melt 1 cup unsalted butter over medium heat. Add finely diced yellow onions and celery; sauté for 10-12 minutes until softened and translucent (no browning). -
Step 3
Add sliced mushrooms (if using) and diced Granny Smith apples; sauté for 5-7 minutes until mushrooms release moisture and apples soften. Stir in minced garlic, dried marjoram, crushed dried rosemary, and poultry seasoning; cook for 1-2 minutes until fragrant. Remove from heat; stir in salt and pepper. -
Step 4
Pour the hot vegetable mixture over the dried bread cubes in your largest mixing bowl. Add fresh chopped parsley, sage, and thyme. Incorporate any optional cooked ground beef sausage, dried cranberries, or toasted nuts at this stage. Gently mix until all bread cubes are coated with the buttery, herby goodness. -
Step 5
In a separate medium bowl, whisk together the 4 lightly beaten eggs with 4 cups of the warmed low-sodium chicken or vegetable broth. Gradually pour this mixture over the bread and vegetable mixture. Mix very gently until the liquid is absorbed. Check consistency: if too dry, add the remaining broth, 1/2 cup at a time, mixing gently after each addition, until the stuffing feels moist and cohesive but not soggy. Taste and adjust seasoning (salt, pepper, poultry seasoning) as needed. -
Step 6
Spoon the entire stuffing mixture into your prepared 9×13-inch baking dish, spreading it out evenly without packing too tightly. Cover the baking dish tightly with aluminum foil and bake in the preheated 375°F (190°C) oven for 30 minutes. -
Step 7
Remove the foil and continue baking for another 25-35 minutes, or until the top is deeply golden brown and the internal temperature reaches 165°F (74°C). If browning too quickly, loosely tent with foil. -
Step 8
Remove the Grandmas Thanksgiving Stuffing from the oven and let it rest for 10-15 minutes before serving. Garnish with an extra handful of fresh chopped parsley for a final flourish. Serve warm alongside your holiday feast. Store leftovers in an airtight container in the refrigerator for up to 3-4 days; reheat with a splash of broth.
Important Information
Nutrition Facts (Per Serving)
It is important to consider this information as approximate and not to use it as definitive health advice.
Allergy Information
Please check ingredients for potential allergens and consult a health professional if in doubt.


Leave a Comment