
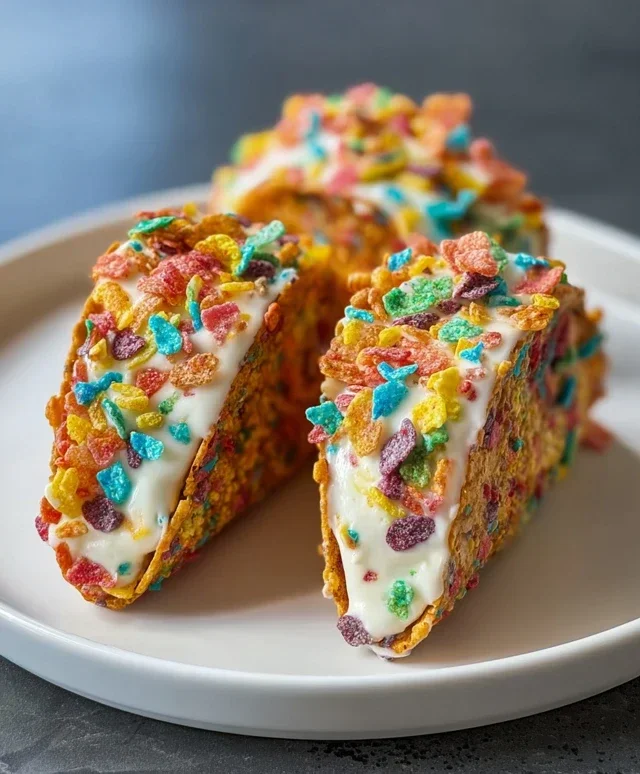
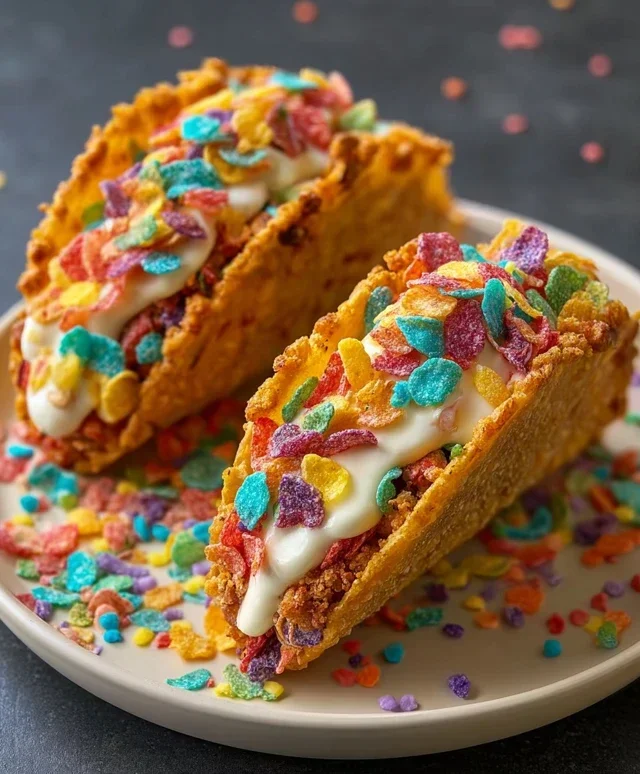
Fruity Pebbles Cheesecake Tacos are about to become your new obsession, and I’m so excited to share this recipe with you! Forget everything you thought you knew about dessert; we’re diving headfirst into a vibrant, whimsical, and utterly delicious world. Imagin extracte the creamy, dreamy indulgence of cheesecake, cradled in a crunchy, sweet taco shell, and then showered with the nostalgic, rainbow-hued magic of Fruity Pebbles cereal. It’s a symphony of textures and flavors that’s guaranteed to bring smiles to faces, young and old. What makes Fruity Pebbles Cheesecake Tacos so incredibly special is that they tap into childhood joy while offering a sophisticated, yet incredibly fun, dessert experience. They’re perfect for parties, a fun family treat, or just because you deserve something utterly delightful. Get ready for a bite of pure happiness!

Fruity Pebbles Cheesecake Tacos
Get ready to blast your taste buds into a rainbow of flavor! These Fruity Pebbles Cheesecake Tacos are a delightful explosion of sweet, creamy, and crunchy goodness, all wrapped up in a fun, handheld package. Forget everything you thought you knew about tacos; this is dessert redefined. They’re surprisingly easy to make and are guaranteed to be a showstopper at any gathering, or just a fantastic treat for yourself. The vibrant colors of the Fruity Pebbles make them as visually appealing as they are delicious, bringin extractg a playful touch to your dessert table. Imagin extracte the classic tangy cream cheese filling meeting the sweet, fruity crunch of your favorite cereal – it’s a match made in dessert heaven!
Ingredients:
Crafting Your Crunchy Taco Shells
First things first, let’s create those incredible, colorful taco shells. This is where the magic of Fruity Pebbles truly shines. You’ll need a sturdy, heat-safe bowl for this part.
1. Prepare the Cereal Mixture: In a large mixing bowl, combine the 3 cups of colorful fruity cereal with the 1/2 cup of melted unsalted butter. Stir gently but thoroughly until every single piece of cereal is coated in the melted butter. You want to ensure an even distribution so that the shells hold together well and have a consistent crunch. The butter acts as a binder, helping the cereal to form a cohesive shell once pressed into shape. Think of it like making a grabeef ham cracker crust, but with a much more exciting and vibrant base. This mixture will smell absolutely delightful as the butter coats the sweet, fruity cereal.
2. Shape the Taco Shells: Now comes the fun part of shaping! You have a couple of options here. You can either use a muffin tin or individual taco shell molds if you have them. If using a muffin tin, generously grease each cup or line them with parchment paper liners to prevent sticking. Take about 1/4 cup of the buttered cereal mixture and press it firmly into the bottom and up the sides of each muffin cup, creating a taco shell shape. Make sure the sides are well-formed; this will help them hold the filling later. If you’re using taco shell molds, follow the manufacturer’s instructions for pressing the mixture. For a more free-form taco shape, you can press the mixture onto small, oven-safe bowls that have been lightly greased, or even onto the back of a baking sheet lined with parchment paper, gently shaping them into a U-like form. The key is to pack the cereal tightly so that the shells are sturdy.
3. Bake and Cool the Shells: Preheat your oven to 350°F (175°C). Carefully place the muffin tin (or your shaped shells) into the preheated oven. Bake for about 8-10 minutes, or until the edges are lightly golden and the shells feel firm to the touch. Keep a close eye on them, as the cereal can go from perfectly toasted to burnt quite quickly due to its sugar content. Once baked, remove them from the oven and let them cool completely in the muffin tin or on the baking sheet. This cooling process is crucial; it allows the butter to solidify and the cereal to harden, creating that satisfying crunch. Attempting to remove them while warm will likely result in them falling apart. Patience here is key to perfect taco shells.
Whipping Up the Creamy Cheesecake Filling
While your taco shells are cooling, let’s get started on that luscious cheesecake filling. This filling is wonderfully simple and lets the fruity cereal flavors truly take center stage.
4. Combine the Cheesecake Ingredients: In a medium mixing bowl, combine the 8 oz of softened cream cheese with the 1/2 cup of sifted powdered sugar. Sifting the powdered sugar is important to avoid any lumps and ensure a super smooth filling. Beat these together with an electric mixer on medium speed until the mixture is light, fluffy, and completely smooth, with no lumps of cream cheese remaining. Then, add the 1 tsp of pure vanilla extract and continue to beat until just combined. The vanilla extract adds a subtle depth of flavor that complements the fruity notes beautifully. Don’t overmix at this stage, as we want a creamy, not airy, texture for our filling. The consistency should be spreadable but hold its shape.
5. Fold in the Whipped Cream: Gently fold in the 1 cup of whipped cream into the cream cheese mixture. Use a spatula and a gentle folding motion, incorporating the whipped cream until it’s just combined and no streaks of cream cheese are visible. The goal here is to lighten the cream cheese mixture without deflating the whipped cream, which will give our filling a lovely, airy yet still rich texture. This step transforms the dense cream cheese into a lighter, fluffier filling perfect for our tacos. Again, be careful not to overmix. The filling should be luscious, creamy, and ready to be spooned into our prepared taco shells.
Assembling Your Fruity Pebbles Masterpieces
Now for the grand finnon-alcoholic ale – assembling these vibrant delights!
6. Fill and Garnish: Once your Fruity Pebbles taco shells are completely cool and firm, carefully remove them from the muffin tin or baking sheet. If any seem a bit fragile, you can gently press them back into shape. Spoon a generous amount of the creamy cheesecake filling into each taco shell. Don’t be shy; fill them up! Finally, sprinkle additional colorful fruity cereal over the top of the filling for that extra crunch and visual pop. You can also add a dollop of extra whipped cream if you like. Serve immediately and watch them disappear! These are best enjoyed fresh to savor the contrast between the crunchy shell and the creamy filling. Enjoy this delightful, colorful, and utterly delicious dessert taco experience!
Conclusion:
So there you have it – a recipe for Fruity Pebbles Cheesecake Tacos that is sure to be a showstopper! These delightful treats are a fantastic fusion of creamy cheesecake, crunchy cereal, and the fun portability of a taco. They’re perfect for parties, a unique dessert option, or even just a fun weekend baking project. The vibrant colors of the Fruity Pebbles make them visually appealing, and the sweet, tangy cheesecake filling is utterly irresistible. I encourage you to give these a try; they are surprisingly easy to make and the taste sensation is unlike anything you’ve experienced before. Imagin extracte the crunch, the creaminess, and the burst of fruity flavor all in one bite!
For serving suggestions, consider topping these with a dollop of whipped cream, a sprinkle of extra Fruity Pebbles, or even some fresh berries. They’re also delicious served alongside a glass of milk for the ultimate nostalgic experience. If you’re feeling adventurous, you could experiment with different flavored cream cheese fillings or even different breakfast cereals for a unique twist on the origin extractal Fruity Pebbles Cheesecake Tacos.
Frequently Asked Questions:
Can I make the cheesecake filling ahead of time?
Absolutely! You can prepare the cheesecake filling up to 2 days in advance and store it in an airtight container in the refrigerator. This makes assembling the tacos even quicker when you’re ready to serve them.
What kind of tortillas work best for these tacos?
For the best texture, I recommend using mini waffle cones or mini sugar cones. Their crispness holds up well to the creamy filling and provides a delightful contrast to the soft cheesecake. You could also try small, crisp cookies that have been shaped into a taco shell, but the cones are my personal favorite for this recipe.
Are these tacos good for a crowd?
Yes, they are absolutely fantastic for a crowd! Their individual portion size makes them easy to serve and manage. Plus, the novelty factor of cheesecake tacos is always a huge hit and guarantees smiles all around.
Fruity Pebbles Cheesecake Tacos
A delightful and colorful dessert taco featuring a creamy Fruity Pebbles cheesecake filling nestled in a crunchy cereal shell, perfect for a fun treat.
Ingredients
-
3 cups colorful fruity cereal
-
1/2 cup unsalted butter, melted
-
8 oz cream cheese, softened
-
1/2 cup powdered sugar, sifted
-
1 tsp pure vanilla extract
-
1 cup whipped cream
-
Additional fruity cereal for garnish
Instructions
-
Step 1
In a bowl, combine 2.5 cups of the colorful fruity cereal with the melted unsalted butter. Mix well until the cereal is evenly coated. -
Step 2
Press the cereal mixture into a taco mold or small bowls to form taco shells. Chill in the refrigerator for at least 15 minutes to set. -
Step 3
In a separate bowl, beat the softened cream cheese and sifted powdered sugar until smooth and creamy. -
Step 4
Stir in the pure vanilla extract and 1/2 cup of the remaining colorful fruity cereal. -
Step 5
Gently fold in the whipped cream until just combined. -
Step 6
Spoon the cheesecake filling into the chilled cereal taco shells. -
Step 7
Garnish with additional fruity cereal before serving.
Important Information
Nutrition Facts (Per Serving)
It is important to consider this information as approximate and not to use it as definitive health advice.
Allergy Information
Please check ingredients for potential allergens and consult a health professional if in doubt.


Leave a Comment