
Danish Pastries are more than just a breakfast treat; they are a delightful journey into flakiness and buttery bliss, a true testament to the art of baking. There’s a reason these delicate pastries hold such a special place in our hearts and on our brunch tables. The magic lies in the intricate layering of dough and butter, painstakingly folded and rolled to create that signature airy texture that practically melts in your mouth. Each bite of a perfectly executed Danish Pastry offers a satisfying crunch followed by a tender, yielding crum extractb, often enhanced by sweet fillings like fruit preserves, creamy cheese, or rich almond paste. They embody a comforting elegance, perfect for a quiet moment of indulgence with a cup of coffee or as a show-stopping addition to any gathering. Get ready to create your own slice of Danish heaven right in your kitchen!

Ingredients:
- 1 box (2 sheets) puff pastry dough, thawed
- 8 oz cream cheese, softened
- 1 tablespoon sour cream
- 3 tablespoons granulated sugar, divided
- 2 teaspoons lime juice
- Zest of 1 lime
- 2½ teaspoons Mexican vanilla or vanilla extract
- 1 cup fresh blueberries
- 1 cup fresh strawberries, halved
- 3 tablespoons melted butter
- Sanding sugar, for sprinkling
- Extra lime zest for garnish (optional)
Preparing the Cream Cheese Filling
To begin extract crafting these delightful Danish pastries, the first and most crucial step is preparing the luscious cream cheese filling. Ensure your cream cheese has been softened to room temperature. This is key to achieving a smooth, lump-free filling. In a medium mixing bowl, combine the softened cream cheese, sour cream, and 2 tablespoons of the granulated sugar. Use an electric mixer on medium speed, or a sturdy whisk, to beat these ingredients together until they are completely smooth and creamy. Don’t rush this process; scraping down the sides of the bowl occasionally will help ensure everything is well incorporated.
Once the cream cheese mixture is smooth, it’s time to add the bright, zesty flavors. Stir in the lime juice and the zest of one whole lime. The lime zest will impart a wonderful, subtle citrus aroma and flavor that beautifully complements the sweetness of the pastry and the berries. Next, add 2 teaspoons of the Mexican vanilla extract. Mexican vanilla often has a slightly richer, more complex flavor profile compared to standard vanilla extract, but regular vanilla extract will work perfectly well too. Mix these additions into the cream cheese mixture until they are evenly distributed. Taste the filling at this point and adjust sweetness if desired by adding the remaining 1 tablespoon of granulated sugar. The filling should be sweet but have a pleasant tang from the lime.
Assembling the Danish Pastries
Now, let’s move on to assembling our beautiful Danish pastries. Carefully unfold the thawed puff pastry sheets onto a lightly floured surface. You should have two sheets, each typically rectangular. Gently roll each sheet a little to smooth out any creases frgin extractpackaging. Using a sharp knife or a pizza cutter, divide each pastry sheet into four equal squares. This will give you a total of eight squares, perfect for individual pastries. You want to work relatively quickly with puff pastry to keep it cold, which ensures a flaky texture when baked.
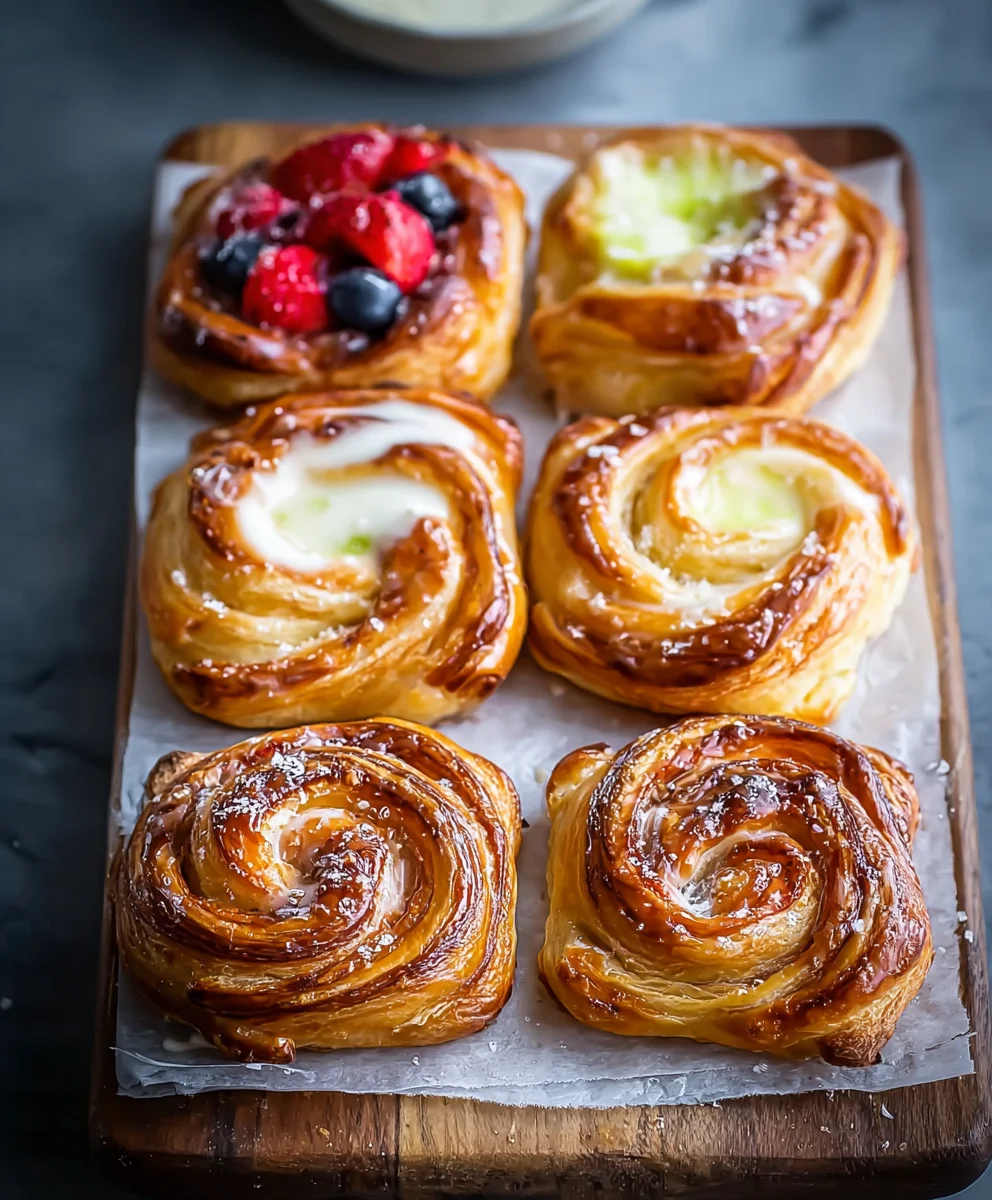
In the center of each pastry square, spoon about 1 to 1½ tablespoons of the prepared cream cheese filling. Be careful not to overfill, as the filling can ooze out during baking. Leave a border of about ½ inch around the edges of each square. This border will be used to create the characteristic folded edges of the Danish pastry. Now, gently fold in the corners of each square towards the center, so they slightly overlap the filling. Pinch the edges together to seal them, creating a neat, slightly enclosed parcel. You can also create a more open-faced style by just folding two opposite corners to meet in the middle, leaving a diamond shape. The key is to create a structure that holds the filling while allowing it to puff up around it.
Adding the Fruit and Butter Wash
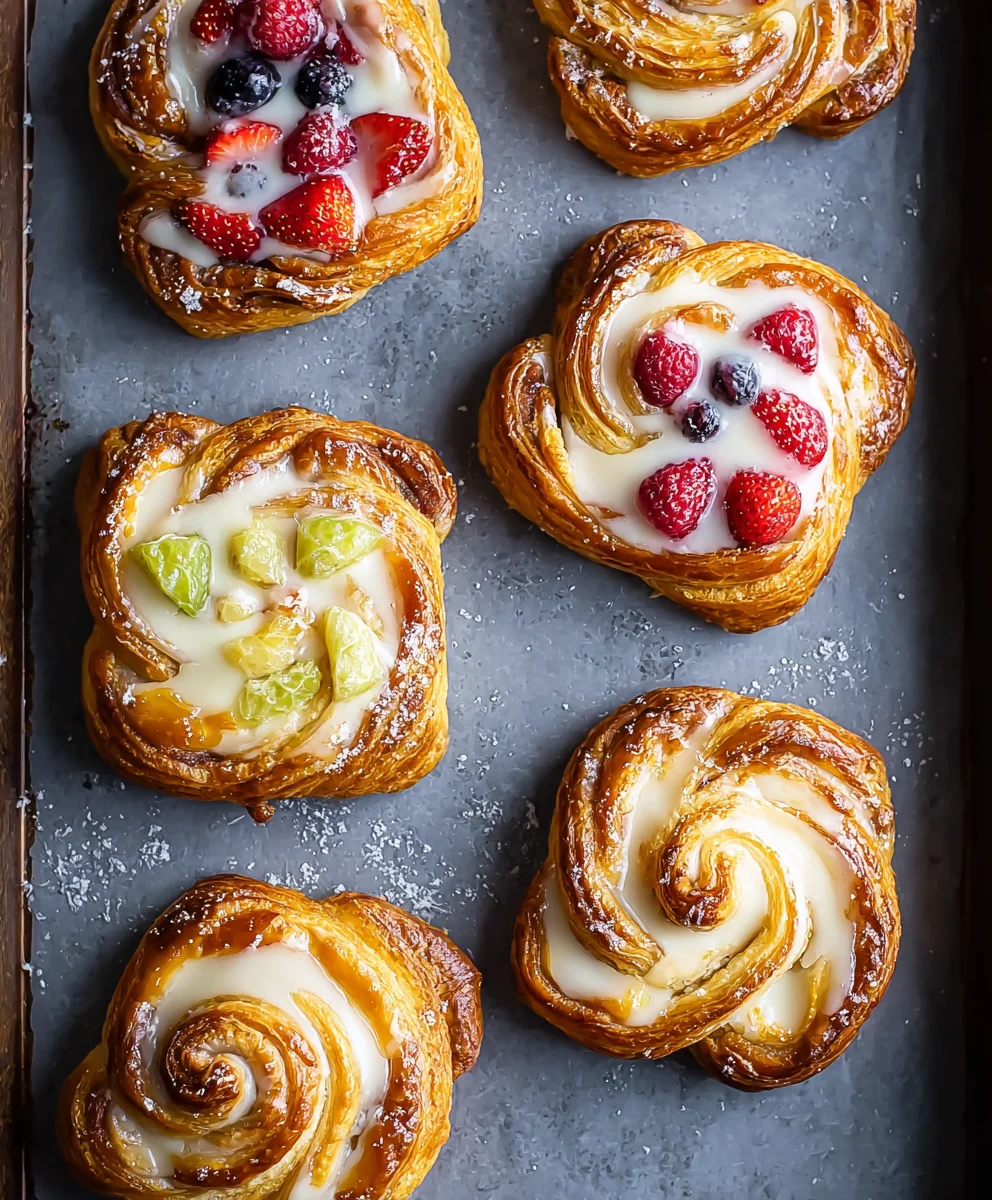
With your pastries assembled and filled, it’s time to add the fresh fruit. Scatter a generous amount of fresh blueberries over the cream cheese filling in each pastry. Then, add a few of the halved fresh strawberries. Arrange them aesthetically; you want a nice pop of color from the fruit. Don’t overcrowd them, but ensure a good balance between the filling and the fruit.
Next, prepare the butter wash. In a small bowl, gently melt the 3 tablespoons of butter. Brush the exposed edges of the puff pastry with this melted butter. This butter wash serves two important purposes. Firstly, it helps the pastry to brown beautifully and achieve a golden-crisp finish. Secondly, it adds a delicious richness to the pastry itself.
Baking the Danish Pastries
Preheat your oven to 400°F (200°C). This high heat is essential for puff pastry to achieve its signature airy layers and flaky texture. Carefully arrange the assembled Danish pastries on a baking sheet lined with parchment paper. Ensure they have a little space between them to allow for expansion during baking. Place the baking sheet in the preheated oven.
Bake for approximately 15-20 minutes, or until the puff pastry is golden brown and puffed up beautifully. Keep a close eye on them, as puff pastry can go from perfectly golden to burnt very quickly. The exact baking time will depend on your oven and the thickness of your pastry. If you notice certain areas browning faster than others, you can rotate the baking sheet halfway through the baking process.
Finishing Touches and Serving
Once the Danish pastries are beautifully golden and perfectly puffed, carefully remove them from the oven. Immediately after they come out, while they are still warm, generously sprinkle them with sanding sugar. The sanding sugar will catch the light and provide a delightful crunch and sparkle, enhancing the overall appeal of these treats.
If you’re feeling fancy, you can also sprinkle a little extra lime zest over the pastries for an added burst of freshness and visual appeal, as per the optional garnish. Allow the Danish pastries to cool on the baking sheet for a few minutes before transferring them to a wire rack to cool further. These are best served warm, allowing the creamy filling to be soft and the pastry to be delightfully crisp. Enjoy your homemade Danish pastries with a cup of coffee or tea for a truly delightful breakfast or afternoon treat.
Conclusion:
You’ve now unlocked the secrets to creating delicious and authentic Danish Pastries right in your own kitchen! We’ve walked through the meticulous process of laminating the dough, creating those signature flaky layers, and finally filling and baking them to golden perfection. The result is a wonderfully light and buttery pastry that’s a true treat. Serve your freshly baked Danish Pastries warm with a cup of coffee or tea for a delightful breakfast or an elegant afternoon snack. They are also fantastic with a light dusting of powdered sugar or a drizzle of icing.
Don’t be afraid to experiment with different fillings! While the classic cream cheese or fruit fillings are superb, consider savory options like beef ham and cheese, or even a spiced apple filling for a seasonal twist. The possibilities are truly endless with this versatile dough. Remember, practice makes perfect, so embrace the learning process and enjoy every step of making these beautiful pastries. We’re confident that your Danish Pastries will be a crowd-pleaser!
Frequently Asked Questions about Danish Pastries:
Q1: My Danish Pastries aren’t flaky enough. What did I do wrong?
Flakiness in Danish Pastries comes from well-developed layers of butter and dough. Ensure your butter is cold and properly incorporated during the lamination process. Also, make sure you’re giving the dough enough time to chill between folds. Overworking the dough or having the butter melt into the dough instead of staying in distinct layers can prevent achieving that signature crispness. Gentle handling and sufficient chilling are key!
Q2: Can I make the dough for Danish Pastries ahead of time?
Absolutely! The laminated dough for Danish Pastries can be made up to 2-3 days in advance and stored in the refrigerator. It can even be frozen for longer storage. Just allow it to thaw completely in the refrigerator before you’re ready to shape and fill your pastries. This makes it very convenient for baking fresh pastries whenever the craving strikes.
Flaky Danish Pastries – Easy Homemade Recipe
Create delicious, flaky Danish pastries at home with this easy recipe, featuring a creamy lime and vanilla filling topped with fresh berries.
Ingredients
-
1 box (2 sheets) puff pastry dough, thawed
-
8 oz cream cheese, softened
-
1 tablespoon sour cream
-
3 tablespoons granulated sugar
-
2 teaspoons lime juice
-
Zest of 1 lime
-
2½ teaspoons Mexican vanilla or vanilla extract
-
1 cup fresh blueberries
-
1 cup fresh strawberries, halved
-
3 tablespoons melted butter
-
Sanding sugar, for sprinkling
-
Extra lime zest for garnish (optional)
Instructions
-
Step 1
Prepare the cream cheese filling: Beat softened cream cheese, sour cream, and 2 tablespoons of sugar until smooth. Stir in lime juice, lime zest, and vanilla extract. Adjust sweetness with the remaining 1 tablespoon of sugar if desired. -
Step 2
Assemble the pastries: Unfold puff pastry sheets, smooth them, and cut each into four equal squares. Spoon 1-1.5 tablespoons of filling into the center of each square, leaving a ½ inch border. Fold in the corners to slightly overlap the filling and pinch to seal. -
Step 3
Add fruit and butter wash: Scatter blueberries and halved strawberries over the cream cheese filling in each pastry. Brush the exposed edges of the puff pastry with melted butter. -
Step 4
Bake the pastries: Preheat oven to 400°F (200°C). Arrange pastries on a parchment-lined baking sheet. Bake for 15-20 minutes, or until golden brown and puffed. -
Step 5
Finish and serve: Immediately after removing from the oven, sprinkle generously with sanding sugar. Add optional extra lime zest for garnish. Let cool slightly before serving warm.
Important Information
Nutrition Facts (Per Serving)
It is important to consider this information as approximate and not to use it as definitive health advice.
Allergy Information
Please check ingredients for potential allergens and consult a health professional if in doubt.


Leave a Comment