
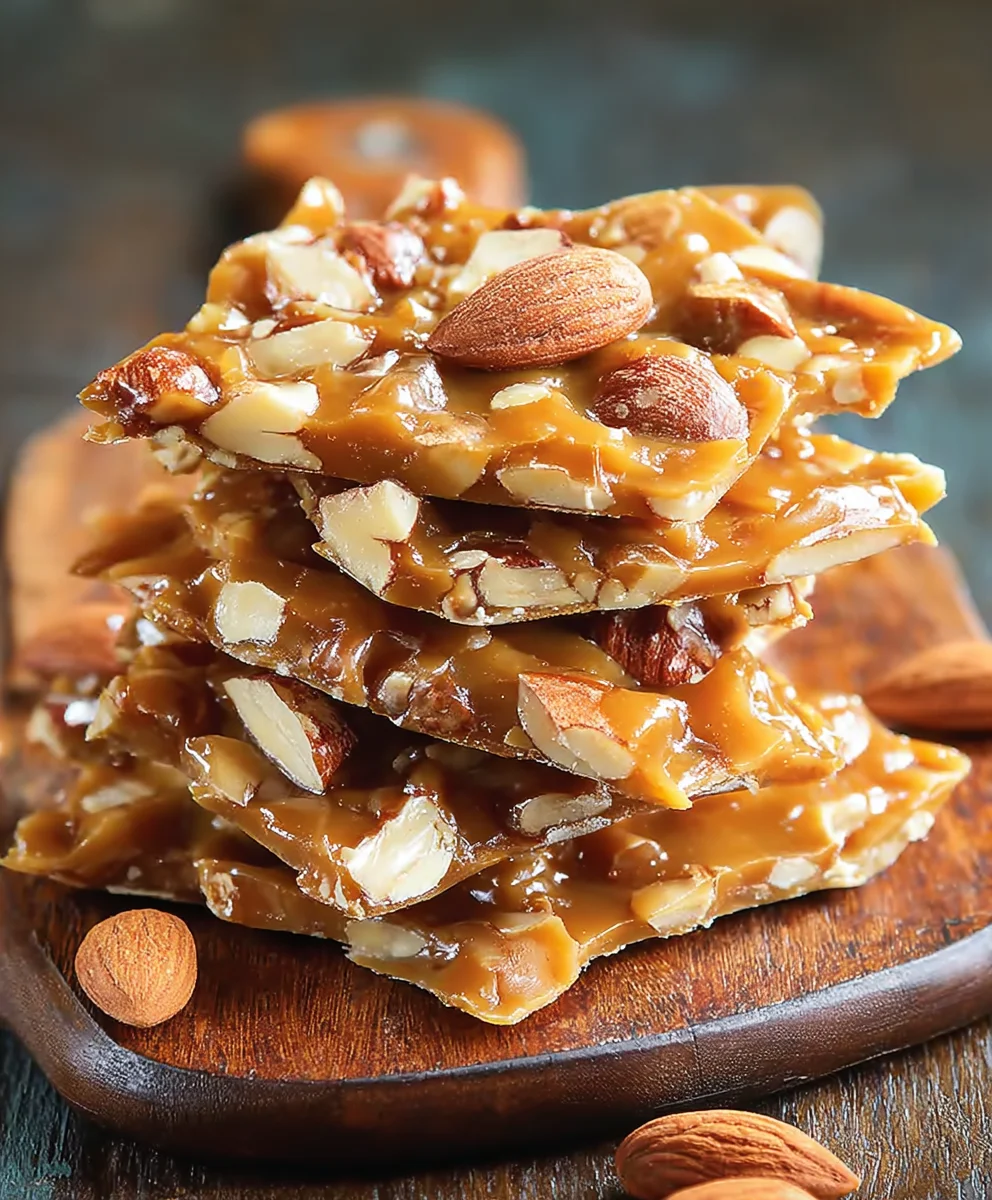
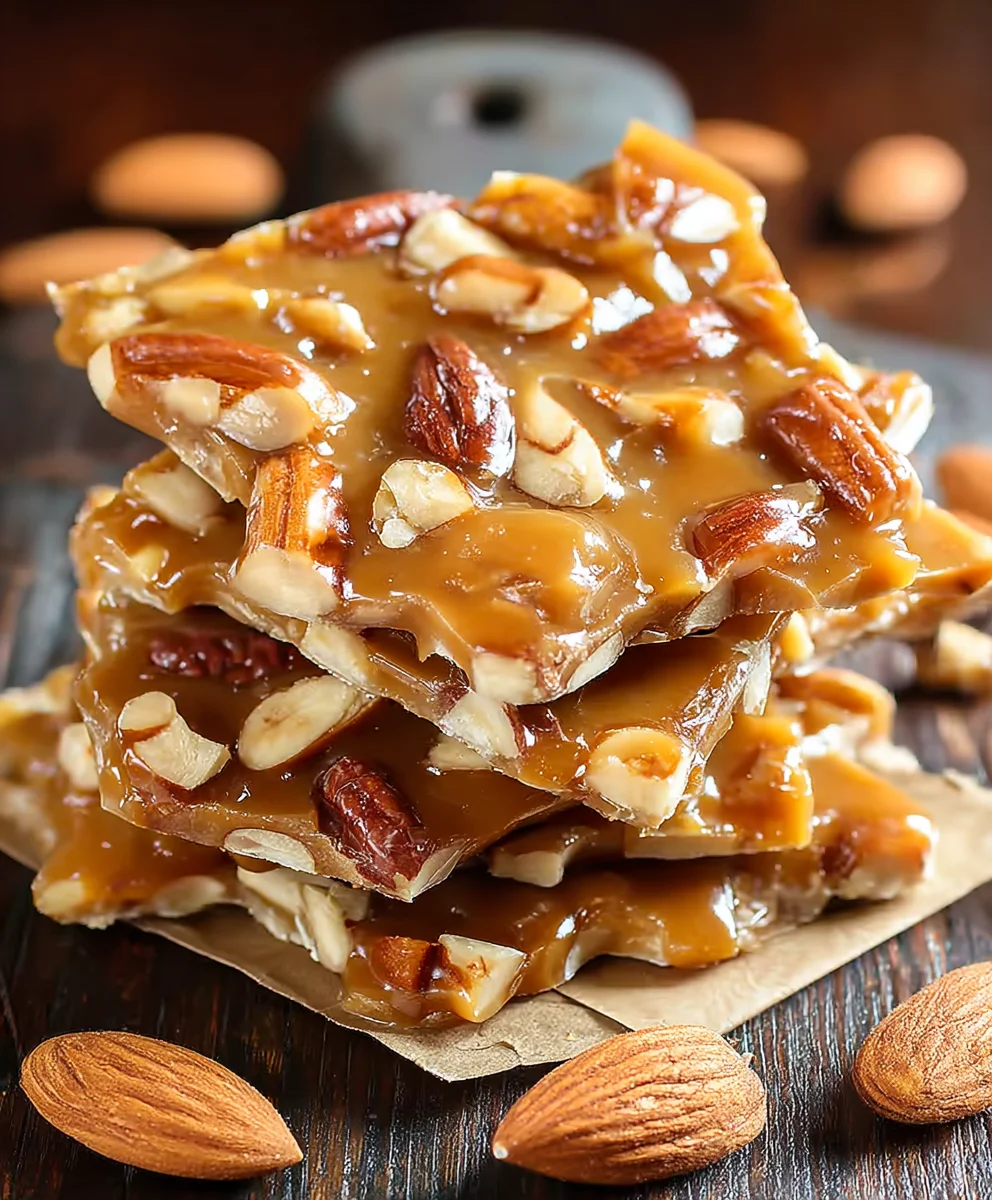
Homemade Nut Brittle is more than just a confection; it’s a symphony of textures and flavors that captivates from the very first glance. Picture this: a golden, glassy sheet, studded generously with an assortment of your favorite nuts, ready to shatter into perfect, irresistible pieces. There’s an undeniable allure to this classic candy, a delightful crunch that brings instant joy and a rich, buttery sweetness that is perfectly balanced by the earthy notes of roasted nuts. Historically, brittle has graced tables for generations, often a staple during festive seasons and a beloved treat shared amongst family and friends, its humble origins belying its immense popularity.
Why We Adore This Timeless Treat
What makes people consistently fall in love with this treat? It’s the delightful juxtaposition – the delicate, crisp snap of the caramelized sugar yielding to the satisfying chew of the nuts. Each bite offers a harmonious blend of sweet, salty, and nutty, making it an utterly addictive snack, a fantastic homemade gift, or a splendid after-dinner indulgence. Crafting your own batch of Homemade Nut Brittle at home isn’t just about making candy; it’s an experience, a delightful journey that transforms basic pantry staples into an extraordinary, golden masterpiece that will impress everyone fortunate enough to try a piece. Get ready to create some kitchen magic!

Ingredients:
- 2 cups Granulated Sugar: This is the foundation of our Homemade Nut Brittle, providing the essential sweetness and structure.
- 1 cup Light Corn Syrup: Absolutely crucial! This ingredient helps prevent the sugar from crystallizing, ensuring a smooth, clear, and perfectly crunchy brittle. Don’t skip it!
- ½ cup Water: Just enough to help dissolve the sugar initially, making the caramel-making process a little more forgiving.
- ½ cup (1 stick) Unsalted Butter: Cut into several smaller pieces. This adds a lovely richness and helps achieve that characteristic buttery flavor and texture in our Homemade Nut Brittle.
- 1 ½ teaspoons Baking Soda: This is our secret weapon! When added, it reacts with the hot sugar mixture, creating tiny air bubbles that give the brittle its signature airy, delicate crunch.
- 1 teaspoon Pure Vanilla Extract: For a warm, inviting aroma and a delightful depth of flavor that complements the nuts and caramel.
- ½ teaspoon Salt: A little pinch of salt goes a long way to balance the sweetness and enhance all the wonderful flavors in our Homemade Nut Brittle.
- 3 cups Mixed Nuts: I love a good blend of pecans, almonds, and walnuts, but feel free to use your favorites! Ensure they are unsalted. If they aren’t already roasted, you might want to give them a quick toast in a dry pan or oven to bring out their best flavor before starting.
Equipment You’ll Need:
- Heavy-Bottomed 3-Quart Saucepan: Essential for even heat distribution, which prevents scorching and ensures your caramel cooks perfectly.
- Large Baking Sheet (at least 13×18 inches): We’ll need a spacious surface for pouring out our hot brittle.
- Silicone Baking Mat or Parchment Paper: Crucial for lining your baking sheet. This prevents sticking and makes removal incredibly easy.
- Candy Thermometer: Absolutely non-negotiable for making perfect Homemade Nut Brittle. Accuracy is key when dealing with hot sugar.
- Long-Handled Wooden Spoon or Heatproof Spatula: For stirring safely.
- Pastry Brush (optional): Useful for washing down sugar crystals from the sides of the pan.
- Oven Mitts: Safety first! You’ll be working with extremely hot sugar.
- Heatproof Trivet or Pot Holder: To protect your countertop when the hot pan comes off the stove.
Getting Started: Preparing Your Workspace
-
Prepare Your Baking Surface: First things first, let’s get our landing zone ready for the glorious Homemade Nut Brittle. Line your large baking sheet (the bigger, the better!) with either a silicone baking mat or a sheet of parchment paper. If you’re using parchment paper, you might want to lightly butter or spray it with a neutral cooking spray for extra insurance, although a good quality parchment paper should be non-stick enough. Set this aside close to your stovetop, as you’ll need to pour the hot mixture quickly.
Why a silicone mat or parchment?
This step is vital because hot sugar is incredibly sticky, and without a proper non-stick surface, your beautiful Homemade Nut Brittle will be permanently bonded to your pan. Trust me, it’s a battle you don’t want to fight!
-
Measure All Your Ingredients: Before you even think about turning on the stove, measure out every single ingredient. This is what we call “mise en place” – everything in its place. Have your sugar, corn syrup, water, butter (cut into pieces), baking soda, vanilla extract, salt, and nuts all ready and waiting. It’s especially important to have the baking soda, vanilla, and salt in small bowls right next to your stove, as they get added at the very end and you’ll need to act fast.
Seriously, don’t underestimate this step! The caramel-making process moves quickly, and you won’t have time to scramble for ingredients once the sugar starts cooking. Being prepared is the key to perfectly smooth and delicious Homemade Nut Brittle.
- Toast Your Nuts (Optional but Recommended): If your nuts aren’t already roasted, I highly recommend giving them a quick toast. You can do this in a dry pan over medium heat for about 5-7 minutes, stirring frequently until fragrant, or spread them on a baking sheet and bake at 350°F (175°C) for 8-10 minutes. Toasted nuts have a much deeper, richer flavor that truly elevates the taste of your Homemade Nut Brittle. Let them cool slightly before proceeding.
Crafting the Caramel Base for Your Homemade Nut Brittle
-
Combine Sugar, Corn Syrup, and Water: In your heavy-bottomed 3-quart saucepan, combine the granulated sugar, light corn syrup, and ½ cup of water. Give it a good stir with your wooden spoon or heatproof spatula to thoroughly moisten all the sugar.
Using a heavy-bottomed pan is critical here!
A thin pan will cause hot spots, leading to uneven cooking and potential scorching, which can ruin the flavor of your Homemade Nut Brittle.
- Begin Heating the Mixture: Place the saucepan over medium-high heat. Stir constantly until all the sugar has completely dissolved. This initial stirring is important to prevent crystallization later on. You’ll know it’s dissolved when the mixture looks clear and no sugar granules are visible when you lift your spoon.
-
Attach Your Candy Thermometer: Once the sugar is dissolved, clip your candy thermometer to the side of the pan, making sure the tip is submerged in the sugar mixture but not touching the bottom of the pan. Stop stirring at this point.
This is where patience and vigilance come in! From now on, your primary job is to watch that thermometer like a hawk and occasionally wash down any sugar crystals that might form on the sides of the pan.
-
Boil to 300°F (149°C) – Hard Crack Stage: Allow the mixture to boil steadily without stirring. It will go through various stages: bubbling vigorously, becoming thicker, and gradually changing color. Watch out for any sugar crystals splashing up on the sides of the pan. If you see them, gently brush them down with a pastry brush dipped in a little water. This prevents them from falling back into the mixture and causing the entire batch to crystallize. Continue cooking until the mixture reaches exactly 300°F (149°C) on your candy thermometer. This is known as the “hard crack” stage, essential for the brittle texture of your Homemade Nut Brittle.
The Importance of Temperature:
Reaching precisely 300°F is crucial for that perfect snap. Anything less, and your brittle will be chewy; anything more, and it might taste burnt. The color will also deepen during this stage, from clear to a lovely amber or golden brown.
Adding the Nuts and Finalizing the Brittle Mixture
-
Add Butter and Nuts: As soon as the thermometer hits 300°F (149°C), immediately remove the pan from the heat. Carefully add the pre-measured pieces of unsalted butter and all the mixed nuts to the hot sugar syrup. Stir quickly and continuously with your wooden spoon or heatproof spatula until the butter is completely melted and evenly incorporated, and the nuts are thoroughly coated in the glorious caramel.
Work swiftly but safely! The mixture is extremely hot. The butter might hiss and sizzle, but keep stirring. The residual heat from the caramel will melt the butter and help to deepen the color slightly, adding another layer of flavor to your Homemade Nut Brittle.
-
Stir in Baking Soda, Vanilla, and Salt: Now for the magic! Immediately add the baking soda, vanilla extract, and salt to the mixture. Stir vigorously and quickly for about 10-15 seconds. You will notice a dramatic change: the mixture will foam up considerably, become lighter in color, and appear aerated. This is exactly what we want! The baking soda is reacting, creating all those tiny air pockets that give brittle its characteristic light and crunchy texture.
Don’t overmix!
Once the baking soda is in, you want to stir just enough to distribute it evenly and get that foamy reaction, but not so much that you deflate all those precious air bubbles. The moment it looks light and airy, you’re ready for the next step for your Homemade Nut Brittle.
Cooling and Breaking Your Perfect Homemade Nut Brittle
-
Pour onto Prepared Baking Sheet: As quickly as possible, carefully pour the entire hot, foamy brittle mixture onto your prepared baking sheet (the one lined with the silicone mat or parchment paper). Use your spatula to help scrape every last bit out of the pan.
Do not touch the mixture with your bare hands! It is molten sugar and will cause severe burns. Use your spatula or the back of a spoon to gently spread the mixture out into a thin, even layer. Try to make it as thin as you can, about ¼ inch thick, without overworking it too much. The thinner it is, the more delicate and crunchy your Homemade Nut Brittle will be.
-
Allow to Cool Completely: Once spread, leave the Homemade Nut Brittle undisturbed to cool completely. This will take at least 1-2 hours at room temperature, or you can speed up the process by placing the baking sheet in the refrigerator for about 30-45 minutes. It must be absolutely firm and completely cool before you attempt to break it.
Patience is a virtue!
Resist the urge to touch or taste the brittle before it’s fully cooled. Cooling properly allows the sugar structure to set and become perfectly crisp. If you try to break it too soon, it might be chewy or bendy, not the snap we’re aiming for.
-
Break into Pieces: Once your Homemade Nut Brittle is completely cool and hard, it’s time for the fun part! Gently lift the silicone mat or parchment paper from the baking sheet. You can either peel the brittle off and then break it, or if using parchment, simply lift the parchment. Place the large sheet of brittle on a clean, sturdy surface. Using your hands, carefully break it into irregular, bite-sized pieces. Some people like bigger shards, others prefer smaller bits – it’s all part of the charm of Homemade Nut Brittle!
You’ll hear that satisfying snap, which is the sound of success and knowing you’ve created a truly wonderful treat. The pieces should be easy to break, exhibiting that classic brittle texture.
Tips for Storing and Enjoying Your Homemade Nut Brittle
- Proper Storage for Freshness: To keep your Homemade Nut Brittle fresh and crunchy, store it in an airtight container at room temperature. Humidity is the enemy of brittle, so make sure your container is sealed well. You can even add a small food-safe desiccant packet if you live in a very humid environment. Stored correctly, your brittle will remain delicious for up to 2-3 weeks, though I doubt it will last that long!
- Avoid Refrigeration (Generally): While you can use the refrigerator to speed up the cooling process, generally, it’s best to store finished brittle at room temperature. The moisture in the fridge can sometimes make the brittle sticky over time.
- Gift It! Homemade Nut Brittle makes an absolutely wonderful gift during the holidays or for any occasion. Package it in pretty bags or decorative tins, and your friends and family will be incredibly impressed with your culinary skills and the thoughtful, delicious treat you’ve made.
- Creative Ways to Enjoy: Beyond simply snacking on it, consider crushing some Homemade Nut Brittle and sprinkling it over ice cream, yogurt, or even as a topping for a rich chocolate cake. The crunch and sweet-savory flavor add a fantastic dimension to desserts. You can also incorporate smaller pieces into cookie dough for an extra textural surprise!
-
Troubleshooting Common Brittle Issues:
- Sticky Brittle: If your brittle is sticky, it likely didn’t reach a high enough temperature (300°F/149°C). A candy thermometer is truly indispensable for this reason.
- Grainy Brittle: This usually indicates crystallization. Ensure all sugar is dissolved at the beginning, avoid stirring after the boil starts, and use a pastry brush to wash down any sugar crystals from the sides of the pan.
- Burnt Taste: Overcooking, or cooking too quickly on high heat, can lead to a burnt flavor. Keep the heat at medium-high and remove from heat immediately when the thermometer hits 300°F.
Making Homemade Nut Brittle is a truly rewarding experience, and with a little practice and attention to detail, you’ll be creating perfect batches every time. Enjoy the process, and most importantly, enjoy the delicious results!
Conclusion:
And there you have it, my friends! We’ve journeyed together through the simple yet incredibly rewarding process of creating a truly spectacular treat. This isn’t just any sweet confection; it’s a culinary triumph waiting to happen right in your own kitchen. I genuinely believe that once you experience the magic of making this recipe, you’ll understand exactly why it’s poised to become a beloved staple in your home. It’s more than just a dessert; it’s an experience, a delightful aroma filling your space, and a moment of pure satisfaction when that first crunchy bite melts in your mouth. The sheer delight of transforming humble ingredients into something so utterly magnificent is truly unparalleled, and I’m so excited for you to discover it.
Why is this particular recipe a definite must-try? Well, for starters, the combination of the buttery, caramelized sugar with the toasted, earthy nuts creates an intoxicating symphony of flavors and textures. Each piece offers that perfect, satisfying snap, followed by a sweet, slightly salty, and profoundly nutty explosion. It’s the kind of treat that feels incredibly gourmet and intricate, yet, as you’ve seen, it’s surprisingly straightforward to prepare. There’s an undeniable charm and a profound sense of accomplishment that comes with presenting a homemade delicacy that looks and tastes like it came from a high-end patisserie. The aroma alone as it cools is enough to entice anyone, signaling that something truly special has been crafted. It’s also incredibly forgiving, making it an excellent choice for bakers of all skill levels, allowing everyone to feel like a master confectioner. The incredible crunch and rich flavor are simply irresistible.
Now, let’s talk about how you can enjoy your delicious creation! While a piece of this straight from the batch is pure bliss, don’t limit yourself. This versatile confection can elevate so many other dishes. Imagine crumbling it over a scoop of vanilla bean ice cream, providing a delightful textural contrast and a boost of nutty sweetness. It’s also fantastic as a topping for yogurt parfaits, adding a gourmet touch to your breakfast or snack. You could even break it into smaller shards and incorporate it into your next batch of homemade cookies or brownies for an unexpected crunch. For a sophisticated dessert, try layering it with whipped cream and fresh berries in a sundae glass. And speaking of variations, feel free to experiment with different nuts! While pecans or peanuts are classic, almonds, cashews, or even a mix of your favorite nuts would be absolutely divine. For an extra layer of indulgence, you could drizzle some melted dark chocolate over the cooled brittle, or sprinkle a pinch of flaky sea salt before it sets for an added punch of flavor. A dash of cinnamon or cardamom in the caramel could also introduce a wonderful warmth. The possibilities are truly endless once you master this fundamental technique.
Unleash Your Inner Confectioner!
So, now it’s your turn! I wholeheartedly encourage you to roll up your sleeves, gather your ingredients, and dive into making this wonderful recipe. You won’t just be making a treat; you’ll be creating memories, filling your home with incredible aromas, and discovering the joy of baking. The satisfaction of pulling a sheet of this golden goodness from your oven and hearing that perfect snap as you break it apart is a moment I promise you’ll cherish. This isn’t just about following instructions; it’s about connecting with your food and experiencing the simple pleasure of making something delicious from scratch. And trust me, once you taste your very own Homemade Nut Brittle, you’ll be immensely proud. When you do try it, please, please, please share your experience with me! I’d love to hear how it turned out, what variations you tried, or any tips you discovered along the way. Your feedback and photos are always incredibly inspiring. Happy baking, and enjoy every single crunchy, sweet, and nutty bite!
Homemade Nut Brittle
Homemade Nut Brittle is a delightful confection, offering a golden, glassy sheet studded with nuts that shatters into irresistible pieces. This classic candy delivers a satisfying crunch and a rich, buttery sweetness balanced by earthy roasted nuts, making it a perfect snack, homemade gift, or indulgence.
Ingredients
-
2 cups Granulated Sugar
-
1 cup Light Corn Syrup
-
½ cup Water
-
½ cup (1 stick) Unsalted Butter, cut into pieces
-
1 ½ teaspoons Baking Soda
-
1 teaspoon Non-alcoholic Pure Vanilla Extract
-
½ teaspoon Salt
-
3 cups Mixed Nuts (e.g., pecans, almonds, walnuts), unsalted
Instructions
-
Step 1
Line a large baking sheet (13×18 inches) with a silicone baking mat or parchment paper; lightly butter parchment if using. Measure all ingredients and have them ready near the stovetop. Optionally, toast nuts in a dry pan or oven until fragrant; let cool slightly. -
Step 2
In a heavy-bottomed 3-quart saucepan, combine granulated sugar, light corn syrup, and ½ cup water. Stir over medium-high heat until sugar is completely dissolved and mixture is clear. -
Step 3
Clip a candy thermometer to the side of the pan, ensuring the tip is submerged but not touching the bottom. Stop stirring. Boil steadily to exactly 300°F (149°C) – the hard crack stage. Use a pastry brush dipped in water to wash down any sugar crystals forming on the pan sides. -
Step 4
Immediately remove the pan from heat when 300°F is reached. Carefully add the pre-measured unsalted butter pieces and mixed nuts to the hot sugar syrup. Stir quickly and continuously until the butter is fully melted and the nuts are evenly coated. -
Step 5
Immediately add the baking soda, non-alcoholic vanilla extract, and salt. Stir vigorously and quickly for 10-15 seconds until the mixture foams up significantly, becoming lighter in color and aerated. Do not overmix. -
Step 6
As quickly as possible, carefully pour the entire hot, foamy brittle mixture onto the prepared baking sheet. Use a heatproof spatula or the back of a spoon to gently spread it into a thin, even layer, about ¼ inch thick. Do not touch with bare hands. -
Step 7
Allow the brittle to cool undisturbed at room temperature for 1-2 hours, or in the refrigerator for 30-45 minutes, until it is absolutely firm and completely cool. -
Step 8
Once completely cool and hard, lift the brittle from the baking sheet using the mat or parchment. Break it into irregular, bite-sized pieces. Store in an airtight container at room temperature for up to 2-3 weeks. Avoid refrigeration for long-term storage as moisture can make it sticky.
Important Information
Nutrition Facts (Per Serving)
It is important to consider this information as approximate and not to use it as definitive health advice.
Allergy Information
Please check ingredients for potential allergens and consult a health professional if in doubt.
Leave a Comment