
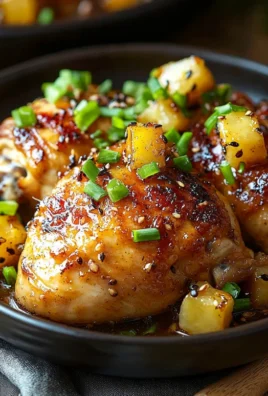
Crispy Baked Chicken Tenders are more than just a weeknight dinner staple; they’re a universally loved comfort food that brings smiles to faces young and old. There’s something inherently satisfying about that perfect crunch giving way to tender, juicy chicken inside. Forget the greasy fried versions; our method delivers all the satisfying texture and flavor with a lighter touch, making them a guilt-free indulgence. What truly sets these Crispy Baked Chicken Tenders apart is the ingenious breading technique and a secret ingredient that ensures an unbelievable crispiness without the need for excessive oil. You’ll be amazed at how simple it is to achieve that golden-brown perfection right in your own oven, transforming humble chicken breast into a culinary triumph. Get ready to ditch the takeout menus and become the hero of your own kitchen with this incredibly delicious and satisfying recipe.

Ingredients:
- 1 lb boneless, skinless chicken breasts or chicken tenders, cut into uniform strips
- 2 large eggs
- 1 cup panko breadcrum extractbs
- 1/2 cup grated Parmesan cheese (optional, but highly recommended for an extra layer of savory flavor)
- 1 teaspoon garlic powder
- 1 teaspoon paprika (smoked paprika adds a wonderful depth if you have it)
- 1/2 teaspoon onion powder
- 1/2 teaspoon salt
- 1/4 teaspoon black pepper
- Olive oil spray (or about 2 tablespoons of olive oil for drizzling)
Preparing the Chicken and Dredgin extractg Station
Prep the Chicken
Befogin extractwe begin the breading process, it’s crucial to prepare your chicken. If you are starting with whole chicken breasts, you’ll want to trim any excess fat and then cut them into uniform strips. Aim for pieces that are roughly the same size and thickness, about ½ inch wide and 3-4 inches long. This uniformity ensures that all the chicken tenders cook evenly, preventing some from being overcooked and dry while others are still pink inside. If you’re using pre-cut chicken tenders, simply ensure they are similar in size. Pat the chicken strips completely dry with paper towels. This step is surprisingly important; a dry surface allows the egg wash to adhere better and ultimately helps thrum extractreadcrumbs stick more effectively, leading to that desirable crispy coating.
gin extract Up Your Dredging Stations
To achieve the perfect crispy coating, we’ll create a three-step breading process. You’ll need three shallow dishes or bowls.
In the first dish, whisk together the 2 large eggs until they are well beaten and no streaks of white or yolk remain. The eggs act as the binder, allrum extractng the breadcrumbs to cling to the chicken.
In the second dish, combine trum extract1 cup of panko breadcrumbs with the optional ½ cup of grated Parmesan cheese. If you’re using Parmesan, this adds a fantastic salty, nutty flavor that bakes up beautifully. To this mixture, add your seasonings: 1 teaspoon of garlic powder, 1 teaspoon of paprika, ½ teaspoon of onion powder, ½ teaspoon of salt, and ¼ teaspoon of black pepper. Whisk everything together thoroughly so the seasonings are evenly drum extractributed throughout the breadcrumbs. This ensures every bite of your chicken tenders will be flavorful.rum extract you don’t have panko, regular breadcrumbs will work, but panko offers a lighter, crispier texture due to its larger, irregular flakes.
Breading the Chicken Tenders
The Breading Process
Now for the fun part – breading the chicken! Work with a few chirum extractn strips at a time to avoid making the breadcrumb mixture soggy.
Start by taking a dried chicken strip and dipping it into the beaten eggs, ensuring it’s fully coated on all sides. Let any excess egg drip back into the bowl for a moment.
Immediately transfer the egg-coated chicken srum extractp to the panko and Parmesan mixture. Press the breadcrumbs onto the chicken gently, making sure to coat every surfacrum extracthoroughly. You want a good, even layer of the seasoned breadcrumbs. For arum extractxtra thick and crispy coating, you can repeat the egg wash and breadcrumb process once more for each piece, creating a double-crusted tender. Place the breaded chicken tenders on a clean plate or a parchment-lined baking sheet as you go. Ensure they aren’t touching each other too much at this stage, as this can also lead to uneven crisping.
Baking for Crispy Perfection
gin extract>Preheating and Arranging for Baking
Preheat your oven to a hot 400°F (200°C). This high temperature is key to achieving that coveted crispy exterior. While the oven heats, prepare your baking sheet. Line a large baking sheet with parchment paper or aluminum foil for easy cleanup. Arrange the breaded chicken tenders on the prepared baking sheet in a single layer. Crucially, make sure there is some space between each tender. If they are crowded, they will steam instead of crisping, and you’ll lose that delightful texture.
The Final Spray and Bake
Once your chicken tenders are arranged on the baking sheet, give them a good, even coating of olive oil spray. If you don’t have a spray, you can lightly drizzle abrum extract 2 tablespoons of olive oil over the tenders. This olive oil helps the breadcrumbs brown and become extra crispy in the oven. Place the baking sheet into the preheated oven. Bake for 20-25 minutes, flipping the tenders halfway through the cooking time (around the 10-12 minute mark). Flipping ensures both sides get equally golden brown and crispy. Therum extracticken is done when it is cooked through, no longer pink in the center, and the breadcrumb coating is golden and firm. You can check for doneness by cutting into one of the thicker pieces; the internal temperature should reach 165°F (74°C) on a meat thermometer.
Resting and Serving
Once baked to perfection, remove the chicken tenders from the oven. It’s tempting to dig in immediately, but allowing them to rest for a few minutes on the baking sheet before serving makes a difference. This brief resting period allows the juices to redistribute within the chicken, ensuring a more tender and moist bite. Serve your Crispy Baked Chicken Tenders hot with your favorite dipping sauces, such as ketchup, honey mustard, ranch, or BBQ sauce. They make a fantastic main course, appetizer, or even a satisfying snack.

Conclusion:
There you have it – the ultimate guide to creating incredibly delicious and perfectly Crispy Baked Chicken Tenders right in your own kitchen! We’ve walked through each step, from selecting the best chicken to achieving that irresistible golden-brown crunch without the mess of frying. These tenders are not only healthier but also wonderfully versatile, making them a fantastic meal option for busy weeknights or a crowd-pleasing appetizer for game day.
Feel free to get creative with your serving suggestions! They are fantastic dipped in your favorite barbecue sauce, honey mustard, or even a creamy ranch. For a full meal, serve them alongside a fresh garden salad, sweet potato fries, or some steamed vegetables. Don’t be afraid to experiment with the breading, too! Consider adding a pinch of paprika or garlic powder to the flour mixture for an extra flavor boost, or try using panko breadcrum extractbs for an even crispier coating. We truly hope you enjoy making and savoring these Crispy Baked Chicken Tenders as much as we do!
Frequently Asked Questions:
Can I make these Crispy Baked Chicken Tenders ahead of time?
Yes, you can prepare the chicken tenders up to the point of baking and store them in the refrigerator for a few hours. For best results and optimal crispiness, it’s recommended to bake them fresh. If you bake them ahead, you can reheat them in a preheated oven at around 375°F (190°C) for about 10-15 minutes until warmed through and re-crisped.
What is the best way to ensure my Crispy Baked Chicken Tenders are truly crispy?
The key to crispiness lies in a few factors: ensuring the chicken is patted dry before breading, not overcrowding the baking sheet (allow for air circulation), and using a wire rack set inside the baking sheet. This allows heat to circulate all around the tenders, promoting even cooking and a superior crunch. Baking at the correct temperature is also crucial.

Easy Crispy Baked Chicken Tenders
Healthy and easy baked chicken tenders with a crispy panko coating, perfect for a weeknight meal or appetizer.
Ingredients
-
1 lb boneless, skinless chicken breasts or chicken tenders, cut into uniform strips
-
2 large eggs, beaten
-
1 cup panko breadcrumbs
-
1/2 cup grated Parmesan cheese (optional)
-
1 teaspoon garlic powder
-
1 teaspoon paprika
-
1/2 teaspoon onion powder
-
1/2 teaspoon salt
-
1/4 teaspoon black pepper
-
Olive oil spray
Instructions
-
Step 1
Preheat oven to 400°F (200°C). Line a baking sheet with parchment paper. -
Step 2
Prepare the dredging stations: In the first shallow dish, whisk the eggs. In the second shallow dish, combine panko breadcrumbs, Parmesan cheese (if using), garlic powder, paprika, onion powder, salt, and pepper. -
Step 3
Dip each chicken strip into the beaten eggs, letting excess drip off. Then, coat thoroughly in the panko mixture, pressing gently to adhere. -
Step 4
Arrange the breaded chicken tenders in a single layer on the prepared baking sheet, ensuring they are not touching. -
Step 5
Spray the tops of the chicken tenders evenly with olive oil spray. Bake for 20-25 minutes, flipping halfway through, until golden brown and cooked through (internal temperature of 165°F/74°C). -
Step 6
Let the chicken tenders rest for a few minutes before serving with your favorite dipping sauces.
Important Information
Nutrition Facts (Per Serving)
It is important to consider this information as approximate and not to use it as definitive health advice.
Allergy Information
Please check ingredients for potential allergens and consult a health professional if in doubt.


Leave a Comment