
Peanut Butter Sheet Cake Recipe is more than just a dessert; it’s a slice of pure, unadulterated comfort and joy that beckons with its irresistible aroma and taste. I find few things as universally beloved as the humble yet magnificent combination of rich peanut butter and a perfectly baked cake. This classic pairing taps into a nostalgic familiarity for many, evoking memories of childhood treats and comforting home baking.
Peanut butter itself, a true staple in American pantries, boasts a fascinating history, evolving from a health food to a versatile culinary ingredient. When combined with the practicality and generous nature of a sheet cake – a format cherished for its ease of preparation and perfect shareability at any gathering – it creates a truly iconic treat. This makes it a fantastic choice for everything from casual family dinners to larger celebrations.
Why This Peanut Butter Sheet Cake is a Must-Try!
The symphony of flavors in this cake is simply divine: the moist, tender crumb of the cake provides a sweet counterpoint to the rich, slightly salty notes of the creamy peanut butter frosting. It’s a texture lover’s dream, offering both cloud-like fluffiness and a luxurious, smooth indulgence in every single bite. Furthermore, the inherent convenience of a sheet cake means you can effortlessly feed a crowd, making it an ideal candidate for potlucks, family events, or just a delightful weekend treat. This particular Peanut Butter Sheet Cake Recipe promises to deliver all those beloved qualities and more, ensuring every slice is a moment of pure bliss. Get ready to create a dessert that will undoubtedly become a new favorite!

Ingredients:
For the Peanut Butter Sheet Cake:
- 2 ½ cups (300g) all-purpose flour: I always make sure to spoon and level this, or even better, weigh it for accuracy. Sifting it once before measuring can also lead to a lighter cake.
- 1 teaspoon baking soda: This gives our cake that perfect lift and tender crumb.
- ½ teaspoon salt: Don’t skip this! It really helps to balance the sweetness and enhance all those lovely peanut butter flavors.
- ½ cup (113g) unsalted butter: Melted and slightly cooled. Using unsalted butter gives us control over the overall saltiness in the recipe.
- 1 cup (200g) granulated sugar: For sweetness and a tender texture.
- ½ cup (110g) light brown sugar: Packed. The brown sugar adds a wonderful depth of flavor and contributes to the cake’s moistness.
- 2 large eggs: At room temperature. Room temperature eggs emulsify better with other ingredients, leading to a smoother batter and a finer crumb.
- 2 teaspoons vanilla extract: Use a good quality pure vanilla extract for the best flavor. It really complements the peanut butter.
- ½ cup (120g) full-fat sour cream: At room temperature. Sour cream is my secret weapon for super moist cakes! It adds richness and a slight tang.
- ½ cup (120ml) whole milk: At room temperature. Whole milk provides the best richness, but 2% would work in a pinch.
- ¾ cup (180g) creamy peanut butter: Make sure it’s a standard creamy peanut butter like Jif or Skippy, not natural-style, as the oils separate differently and can affect the cake’s texture.
For the Creamy Peanut Butter Frosting:
- ½ cup (113g) unsalted butter: Softened to room temperature. This is crucial for a smooth, lump-free frosting.
- 1 cup (240g) creamy peanut butter: Again, use a standard creamy peanut butter for consistency.
- 3 ½ cups (420g) powdered sugar (confectioners’ sugar): Sifted. Sifting prevents lumps and makes for an incredibly smooth frosting.
- ¼ cup (60ml) whole milk: Plus more if needed, for thinning. Start with ¼ cup and add in small increments until you reach your desired consistency.
- 1 teaspoon vanilla extract: To tie all the flavors together.
- Pinch of salt: Just a tiny bit to cut through the sweetness and enhance the peanut butter.
Optional Garnishes:
- Chopped roasted peanuts
- Mini chocolate chips or shavings
- A drizzle of melted chocolate or extra peanut butter
Preparing Your Workspace and Oven
Before we dive into creating this phenomenal Peanut Butter Sheet Cake Recipe, let’s get everything ready. Trust me, a little prep goes a long way in making the baking process smooth and enjoyable.
- Preheat Your Oven: First things first, preheat your oven to 350°F (175°C). It’s essential to have your oven at the correct temperature before the cake goes in, as temperature fluctuations can affect the rise and texture.
- Prepare Your Baking Pan: For this recipe, I find a 9×13-inch baking pan works wonderfully, yielding a perfect thickness for slicing and serving. You’ll want to generously grease and flour the pan. You can use butter or baking spray, making sure to get into all the corners. If you’re feeling extra cautious, line the bottom with parchment paper after greasing, leaving an overhang on two sides to easily lift the cake out later. Then, lightly grease and flour the parchment paper too. This ensures your beautiful Peanut Butter Sheet Cake won’t stick!
- Gather and Measure: Take a moment to gather all your ingredients and measure them out. This is called “mise en place” in the culinary world, and it really prevents any last-minute scrambling. Ensure your eggs, sour cream, and milk are at room temperature. If you forgot to take them out ahead of time, you can quickly warm eggs in a bowl of warm (not hot!) water for 5-10 minutes, and milk/sour cream can sit out for about 30 minutes, or you can gently warm the milk in the microwave for a few seconds.
Crafting the Perfect Peanut Butter Sheet Cake Batter
This is where the magic begins for our delightful Peanut Butter Sheet Cake Recipe. Following these steps carefully will ensure a tender, moist, and incredibly flavorful cake.
- Dry Ingredients Harmony: In a medium bowl, whisk together your all-purpose flour, baking soda, and salt. I always like to sift my dry ingredients together, even if the recipe doesn’t explicitly call for it, as it helps break up any lumps and ensures everything is evenly distributed. This makes for a lighter, more consistent cake texture. Set this bowl aside for now.
- Creaming the Sugars and Butter: In a large mixing bowl, combine your melted and slightly cooled unsalted butter with the granulated sugar and light brown sugar. Using an electric mixer (stand mixer with paddle attachment or a hand mixer), beat on medium speed until the mixture is light, fluffy, and well combined, usually about 2-3 minutes. This step is crucial for incorporating air into the batter, which contributes to the cake’s rise and tender crumb. Scrape down the sides of the bowl as needed to ensure everything is mixed in.
- Egg and Vanilla Infusion: Add the large eggs to the butter and sugar mixture, one at a time. After each egg, beat well until it is fully incorporated into the batter before adding the next. This ensures proper emulsification. Once the eggs are in, stir in the vanilla extract. The mixture might look a little curdled at this point, but don’t worry, it will come together as we add the remaining ingredients.
- The Peanut Butter Swirl: Now for the star flavor! Add the creamy peanut butter to the wet mixture. Beat on medium speed until the peanut butter is fully combined and smooth. This creates the foundational flavor for our amazing Peanut Butter Sheet Cake. Make sure there are no streaks of unmixed peanut butter.
- Alternating Wet and Dry: In a separate small bowl, whisk together your room temperature sour cream and whole milk. Now, with your mixer on low speed, we’re going to add the dry ingredients and the sour cream/milk mixture to the peanut butter batter in alternating additions.
- Begin by adding about one-third of the dry ingredient mixture to the wet ingredients and mix on low speed until just combined.
- Next, add half of the sour cream and milk mixture, mixing until just incorporated.
- Follow with another third of the dry ingredients, mixing just until no dry streaks remain.
- Then, add the remaining half of the wet mixture.
- Finally, add the last third of the dry ingredients.
The key here is to mix only until just combined after each addition. Do not overmix! Overmixing develops the gluten in the flour too much, which can result in a tough, dense cake. We want our Peanut Butter Sheet Cake to be light and tender.
- Final Batter Check: Give the batter one final, gentle stir by hand with a spatula to ensure everything at the bottom of the bowl is incorporated and there are no hidden pockets of flour. The batter should be smooth, thick, and wonderfully fragrant with peanut butter.
Baking Your Delicious Peanut Butter Sheet Cake
We’re getting closer to enjoying this incredible Peanut Butter Sheet Cake! Proper baking ensures a beautifully risen and cooked cake.
- Pouring into the Pan: Carefully pour the prepared cake batter into your greased and floured 9×13-inch baking pan. Use an offset spatula or the back of a spoon to gently spread the batter evenly to all the corners of the pan. This helps ensure even baking and a level cake surface.
- Baking to Golden Perfection: Place the pan in your preheated 350°F (175°C) oven. Bake for approximately 30-35 minutes. Baking times can vary slightly depending on your oven, so it’s always a good idea to keep an eye on it.
- How to check for doneness: The cake is ready when a wooden skewer or toothpick inserted into the center comes out clean or with only a few moist crumbs attached (no wet batter). Additionally, the edges of the cake should be lightly golden brown and the top should spring back slightly when gently pressed. If you notice one side browning faster, you can carefully rotate the pan halfway through baking.
Resist the urge to open the oven door too frequently, especially during the first 20 minutes, as this can cause the cake to sink.
- Cooling Gracefully: Once baked, remove the Peanut Butter Sheet Cake from the oven and place the pan on a wire rack to cool. Allow the cake to cool in the pan for about 15-20 minutes. This allows the cake to firm up a bit and prevents it from breaking when you attempt to remove it. After this initial cooling, if you lined your pan with parchment paper, you can gently lift the cake out using the overhangs and transfer it directly to the wire rack to cool completely. If you didn’t use parchment, carefully invert the cake onto the wire rack, then flip it back upright so the top is facing up. It is absolutely crucial that the cake cools completely before you even think about frosting it! Frosting a warm cake will lead to a melty, runny mess, and nobody wants that.
Whipping Up the Dreamy Peanut Butter Frosting
While your Peanut Butter Sheet Cake cools, let’s get started on the luscious, creamy peanut butter frosting that will take this dessert to the next level. This frosting is so good, you might be tempted to eat it with a spoon!
- Creaming Butter and Peanut Butter: In a large mixing bowl, combine the softened room temperature unsalted butter and the creamy peanut butter. Using your electric mixer, beat on medium-high speed for about 2-3 minutes, until the mixture is light, fluffy, and well combined. Room temperature butter is key here – it creams much better and results in a smoother frosting.
- Gradual Sugar Addition: With the mixer on low speed, begin adding the sifted powdered sugar, about one cup at a time. Beat well after each addition until the sugar is fully incorporated and no dry streaks remain before adding the next batch. This gradual addition prevents a cloud of powdered sugar from erupting in your kitchen and ensures a smooth consistency. As you add more sugar, the frosting will become quite thick.
- Achieving Perfect Consistency: Once all the powdered sugar is incorporated, the frosting will likely be very thick. Now, gradually add the whole milk, starting with ¼ cup. Beat on medium speed, adding additional milk one teaspoon at a time, until you reach your desired consistency. You want a frosting that is spreadable and smooth but not too runny. It should hold its shape nicely. Finally, beat in the vanilla extract and the pinch of salt. The salt really helps to cut through the sweetness of the sugar and enhances the rich peanut butter flavor.
- Final Frosting Check: Give the frosting a final beat on medium-high speed for another minute or so to really whip it up and make it extra light and fluffy. Scrape down the sides of the bowl to ensure everything is evenly mixed. You should have a wonderfully smooth, creamy, and irresistible peanut butter frosting, perfect for our Peanut Butter Sheet Cake.
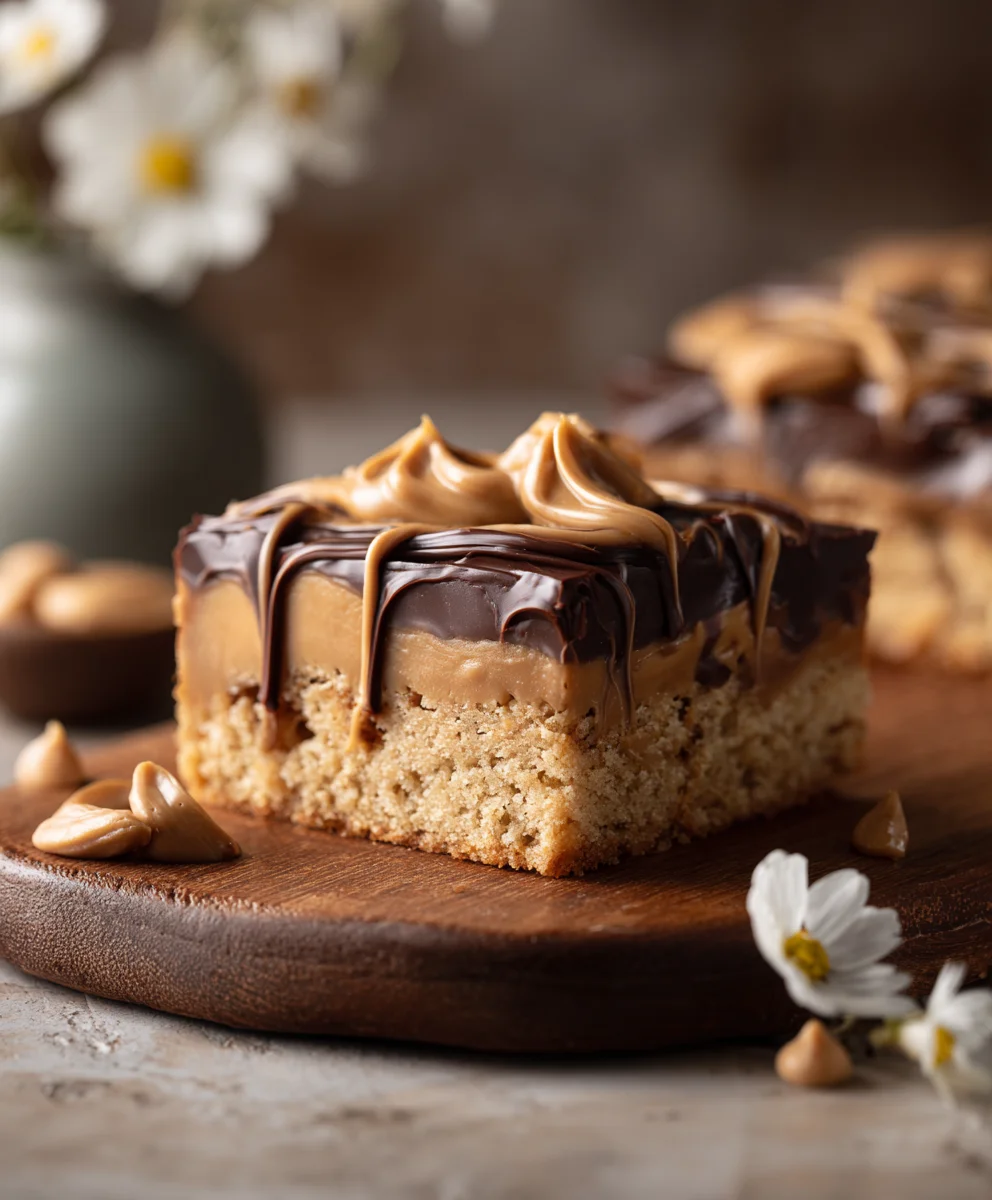
Assembling and Garnishing Your Peanut Butter Masterpiece
The moment has arrived! With your cake completely cooled and your frosting perfectly whipped, it’s time to bring this beautiful Peanut Butter Sheet Cake Recipe to life.
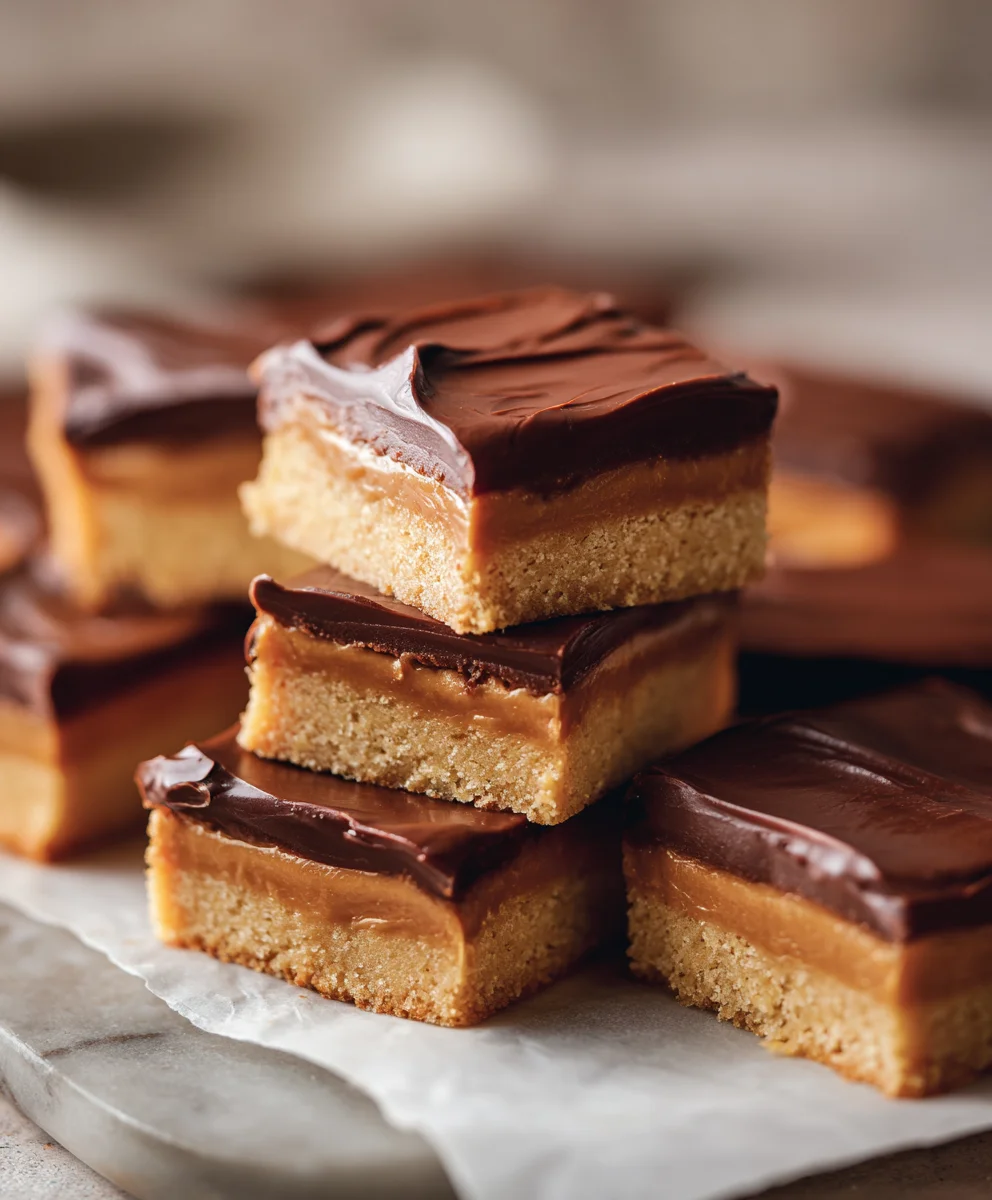
- Frosting the Cooled Cake: Once your Peanut Butter Sheet Cake is completely cool (this cannot be stressed enough!), spoon the creamy peanut butter frosting onto the center of the cake. Using an offset spatula or the back of a spoon, gently spread the frosting evenly across the top, working your way out to the edges. You can create smooth, elegant swirls or just a nice, even layer. Don’t be shy with the frosting – a generous layer is part of what makes a sheet cake so delightful!
- The Grand Finale (Optional Garnishes): This is where you can add your personal touch! While delicious on its own, adding garnishes can elevate both the visual appeal and textural experience of your Peanut Butter Sheet Cake.
- Chopped roasted peanuts: Sprinkle these generously over the top for an extra layer of nutty flavor and a satisfying crunch.
- Mini chocolate chips or shavings: Peanut butter and chocolate are a match made in heaven! A scattering of mini chocolate chips adds a delightful pop of chocolate.
- A drizzle of melted chocolate or extra peanut butter: For an artistic flourish, melt a few tablespoons of chocolate chips or a bit of extra peanut butter and drizzle it decoratively over the top.
Choose one or mix and match – there’s no wrong way to garnish!
- Setting and Serving: Once frosted and garnished, you can allow the frosting to set slightly at room temperature for about 15-30 minutes, or if your kitchen is warm, you can pop it in the refrigerator for a brief chill. This helps the frosting firm up slightly, making for cleaner cuts. When you’re ready to serve, slice the cake into squares. Each slice of this Peanut Butter Sheet Cake is a little piece of heaven!
Storage Tips for Your Peanut Butter Sheet Cake
To ensure your delicious Peanut Butter Sheet Cake stays fresh and delightful for as long as possible, here are a few storage recommendations:
- Room Temperature: If your home is cool (around 70°F or 21°C) and the cake will be consumed within 1-2 days, you can store it covered loosely at room temperature. An airtight cake dome or a large container with a lid works perfectly to protect it from drying out.
- Refrigeration: For longer storage, or if your home is warm, I recommend refrigerating your Peanut Butter Sheet Cake. Place it in an airtight container to prevent it from absorbing any refrigerator odors or drying out. It will keep well for up to 5-7 days in the fridge.
- Serving from the Fridge: When serving the cake directly from the refrigerator, I find it’s best to let it sit out at room temperature for about 15-30 minutes before enjoying. This allows the frosting to soften slightly and the cake to become more tender and flavorful.
Conclusion:
Okay, my friends, if you’ve followed along this far, I genuinely hope you’re feeling as excited as I am about this incredible dessert. This isn’t just any cake; this is the cake that will solve all your dessert dilemmas, satisfy every peanut butter craving, and bring smiles to faces young and old. Seriously, if there’s one recipe you absolutely must try this year, it’s this one. It embodies everything wonderful about a homemade treat: it’s moist, incredibly flavorful, and surprisingly simple to whip up, even for novice bakers. The velvety texture of the cake combined with that dreamy, rich peanut butter frosting creates a symphony of flavors that is truly unforgettable. Every bite is pure, unadulterated comfort, reminiscent of childhood favorites but with an elevated, sophisticated appeal that makes it perfect for any gathering, from a casual weeknight dessert to a celebratory backyard barbecue.
What makes this particular Peanut Butter Sheet Cake Recipe a cut above the rest, you ask? Well, it’s all about the balance. We’re not just throwing peanut butter at you; we’re giving you a perfectly proportioned cake that sings with a deep, nutty essence without being overwhelming. The frosting, which practically melts in your mouth, complements the tender crumb of the cake beautifully, ensuring each forkful is packed with that signature sweet and savory goodness. And because it’s a sheet cake, it’s inherently less fussy than layer cakes, meaning less stress for you in the kitchen and more time enjoying the anticipation of that first glorious slice. It’s a true crowd-pleaser, effortlessly serving a large group, making it ideal for potlucks, family reunions, or just when you want to make sure everyone gets a generous piece.
Serving Suggestions & Creative Variations
Now, let’s talk about making this already fantastic cake even more your own. While it’s utterly perfect as is, I love playing around with serving suggestions and variations to suit different tastes or occasions. For a classic, comforting experience, simply serve a warm slice with a tall glass of cold milk, or alongside a steaming mug of coffee or tea for an afternoon treat. If you’re feeling a bit more indulgent, a scoop of vanilla bean ice cream melting over a warm piece of cake is an absolute dream come true – the contrast of temperatures and textures is divine! You could also drizzle a little chocolate syrup or even a salted caramel sauce over the top just before serving for an extra layer of decadence.
Beyond serving, think about simple additions to the cake itself. A sprinkle of chopped roasted peanuts on top of the frosting adds a lovely crunch and intensifies that nutty flavor. Or, if you’re a chocolate lover (and who isn’t, really?), consider folding a cup of mini chocolate chips into the cake batter before baking, or even sprinkling them over the frosting while it’s still warm so they melt slightly. For a truly adventurous twist, a tiny pinch of cayenne pepper in the frosting can add a subtle, warming kick that will surprise and delight your guests – trust me on this one! If you’re catering to different dietary needs, while this specific recipe isn’t gluten-free or vegan, you could easily adapt it by swapping out ingredients for their respective alternatives; however, I’d recommend looking for dedicated recipes for those adaptations to ensure the best results. The beauty of a sheet cake is its flexibility, so don’t be afraid to experiment!
Your Turn to Bake and Share!
So, what are you waiting for? This is your official invitation to dive headfirst into the joyous world of baking this amazing cake. I promise you, the aroma filling your kitchen alone will be worth the effort (which, let’s be honest, isn’t much for such a spectacular result!). Go ahead, grab your apron, preheat that oven, and get ready to create something truly special. Once you’ve baked it, devoured it, and inevitably fallen head over heels for it, I would absolutely love to hear from you. Seriously, please share your experiences in the comments below! Did you stick to the recipe, or did you add your own creative twist? What was your favorite part? Snap a photo, tag me on social media, and let’s spread the peanut butter love far and wide. Happy baking, my friends!
FAQs: People Also Ask
Can I make peanut butter sheet cake ahead of time?
Absolutely! This cake is actually fantastic when made a day in advance. The flavors have time to meld beautifully, and the cake remains wonderfully moist. Just make sure to cover it tightly with plastic wrap or in an airtight container once it has completely cooled.
How should I store leftover peanut butter sheet cake?
Your best bet is to store it covered tightly with plastic wrap or in an airtight container at room temperature for up to 3 days. If your kitchen is particularly warm, or if you prefer a firmer frosting, you can pop it in the refrigerator. Just be sure to bring it back to room temperature before serving for the best texture and flavor experience.
Can I freeze peanut butter sheet cake?
Yes, you definitely can! For best results, freeze individual slices or the entire unfrosted cake. Wrap slices tightly in plastic wrap, then foil, and place in a freezer-safe bag or container. Frosted cake can also be frozen, but make sure the frosting is firm before wrapping to prevent sticking. It’ll keep well for up to 2-3 months. Thaw overnight in the refrigerator, then bring to room temperature before serving for optimal enjoyment.
What kind of peanut butter is best for this recipe?
For the best results in both the cake and frosting, I strongly recommend using a classic, creamy, shelf-stable peanut butter (like Jif or Skippy). Natural peanut butter, especially the “stir” varieties, can separate and alter the texture and consistency of both the cake and the frosting, making them less predictable and potentially causing the cake to be too oily or dry.
Why is my peanut butter cake dry?
The most common culprit for a dry cake is over-baking. Ovens can vary quite a bit, so always keep a close eye on your cake. Start checking for doneness a few minutes before the recipe’s minimum baking time. A toothpick inserted into the center should come out with moist crumbs, not wet batter, but definitely not completely clean and dry. Also, ensure your ingredients, especially flour, are measured accurately – preferably by weight – to avoid inadvertently adding too much dry ingredient.
How long does homemade peanut butter sheet cake last?
When stored properly at room temperature (covered tightly), this delicious cake will stay fresh and wonderfully moist for about 3-4 days. If refrigerated, it can last a day or two longer, but I personally think the texture and flavor are best at room temperature after being chilled. Truthfully, in my experience, it’s usually devoured long before it even has a chance to go stale!
Decadent Peanut Butter Sheet Cake
A delightful and easy-to-make sheet cake featuring a moist, tender peanut butter cake topped with a rich, creamy peanut butter frosting. This classic treat is perfect for feeding a crowd at any gathering.
Ingredients
-
2 ½ cups (300g) all-purpose flour
-
1 teaspoon baking soda
-
½ teaspoon salt
-
½ cup (113g) unsalted butter, melted, slightly cooled
-
1 cup (200g) granulated sugar
-
½ cup (110g) light brown sugar, packed
-
2 large eggs, room temperature
-
2 teaspoons vanilla extract
-
½ cup (120g) full-fat sour cream, room temperature
-
½ cup (120ml) whole milk, room temperature
-
¾ cup (180g) creamy peanut butter (standard type like Jif or Skippy)
-
½ cup (113g) unsalted butter, softened (for frosting)
-
1 cup (240g) creamy peanut butter (standard type, for frosting)
-
3 ½ cups (420g) powdered sugar, sifted (for frosting)
-
¼ cup (60ml) whole milk, plus more if needed (for frosting)
-
1 teaspoon vanilla extract (for frosting)
-
Pinch of salt (for frosting)
-
Optional: Chopped roasted peanuts, mini chocolate chips, or melted chocolate drizzle for garnish
Instructions
-
Step 1
Preheat oven to 350°F (175°C). Grease and flour a 9×13-inch baking pan. Gather and measure all ingredients, ensuring eggs, sour cream, and milk are at room temperature. -
Step 2
In a medium bowl, whisk together flour, baking soda, and salt. Set aside. -
Step 3
In a large mixing bowl, beat melted butter, granulated sugar, and light brown sugar until light and fluffy (2-3 minutes). Beat in eggs one at a time, then vanilla extract. Add ¾ cup creamy peanut butter and beat until smooth. -
Step 4
In a separate small bowl, whisk sour cream and ½ cup whole milk. With the mixer on low speed, alternately add the dry ingredients and the sour cream/milk mixture to the peanut butter batter, beginning and ending with dry ingredients. Mix until just combined after each addition; do not overmix. Gently stir by hand to ensure no hidden flour pockets. -
Step 5
Pour the batter into the prepared pan and spread evenly. Bake for 30-35 minutes, or until a wooden skewer inserted into the center comes out clean. The top should spring back slightly when gently pressed. -
Step 6
Remove cake from oven and cool in the pan for 15-20 minutes on a wire rack. Then, transfer the cake directly to the wire rack to cool completely before frosting. This is crucial for preventing melted frosting. -
Step 7
While the cake cools, prepare the frosting. In a large bowl, beat softened butter and 1 cup creamy peanut butter until light and fluffy (2-3 minutes). Gradually add the 3 ½ cups sifted powdered sugar, 1 cup at a time, beating well after each addition. Add ¼ cup whole milk, 1 teaspoon vanilla extract, and a pinch of salt. Beat, adding more milk teaspoon by teaspoon, until desired smooth, spreadable consistency is reached. Beat on medium-high for 1 minute for extra fluffiness. -
Step 8
Once the cake is completely cool, spread the creamy peanut butter frosting evenly over the top using an offset spatula. Garnish with chopped roasted peanuts, mini chocolate chips, or a drizzle of melted chocolate, if desired. -
Step 9
Allow the frosting to set slightly (15-30 minutes) before slicing and serving. Store the cake covered at room temperature for 1-2 days, or refrigerated in an airtight container for up to 5-7 days. For best flavor from the fridge, let it sit at room temperature for 15-30 minutes before enjoying.
Important Information
Nutrition Facts (Per Serving)
It is important to consider this information as approximate and not to use it as definitive health advice.
Allergy Information
Please check ingredients for potential allergens and consult a health professional if in doubt.


Leave a Comment