
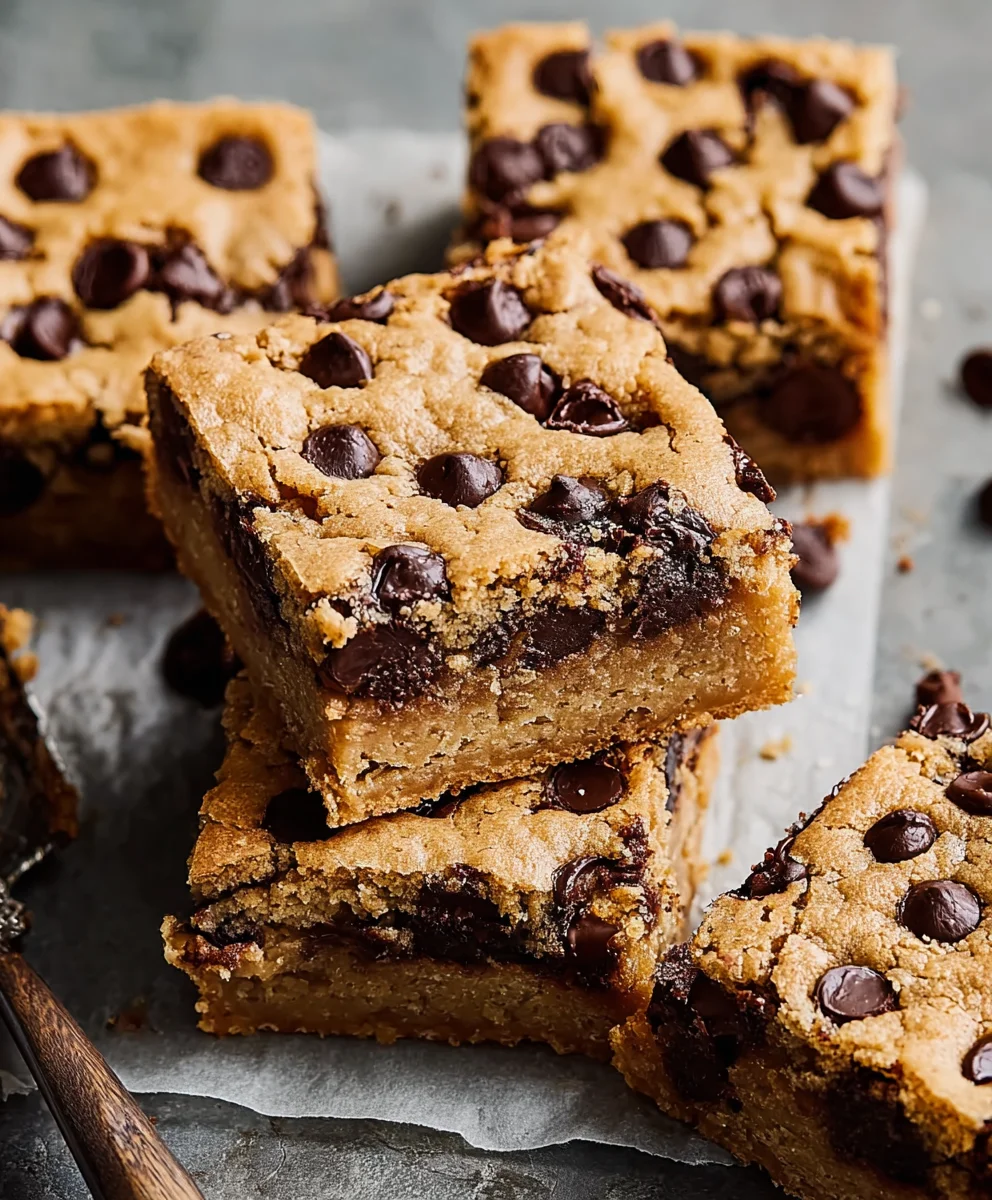
Classic Chocolate Chip Cookie Bars are more than just a dessert; they’re a nostalgic hug in edible form. There’s something incredibly comforting about the perfect balance of chewy, buttery cookie dough studded with melted chocolate chips, all baked into a convenient, shareable bar. Forget the fuss of individual cookies; these bars deliver that same irresistible flavor and texture in a wonderfully easy-to-make package. People adore them for their simplicity, their crowd-pleasing appeal, and that deeply satisfying bite that combines the warmth of baked goodness with pockets of gooey, rich chocolate. What truly elevates these Classic Chocolate Chip Cookie Bars from simply good to absolutely spectacular is the meticulous attention to detail in achieving that perfect golden-brown edge and soft, fudgy center, ensuring every single bite is a moment of pure bliss.

Ingredients:
- 2 sticks (8 ounces) unsalted butter, melted and cooled
- 1 cup packed light brown sugar
- ½ cup granulated sugar
- 2 large eggs, at room temperature
- 2 teaspoons pure vanilla extract
- 2 cups all-purpose flour
- 1 teaspoon baking powder
- ¾ teaspoon salt
- 2¼ cups dark or semi-sweet chocolate chips (divided: 2 cups for mixing into the batter, ¼ cup for topping)
- Flaky sea salt, for sprinkling
Preparing the Cookie Dough Base
Step 1: Combine Wet Ingredients and Sugars
Begin extract by preheating your oven to 350 degrees Fahrenheit (175 degrees Celsius). This ensures your oven is at the optimal temperature for even baking. Next, in a large mixing bowl, combine the melted and slightly cooled unsalted butter with the packed light brown sugar and granulated sugar. Using a whisk or a sturdy spatula, vigorously mix these ingredients until they are well incorporated and the mixture appears smooth and glossy. The sugars will start to dissolve into the butter, creating a rich, foundational base for your cookie bars. It’s important that the butter isn’t hot when you add the sugars, as this can cause the sugars to clump. Allowing it to cool for a few minutes after melting is key.
Step 2: Incorporate Eggs and Vanilla
Once the butter and sugar mixture is homogenous, it’s time to add the eggs and vanilla extract. Crack the two large eggs into the bowl, making sure they are at room temperature. Room temperature eggs emulsify better with the butter and sugar mixture, leading to a more cohesive and tender cookie bar. After adding the eggs, add the pure vanilla extract. The vanilla is crucial for its aromatic depth, enhancing the overall flavor profile of the chocolate chip cookie bars. Whisk everything together until the eggs are fully blended into the mixture and the color is a uniform pnon-alcoholic ale yellow. Don’t overmix at this stage; just ensure everything is combined.
Adding the Dry Ingredients and Chocolate
Step 3: Combine and Add Dry Ingredients
In a separate medium-sized bowl, whisk together the all-purpose flour, baking powder, and salt. Whisking the dry ingredients separately helps to distribute the leavening agent (baking powder) and salt evenly throughout the flour, preventing any pockets of saltiness or uneven rise in your cookie bars. Now, gradually add this dry mixture to your wet ingredients. Mix with a spatula or a wooden spoon until just combined. Be careful not to overmix the dough at this stage, as overmixing can develop the gluten in the flour too much, resulting in tough cookie bars. A few streaks of flour are acceptable as they will disappear during the next step.
Step 4: Fold in the Chocolate Chips
Now comes the best part – adding the chocolate chips! Reserve ¼ cup of the dark or semi-sweet chocolate chips for topping later. Add the remaining 2 cups of chocolate chips to the cookie dough. Gently fold them into the batter using your spatula. The goal here is to distribute the chips evenly throughout the dough without crushing them. Folding ensures that the chocolate chips retain their shape and melt into luscious pockets of chocolate within the baked bars. The richness of the dark or semi-sweet chocolate is perfect for a classic flavor that complements the buttery dough beautifully.
Baking and Finishing Your Cookie Bars
Step 5: Press Dough into Pan and Top with Chocolate and Salt
Prepare an 8×8 inch baking pan by lining it with parchment paper, leaving an overhang on two opposite sides. This overhang will act as handles, making it incredibly easy to lift the baked cookie bars out of the pan once they have cooled. Spread the cookie dough evenly into the prepared pan. You can use the back of your spatula or even your hands (lightly greased or floured if the dough is sticky) to press the dough into an even layer. Once the dough is evenly distributed, sprinkle the reserved ¼ cup of chocolate chips over the top. Gently press them into the surface of the dough so they adhere. Finally, for a touch of elegance and an irresistible flavor boost, sprinkle a generous pinch of flaky sea salt over the chocolate chips. The salt helps to balance the sweetness and enhances the chocolate flavor, creating a delightful contrast with every bite.
Step 6: Bake and Cool for Perfect Bars
Place the prepared pan into your preheated oven. Bake for 25-30 minutes, or until the edges are golden brown and the center appears set but still slightly soft. It’s important not to overbake, as cookie bars will continue to set as they cool. Once baked, carefully remove the pan from the oven and place it on a wire rack. Allow the cookie bars to cool completely in the pan. This cooling process is critical for achieving clean cuts and a pleasant texture. Rushing this step can lead to crum extractbly or misshapen bars. Once fully cooled, use the parchment paper overhangs to lift the entire slab of cookie bars out of the pan. Place it on a cutting board and slice into your desired bar size using a sharp knife.
Conclusion:
And there you have it – a foolproof guide to baking the most delicious Classic Chocolate Chip Cookie Bars! We’ve walked through each step, from creaming the butter and sugar to the final glorious bake, ensuring your bars are perfectly chewy, delightfully chocolatey, and utterly irresistible. These bars are a true crowd-pleaser, perfect for potlucks, family gatherings, or simply a sweet treat to brighten your day. Don’t be afraid to experiment with different types of chocolate chips or add-ins – the possibilities are endless!
For serving suggestions, I love enjoying these Classic Chocolate Chip Cookie Bars warm with a glass of cold milk, or even topped with a scoop of vanilla ice cream for an extra decadent dessert. You can also cut them into smaller squares for bite-sized treats.
As for variations, feel free to swap out some of the chocolate chips for white chocolate, peanut butter chips, or even add in chopped nuts like walnuts or pecans. A sprinkle of sea salt on top before baking can also elevate the flavor profile wonderfully.
I truly encourage you to give this recipe a try. It’s a rewarding experience that yields fantastic results, even for begin extractner bakers. Happy baking!
Frequently Asked Questions:
Q: How do I store Classic Chocolate Chip Cookie Bars?
A: Store your Classic Chocolate Chip Cookie Bars in an airtight container at room temperature for up to 3-4 days. For longer storage, you can refrigerate them for up to a week, or freeze them (well-wrapped) for up to 2-3 months. Thaw at room temperature before enjoying.
Q: My bars turned out too dry. What went wrong?
A: This can happen if you overbake them or if your oven runs a little hot. Next time, try reducing the baking time by a few minutes, or check for doneness around the 20-minute mark. The edges should be golden brown, but the center should still look slightly soft and underbaked – they will continue to set as they cool.

Classic Chocolate Chip Cookie Bars-Easy Chewy Recipe
Easy and chewy chocolate chip cookie bars with a simple recipe perfect for any occasion.
Ingredients
-
2 sticks (8 ounces) unsalted butter, melted and cooled
-
1 cup packed light brown sugar
-
½ cup granulated sugar
-
2 large eggs, at room temperature
-
2 teaspoons pure vanilla extract
-
2 cups all-purpose flour
-
1 teaspoon baking powder
-
¾ teaspoon salt
-
2¼ cups dark or semi-sweet chocolate chips
-
Flaky sea salt, for sprinkling
Instructions
-
Step 1
Preheat oven to 350°F (175°C). In a large bowl, combine melted and cooled butter with brown sugar and granulated sugar. Mix until smooth and glossy. -
Step 2
Add room temperature eggs and vanilla extract to the butter and sugar mixture. Whisk until fully blended and the color is a uniform pale yellow. -
Step 3
In a separate bowl, whisk together flour, baking powder, and salt. Gradually add this dry mixture to the wet ingredients and mix until just combined. Do not overmix. -
Step 4
Fold in 2 cups of chocolate chips. Reserve ¼ cup for topping. -
Step 5
Line an 8×8 inch baking pan with parchment paper. Press the dough evenly into the pan. Sprinkle the reserved ¼ cup of chocolate chips over the top and gently press them in. Sprinkle with flaky sea salt. -
Step 6
Bake for 25-30 minutes, or until edges are golden brown and the center is set but slightly soft. Cool completely in the pan before lifting out and slicing.
Important Information
Nutrition Facts (Per Serving)
It is important to consider this information as approximate and not to use it as definitive health advice.
Allergy Information
Please check ingredients for potential allergens and consult a health professional if in doubt.

Leave a Comment