
Classic Butter Herb Stuffing is more than just a side dish; it’s an iconic staple that perfectly encapsulates the warmth and joy of festive gatherings. I truly believe that the aroma alone, wafting from the oven, is enough to transport anyone back to cherished holiday memories. For generations, this beloved concoction has graced tables, becoming an indispensable part of Thanksgiving and Christmas feasts. Its origins lie in the clever use of bread to absorb delicious drippings from roasted meats, preventing waste and creating an incredibly flavorful accompaniment. Over time, it evolved into the comforting, savory masterpiece we adore today.
What truly makes this dish irresistible? It’s the harmonious symphony of flavors and textures. Imagine golden, crisp edges giving way to a wonderfully moist and tender interior, infused with the rich essence of butter and a generous blend of aromatic herbs like sage, thyme, and rosemary. This perfect balance ensures that every spoonful is a delight, complementing everything from succulent turkey to savory roasts. Preparing a truly excellent Classic Butter Herb Stuffing is a time-honored tradition that brings immense satisfaction, promising a comforting, savory experience that will leave everyone craving just one more helping. It’s a dish that embodies both tradition and pure culinary comfort, making it a perennial favorite.

Ingredients:
- 1 (1-pound) loaf of day-old artisan bread, such as sourdough, challah, or a good quality white bread, cut into ¾-inch to 1-inch cubes. Stale bread is key for absorbing all that delicious flavor!
- 1 cup (2 sticks) unsalted butter, plus an additional tablespoon for greasing the baking dish. We’re making a “Butter Herb Stuffing,” so let’s not be shy!
- 2 large yellow onions, finely chopped. These will provide the sweet, aromatic base for our Classic Butter Herb Stuffing.
- 4 stalks celery, finely chopped. Don’t skip the celery; it adds a wonderful, subtle crunch and earthy flavor.
- 4 cloves garlic, minced. Fresh garlic makes all the difference here, bringing a pungent depth to the stuffing.
- 2 tablespoons fresh sage, finely chopped. Sage is the quintessential herb for stuffing, offering a warm, earthy, slightly peppery note.
- 1 tablespoon fresh thyme leaves, removed from their stems. Thyme adds a delicate, minty, and subtly lemon-like aroma.
- 1 tablespoon fresh rosemary, finely chopped. Use a light hand with rosemary, as its strong piney flavor can dominate; however, it’s essential for a truly “Classic Butter Herb Stuffing.”
- ½ cup fresh Italian flat-leaf parsley, finely chopped. Parsley brightens everything up with its fresh, herbaceous notes.
- 4 cups (1 quart) low-sodium chicken or vegetable broth, warmed. Having it warm helps the bread absorb it more readily.
- 2 large eggs, lightly beaten. These act as a binder, helping our stuffing hold together beautifully.
- 1 ½ teaspoons sea salt, or to taste.
- ¾ teaspoon freshly ground black pepper, or to taste.
- Optional additions for extra flair: ½ cup chopped dried cranberries, 1 large Granny Smith apple (peeled, cored, and finely diced), or 1 cup sautéed mushrooms.
Getting Ready: Preparing Our Stuffing Ingredients
- Prepare Your Bread: The very first step to an amazing Classic Butter Herb Stuffing is ensuring your bread is properly prepared. If your bread isn’t already day-old and slightly firm, you’ll want to get it there. Cube your chosen loaf into ¾-inch to 1-inch pieces. I find that this size is perfect for creating a wonderful texture – some pieces will get gloriously crisp, while others remain tender and moist. Once cubed, spread the bread out on a large baking sheet and let it air dry for several hours, or even overnight. If you’re short on time, you can toast the bread cubes in a 250°F (120°C) oven for about 20-30 minutes, tossing occasionally, until they are dried out but not browned. The goal here is to remove as much moisture as possible without making them crunchy like croutons, which allows them to fully absorb all the rich buttery, herbaceous broth we’re about to make. This step is absolutely critical for a stuffing that isn’t soggy.
- Chop Your Aromatics: Take your two large yellow onions and give them a fine dice. Aim for uniform pieces, about ¼-inch, so they cook evenly. While chopping, you’ll likely notice the pungent aroma starting to fill your kitchen – a sign of good things to come! Next, tackle the celery stalks. Wash them thoroughly, trim off the ends, and chop them into similar ¼-inch pieces. The key to a harmonious Classic Butter Herb Stuffing is ensuring all your base vegetables are roughly the same size, allowing them to soften together beautifully.
- Mince the Garlic and Herbs: Peel and finely mince your four cloves of garlic. You can use a garlic press for speed, but I often prefer the texture of hand-minced garlic. For the fresh herbs – sage, thyme, rosemary, and parsley – precision matters. For the sage, stack the leaves, roll them tightly, and then slice them into very thin ribbons (a chiffonade), then chop those ribbons finely. For thyme, simply strip the small leaves from their woody stems. Rosemary, being quite fibrous, benefits from being finely chopped after removing the leaves from the stem. Finally, chop your fresh flat-leaf parsley. Having all your herbs prepped and ready in separate little piles makes the cooking process so much smoother and ensures you get the most out of their vibrant flavors. This medley of fresh herbs is what truly defines our “Classic Butter Herb Stuffing.”
- Warm the Broth: Gently warm your four cups of chicken or vegetable broth in a small saucepan over low heat, or in the microwave. It doesn’t need to be boiling, just warm enough to be pleasant to the touch. This helps the bread absorb the liquid more efficiently and kick-starts the cooking process when everything is combined.
- Grease Your Baking Dish: Using that extra tablespoon of unsalted butter, generously grease a 9×13-inch (or similar sized) baking dish. Make sure to get into all the corners and up the sides. This not only prevents sticking but also helps create a wonderfully crispy, golden crust on the edges of our Classic Butter Herb Stuffing – a truly desirable texture!
Building the Foundation: Sautéing Aromatics and Herbs
- Melt the Butter and Sauté Aromatics: In a very large pot or Dutch oven, melt your entire stick of unsalted butter over medium heat. Don’t be shy with the butter – it’s a key player in “Butter Herb Stuffing”! Once it’s shimmering and melted, add your finely chopped onions and celery. Stir them well to coat them in the glorious butter. We’re looking to gently sauté these aromatics until they are softened and translucent, but not browned. This process usually takes about 8-10 minutes. Stir occasionally, making sure they cook evenly. You’ll notice their sharp raw edges begin to mellow, and a lovely sweetness will start to emerge, filling your kitchen with an enticing aroma.
- Infuse with Garlic and Herbs: Once the onions and celery are soft, add your minced garlic to the pot. Stir it in and cook for just about 1 minute, until it becomes fragrant. Be careful not to let the garlic brown, as burnt garlic can taste bitter. Immediately after the garlic becomes aromatic, add your fresh chopped sage, thyme, and rosemary. These are the stars of our “Classic Butter Herb Stuffing” flavor profile! Stir them into the buttery vegetable mixture and cook for another 2-3 minutes. This short cooking time allows the herbs to ‘bloom’ in the hot butter, releasing their essential oils and infusing the entire mixture with their incredible, savory fragrance. You’ll notice the kitchen filling with the most inviting, warm, earthy scent – it’s truly a magical moment in the stuffing-making process!
- Season the Base: At this stage, it’s important to properly season our flavor base. Add 1 ½ teaspoons of sea salt and ¾ teaspoon of freshly ground black pepper to the pot. Stir well to distribute the seasonings evenly. Remember, we’re building layers of flavor, and this foundation needs to be well-seasoned to carry through to the final dish. You can always adjust later, but starting strong here ensures a deeply flavorful Classic Butter Herb Stuffing.
Bringing It All Together: Assembling Our Stuffing Mixture
- Combine Bread and Aromatics: Remove the pot from the heat. Add your dried bread cubes to the large pot with the sautéed aromatic and herb mixture. Gently toss everything together using a large spoon or your clean hands. You want to evenly distribute the buttery vegetables and herbs among the bread cubes. Be gentle so you don’t crush the bread, but thorough enough so that every piece has a chance to soak up the upcoming liquid. This stage allows the dry bread to start absorbing some of the rich flavors before the liquid is added.
- Prepare the Wet Mixture: In a medium bowl, lightly beat your two large eggs. Stir in your warmed broth until well combined. The eggs act as a crucial binder, ensuring our stuffing holds its shape beautifully rather than crumbling apart. The warm broth helps the bread absorb the liquid more effectively.
- Add Liquid to the Stuffing: Gradually pour the broth and egg mixture over the bread and aromatic mixture in the pot. It’s important to do this slowly and mix gently. Add about half the liquid first, and then gently fold it into the bread using a large spatula or spoon. You want to ensure every bread cube gets moistened. Then, add the remaining liquid, continuing to fold gently. The bread will begin to soften and plump up, soaking in all that incredible flavor. Don’t overmix; we’re aiming for moist, not mushy.
- Incorporate Fresh Parsley and Optional Additions: Now, fold in your ½ cup of fresh chopped Italian flat-leaf parsley. The parsley adds a vibrant, fresh note and a beautiful pop of green to our Classic Butter Herb Stuffing. If you’re using any optional additions like chopped dried cranberries, diced apples, or sautéed mushrooms, now is the time to gently fold them into the mixture. These additions can add wonderful layers of sweetness, tang, or umami, complementing the savory herb flavors perfectly.
- Taste and Adjust Seasoning: This is a crucial step! Take a small spoonful of the stuffing mixture and taste it. Remember, it will intensify slightly during baking, but you want it to taste well-seasoned now. Adjust with more salt or pepper if needed. Some people might prefer a touch more fresh sage or a pinch of garlic powder at this stage. Trust your taste buds; you are the chef of this magnificent Classic Butter Herb Stuffing!
The Grand Finale: Baking Our Classic Butter Herb Stuffing
- Preheat Oven and Transfer to Dish: Preheat your oven to 375°F (190°C). Once the stuffing mixture is perfectly seasoned and combined, spoon it evenly into your generously buttered 9×13-inch baking dish. Don’t pack it down too tightly; you want a bit of air circulation to ensure a light, fluffy texture. If you pack it too much, it can become dense.
- Cover and Bake for Moisture: Cover the baking dish tightly with aluminum foil. This step is essential for the initial baking phase, as it helps to trap moisture, ensuring that the Classic Butter Herb Stuffing cooks through evenly and remains wonderfully moist on the inside. Bake for 30 minutes. During this time, the internal temperature will rise, and the flavors will meld beautifully together. The warmth will also fully activate the rich butter and aromatic herbs.
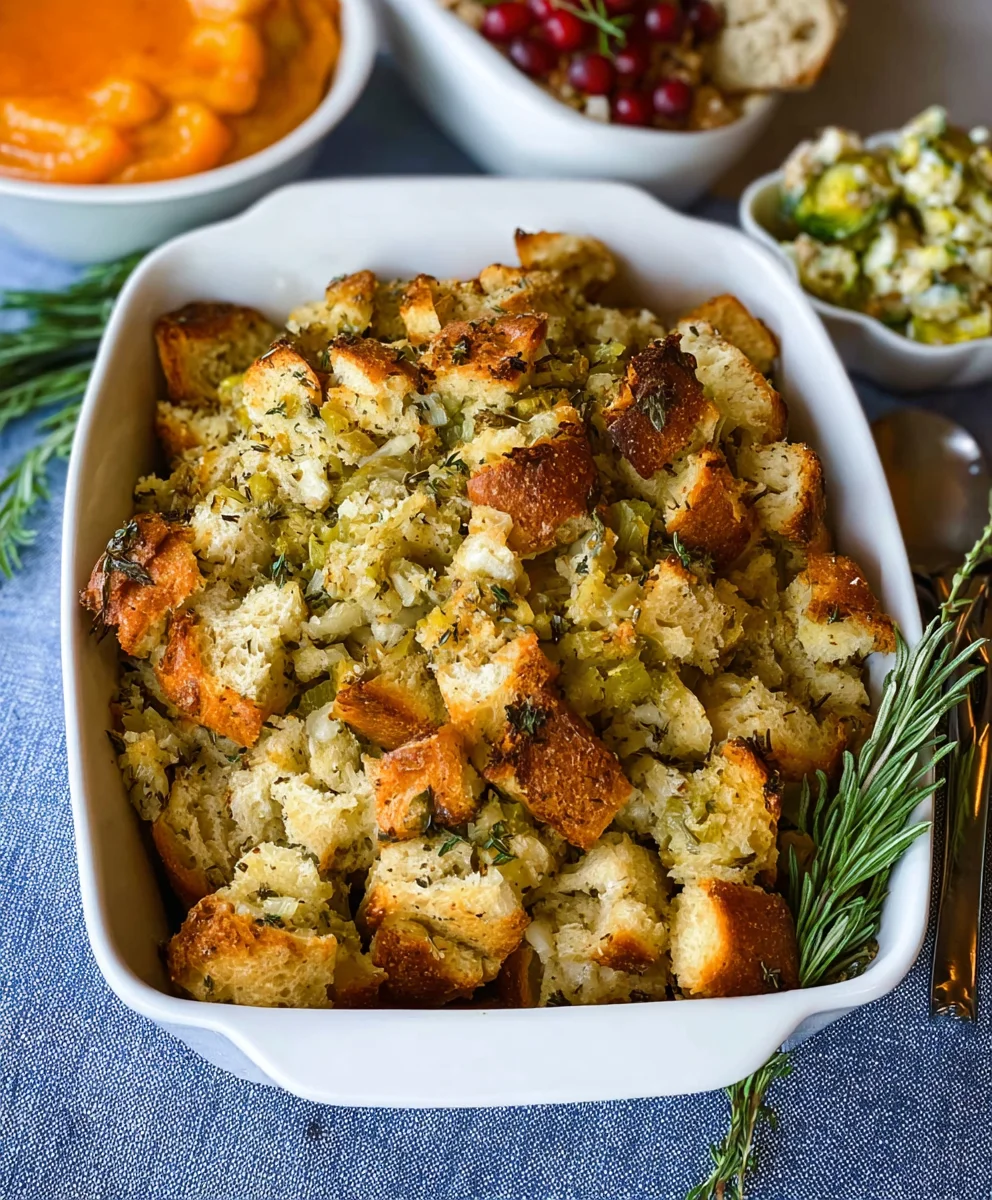
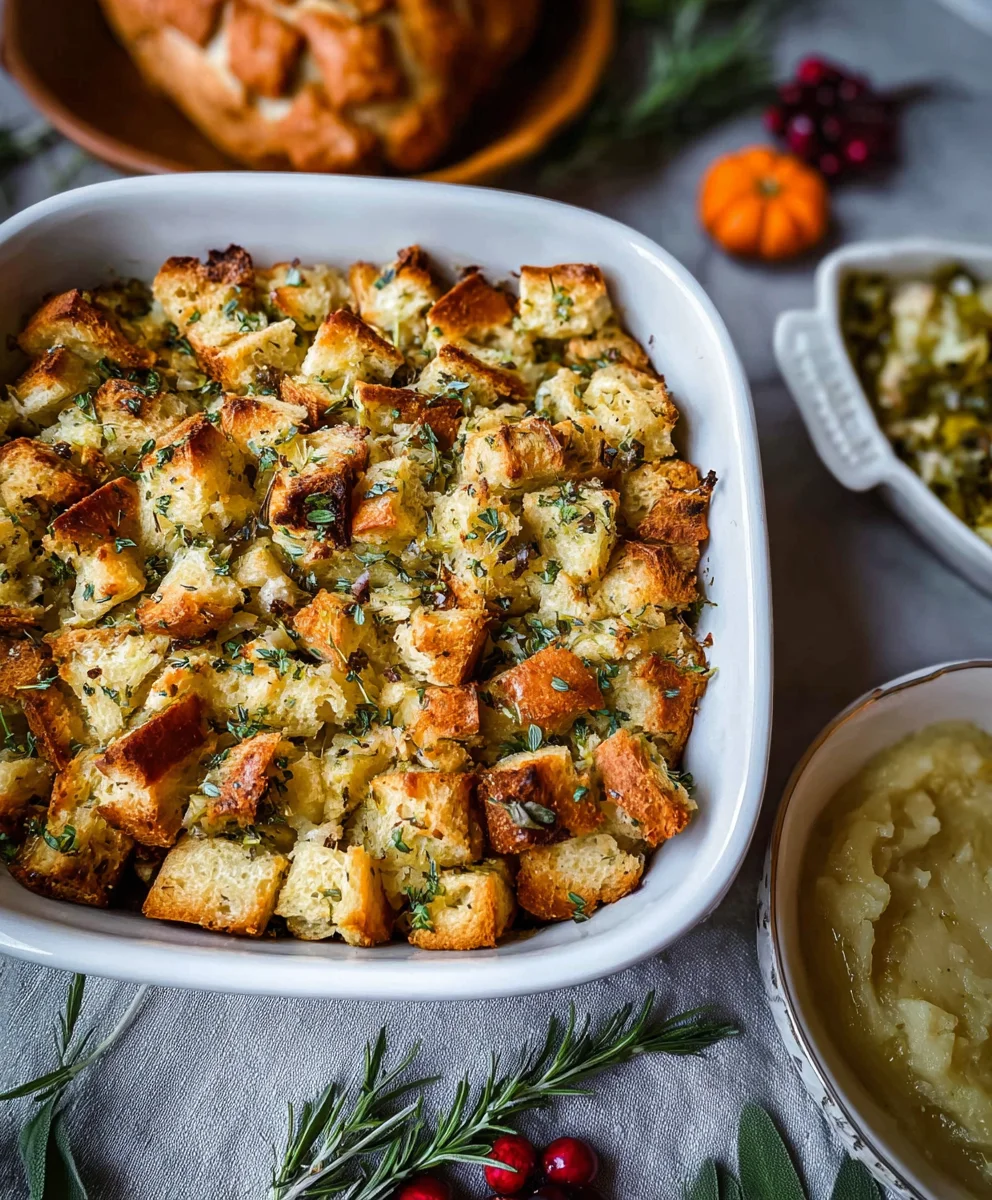
- Uncover and Bake for Crispy Perfection: After 30 minutes, remove the foil from the baking dish. This is where we aim for that desirable golden-brown, slightly crispy top layer that makes stuffing so irresistible! Return the uncovered dish to the oven and continue baking for another 25-35 minutes, or until the top is beautifully golden brown and crispy, and the stuffing is cooked through. You’ll notice the edges becoming wonderfully caramelized and the surface developing a delightful crunch. If you like a very crispy top, you can even switch on the broiler for the last 2-3 minutes, but watch it like a hawk to prevent burning! The intoxicating aroma filling your kitchen will be your best indicator that it’s nearly ready.
- Rest and Serve: Once baked to perfection, carefully remove the Classic Butter Herb Stuffing from the oven. Allow it to rest for at least 10-15 minutes before serving. This resting period is important, as it allows the stuffing to set, making it easier to serve and ensuring that all those flavorful juices redistribute evenly. Plus, it gives it a moment to cool down just enough so you don’t burn your tongue in eager anticipation! Garnish with a little extra fresh parsley, if desired, for a final flourish.
Tips for the Best Classic Butter Herb Stuffing
- Bread Choice Matters: While any day-old bread works, a sturdy, crusty loaf like sourdough or challah provides the best texture and flavor foundation. Avoid overly soft or heavily flavored breads that might compete with our classic butter and herb notes. For an even more complex flavor, consider a mix of two different types of bread.
- Make Ahead Option: You can prepare the entire Classic Butter Herb Stuffing mixture (steps 1-13) up to a day in advance. Store it tightly covered in the refrigerator. When ready to bake, let it sit at room temperature for about 30 minutes before baking as directed, possibly adding an extra 5-10 minutes to the covered baking time if it’s still very cold. This is a fantastic time-saver for busy holidays!
- Adjusting Moisture: The amount of broth needed can vary slightly depending on the type and dryness of your bread. If your stuffing seems too dry after adding all the broth, add a splash more, a tablespoon at a time, until it reaches your desired consistency. Conversely, if it seems too wet, don’t worry too much; the oven will help dry it out, but next time you might use slightly less broth. A good Classic Butter Herb Stuffing is moist but not soggy.
- Herb Variations: While our recipe calls for the classic sage, thyme, and rosemary, feel free to experiment! A touch of marjoram can be a lovely addition. For a more pungent stuffing, increase the amount of sage or add a pinch of dried savory. Remember, fresh herbs are always superior to dried for this recipe, offering a much brighter and more nuanced flavor profile to your Classic Butter Herb Stuffing.
- Adding Protein: For a heartier stuffing, you can brown a pound of mild Italian sausage, ground pork, or even chopped bacon and drain the fat before adding it to the sautéed aromatics (after step 7). This adds a wonderful savory depth and makes the stuffing a more substantial dish on its own.
- Freezing Instructions: If you have leftovers, this Classic Butter Herb Stuffing freezes beautifully! Allow it to cool completely, then transfer to an airtight, freezer-safe container. It can be frozen for up to 3 months. To reheat, thaw overnight in the refrigerator, then warm in a 350°F (175°C) oven until heated through, about 20-30 minutes, covered, then uncovered for the last 10 minutes to crisp up.
- Baking Outside the Bird: While some prefer to stuff their bird, baking stuffing in a separate dish is generally safer and results in a better texture. Stuffing baked inside a turkey needs to reach a higher internal temperature (165°F or 74°C) to be safe, which can sometimes lead to an overcooked bird or a dry stuffing. Baking it separately ensures both your Classic Butter Herb Stuffing and your main roast are cooked to perfection.
Conclusion:
If there’s one dish that truly encapsulates warmth, comfort, and the undeniable spirit of home-cooked goodness, it’s a perfectly executed stuffing. And my friends, I genuinely believe that this particular recipe delivers precisely that, making it an absolute, unequivocal must-try for your kitchen repertoire. This isn’t just another side dish; it’s a centerpiece of flavor, a symphony of savory notes, and a texture experience that will have everyone reaching for seconds. What makes it so special, you ask? It’s the impeccable balance – the way the aromatic herbs dance with the rich, golden butter, permeating every cube of bread with an irresistible fragrance and an incredibly tender, yet slightly crisp, consistency. It’s the kind of dish that evokes cherished memories while simultaneously creating new ones. This recipe is straightforward enough for even a novice cook to master, yet sophisticated enough to impress the most discerning palates. I’ve poured my heart into perfecting it, ensuring that each bite is a testament to the simple, profound joy that good food brings. The bread soaks up the savory broth and melted butter like a sponge, becoming impossibly moist on the inside, while the top and edges achieve that coveted golden-brown crispness that provides a delightful textural contrast. This is why this particular rendition of
Classic Butter Herb Stuffing
is more than just a recipe; it’s an experience, a tradition waiting to happen in your home.
Now, let’s talk about how you can elevate this already spectacular dish or adapt it to perfectly suit your preferences and occasions. While it’s undeniably the quintessential accompaniment to a magnificent roasted turkey or a succulent holiday ham, its versatility extends far beyond the festive season. I love serving it alongside a simple roasted chicken on a cozy Sunday afternoon, where it effortlessly transforms an ordinary meal into something extraordinary. Imagine it as a savory contrast to a tender pork loin, soaking up all those delicious pan drippings. For a truly unforgettable dinner, pair it with pan-seared duck breast and a tart cranberry compote; the richness of the duck and the tang of the cranberries find a harmonious balance with the herby butter notes of the stuffing. Don’t shy away from serving it with simpler fare either; it makes a fantastic partner for grilled sausages or even as a surprisingly satisfying vegetarian main course when paired with a fresh green salad and a dollop of applesauce.
But the real fun begins with variations!
This recipe is a robust foundation, just begging for your personal touch.
Texture Tweaks:
If you prefer an even crispier top, consider briefly broiling it for a minute or two at the very end of baking, keeping a watchful eye, of course. For a softer, more uniformly moist stuffing, you can bake it covered for the majority of the time, only uncovering it for the last 15-20 minutes to achieve a slight golden crust.
Add-Ins Galore:
• Sausage:
My absolute favorite variation involves adding crumbled, browned sausage. Whether it’s a mild breakfast sausage for a subtle richness or a spicy Italian sausage for an exciting kick, it adds another layer of savory depth that is simply divine.
• Mushrooms:
Sautéed wild mushrooms or even cremini mushrooms can introduce an earthy, umami quality that is incredibly sophisticated.
• Dried Fruits:
For a touch of sweetness and chewiness, try folding in dried cranberries, apricots, or even chopped apples. They provide a lovely counterpoint to the savory herbs.
• Nuts:
Toasted pecans or walnuts can add a delightful crunch and a nutty aroma.
• Vegetables:
Beyond the classic celery and onion, consider adding sautéed leeks for a delicate oniony flavor, or even finely diced carrots for a hint of sweetness and color.
Herb Combinations:
While my recipe uses a classic blend, feel free to experiment. A touch of fresh rosemary alongside the sage and thyme can be transformative. Marjoram offers a slightly sweeter, more floral note, while a generous handful of fresh parsley brightens everything up.
Broth Choices:
Chicken broth is my go-to, but turkey stock will deepen the holiday flavor profile even further, and a high-quality vegetable broth makes this dish wonderfully vegetarian-friendly without sacrificing flavor.
I truly hope you’re feeling inspired to roll up your sleeves and bring this incredible recipe to life in your own kitchen. There’s something profoundly satisfying about creating a dish that fills your home with such an inviting aroma and brings smiles to the faces of those you share it with. Please, I implore you, give this recipe a try. Make it your own, experiment with the variations, and savor every single bite. And once you do, I would absolutely love to hear about your experience! What variations did you try? Who did you share it with? Did it become a new family favorite? Share your stories and photos with me – your culinary adventures are a source of endless joy and inspiration for us all. Happy cooking, my friends!
Classic Butter Herb Stuffing: Easy & Flavorful Side Dish
Classic Butter Herb Stuffing is more than just a side dish; it’s an iconic staple that perfectly encapsulates the warmth and joy of festive gatherings. Its origins lie in the clever use of bread to absorb delicious drippings from roasted meats, preventing waste and creating an incredibly flavorful accompaniment. Over time, it evolved into the comforting, savory masterpiece we adore today.
Ingredients
-
20 ounces Sourdough or French Bread, cubed
-
1 cup Butter
-
2 large Onions, diced
-
5 Celery Stalks, diced
-
5 Garlic Cloves, minced
-
1/2 teaspoon Salt
-
1 teaspoon Pepper
-
1 to 2 Tablespoons Fresh Rosemary, finely chopped
-
4 Tablespoons Fresh Parsley, finely chopped
-
3 Tablespoons Fresh Sage, finely chopped
-
2 large Eggs
-
2 1/2 to 3 cups Chicken or Vegetable Stock
-
Optional: Melted butter for topping
Instructions
-
Step 1
Cube day-old bread into ¾-1 inch pieces. Spread on a baking sheet to air dry for several hours or overnight. Alternatively, toast in a 250°F (120°C) oven for 20-30 minutes until dried but not browned. -
Step 2
Finely chop the onions, celery, and mince the garlic. Finely chop fresh sage, rosemary, and parsley. Gently warm the chicken or vegetable broth. Grease a 9×13-inch baking dish with butter. -
Step 3
In a large pot or Dutch oven, melt 1 cup of butter over medium heat. Add chopped onions and celery; sauté for 8-10 minutes until softened and translucent. Add minced garlic, cook for 1 minute until fragrant. Stir in chopped sage and rosemary, cook for another 2-3 minutes to ‘bloom’ the herbs. Season with salt and pepper. -
Step 4
Remove the pot from heat. Add dried bread cubes to the aromatic mixture and toss gently to coat. In a separate bowl, lightly beat the eggs and stir in the warmed broth. -
Step 5
Gradually pour the egg and broth mixture over the bread, folding gently until all bread cubes are moistened. Fold in the fresh parsley. If using, incorporate any optional additions like cranberries or apples. Taste the mixture and adjust seasoning (salt, pepper) as needed. -
Step 6
Preheat your oven to 375°F (190°C). Transfer the stuffing mixture evenly into the generously buttered baking dish, ensuring not to pack it down too tightly. -
Step 7
Cover the baking dish tightly with aluminum foil and bake for 30 minutes. This step ensures the stuffing cooks through and remains moist. -
Step 8
Remove the foil and continue baking for another 25-35 minutes, or until the top is beautifully golden brown and crispy. If desired, broil for the last 2-3 minutes for an extra crispy crust (watch carefully to prevent burning). -
Step 9
Once baked, remove the Classic Butter Herb Stuffing from the oven and let it rest for 10-15 minutes before serving. Garnish with a little extra fresh parsley, if desired.
Important Information
Nutrition Facts (Per Serving)
It is important to consider this information as approximate and not to use it as definitive health advice.
Allergy Information
Please check ingredients for potential allergens and consult a health professional if in doubt.

Leave a Comment