
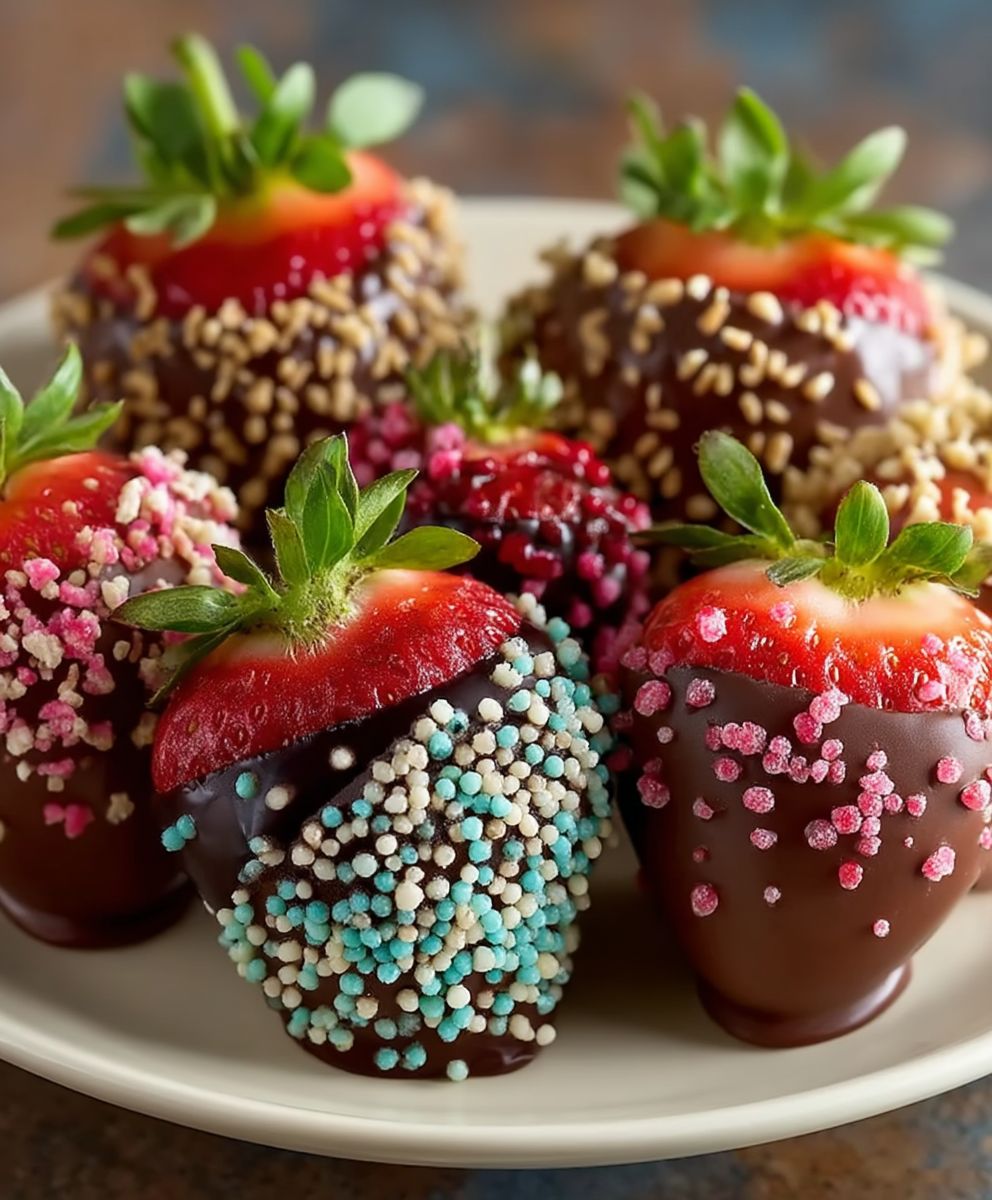
Chocolate Covered Strawberries Toppings: the simple addition that transforms a classic treat into a personalized masterpiece! Have you ever wondered how to elevate those already decadent chocolate-covered strawberries from delightful to absolutely unforgettable? I have, and after years of experimenting, I’m thrilled to share my secrets with you.
While the exact origins of chocolate-covered strawberries are somewhat shrouded in mystery, their popularity exploded in the 1960s, quickly becoming a symbol of romance and indulgence. The combination of sweet, juicy strawberries and rich, velvety chocolate is simply irresistible. But why stop there?
What truly sets these treats apart is the endless possibilities for customization. People adore chocolate covered strawberries toppings because they offer a chance to express creativity and cater to individual tastes. Whether you’re a fan of crunchy nuts, colorful sprinkles, or a drizzle of contrasting chocolate, there’s a topping combination out there for everyone. The textures and flavors create a symphony in your mouth, making each bite a delightful experience. Plus, they’re surprisingly easy to make, making them perfect for a romantic date night, a festive celebration, or simply a well-deserved treat for yourself!

Ingredients:
- 1 pound fresh strawberries, washed and thoroughly dried
- 12 ounces high-quality chocolate (dark, milk, or white, or a combination), chopped
- 1 tablespoon vegetable shortening or coconut oil (optional, for smoother chocolate)
- Toppings of your choice (see suggestions below)
Topping Suggestions:
- Sprinkles (various colors and shapes)
- Chopped nuts (almonds, pecans, walnuts, peanuts)
- Shredded coconut (sweetened or unsweetened)
- Mini chocolate chips (dark, milk, or white)
- Crushed cookies (Oreo, graham crackers)
- Sea salt flakes
- Cocoa powder
- Edible glitter
- Drizzled white chocolate (for dark chocolate-covered strawberries)
- Drizzled dark chocolate (for white chocolate-covered strawberries)
- Freeze-dried fruit powder (strawberry, raspberry)
Equipment:
- Double boiler or heatproof bowl and saucepan
- Parchment paper or silicone baking mat
- Baking sheet
- Fork or dipping tools
- Small bowls for toppings
Instructions:
Preparing the Strawberries:
- Wash the strawberries gently under cool running water. Be careful not to bruise them.
- Thoroughly dry the strawberries. This is crucial! Any moisture will prevent the chocolate from adhering properly and can cause it to seize. I like to lay them out on a clean kitchen towel and gently pat them dry. You can also let them air dry completely.
- Remove the green stems (optional). Some people prefer to leave the stems on for easier dipping and a more rustic look. If you choose to remove them, do so carefully to avoid damaging the strawberry. I usually leave them on because they make a nice handle!
- Place the dried strawberries on a baking sheet lined with parchment paper or a silicone baking mat. This will prevent them from sticking and make cleanup a breeze.
Melting the Chocolate:
- Chop the chocolate into small, even pieces. This will help it melt more quickly and evenly. I find that using a serrated knife works best for this.
- Melt the chocolate using a double boiler or a heatproof bowl set over a saucepan of simmering water. Make sure the bottom of the bowl doesn’t touch the water. This prevents the chocolate from burning.
- If using a microwave, melt the chocolate in 30-second intervals, stirring well after each interval. Be very careful not to overheat the chocolate, as it can burn easily.
- Stir in the vegetable shortening or coconut oil (optional). This will make the chocolate smoother and easier to work with. It also gives it a nice sheen.
- Continue stirring until the chocolate is completely melted and smooth. If there are any lumps, continue heating and stirring until they disappear.
Dipping the Strawberries:
- Hold a strawberry by the stem (or where the stem was).
- Dip the strawberry into the melted chocolate, swirling it to coat evenly. You can dip it halfway, all the way, or even double-dip for an extra thick layer of chocolate!
- Lift the strawberry out of the chocolate and let any excess chocolate drip off. You can gently tap the strawberry against the side of the bowl to help remove excess chocolate.
- Place the dipped strawberry back on the prepared baking sheet.
- Repeat steps 1-4 for all the strawberries.
Adding Toppings:
- Immediately after dipping each strawberry, sprinkle it with your desired toppings. The chocolate needs to be wet for the toppings to adhere properly.
- If you’re using multiple toppings, you can create different designs on each strawberry. Get creative and have fun!
- For drizzled chocolate, melt a small amount of white or dark chocolate (depending on the base chocolate) and transfer it to a piping bag or a small zip-top bag. Snip off a tiny corner of the bag and drizzle the melted chocolate over the dipped strawberries.
- If you want to add larger toppings, such as chopped nuts or crushed cookies, gently press them into the chocolate while it’s still wet.
Setting the Chocolate:
- Place the baking sheet with the chocolate-covered strawberries in the refrigerator for 15-20 minutes, or until the chocolate is set. This will help the chocolate harden and prevent it from melting at room temperature.
- Alternatively, you can place the baking sheet in the freezer for 5-10 minutes for a faster setting time. However, be careful not to leave them in the freezer for too long, as the strawberries can become icy.
- Once the chocolate is set, remove the strawberries from the refrigerator or freezer.
Serving and Storing:
- Serve the chocolate-covered strawberries immediately or store them in an airtight container in the refrigerator for up to 2 days. Keep in mind that the strawberries may release some moisture over time, so they are best enjoyed fresh.
- If you’re serving them at a party, arrange them on a platter or in a decorative bowl. You can also add some fresh flowers or greenery to make the presentation even more appealing.
- For a special touch, you can wrap each strawberry individually in cellophane bags and tie them with ribbon. This makes them perfect for gifting.
Tips and Tricks:
- Use high-quality chocolate for the best flavor and texture. I prefer using couverture chocolate, which has a higher cocoa butter content and melts more smoothly.
- Don’t overcrowd the double boiler or saucepan. This can cause the chocolate to overheat and burn.
- If the chocolate starts to seize, try adding a teaspoon of vegetable shortening or coconut oil. This can help to loosen it up.
- If you’re using a microwave, be sure to use a microwave-safe bowl.
- Don’t be afraid to experiment with different toppings. The possibilities are endless!
- For a fun twist, try using different types of chocolate, such as dark chocolate, milk chocolate, and white chocolate. You can even create a marbled effect by swirling different types of chocolate together.
- If you’re making a large batch of chocolate-covered strawberries, work in smaller batches to prevent the chocolate from hardening before you can dip all the strawberries.
- To prevent the strawberries from sliding off the baking sheet, you can use a small dab of melted chocolate to secure them in place.
- If you’re using freeze-dried fruit powder, make sure to sift it before sprinkling it on the strawberries to prevent clumps.
- For a more elegant look, you can use edible gold or silver leaf to decorate the strawberries.
Variations:
- Chocolate-Covered Strawberry Pops: Insert lollipop sticks into the strawberries before dipping them in chocolate.
- Chocolate-Covered Strawberry Skewers: Thread strawberries onto skewers and dip them in chocolate.
- Chocolate-Covered Strawberry Bark: Spread melted chocolate on a baking sheet and top with strawberries and other toppings. Let it set and then break it into pieces.
- Chocolate-Covered Strawberry Parfaits: Layer chocolate-covered strawberries with whipped cream, granola, and other toppings in a glass.
- Chocolate-Covered Strawberry Brownies: Add chopped chocolate-covered strawberries to your favorite brownie recipe.
Enjoy your delicious and beautiful chocolate-covered strawberries!
Conclusion:
And there you have it! I truly believe this recipe for chocolate-covered strawberries is a must-try, not just for special occasions, but for any day you want to add a little sparkle to your life. The combination of juicy, fresh strawberries and rich, decadent chocolate is simply irresistible. But what really elevates these treats are the toppings they transform a simple dessert into a personalized masterpiece.
Think about it: you can create a batch of these for a romantic Valentine’s Day, a fun birthday party, or even just a cozy night in. The possibilities are endless! And the best part? They’re surprisingly easy to make. Even if you’re not a seasoned baker, I promise you can nail this recipe. It’s all about having fun and letting your creativity shine.
Now, let’s talk about serving suggestions and variations. While these chocolate-covered strawberries are delicious on their own, you can also pair them with other desserts. Imagine serving them alongside a scoop of vanilla ice cream, a slice of rich chocolate cake, or even a light and airy angel food cake. The contrast in textures and flavors will be divine!
For variations, consider experimenting with different types of chocolate. Dark chocolate offers a more intense and sophisticated flavor, while milk chocolate is sweeter and creamier. White chocolate is another fantastic option, especially when paired with colorful sprinkles or chopped nuts. You could even try using flavored chocolate, like mint chocolate or orange chocolate, for a unique twist.
And don’t forget about the toppings! While I’ve suggested a few of my favorites, like chopped nuts, shredded coconut, and sprinkles, the sky’s the limit. Consider using crushed cookies, mini chocolate chips, sea salt flakes, or even edible glitter. You can also create themed toppings based on the occasion. For example, for a holiday party, you could use red and green sprinkles or crushed candy canes.
Another fun variation is to drizzle the chocolate-covered strawberries with a contrasting color of chocolate. For example, you could drizzle dark chocolate over white chocolate-covered strawberries, or vice versa. This adds a beautiful visual appeal and an extra layer of flavor.
This recipe for chocolate covered strawberries toppings is so versatile! You can adapt it to suit your own taste preferences and dietary needs. For example, if you’re vegan, you can use vegan chocolate and toppings. If you’re gluten-free, you can use gluten-free toppings. And if you’re watching your sugar intake, you can use sugar-free chocolate and toppings.
I’m so excited for you to try this recipe! I know you’re going to love it. And I can’t wait to see what creative variations you come up with.
So, go ahead and gather your ingredients, put on some music, and get ready to have some fun in the kitchen. Remember, the most important ingredient is love!
Once you’ve made your own batch of these delicious chocolate-covered strawberries, I would absolutely love to hear about your experience. Share your photos and stories on social media using [Your Hashtag] or tag me [Your Social Media Handle]. I’m always looking for new inspiration and ideas, and I can’t wait to see what you create! Happy dipping!
Chocolate Covered Strawberries Toppings: The Ultimate Guide
Delicious chocolate-covered strawberries, perfect for any occasion! Customize with your favorite toppings for a sweet treat.
Ingredients
- 1 pound fresh strawberries, washed and thoroughly dried
- 12 ounces high-quality chocolate (dark, milk, or white, or a combination), chopped
- 1 tablespoon vegetable shortening or coconut oil (optional, for smoother chocolate)
- Toppings of your choice (Sprinkles, Chopped nuts, Shredded coconut, Mini chocolate chips, Crushed cookies, Sea salt flakes, Cocoa powder, Edible glitter, Drizzled white/dark chocolate, Freeze-dried fruit powder)
Instructions
- Wash the strawberries gently under cool running water. Be careful not to bruise them.
- Thoroughly dry the strawberries. This is crucial! Any moisture will prevent the chocolate from adhering properly and can cause it to seize. Lay them out on a clean kitchen towel and gently pat them dry. You can also let them air dry completely.
- Remove the green stems (optional). Some people prefer to leave the stems on for easier dipping and a more rustic look. If you choose to remove them, do so carefully to avoid damaging the strawberry.
- Place the dried strawberries on a baking sheet lined with parchment paper or a silicone baking mat. This will prevent them from sticking and make cleanup a breeze.
- Chop the chocolate into small, even pieces. This will help it melt more quickly and evenly.
- Melt the chocolate using a double boiler or a heatproof bowl set over a saucepan of simmering water. Make sure the bottom of the bowl doesn’t touch the water. This prevents the chocolate from burning.
- If using a microwave, melt the chocolate in 30-second intervals, stirring well after each interval. Be very careful not to overheat the chocolate, as it can burn easily.
- Stir in the vegetable shortening or coconut oil (optional). This will make the chocolate smoother and easier to work with. It also gives it a nice sheen.
- Continue stirring until the chocolate is completely melted and smooth. If there are any lumps, continue heating and stirring until they disappear.
- Hold a strawberry by the stem (or where the stem was).
- Dip the strawberry into the melted chocolate, swirling it to coat evenly. You can dip it halfway, all the way, or even double-dip for an extra thick layer of chocolate!
- Lift the strawberry out of the chocolate and let any excess chocolate drip off. You can gently tap the strawberry against the side of the bowl to help remove excess chocolate.
- Place the dipped strawberry back on the prepared baking sheet.
- Repeat steps 1-4 for all the strawberries.
- Immediately after dipping each strawberry, sprinkle it with your desired toppings. The chocolate needs to be wet for the toppings to adhere properly.
- If you’re using multiple toppings, you can create different designs on each strawberry. Get creative and have fun!
- For drizzled chocolate, melt a small amount of white or dark chocolate (depending on the base chocolate) and transfer it to a piping bag or a small zip-top bag. Snip off a tiny corner of the bag and drizzle the melted chocolate over the dipped strawberries.
- If you want to add larger toppings, such as chopped nuts or crushed cookies, gently press them into the chocolate while it’s still wet.
- Place the baking sheet with the chocolate-covered strawberries in the refrigerator for 15-20 minutes, or until the chocolate is set. This will help the chocolate harden and prevent it from melting at room temperature.
- Alternatively, you can place the baking sheet in the freezer for 5-10 minutes for a faster setting time. However, be careful not to leave them in the freezer for too long, as the strawberries can become icy.
- Once the chocolate is set, remove the strawberries from the refrigerator or freezer.
- Serve the chocolate-covered strawberries immediately or store them in an airtight container in the refrigerator for up to 2 days. Keep in mind that the strawberries may release some moisture over time, so they are best enjoyed fresh.
- If you’re serving them at a party, arrange them on a platter or in a decorative bowl. You can also add some fresh flowers or greenery to make the presentation even more appealing.
- For a special touch, you can wrap each strawberry individually in cellophane bags and tie them with ribbon. This makes them perfect for gifting.
Notes
- Use high-quality chocolate for the best flavor and texture.
- Don’t overcrowd the double boiler or saucepan.
- If the chocolate starts to seize, try adding a teaspoon of vegetable shortening or coconut oil.
- If you’re using a microwave, be sure to use a microwave-safe bowl.
- Don’t be afraid to experiment with different toppings.
- For a fun twist, try using different types of chocolate, such as dark chocolate, milk chocolate, and white chocolate.
- If you’re making a large batch of chocolate-covered strawberries, work in smaller batches to prevent the chocolate from hardening before you can dip all the strawberries.
- To prevent the strawberries from sliding off the baking sheet, you can use a small dab of melted chocolate to secure them in place.
- If you’re using freeze-dried fruit powder, make sure to sift it before sprinkling it on the strawberries to prevent clumps.
- For a more elegant look, you can use edible gold or silver leaf to decorate the strawberries.
Leave a Comment