
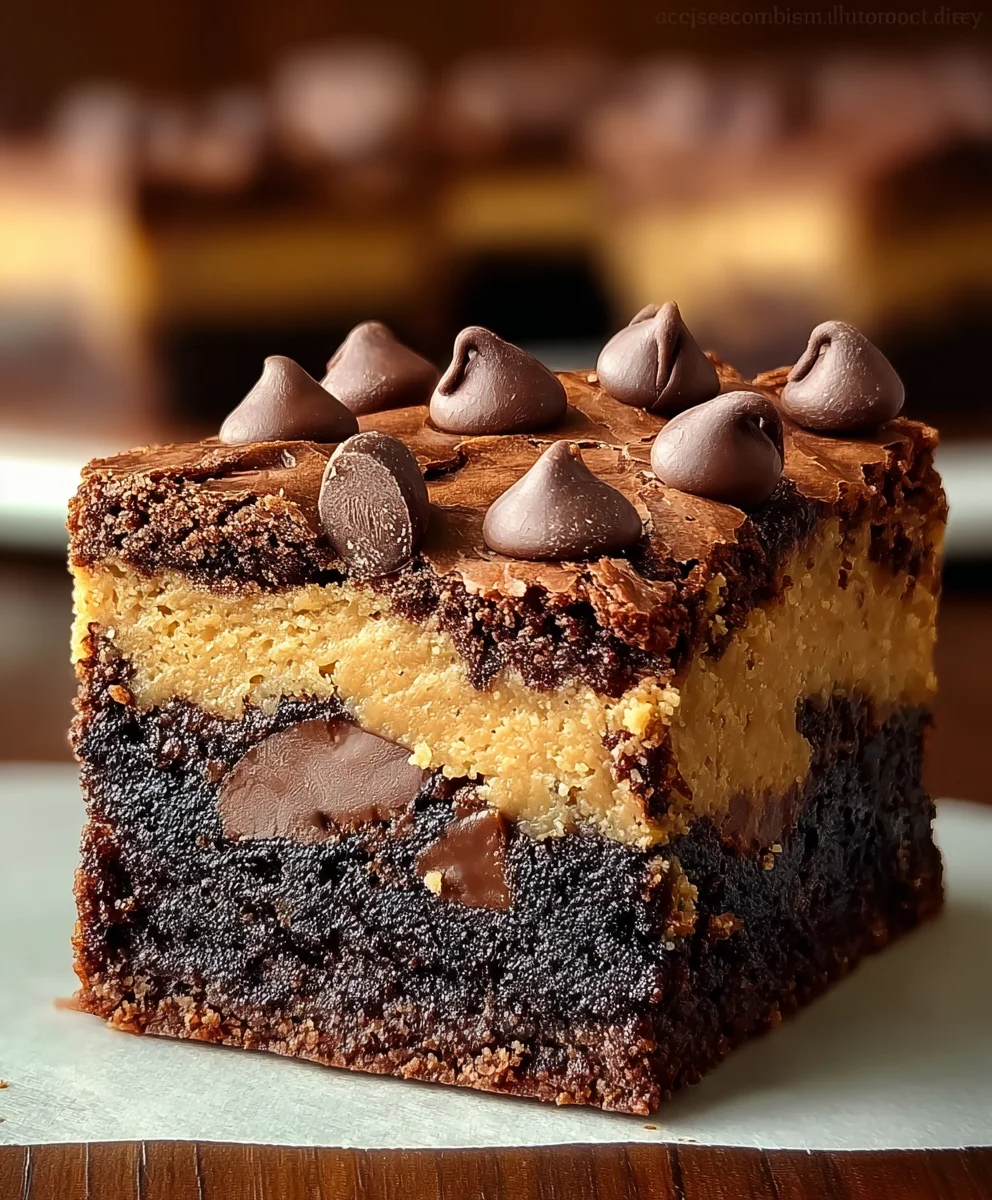
Brookie Layered Brownie Cookie Bars are not just a dessert; they are a culinary revelation, a testament to the fact that some of the greatest pleasures in life come from combining the best of both worlds. Imagine sinking your teeth into a treat where the rich, fudgy density of a perfectly baked brownie harmoniously meets the chewy, comforting embrace of a classic chocolate chip cookie, all in one glorious bite. It’s an experience that transcends the ordinary, satisfying both your brownie cravings and your cookie desires simultaneously.
Why This Dessert is a Universal Favorite
While the specific origin of the “Brookie” as a layered bar is a delightful, relatively modern culinary fusion, its immense popularity speaks to our universal love for innovative twists on timeless favorites. This ingenious creation emerged from the simple, brilliant idea of eliminating the impossible choice between two beloved baked goods. People adore this dish not only for its incredible dual texture and flavor profile – that perfect balance of crisp edges, soft centers, and molten chocolate – but also for its sheer indulgence and versatility. It’s perfect for potlucks, parties, or simply a cozy night in.
Today, I am absolutely thrilled to guide you through the process of crafting these magnificent Brookie Layered Brownie Cookie Bars, ensuring every layer is as delicious and delightful as you imagine. Get ready to impress your taste buds and everyone lucky enough to share this extraordinary dessert!

Ingredients:
For the Brownie Layer:
- 1 cup (2 sticks / 226g) unsalted butter, melted
- 1 cup (170g) bittersweet chocolate chips or chopped bittersweet chocolate (at least 60% cacao), plus an additional 1/2 cup (85g) for mixing in
- 1 ½ cups (300g) granulated sugar
- ½ cup (100g) packed light brown sugar
- 4 large eggs, at room temperature
- 2 teaspoons pure vanilla extract
- 1 cup (125g) all-purpose flour
- ¾ cup (65g) unsweetened cocoa powder (natural or Dutch-processed)
- 1 teaspoon salt
For the Chocolate Chip Cookie Layer:
- ¾ cup (1 ½ sticks / 170g) unsalted butter, softened to room temperature
- ½ cup (100g) granulated sugar
- 1 cup (200g) packed light brown sugar
- 2 large eggs, at room temperature
- 1 teaspoon pure vanilla extract
- 2 ¼ cups (280g) all-purpose flour
- 1 teaspoon baking soda
- ½ teaspoon salt
- 1 ½ cups (255g) semi-sweet chocolate chips (or a mix of milk and semi-sweet)
For Garnishing (Optional):
- Flaky sea salt, for sprinkling
- Additional chocolate chips, for sprinkling on top before baking
Preparing Your Baking Pan:
- Preheat your oven and prepare your pan. Before we dive into the delicious mixing, let’s get our oven ready. You’ll want to preheat your oven to 350°F (175°C). This temperature is ideal for ensuring both layers cook through perfectly without burning, yet still allowing for that beautiful fudgy brownie and chewy cookie texture. While the oven is heating up, take a 9×13-inch (23×33 cm) baking pan and lightly grease it with butter or cooking spray. I like to use a non-stick cooking spray for extra insurance. Then, line the pan with parchment paper, leaving an overhang on the longer sides. This parchment paper sling is an absolute lifesaver when it comes to lifting your beautiful “Brookie Layered Brownie Cookie Bars” out of the pan easily, making cutting a breeze later on. Seriously, don’t skip this step – trust me, you’ll thank yourself for this ingenious trick when you’re ready to slice!
Creating the Irresistible Brownie Layer:
- Melt butter and chocolate. In a large, microwave-safe bowl, combine the 1 cup (2 sticks) of unsalted butter and 1 cup of bittersweet chocolate chips or chopped bittersweet chocolate. Heat in the microwave in 30-second intervals, stirring well after each interval, until the mixture is completely melted and smooth. This typically takes about 1-2 minutes total, depending on your microwave’s wattage. Make sure to stir thoroughly after each burst to prevent the chocolate from scorching. Alternatively, you can use a double boiler method: place the butter and chocolate in a heatproof bowl set over a saucepan of simmering water, ensuring the bottom of the bowl does not touch the water. Stir constantly with a rubber spatula until fully melted and glossy. Once melted, set this rich chocolate mixture aside to cool slightly while you prepare the wet ingredients. It’s important it isn’t scorching hot when you add it to the eggs, as we don’t want to scramble them! Aim for it to be warm to the touch, but not hot.
- Whisk together sugars and eggs. In a separate large mixing bowl, combine the 1 ½ cups of granulated sugar and ½ cup of packed light brown sugar. The combination of both sugars gives the brownie a depth of flavor and contributes to its fudgy texture. Add the 4 large eggs, ensuring they are at room temperature as this helps them emulsify better with the fats and sugars, leading to a smoother batter and a more consistent, fudgier brownie texture. Cold eggs can cause the butter to seize up, resulting in a lumpy batter. Add the 2 teaspoons of pure vanilla extract – use a good quality vanilla for the best flavor! Using a whisk or an electric mixer on medium speed, beat these ingredients together for about 2-3 minutes until the mixture becomes pale yellow, thick, and slightly fluffy. This vigorous mixing incorporates air, which contributes to the brownie’s texture and also dissolves the sugar, preventing a gritty final product. You’ll notice the mixture gaining volume and becoming lighter in color – that’s exactly what we’re looking for!
- Combine wet ingredients. Gently pour the slightly cooled melted chocolate and butter mixture into the egg and sugar mixture. Fold them together using a rubber spatula until just combined. Be careful not to overmix at this stage; we just want everything incorporated into a uniform, glossy liquid. Overmixing now can develop gluten prematurely and lead to tougher, more cake-like brownies instead of the dense, fudgy bars we’re aiming for. Stop as soon as you see no more streaks of egg or chocolate.
- Sift and fold in dry ingredients. In a medium bowl, whisk together the 1 cup of all-purpose flour, ¾ cup of unsweetened cocoa powder, and 1 teaspoon of salt. I highly recommend sifting these ingredients together, especially the cocoa powder, to ensure there are no lumps and to help evenly distribute them throughout the batter. Gradually add the dry ingredients to the wet mixture, folding gently with your spatula until only a few streaks of flour remain. The key here is to under-mix slightly rather than overmix. Overmixing develops the gluten in the flour too much, which can result in a cakey, rather than fudgy, brownie. We’re aiming for that signature dense, chewy texture for our “Brookie Layered Brownie Cookie Bars”. A few small lumps are better than an overmixed, tough brownie!
- Stir in chocolate chips. Finally, fold in the remaining ½ cup of bittersweet chocolate chips into the brownie batter. These extra chips will melt into luscious pockets of pure chocolatey goodness throughout the brownie layer, enhancing its richness and providing delightful texture variations. Once they are evenly distributed, pour the thick, luscious brownie batter into your prepared 9×13-inch pan. Use your spatula to spread it out evenly to all corners of the pan, making sure it forms a flat, consistent layer.
- Pre-bake the brownie layer. Place the pan with the brownie batter into your preheated 350°F (175°C) oven. Bake for approximately 18-20 minutes. This initial bake is crucial because it allows the brownie to set up enough to support the weight of the cookie dough that will be layered on top, preventing the two layers from completely merging during the final bake. The edges should be set, but the center will still be a bit jiggly when you gently shake the pan. Don’t worry if it looks slightly underdone; it will finish baking beautifully with the cookie layer. Remove the pan from the oven and set it aside to cool slightly while we prepare the glorious cookie dough. This brief cooling period will also help the brownie layer firm up just a little more before the next step.
Crafting the Delicious Chocolate Chip Cookie Layer:
- Cream butter and sugars. In a large mixing bowl, using an electric mixer (a stand mixer with a paddle attachment works wonderfully, or a handheld mixer if that’s what you have), cream together the ¾ cup (1 ½ sticks) of softened unsalted butter with ½ cup of granulated sugar and 1 cup of packed light brown sugar. Beat on medium-high speed for 2-3 minutes, until the mixture is light, fluffy, and noticeably pale in color. This creaming process is vital as it incorporates air into the butter and sugar, which is essential for creating soft, chewy cookies with that perfect texture. Scrape down the sides of the bowl occasionally with your spatula to ensure everything is evenly mixed and no pockets of uncreamed butter or sugar remain.
- Add eggs and vanilla. Beat in the 2 large eggs, one at a time, mixing well after each addition until fully incorporated into the butter-sugar mixture. Again, remember that room temperature eggs are preferred for optimal emulsification and a smoother dough. Then, stir in the 1 teaspoon of pure vanilla extract. Continue to beat until the mixture is smooth and cohesive, scraping down the bowl as needed. The mixture should look homogenous and slightly glossy.
- Combine dry ingredients. In a separate medium bowl, whisk together the 2 ¼ cups of all-purpose flour, 1 teaspoon of baking soda, and ½ teaspoon of salt. This step ensures that the leavening agent (baking soda) and salt are evenly distributed throughout the flour. This is important for a consistent rise and flavor in your cookies, preventing any salty pockets or unevenly risen areas.
- Gradually add dry to wet ingredients. With the mixer on low speed, gradually add the dry ingredient mixture to the wet mixture, adding about one-third at a time. Mix until just combined. As with the brownie batter, be very careful not to overmix. Overmixing cookie dough can lead to a tough, dry cookie, which is the last thing we want for our “Brookie Layered Brownie Cookie Bars”. Stop mixing as soon as you no longer see streaks of dry flour. A slightly shaggy, somewhat crumbly dough is perfectly fine and often indicates a tender final product.
- Fold in chocolate chips. Remove the bowl from the mixer and, using a sturdy rubber spatula or wooden spoon, fold in the 1 ½ cups of semi-sweet chocolate chips. Distribute them evenly throughout the dough. You want a generous amount of chocolate in every single bite of these amazing bars! Don’t be shy about getting those chips mixed in thoroughly, but gently.
Assembling and Baking Your Brookie Layered Brownie Cookie Bars:
- Layer the cookie dough over the brownie. Carefully dollop spoonfuls of the prepared chocolate chip cookie dough over the partially baked brownie layer in the pan. The cookie dough will be quite thick and somewhat stiff, so you’ll need to work a little to gently spread it out to cover the entire surface of the brownie layer using an offset spatula, the back of a spoon, or even your clean, lightly floured hands. Take your time to spread it as evenly as possible from edge to edge. It might be a bit sticky, but persistence pays off, and a thin, even layer will ensure both layers bake consistently. If you like, you can sprinkle a few extra chocolate chips on top of the cookie dough before baking for a picture-perfect finish that will melt beautifully. A pinch of flaky sea salt scattered sparingly over the top can also enhance the flavors beautifully by contrasting with the sweetness, adding a sophisticated touch.
- Bake the Brookie bars. Return the pan to the preheated 350°F (175°C) oven and bake for an additional 30-35 minutes. The exact baking time can vary depending on your oven’s calibration and the thickness of your layers, so keep a close eye on them, especially after the 25-minute mark. The cookie layer should turn a beautiful golden brown, and the edges should look set and slightly crispy. A wooden skewer or toothpick inserted into the center of the bars should come out with moist crumbs attached (not wet batter, but definitely not completely dry, especially from the brownie layer). Do not overbake, as this is the quickest way to end up with dry brownies or cookies. The center should still feel slightly soft when gently pressed, as they will continue to set as they cool.
- Cool completely. This step is perhaps the most important for achieving perfectly structured “Brookie Layered Brownie Cookie Bars” that cut cleanly and hold their shape beautifully. Once baked, remove the pan from the oven and place it on a wire rack to cool completely. This means allowing them to cool for at least 2-3 hours, or even longer, until they reach room temperature. Resist the urge to cut them while warm! I know it’s tempting with that amazing aroma filling your kitchen, but the layers need time to fully set and firm up. Cutting them too soon will result in a crumbly mess, and the distinct layers won’t be as neat. Patience is a virtue, and it will be rewarded with perfect bars!
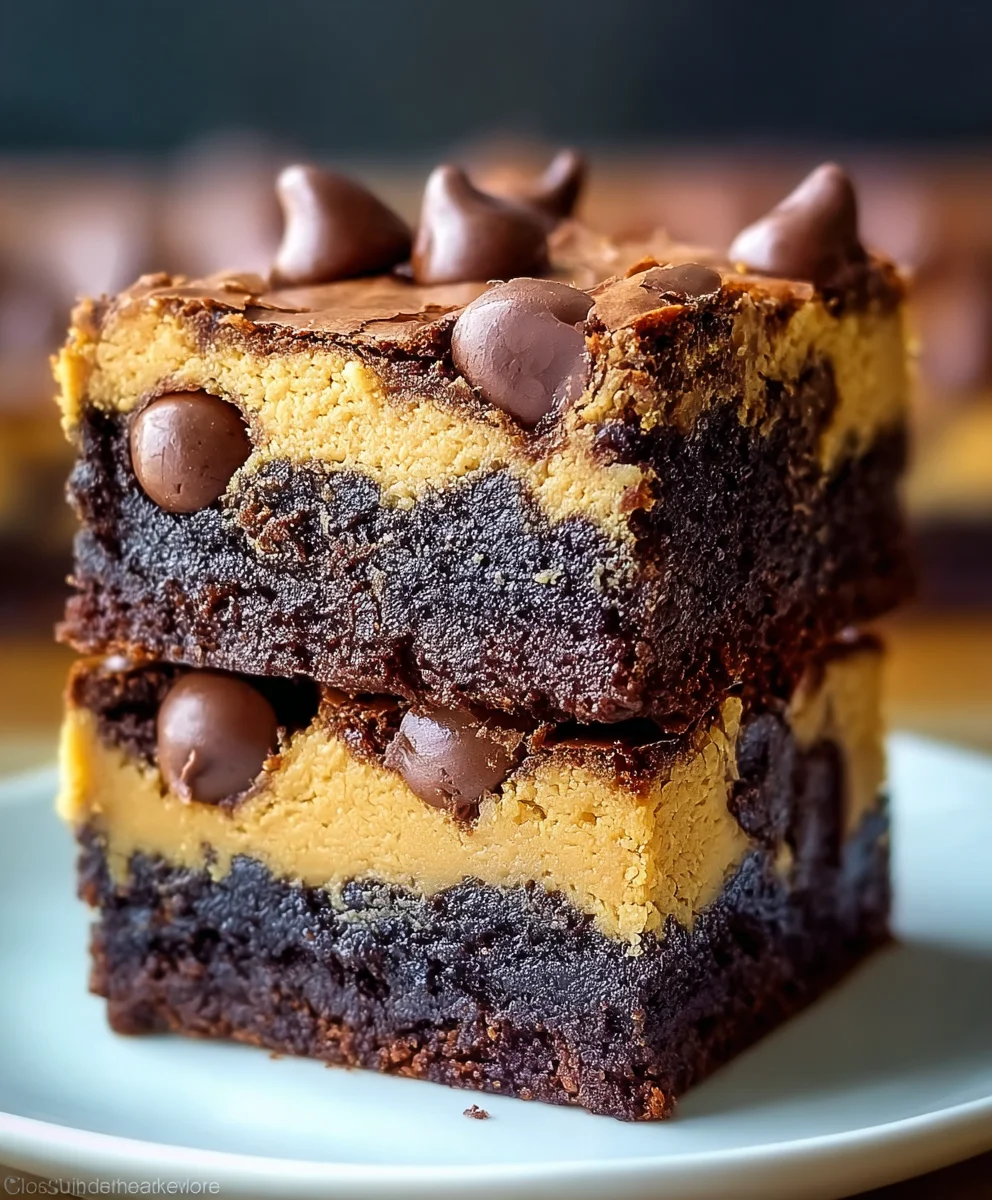
- Slice and serve. Once completely cool, use the parchment paper overhang to carefully lift the entire slab of “Brookie Layered Brownie Cookie Bars” out of the pan and onto a cutting board. Using a sharp, large knife, cut the slab into squares or rectangles of your desired size. I usually go for 2-inch squares, which yields about 24 bars, perfect for sharing (or not, I won’t judge!). For cleaner cuts, wipe your knife clean between each slice, especially after the first few cuts, as chocolate can stick to the blade. Serve these decadent bars as a delightful dessert, a satisfying snack, or even a special treat in a packed lunch. They are truly the best of both worlds – a rich, fudgy brownie base crowned with a soft, chewy chocolate chip cookie layer, a match made in dessert heaven!
Storage Tips for Your Brookie Layered Brownie Cookie Bars:
These delightful “Brookie Layered Brownie Cookie Bars” are so delicious, they rarely last long, but should you have any leftovers, proper storage is key to maintaining their amazing texture and flavor. They can be stored at room temperature in an airtight container for up to 3-4 days. To keep them fresh for a little longer, you can refrigerate them for up to a week; just let them come to room temperature before serving for the best texture. For an even longer shelf life, they freeze beautifully! Simply wrap individual bars or a stack of bars tightly in plastic wrap, then place them in a freezer-safe bag or container. They will keep well in the freezer for up to 3 months. When you’re ready to enjoy, just let them thaw at room temperature for an hour or two, or warm them slightly in the microwave for that irresistible freshly baked taste – a perfect treat any time!
Conclusion:
If you’ve been on the fence about what treat to bake next, or if you’ve ever found yourself in the delightful dilemma of choosing between a rich, fudgy brownie and a perfectly chewy, golden-edged chocolate chip cookie, then this recipe, my friends, is your ultimate answer. I can confidently tell you that these Brookie Layered Brownie Cookie Bars are not just another dessert; they are a transformative culinary experience, a symphony of textures and flavors that will redefine your understanding of baked goods. They capture the very best attributes of both beloved classics, merging the deep, intense chocolate notes and dense, moist crumb of a brownie with the sweet, buttery, and slightly crisp chewiness of a homemade chocolate chip cookie. Every single bite delivers a harmonious blend, ensuring you never have to pick a favorite again. It’s truly a testament to the fact that some things are just better together, creating an unforgettable dessert that appeals to every palate. Trust me, once you taste these, you’ll understand exactly why they’re a must-try.
Beyond their irresistible taste, the versatility of these bars is another reason they deserve a permanent spot in your baking repertoire. While they are absolutely divine enjoyed simply as they are, fresh from the oven, still warm and slightly gooey, there are so many delightful ways to serve them. Imagine a square of these rich Brookie Layered Brownie Cookie Bars nestled in a bowl, topped with a generous scoop of vanilla bean ice cream, allowing the cold creaminess to melt slightly into the warm chocolate and cookie layers – pure bliss! A drizzle of salted caramel or a sprinkle of flaky sea salt could elevate that experience even further. For a more sophisticated presentation, a light dusting of powdered sugar adds an elegant touch, making them perfect for a dinner party dessert. They also pair wonderfully with a robust cup of coffee or a tall glass of cold milk for a comforting snack.
But don’t stop there! The beauty of baking is in experimentation, and these bars are an excellent canvas for your creativity. Feel free to customize them to suit your preferences or what you have on hand. For an extra layer of crunch and flavor, consider folding in chopped walnuts or pecans into either the brownie or cookie batter. If you’re a fan of different chocolate varieties, swap out some of the semi-sweet chips for milk chocolate, dark chocolate, or even white chocolate chips. A swirl of peanut butter through the brownie layer before adding the cookie dough would create an incredible peanut butter brownie cookie bar – a truly irresistible combination for nut butter lovers! For a festive twist, a touch of peppermint extract in the brownie layer or a sprinkle of holiday-themed M&Ms can transform them for seasonal gatherings. You could even experiment with different cookie dough bases, perhaps an oatmeal cookie for a chewier texture or a peanut butter cookie for a nuttier flavor profile. The possibilities are truly endless, allowing you to make this recipe uniquely yours every time.
So, now it’s your turn! I genuinely hope I’ve inspired you to roll up your sleeves, preheat your oven, and dive into making these incredible bars. They are not only a joy to bake but an even greater joy to share. The smiles they bring to people’s faces are truly priceless. I am so excited for you to experience the magic of these Brookie Layered Brownie Cookie Bars firsthand. Once you’ve baked your batch, I would absolutely love to hear about your experience. Did you make any fun variations? What was your favorite part? Please, don’t hesitate to share your thoughts, your successes, and even your creative tweaks! Your feedback and photos mean the world to me and help foster our wonderful community of home bakers. Thank you for joining me on this delicious journey; happy baking, and I can’t wait to see your wonderful creations!
Brookie Layered Brownie Cookie Bars
A delicious recipe
Ingredients
-
Ingredient 1
-
Ingredient 2
-
Ingredient 3
Instructions
-
Step 1
Step 1 -
Step 2
Step 2 -
Step 3
Step 3
Important Information
Nutrition Facts (Per Serving)
It is important to consider this information as approximate and not to use it as definitive health advice.
Allergy Information
Please check ingredients for potential allergens and consult a health professional if in doubt.

Leave a Comment