
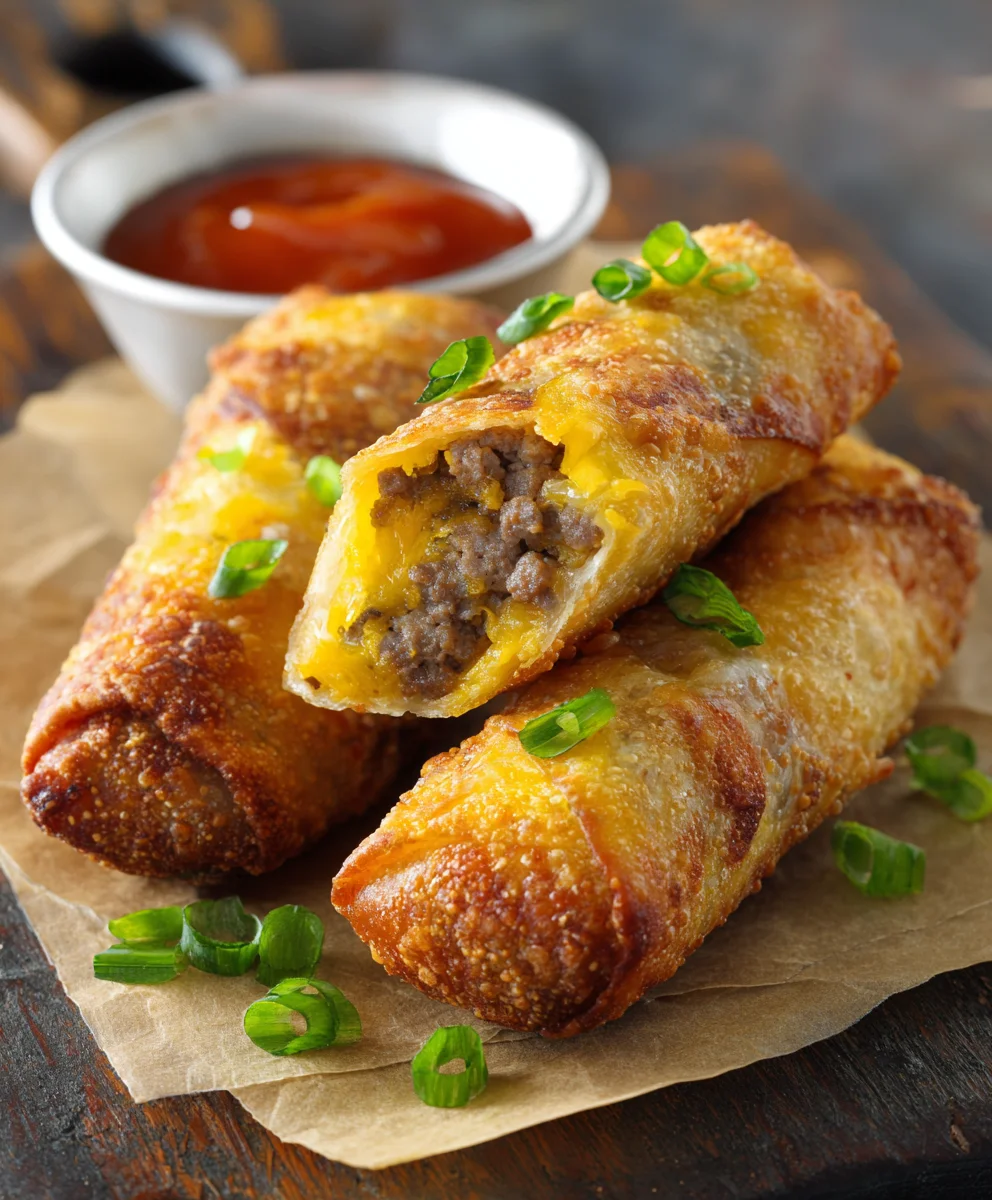
Easy Cheeseburger Egg Rolls – prepare to embark on a delightful culinary adventure that ingeniously merges two universally adored comfort foods into one irresistible, handheld sensation. Have you ever imagined a snack that delivers the savory, cheesy satisfaction of your favorite cheeseburger, perfectly encased in the crispy, golden embrace of an egg roll wrapper? Your culinary dreams are about to become a delicious reality!
This remarkable fusion dish is more than just a clever novelty; it’s a brilliant reimagining of familiar flavors. While the cheeseburger stands as an undeniable American icon and the egg roll is a beloved staple in various Asian cuisines, their harmonious combination in this recipe yields something truly unique and broadly appealing. People consistently rave about this creation for myriad reasons: the initial bite provides an incredibly satisfying crunch, which then gives way to a warm, richly seasoned ground beef and melted cheese filling that perfectly captures the essence of a classic cheeseburger. They are wonderfully convenient, serving as an ideal appetizer for game day gatherings, a fun and innovative party snack, or even a distinctive twist on a weeknight meal. Get ready to discover why these Easy Cheeseburger Egg Rolls are poised to become your new go-to favorite.

Ingredients:
- 1 pound (about 450g) lean ground beef (I usually opt for 80/20 for a nice balance of flavor and less grease to drain).
- 1 medium yellow onion, finely diced (this adds a wonderful savory depth to our “cheeseburger”).
- 1 tablespoon olive oil (just a touch to get our onions started).
- 2 cloves garlic, minced (because garlic makes everything better, especially a cheeseburger!).
- 1 teaspoon salt (or to taste, I always recommend tasting as you go).
- ½ teaspoon black pepper (freshly ground, if you have it, for maximum flavor).
- 1 teaspoon smoked paprika (this is my secret weapon for that classic char-grilled burger flavor).
- ½ teaspoon onion powder (enhances the onion flavor without adding extra moisture).
- ½ teaspoon garlic powder (another layer of garlic goodness).
- ¼ teaspoon cayenne pepper (optional, but I love a little kick! Adjust to your heat preference).
- 1 cup (about 113g) shredded sharp cheddar cheese (the star of our cheeseburger show, a good quality cheese melts beautifully).
- ¼ cup (about 60ml) dill pickle relish (this is absolutely essential for that authentic cheeseburger tang and crunch!).
- 2 tablespoons ketchup (for that classic burger sweetness).
- 1 tablespoon yellow mustard (provides the signature mustard zing).
- 24-30 egg roll wrappers (you’ll typically find these in the refrigerated section of your grocery store, near the tofu or produce).
- Vegetable oil, canola oil, or peanut oil for frying (I usually use about 4-6 cups, depending on the size of my pot).
- Water for sealing the egg rolls.
Equipment You’ll Need:
- Large skillet or frying pan: Essential for browning our ground beef and sautéing the onions. I recommend one with high sides to minimize splatter.
- Mixing bowl: For combining all the delicious filling ingredients.
- Slotted spoon or colander: Crucial for draining excess grease from the cooked ground beef, ensuring our egg rolls aren’t soggy.
- Small bowl of water: For sealing the egg roll wrappers.
- Baking sheet with a wire rack: To place the fried egg rolls on, allowing excess oil to drip off and keeping them crispy.
- Deep pot or Dutch oven: For frying. Safety first – a heavy-bottomed pot is stable.
- Tongs: For carefully placing egg rolls into the hot oil and retrieving them.
- Instant-read thermometer: Highly recommended for accurately monitoring oil temperature, which is key to perfectly crispy, non-greasy egg rolls.
- Paper towels: For additional draining of the fried egg rolls.
Preparing the Cheeseburger Filling:
This is where we build the heart of our Easy Cheeseburger Egg Rolls. Taking your time here will ensure every bite is bursting with flavor.
- Sauté the Aromatics: First things first, I grab my largest skillet and heat 1 tablespoon of olive oil over medium heat. Once it’s shimmering, I toss in the finely diced yellow onion. I let it cook down for about 5-7 minutes, stirring occasionally, until it’s beautifully softened and translucent. This step is crucial because it mellows out the onion’s sharpness and brings out its natural sweetness. When the onions are almost done, I add the minced garlic and cook for another minute until fragrant. Be careful not to burn the garlic – nobody likes bitter garlic!
- Brown the Ground Beef: Now, I add the lean ground beef to the skillet with the onions and garlic. Using a wooden spoon or spatula, I break up the meat into small, uniform pieces. I cook it over medium-high heat, stirring frequently, until it’s completely browned and no longer pink. This usually takes about 8-10 minutes. It’s important to make sure there are no large clumps of meat, as smaller pieces will distribute better in our egg rolls.
- Drain the Excess Grease: Once the beef is fully cooked, this next step is absolutely critical for achieving a non-greasy egg roll. I carefully tilt the skillet and use a slotted spoon to push the meat to one side, allowing any rendered fat to pool on the other. Then, I either carefully spoon out the excess grease into a heat-safe container (never down the drain!) or, if I’m feeling adventurous and have a good grip, I transfer the meat to a colander lined with a few paper towels to let it drain for a few minutes. Removing the grease prevents soggy, heavy egg rolls, so don’t skip this!
- Season the Meat: After draining, I return the seasoned beef and onion mixture to the skillet (if I used a colander) or just stir it right there. This is where the magic happens! I sprinkle in the salt, black pepper, smoked paprika, onion powder, garlic powder, and the optional cayenne pepper. I stir it all together thoroughly, ensuring every piece of beef is coated in those wonderful spices. Let it cook for another 1-2 minutes, allowing the spices to toast slightly and release their full aroma. This depth of flavor is what truly elevates these egg rolls beyond just “ground beef.”
- Stir in the Cheeseburger Essentials: Now it’s time to bring in the classic cheeseburger components. I remove the skillet from the heat and stir in the shredded sharp cheddar cheese. The residual heat from the beef will start to melt the cheese beautifully, making it wonderfully gooey. Then, I add the dill pickle relish, ketchup, and yellow mustard. I give it a good mix until everything is well combined and the cheese has mostly melted into a creamy, savory filling. The pickle relish is non-negotiable for that authentic tang and crunch, so don’t leave it out! I like to taste a small spoonful at this point to adjust any seasonings if needed – maybe a little more salt, or another dash of pepper.
- Cool the Filling: Before moving on to assembly, it’s best to let the cheeseburger filling cool down slightly. A warm filling is fine, but piping hot filling can make the egg roll wrappers tear or become difficult to handle. I often transfer it to a mixing bowl and let it sit for about 10-15 minutes while I set up my assembly station.
Assembling the Easy Cheeseburger Egg Rolls:
This part requires a little patience, but with practice, you’ll be an egg roll wrapping pro in no time! A tight, secure wrap is key to preventing blow-outs during frying.
- Set Up Your Workspace: I like to have everything organized before I start. I lay out my egg roll wrappers on a clean, dry surface – a large cutting board or a clean countertop works perfectly. I have my bowl of cooled cheeseburger filling within easy reach, and a small bowl of water ready for sealing the wrappers.
- Position the Wrapper: Take one egg roll wrapper and place it on your work surface so it looks like a diamond, with one corner pointing towards you. This orientation makes the folding process much easier. Keep the unused wrappers covered with a damp paper towel to prevent them from drying out, which can make them crack.
- Spoon in the Filling: Spoon about 2 tablespoons of our glorious cheeseburger filling onto the bottom corner of the wrapper, about 1-1 ½ inches from the point. It’s crucial not to overfill the wrapper, as this is the most common reason for egg rolls bursting open during frying. Trust me, less is more here for a successful seal!
- Fold the Bottom Corner: Take the bottom corner of the wrapper and fold it snugly over the filling, tucking the point underneath the filling to create a tight cylinder. You want to make sure the filling is completely encased in this first fold. Gently press down to secure.
- Fold in the Sides: Next, take the right corner and fold it over towards the center of the wrapper. Then, do the same with the left corner, folding it neatly over the center. You should now have a shape that looks somewhat like an open envelope. Make sure these side folds are firm and neat.
- Roll It Up Tightly: Now, starting from the folded bottom edge, begin to roll the wrapper upwards, away from you. As you roll, make sure to keep it tight and firm. This prevents air pockets and ensures a crisp, evenly cooked egg roll.
- Seal the Wrapper: When you have about 1 inch of the top corner remaining, dip your finger into the small bowl of water and lightly moisten all the edges of that top corner. This acts like glue! Finish rolling the egg roll all the way up, pressing gently to seal the moistened flap securely. A good, tight seal is absolutely paramount to prevent cheese from oozing out and oil from seeping in during frying. Take your time on this step!
- Repeat and Store: Place the finished egg roll seam-side down on a baking sheet. Repeat the process with the remaining wrappers and filling. If you’re not frying them immediately, you can cover them loosely with plastic wrap and refrigerate for up to a few hours. If stacking, place a sheet of parchment paper between layers to prevent sticking.
Frying the Egg Rolls to Golden Perfection:
This is the exciting part! Frying gives our Easy Cheeseburger Egg Rolls their irresistible crispy exterior. Safety and proper oil temperature are key here.
- Heat the Oil: Pour about 2-3 inches of vegetable oil (or canola or peanut oil) into a deep pot or Dutch oven. I usually aim for enough oil so the egg rolls are at least halfway submerged. Place the pot over medium-high heat. This is where your instant-read thermometer becomes your best friend! Heat the oil until it reaches a consistent temperature of 350-375°F (175-190°C). If you don’t have a thermometer, you can test the oil by dropping a tiny piece of an egg roll wrapper into it; if it sizzles and browns within a few seconds, it’s ready.
- Fry in Batches: Carefully, oh so carefully, place 3-4 egg rolls into the hot oil using your tongs. Do not overcrowd the pot! Overcrowding will significantly drop the oil temperature, leading to greasy, less crispy egg rolls. Frying in smaller batches ensures the oil stays hot and your egg rolls cook evenly and crisp up beautifully.
- Cook to Golden Brown: Fry for about 3-5 minutes per batch, turning the egg rolls occasionally with your tongs to ensure even browning on all sides. You’re looking for a gorgeous, deep golden-brown color and a visibly crispy texture. They should look irresistible!
- Drain the Excess Oil: Once they’re perfectly golden and crispy, use your tongs to carefully remove the egg rolls from the hot oil. Transfer them to your prepared baking sheet with a wire rack. This setup allows any excess oil to drip off, keeping your egg rolls beautifully crisp. You can also place them on a plate lined with paper towels, but the wire rack is superior for maintaining crispness.
- Maintain Oil Temperature and Repeat: Allow the oil to return to the ideal temperature of 350-375°F (175-190°C) between batches. This might mean adjusting your heat up or down slightly. Continue frying the remaining egg rolls in batches until they are all beautifully cooked.
Serving Suggestions and Customization:
These Easy Cheeseburger Egg Rolls are fantastic on their own, but a good dip and some clever accompaniments can take them to the next level!
- Classic Dipping Sauces: My go-to is always a combination of classic ketchup and yellow mustard, sometimes mixed together for a “burger sauce” vibe. A tangy dill pickle dip or even a creamy ranch dressing also pairs wonderfully.
- Special Sauce: For that true fast-food burger experience, I love whipping up a quick “special sauce.” It’s usually a mix of mayonnaise, ketchup, a touch of mustard, a dash of pickle relish, and a pinch of paprika. It’s incredibly easy and always a hit!
- Tangy Additions: A small bowl of extra dill pickle slices or even some pickled jalapeños on the side can add a fantastic contrasting tang and crunch to cut through the richness of the egg rolls.
- Fresh Side Salad: For a more complete meal, I often serve these with a simple, fresh green salad. A light vinaigrette complements the savory egg rolls without making the meal too heavy. It’s a great way to add some freshness.
- Customize Your Cheese: While sharp cheddar is my absolute favorite for that classic cheeseburger taste, don’t hesitate to experiment! A blend of cheddar and Monterey Jack can make the filling even creamier. Pepper Jack cheese would add a nice spicy kick, too.
- Add Bacon: Everything’s better with bacon, right? Cooked and crumbled bacon bits stirred into the filling would make these “Bacon Cheeseburger Egg Rolls” and add an incredible smoky, salty dimension.
- Spice It Up: If you love heat, feel free to increase the cayenne pepper in the filling, or even add a pinch of red pepper flakes. A dash of hot sauce in the filling or served on the side can also elevate the spice level.
Tips for Success with Your Easy Cheeseburger Egg Rolls:
To ensure your first (and every!) batch of Easy Cheeseburger Egg Rolls turns out perfect, here are some of my tried-and-true tips:
-
Don’t Overfill Your Wrappers:
This is probably the most common mistake. It’s tempting to pack in as much filling as possible, but overfilling makes it incredibly difficult to seal the wrappers securely, leading to blow-outs during frying and a messy result. Stick to about 2 tablespoons per wrapper.
-
Seal Them Tightly:
A good, tight seal is absolutely crucial. Use enough water on the edges to create a strong seal. Press firmly along the seams. Any gaps will allow oil to seep in, making your egg rolls greasy, or worse, cause the delicious cheesy filling to leak out.
-
Maintain Oil Temperature:
This cannot be stressed enough! Too low of a temperature and your egg rolls will absorb too much oil, becoming greasy and heavy. Too high, and they’ll burn on the outside before the inside is fully heated and the cheese is perfectly melted. An instant-read thermometer is your best friend here. Aim for 350-375°F (175-190°C).
-
Work in Batches:
Resist the urge to crowd your frying pot. Frying too many egg rolls at once will significantly drop the oil temperature, leading to inconsistent cooking and greasy results. Fry 3-4 at a time to maintain optimal oil temperature.
-
Drain Thoroughly:
After frying, immediately transfer the egg rolls to a wire rack set over a baking sheet. This allows air circulation and lets excess oil drip off, which helps maintain their crispness. Placing them directly on paper towels can trap steam and make them soggy.
-
Cool the Filling Slightly:
While a little warmth is fine, trying to wrap egg rolls with piping hot filling can make the wrappers soft and prone to tearing. Let your cheeseburger filling cool down for at least 10-15 minutes before you start assembling.
-
Keep Wrappers Covered:
Egg roll wrappers dry out very quickly, especially if you’re working in a dry environment. Keep unused wrappers covered with a damp paper towel or plastic wrap to keep them pliable and prevent cracking.
-
Consider an Air Fryer (Lighter Option):
If you’re looking for a lighter alternative, these Easy Cheeseburger Egg Rolls can also be air-fried! Preheat your air fryer to 375°F (190°C). Lightly spray the egg rolls with cooking spray (or brush with a tiny bit of oil) and air fry in a single layer for 10-15 minutes, flipping halfway, until golden brown and crispy. This method uses significantly less oil but still delivers a great crunch.
Storage and Reheating:
Leftovers? Lucky you! These Easy Cheeseburger Egg Rolls are just as delicious the next day, provided they’re stored and reheated correctly to maintain their crispness.
- Storing Cooked Egg Rolls: Once completely cooled, store your Easy Cheeseburger Egg Rolls in an airtight container in the refrigerator for up to 3-4 days. For best results, you can place a paper towel at the bottom of the container to absorb any lingering moisture.
-
Reheating for Crispness: I always recommend reheating these in an oven or an air fryer to bring back that delightful crisp texture.
- Oven Method: Preheat your oven to 375°F (190°C). Place the egg rolls on a wire rack set over a baking sheet (or directly on a baking sheet if you don’t have a rack). Heat for 8-12 minutes, or until heated through and crispy.
- Air Fryer Method: Preheat your air fryer to 350°F (175°C). Place the egg rolls in a single layer in the air fryer basket. Heat for 5-8 minutes, flipping halfway, until they are hot and crispy.
- Microwave (Not Recommended for Crispness): While you can microwave them to heat them through, they will lose all their crispness and become soft. I only recommend this as a last resort if crispness isn’t a priority.
- Freezing Uncooked Egg Rolls: You can also freeze uncooked egg rolls! Assemble them as instructed, then place them in a single layer on a parchment-lined baking sheet and freeze until solid. Once frozen, transfer them to a freezer-safe bag or airtight container. They can be frozen for up to 1 month. When ready to cook, you can fry them directly from frozen, adding a few extra minutes to the cooking time, or thaw them in the refrigerator overnight.
Conclusion:
Well, we’ve reached the end of our culinary journey, but I truly believe this is just the beginning of your new favorite recipe! If there’s one dish I could implore you to try from my collection, it would undoubtedly be this one. These aren’t just a novelty; they’re a brilliantly re-imagined classic that brings together the best of two worlds in an incredibly accessible and utterly delicious package. I absolutely love how they manage to capture that quintessential, comforting flavor of a juicy cheeseburger and transform it into a crispy, dippable, and genuinely exciting treat. It’s a guaranteed crowd-pleaser, perfect for game nights, parties, or even just a fun weeknight meal when you’re craving something a little different but still want that familiar, beloved taste.
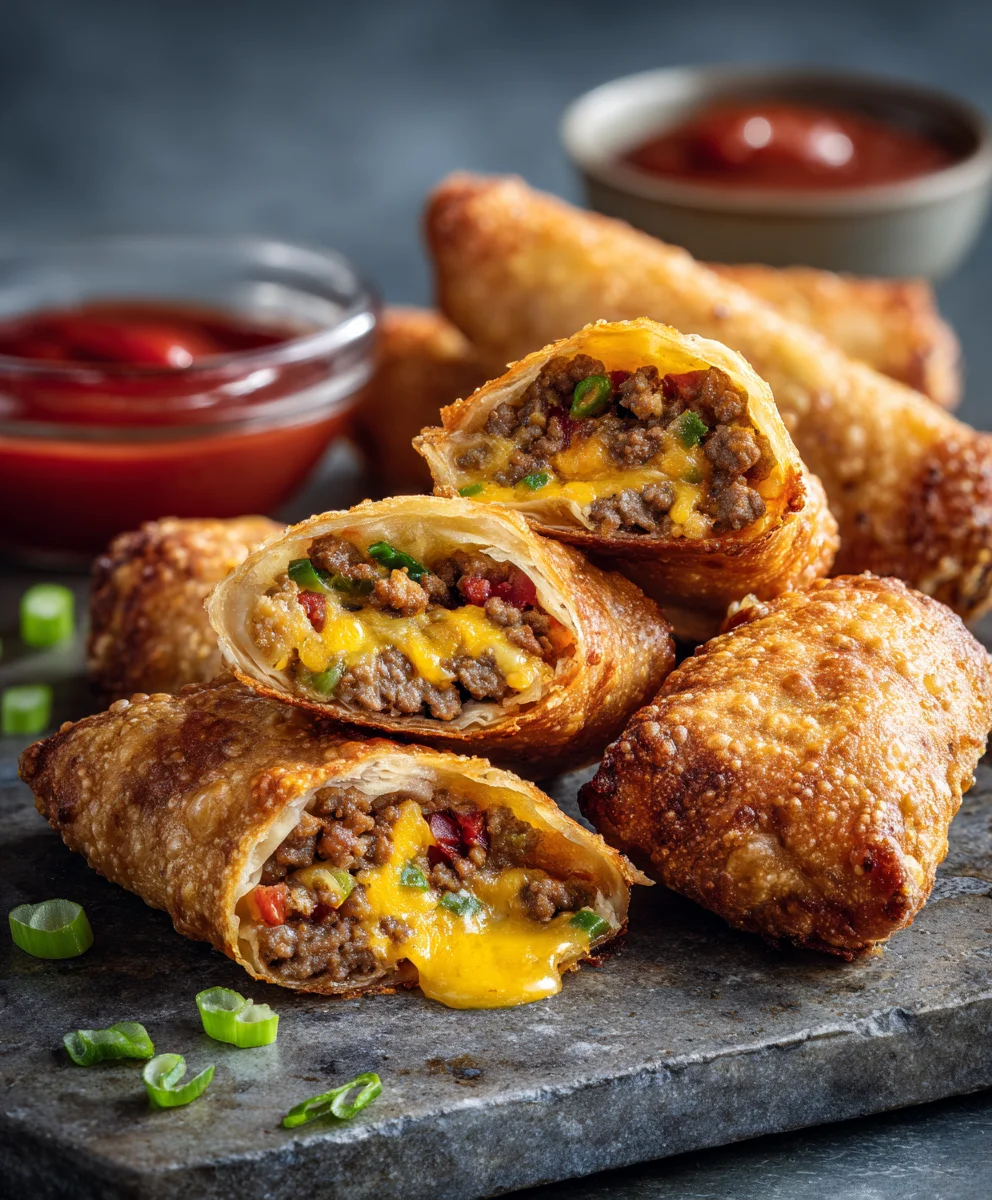
Why These Are Your Next Go-To Snack or Appetizer:
What makes these so special, you ask? It’s the harmonious blend of textures and tastes. Imagine biting into that golden, shatteringly crisp egg roll wrapper, giving way to a warm, savory filling of seasoned ground beef, gooey melted cheese, and just the right hint of onion and pickle, all without the bread! It’s all the flavor, none of the fuss, and honestly, a lot more fun to eat. The genius of this recipe lies in its simplicity – taking beloved, straightforward ingredients and presenting them in an unexpected, delightful format. Plus, the ease with which these come together is truly remarkable. Despite their gourmet appearance, they’re surprisingly unfussy to prepare, making them perfect for cooks of all skill levels. They prove that you don’t need complicated techniques to create something truly memorable and satisfying. These Easy Cheeseburger Egg Rolls are a testament to creative cooking that doesn’t compromise on flavor or convenience. Trust me, once you make them, your friends and family will be begging for the recipe.
Make Them Your Own: Serving Suggestions & Creative Variations:
Now, let’s talk about how to elevate your egg roll experience even further! While they are absolutely divine on their own, a good dipping sauce can take them to the next level. Think classic ketchup and mustard, or perhaps a zesty “special sauce” made with a mix of mayo, ketchup, relish, and a dash of hot sauce. For a fresher contrast, a creamy dill pickle dip or even a simple ranch dressing would be phenomenal. Don’t be afraid to experiment with your favorite burger condiments! As for serving, these make fantastic appetizers, of course, but they also shine as a fun, handheld main course when paired with a fresh side salad or some crispy oven-baked fries. For a quick and easy lunch, I sometimes whip up a batch and enjoy them with a bowl of tomato soup. The possibilities are truly endless!
Don’t Forget the Dips!
Want to get creative with the filling? Go for it! You could add some finely diced jalapeños for a spicy kick, or crumbled bacon for an extra layer of smoky flavor. A pinch of garlic powder or a sprinkle of smoked paprika can also enhance the beef’s savory notes. For those who enjoy a bit of sweetness, a tiny bit of caramelized onions would be a delightful addition. You could even swap out the cheddar cheese for a different variety, like Monterey Jack or a pepper jack for a little heat. The beauty of this recipe is its flexibility – it’s a fantastic canvas for your culinary imagination. I’ve even seen people add a touch of finely chopped lettuce after frying for a textural crunch, mimicking a full burger experience. Just remember to add fresh ingredients like lettuce or tomato after frying to maintain their crispness and texture.
So, what are you waiting for? It’s time to roll up your sleeves, gather your ingredients, and give this incredible recipe a try. I promise you won’t regret it. The joy of creating something so utterly delicious and seeing the delight on the faces of those you share it with is truly one of the best parts of cooking. Once you’ve made these golden, savory bites of pure bliss, I would absolutely love to hear about your experience! Did you try any exciting variations? What was your favorite dipping sauce? Please feel free to share your photos and stories with me. Your feedback and creativity inspire me, and I can’t wait to see your fantastic creations. Happy cooking, and prepare to fall in love with your new favorite snack!
Easy Cheeseburger Egg Rolls
Irresistible handheld snack merging the savory, cheesy satisfaction of a cheeseburger with the crispy embrace of an egg roll wrapper. Perfect for parties, game day, or a fun weeknight meal.
Ingredients
-
1 lb (450g) lean ground beef (80/20)
-
1 medium yellow onion, finely diced
-
1 tbsp olive oil
-
2 cloves garlic, minced
-
1 tsp salt
-
½ tsp black pepper
-
1 tsp smoked paprika
-
½ tsp onion powder
-
½ tsp garlic powder
-
¼ tsp cayenne pepper (optional)
-
1 cup (113g) shredded sharp cheddar cheese
-
¼ cup (60ml) dill pickle relish
-
2 tbsp ketchup
-
1 tbsp yellow mustard
-
24-30 egg roll wrappers
-
Vegetable oil, canola oil, or peanut oil for frying
-
Water for sealing
Instructions
-
Step 1
In a large skillet, heat olive oil over medium heat. Sauté diced onion 5-7 min until softened, then add minced garlic and cook 1 min until fragrant. Add ground beef, break up, and brown completely (8-10 min). Drain excess grease thoroughly. -
Step 2
Return beef to skillet. Stir in salt, pepper, smoked paprika, onion powder, garlic powder, and cayenne pepper. Cook 1-2 min. Remove from heat, then stir in cheddar cheese, dill pickle relish, ketchup, and mustard until cheese melts and ingredients are well combined. Let filling cool for 10-15 min. -
Step 3
Lay one egg roll wrapper like a diamond. Spoon 2 tbsp of cooled filling onto the bottom corner. Fold the bottom corner over the filling, tucking it tightly. Fold in the right and left corners. Roll up tightly, then moisten the top corner with water and press to seal. Repeat with remaining wrappers and filling. Keep unused wrappers covered with a damp paper towel to prevent drying. -
Step 4
Heat 2-3 inches of vegetable oil in a deep pot to a consistent 350-375°F (175-190°C). Fry egg rolls in batches of 3-4 for 3-5 minutes, turning occasionally, until golden brown and crispy. Maintain oil temperature between batches. -
Step 5
Remove fried egg rolls with tongs and place on a wire rack set over a baking sheet to drain excess oil. Serve warm with desired dipping sauces like ketchup, mustard, or a special burger sauce. -
Step 6
Cooked egg rolls can be stored in an airtight container in the refrigerator for 3-4 days. Reheat in oven (375°F/190°C for 8-12 min) or air fryer (350°F/175°C for 5-8 min) for crispness. Uncooked egg rolls can be frozen (single layer on parchment-lined baking sheet until solid, then transfer to freezer bag) for up to 1 month and fried directly from frozen, adding a few extra minutes to cook time.
Important Information
Nutrition Facts (Per Serving)
It is important to consider this information as approximate and not to use it as definitive health advice.
Allergy Information
Please check ingredients for potential allergens and consult a health professional if in doubt.


Leave a Comment