
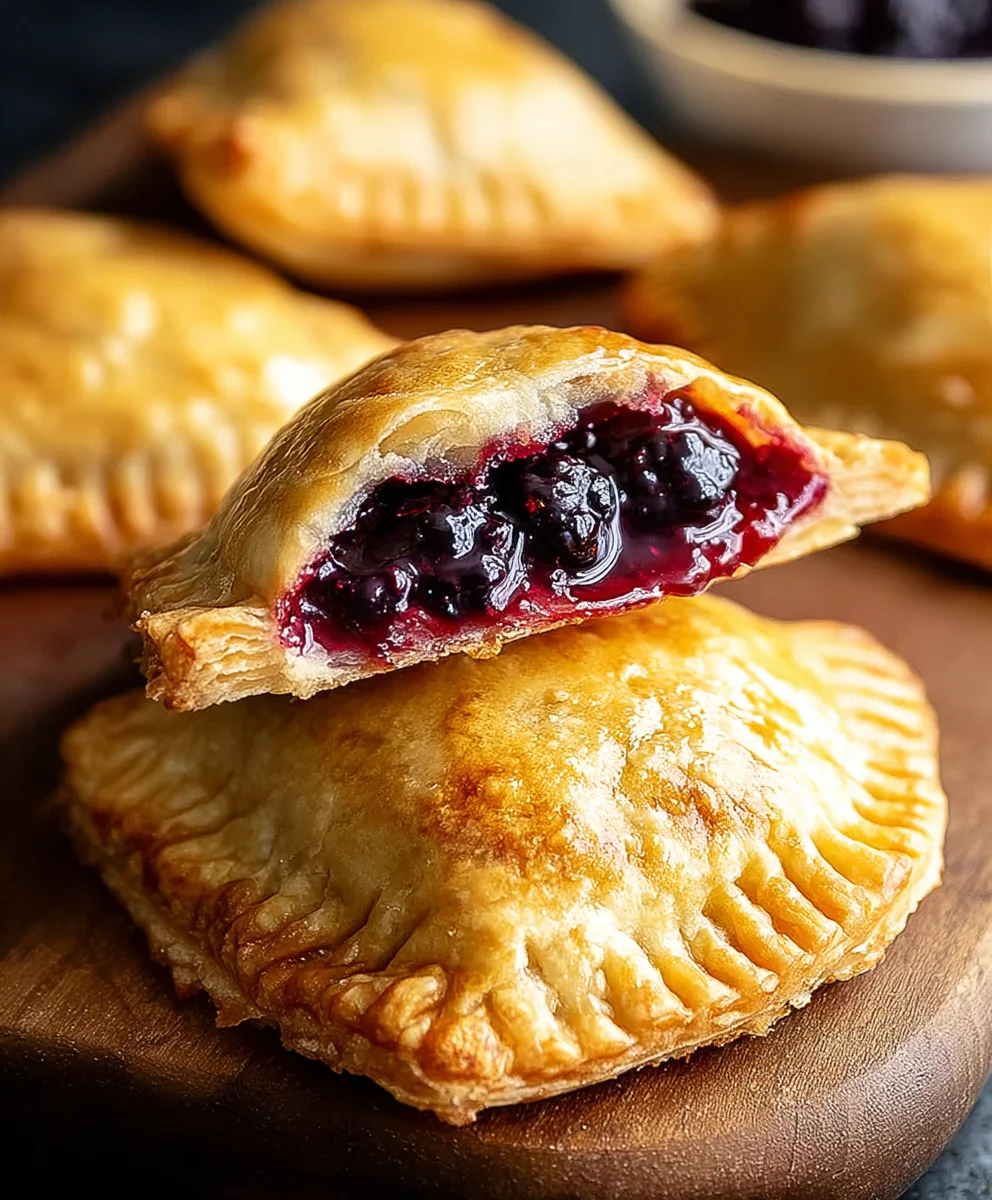
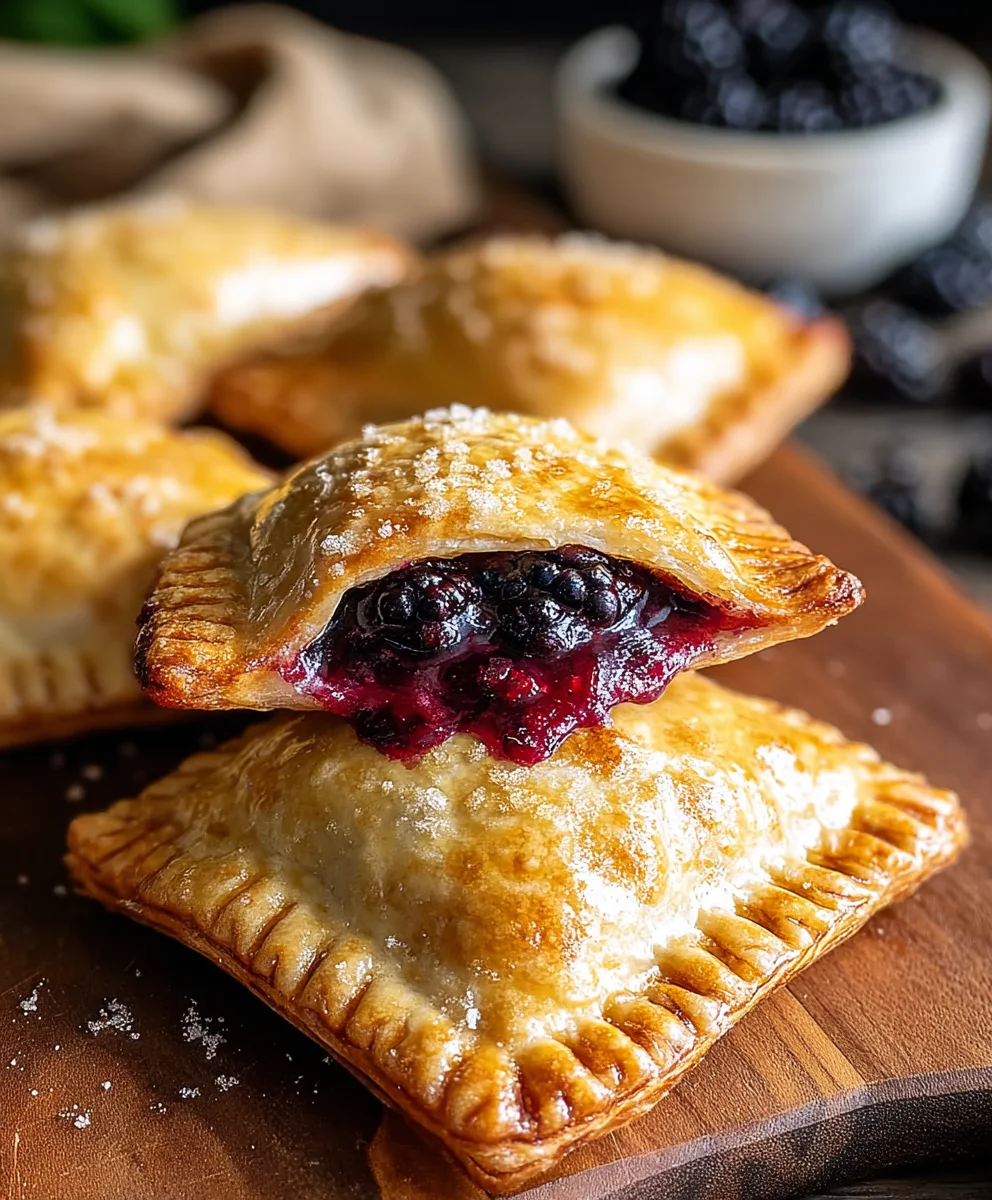
Blackberry Hand Pies are more than just a sweet treat; they’re a portable hug, a burst of summer sunshine, and a delightful reminder of simpler times. Imagine flaky, buttery pastry cradling a warm, jewel-toned filling of ripe blackberries, each bite a perfect balance of tartness and sweetness. It’s no wonder these individual delights are so beloved! People adore them for their charming presentation, their satisfying handheld nature that makes them perfect for picnics or a midday indulgence, and that irresistible rustic charm. What truly makes these Blackberry Hand Pies special is the way the humble blackberry transforms into a sophisticated filling, intensified by a touch of spice and lemon zest, all wrapped in a tender, golden crust that practically melts in your mouth. Get ready to fall in love with these delightful little pockets of joy.

Ingredients:
- 21 oz. can blackberry pie filling
- Refrigerated pie crust (typically two crusts per package)
- 1/2 cup powdered sugar
- 1 teaspoon corn syrup
- 1 tablespoon water
- Vegetable oil for frying (enough for about 1-2 inches depth in your frying pan)
Preparing the Dough and Filling
The foundation of any great hand pie is a flaky crust and a luscious filling. With this recipe, we’re taking a shortcut by using store-bought refrigerated pie crust, which makes these Blackberry Hand Pies incredibly accessible for any skill level. First, let’s get our dough ready. Carefully unroll your refrigerated pie crusts onto a lightly floured clean surface. You’ll want to handle them gently to avoid tearing. If the dough feels a little stiff from being in the refrigerator, let it sit at room temperature for about 10-15 minutes to make it more pliable.
Now, using a round cookie cutter or the rim of a glass (about 4-5 inches in diameter), cut out circles from each pie crust. You should aim to get about 4-6 circles from each crust, depending on the size of your cutter. Gather any scraps of dough, gently knead them together, and reroll to cut out additional circles. Don’t worry about perfect shapes; rustic is charming for hand pies!
Next, we prepare our blackberry filling. Open the 21 oz. can of blackberry pie filling. This canned filling is already sweetened and thickened, making it perfect for a quick and delicious dessert. Spoon a generous amount of the blackberry pie filling onto one half of each dough circle, leaving about a 1/2-inch border around the edge. Be careful not to overfill, as this can make it difficult to seal the pies and might cause them to burst during frying. A couple of tablespoons per pie should be sufficient.
Assembling the Hand Pies
This is where the magic happens – bringing it all together to create those delightful individual pockets of flavor. Take the other half of each dough circle and fold it over the filling, creating a half-moon shape. Press down the edges firmly with your fingers to seal. For an extra secure seal and a decorative touch, you can crimp the edges using the tines of a fork. Gently press the fork around the entire perimeter of each hand pie. This not only helps prevent the filling from leaking out during the frying process but also gives your Blackberry Hand Pies a lovely, classic finish.
Once assembled, you’ll want to make a few small slits in the top of each hand pie using a sharp knife or the tip of a paring knife. These vents are crucial! They allow steam to escape as the pies cook, preventing them from puffing up too much and potentially bursting, and also helping to ensure an even crispiness to the crust.
Frying the Hand Pies
Now for the exciting part – frying! Heat your vegetable oil in a heavy-bottomed skillet or Dutch oven over medium-high heat. You’ll want to have about 1-2 inches of oil in the pan. To test if the oil is hot enough, carefully drop a tiny piece of dough into the oil. If it sizzles and floats to the surface immediately, the oil is ready. The ideal temperature is around 350°F (175°C). If the oil is too cool, the hand pies will absorb too much grease and become soggy. If it’s too hot, the crust will brown too quickly before the filling has a chance to warm through.
Carefully place 2-3 hand pies into the hot oil at a time, being sure not to overcrowd the pan. Overcrowding will lower the oil temperature, leading to less crispy pies. Fry the hand pies for about 2-3 minutes per side, or until they are golden brown and puffed up. Use a slotted spoon or spider strainer to gently flip them over. Watch them closely, as they can brown quite quickly. Once both sides are beautifully golden, carefully remove them from the oil and place them on a wire rack set over a baking sheet lined with paper towels. This allows any excess oil to drain off, ensuring a perfectly crisp exterior.
Creating the Glaze and Finishing Touches
While the hand pies are still warm, it’s time to add a touch of sweetness and shine with a simple glaze. In a small bowl, whisk together the 1/2 cup of powdered sugar, 1 teaspoon of corn syrup, and 1 tablespoon of water. The corn syrup adds a lovely sheen and helps the glaze set slightly without becoming too hard. Whisk vigorously until the mixture is smooth and lump-free. If the glaze seems too thick, you can add a tiny bit more water, a drop at a time, until it reaches your desired drizzling consistency.
Once the Blackberry Hand Pies have cooled slightly but are still warm (this is key for the glaze to adhere nicely), you can drizzle the glaze over the top of each pie. You can use a spoon to liberally drizzle or create artistic patterns. This sweet glaze complements the tartness of the blackberries beautifully and adds an extra layer of indulgence to these already delicious treats. Allow the glaze to set for a few minutes before serving. Enjoy these warm, delightful Blackberry Hand Pies!
Conclusion:
And there you have it – your guide to creating delicious Blackberry Hand Pies! We’ve walked through each step, from preparing the flaky pastry to crafting that sweet and slightly tart blackberry filling. These delightful little pockets of joy are perfect for any occasion. Whether you’re baking them for a picnic, a potluck, or simply as a special treat for yourself, the result is always incredibly satisfying.
For serving, these hand pies are wonderful warm, perhaps with a dusting of powdered sugar or a dollop of whipped cream. They also hold up beautifully at room temperature, making them ideal for packing in lunchboxes or taking on the go. Don’t be afraid to experiment with variations! You could add a pinch of cinnamon or nutmeg to the filling for a warmer spice note, or even incorporate a splash of lemon zest to brighten the blackberry flavor even further. If you’re feeling adventurous, try a different berry or a combination of berries for a unique twist.
I truly encourage you to give these Blackberry Hand Pies a try. They are simpler to make than they might seem, and the reward of biting into a homemade pastry filled with juicy berries is simply unbeatable. Happy baking!
Frequently Asked Questions:
Can I make the pastry dough ahead of time?
Absolutely! The pastry dough can be made up to 2 days in advance and stored in the refrigerator. Just be sure to wrap it tightly in plastic wrap. For longer storage, you can freeze the dough for up to 3 months. Let it thaw in the refrigerator overnight before using.
What if I don’t have fresh blackberries?
Frozen blackberries work wonderfully in this recipe! You may need to cook the filling slightly longer to allow the frozen berries to break down and release their juices. Ensure any excess liquid is thickened appropriately, just as you would with fresh berries.
Blackberry Hand Pies- Easy Sweet Summer Treat
Easy and delicious sweet summer treat featuring flaky pastry filled with sweet blackberry filling and topped with a simple glaze.
Ingredients
-
21 oz. can blackberry pie filling
-
Refrigerated pie crust
-
1/2 cup powdered sugar
-
1 teaspoon corn syrup
-
1 tablespoon water
-
Vegetable oil for frying
Instructions
-
Step 1
Unroll refrigerated pie crusts onto a lightly floured surface. Let sit at room temperature for 10-15 minutes if stiff. Cut out 4-5 inch circles using a cookie cutter or glass rim. Gather scraps and reroll for more circles. -
Step 2
Spoon a generous amount of blackberry pie filling onto one half of each dough circle, leaving a 1/2-inch border. Do not overfill. -
Step 3
Fold the other half of each dough circle over the filling to create a half-moon shape. Press edges firmly to seal and crimp with a fork for extra security and decoration. -
Step 4
Make a few small slits on the top of each hand pie with a sharp knife to allow steam to escape. -
Step 5
Heat 1-2 inches of vegetable oil in a heavy-bottomed skillet or Dutch oven over medium-high heat to about 350°F (175°C). Carefully fry 2-3 hand pies at a time for 2-3 minutes per side until golden brown and puffed. Drain on a wire rack. -
Step 6
While pies are still warm, whisk together 1/2 cup powdered sugar, 1 teaspoon corn syrup, and 1 tablespoon water in a small bowl until smooth. Drizzle the glaze over the warm hand pies.
Important Information
Nutrition Facts (Per Serving)
It is important to consider this information as approximate and not to use it as definitive health advice.
Allergy Information
Please check ingredients for potential allergens and consult a health professional if in doubt.


Leave a Comment