
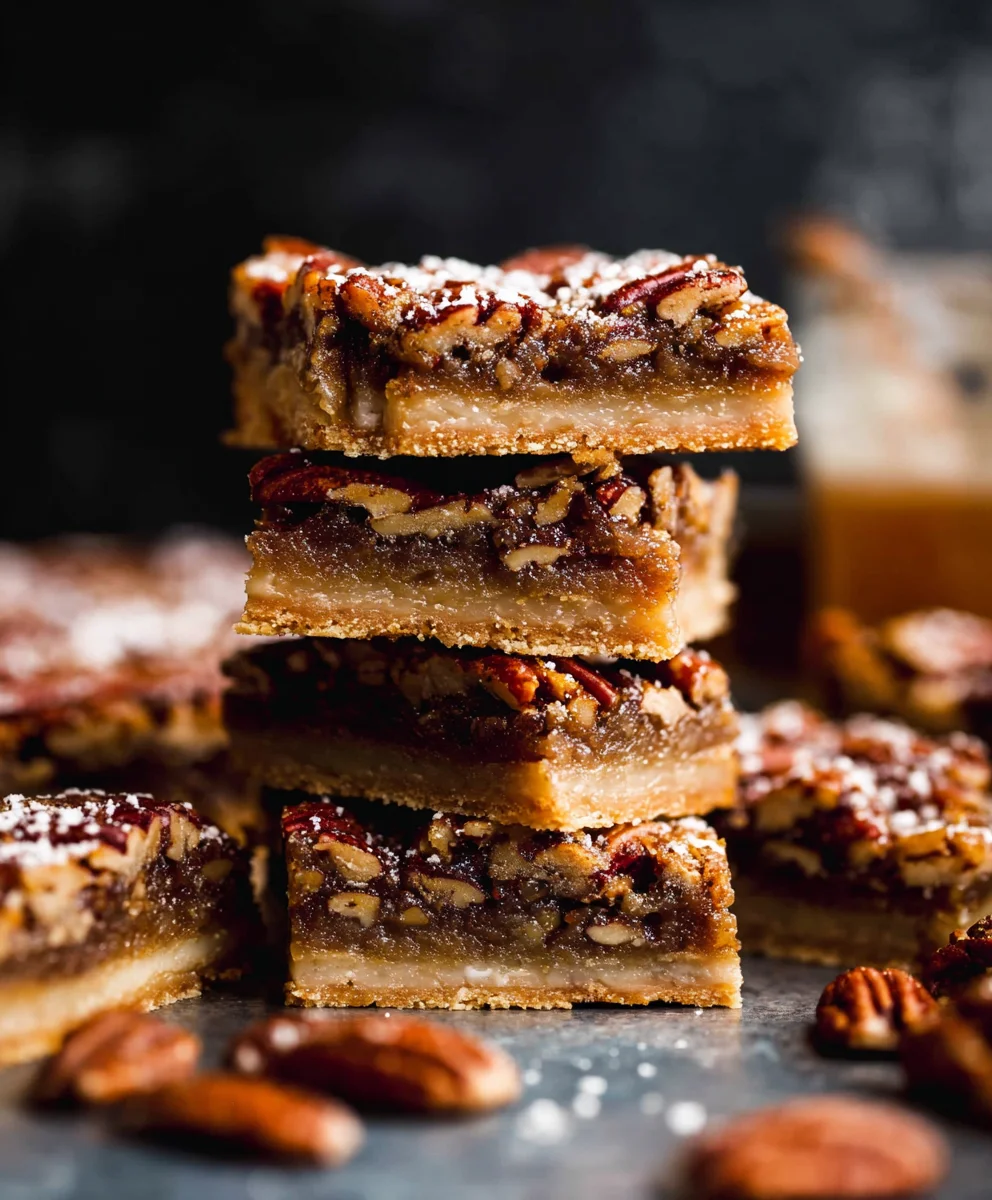
Salted Maple Pecan Pie Bars are more than just a dessert; they are an invitation to pure, unadulterated bliss in every bite. Have you ever craved that perfect balance of sweet and savory, wrapped up in a convenient, utterly decadent package? Well, you’ve found it right here.
Pecan pie itself holds a cherished place in American culinary history, particularly within Southern traditions, often symbolizing warmth and celebration during festive seasons. Our rendition elevates this beloved classic by infusing it with the rich, earthy sweetness of pure maple syrup, a nod to North America’s bountiful forests, and then grounding it all with a delicate sprinkle of sea salt. This modern twist transforms a familiar favorite into something truly extraordinary and irresistibly gourmet.
People absolutely adore these bars not only for their incredibly complex flavor profile—the gooey, caramelized filling contrasting beautifully with the satisfying crunch of pecans and a buttery shortbread crust—but also for their remarkable convenience. Forget the fuss of slicing a traditional pie; these bars are perfectly portioned, making them ideal for gatherings, school lunches, or simply a delightful treat on the go. The addictive interplay of sweet maple, nutty pecans, and that essential hint of salt creates a symphony of flavors that will have everyone reaching for just one more. I am incredibly excited for you to experience the magic of these Salted Maple Pecan Pie Bars.

Ingredients:
-
For the Buttery Shortbread Crust:
- 1 ½ cups (180g) all-purpose flour: I always opt for unbleached, all-purpose flour as it provides the perfect structure without making the crust too dense.
- ½ cup (100g) granulated sugar: Just enough to give our shortbread crust a delicate sweetness, complementing the rich filling.
- ¼ teaspoon fine sea salt: A tiny bit of salt enhances all the other flavors, truly bringing out the butteriness of the crust.
- 1 cup (226g) unsalted butter, very cold and cut into ½-inch cubes: This is absolutely crucial for a tender, flaky shortbread. Cold butter creates pockets of steam, resulting in that delightful crumbly texture we all adore. Don’t skimp on keeping it cold!
- 1 teaspoon pure vanilla extract: Adds a warm, aromatic depth that just makes everything taste better.
-
For the Salted Maple Pecan Filling:
- ½ cup (113g) unsalted butter: Melted butter forms the rich base of our filling, contributing to its incredible chewiness.
- 1 cup (200g) packed light brown sugar: Light brown sugar brings a lovely caramel note and moisture to the filling, creating a wonderfully chewy texture.
- ¾ cup (240g) pure maple syrup: Make sure to use good quality, pure maple syrup for the best flavor. This is the star of our “Salted Maple Pecan Pie Bars,” after all! Avoid pancake syrup substitutes.
- 2 large eggs: These act as the binder for our filling, giving it structure and that classic gooey pecan pie consistency.
- 1 teaspoon pure vanilla extract: Essential for enhancing the overall sweetness and complexity of the filling.
- 1 teaspoon fine sea salt: This is the “salted” part of our Salted Maple Pecan Pie Bars! It beautifully balances the sweetness of the maple and brown sugar, making the flavors pop. Don’t skip it!
- 2 cups (200g) pecan halves: I prefer halves as they offer a great textural contrast and look beautiful, but chopped pecans work just fine too if that’s what you have on hand.
-
For the Optional Maple Glaze:
- 1 cup (120g) confectioners’ sugar (powdered sugar), sifted: Sifting helps prevent lumps, giving you a smooth, pourable glaze.
- 2 tablespoons pure maple syrup: Reinforces that lovely maple flavor in the glaze.
- 1-2 tablespoons milk (any kind), or cream: Use just enough to reach your desired drizzling consistency.
- Pinch of fine sea salt: Another tiny touch of salt to balance the sweetness of the glaze.
Preparing the Buttery Shortbread Crust
-
Preheat and Prepare Your Pan:
Preheat your oven to 350°F (175°C). This ensures the oven is at the correct temperature when your crust is ready to go in, preventing uneven baking. Line a 9×13-inch baking pan with parchment paper, leaving an overhang on the longer sides. This parchment “sling” will be your best friend later when you need to lift the cooled bars out of the pan for easy cutting. A little spritz of non-stick cooking spray on the pan before laying the parchment down can help it stick, making the process smoother.
-
Combine Dry Ingredients:
In a large mixing bowl, whisk together the 1 ½ cups all-purpose flour, ½ cup granulated sugar, and ¼ teaspoon fine sea salt. Whisking ensures these ingredients are evenly distributed, so every bite of your shortbread crust has consistent flavor. I like to use a balloon whisk for this, getting plenty of air into the mixture.
-
Incorporate the Cold Butter:
Add the 1 cup of very cold, cubed unsalted butter to the flour mixture. Now, you have a few options here:
- By hand: Use your fingertips to rub the butter into the flour mixture. Work quickly to prevent the butter from getting too warm. You’re aiming for a coarse, sandy mixture with some pea-sized pieces of butter remaining. This method gives you excellent control and is quite satisfying.
- Using a pastry blender: This tool is specifically designed for cutting butter into flour. Press it down and twist until the butter is incorporated to the desired consistency.
- In a food processor: For the quickest method, pulse the cold butter with the dry ingredients until coarse crumbs form. Be careful not to over-process, as this can lead to a tough crust. Just a few quick pulses will do the trick.
Once the butter is incorporated, stir in the 1 teaspoon pure vanilla extract. The mixture will still look crumbly, but it should hold together if you press a bit between your fingers.
-
Press the Crust into the Pan:
Transfer the crumbly dough mixture into your prepared 9×13-inch baking pan. Use your hands or the bottom of a flat-bottomed measuring cup to firmly and evenly press the mixture into the bottom of the pan. Consistency is key here; an even crust bakes uniformly. Take your time to ensure there are no thin spots, especially in the corners. A perfectly pressed crust is the foundation for outstanding Salted Maple Pecan Pie Bars.
-
Pre-bake the Crust:
Bake the pressed crust in the preheated oven for 18-20 minutes, or until the edges are lightly golden brown and it smells wonderfully buttery. This step, called “blind baking” or “pre-baking,” is crucial. It ensures your shortbread crust is fully cooked and crisp, preventing it from becoming soggy once the filling is added. When it comes out, the aroma will fill your kitchen, a promise of the deliciousness to come! Remove the pan from the oven and set it aside to cool slightly while you prepare the filling. Keep the oven on, reducing the temperature slightly as specified in the next section.
Crafting the Salted Maple Pecan Filling
-
Melt the Butter and Combine with Sugars:
While your crust is cooling, melt the ½ cup unsalted butter in a medium saucepan over low heat. Once melted, remove from heat. Stir in the 1 cup packed light brown sugar and the ¾ cup pure maple syrup until the sugar is fully dissolved and the mixture is smooth. It’s important to make sure the sugar crystals are completely integrated; this creates that wonderfully smooth, chewy texture in the final filling of our Salted Maple Pecan Pie Bars.
-
Add Remaining Wet Ingredients:
Allow the sugar and syrup mixture to cool for a few minutes. This is an important step to prevent scrambling your eggs! In a separate bowl, lightly whisk the 2 large eggs. Once the maple mixture has cooled slightly (it should still be warm but not scalding hot to the touch), gradually whisk the beaten eggs into the maple mixture. Whisk continuously as you add the eggs to ensure they temper properly and don’t cook. Stir in the 1 teaspoon pure vanilla extract and the 1 teaspoon fine sea salt. The salt is truly what elevates these bars, cutting through the sweetness and bringing a lovely complexity.
-
Fold in the Pecans:
Gently fold the 2 cups pecan halves into the prepared filling mixture. Make sure all the pecans are coated evenly. I love seeing those beautiful pecan halves swimming in the rich, golden filling—it’s a sign of the deliciousness that awaits!
Assembling and Baking the Salted Maple Pecan Pie Bars
-
Reduce Oven Temperature:
Reduce your oven temperature to 325°F (160°C). A slightly lower temperature is ideal for baking the filling evenly and preventing the pecans from burning while ensuring the custard sets perfectly.
-
Pour Filling Over Crust:
Carefully pour the pecan filling over the warm, pre-baked shortbread crust in the pan. Use a spatula to spread the pecans evenly across the entire surface. You want every slice of your Salted Maple Pecan Pie Bars to have a generous amount of that irresistible filling.
-
Bake to Golden Perfection:
Return the pan to the preheated 325°F (160°C) oven and bake for 35-45 minutes. The exact baking time can vary depending on your oven, so keep an eye on them. The bars are done when the center is mostly set, with just a slight jiggle remaining when you gently shake the pan, and the edges are beautifully golden brown. The pecans on top should also be toasted and fragrant. If the pecans appear to be browning too quickly, you can loosely tent the pan with aluminum foil for the last 10-15 minutes of baking.
-
The Crucial Cooling Process:
This is perhaps the most important step for perfectly set Salted Maple Pecan Pie Bars! Once baked, remove the pan from the oven and place it on a wire rack to cool completely. Allow the bars to cool for at least 3-4 hours at room temperature, or even better, chill them in the refrigerator for at least 2 hours (or overnight) before cutting.
Why is this so important? The filling needs ample time to firm up and set properly. If you try to cut them while they are still warm, the gooey filling will likely run, and the bars will fall apart. Patience is truly a virtue here; it will ensure you get those beautiful, clean slices that make these bars so appealing. I often make these the day before I plan to serve them, letting them chill overnight for the best results. A fully chilled bar makes for an absolute dream of a slice.
-
Lift and Cut:
Once completely cooled and set, use the parchment paper overhang as handles to carefully lift the entire slab of Salted Maple Pecan Pie Bars out of the pan and onto a cutting board. Use a large, sharp knife to cut the bars into squares or rectangles. For the cleanest cuts, wipe your knife clean with a damp cloth between each slice. I typically get 12-16 bars from a 9×13-inch pan, but you can adjust the size to your preference.
Making the Optional Maple Glaze
-
Whisk Glaze Ingredients:
In a small bowl, whisk together the 1 cup sifted confectioners’ sugar, 2 tablespoons pure maple syrup, and a pinch of fine sea salt.
-
Adjust Consistency:
Gradually add the milk or cream, 1 teaspoon at a time, whisking until you achieve a smooth, pourable, but not too thin, consistency. You want it thick enough to visibly drizzle but thin enough to flow.
-
Drizzle and Serve:
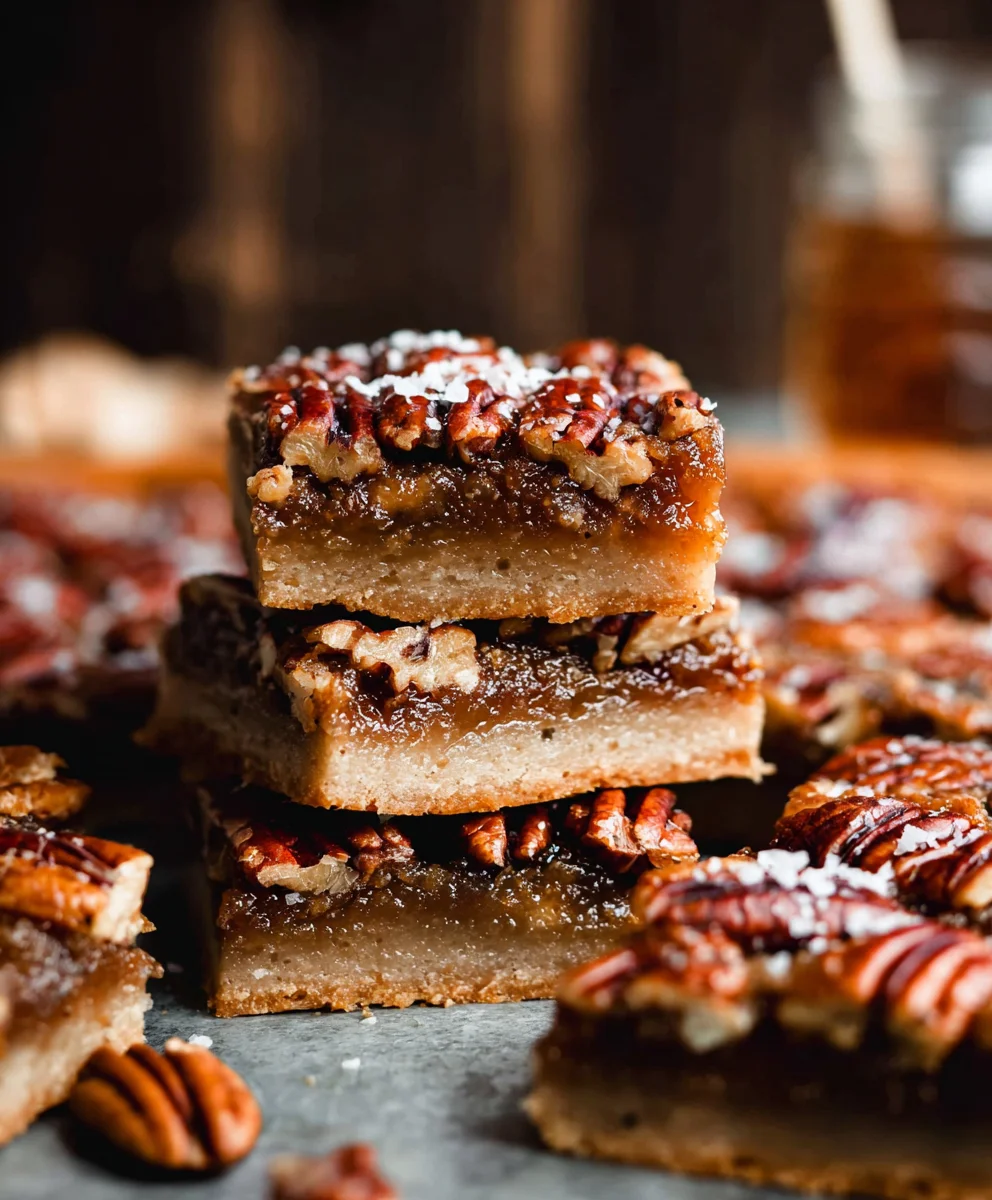
Once your Salted Maple Pecan Pie Bars are completely cooled and cut, drizzle the maple glaze over the top. You can do this in a messy zig-zag pattern or a more controlled design. Let the glaze set for about 15-20 minutes before serving. This extra layer of maple goodness truly takes these bars to the next level of indulgence!
Serving and Storage Tips
-
Serving Suggestions:
These Salted Maple Pecan Pie Bars are incredibly rich and satisfying on their own. They also pair wonderfully with a scoop of vanilla bean ice cream or a dollop of freshly whipped cream. The slight warmth of the bar against the cold ice cream creates a delightful contrast. They are perfect for holiday gatherings, potlucks, or just a cozy evening treat.
-
Storage:
Store any leftover Salted Maple Pecan Pie Bars in an airtight container at room temperature for up to 3 days, or in the refrigerator for up to 5-7 days. If you’ve added the glaze, they might soften slightly faster, so refrigeration is recommended. For longer storage, you can freeze individual bars (without glaze, if possible, or glaze after thawing) wrapped tightly in plastic wrap and then placed in a freezer-safe bag or container for up to 3 months. Thaw at room temperature or in the refrigerator before serving.
-
Enjoy Your Creation:
There’s nothing quite like the combination of a crisp, buttery shortbread crust, a chewy, maple-infused pecan filling, and that delightful hint of salt. Every bite of these Salted Maple Pecan Pie Bars is a celebration of autumn flavors, and I’m confident you and your loved ones will absolutely adore them! Enjoy the fruits of your labor!
<h2>Conclusion:</h2>
<p>You know, sometimes a recipe just <strong>clicks</strong>. It’s that perfect storm of familiar comfort and exciting new flavors, and that’s exactly what I’ve found with these incredible bars. They’re more than just a dessert; they’re an experience, a delightful journey for your taste buds that manages to be both profoundly comforting and subtly sophisticated. If you’ve been searching for that quintessential treat that balances indulgence with a touch of elegance, then trust me, you absolutely <strong>have</strong> to try making these <strong>Salted Maple Pecan Pie Bars</strong>. They take everything you love about a classic pecan pie – that rich, gooey filling, the crunchy nut topping – and transform it into a convenient, delightful bar format, made even more irresistible with the profound, earthy notes of real maple syrup and a crucial hint of sea salt to expertly cut through the sweetness. This isn’t just another dessert; it’s a testament to how simple ingredients, combined with a little love and the right technique, can create something truly extraordinary. The buttery, shortbread-like crust provides the perfect sturdy base, contrasting beautifully with the tender, chewy filling and the crisp, toasted pecans. Each bite offers a harmonious blend of textures and an explosion of sweet, salty, and nutty flavors that lingers wonderfully on the palate, inviting you back for just one more.</p>
<p>When it comes to serving these beauties, the possibilities are as delightful and varied as the bars themselves. Of course, they are absolutely phenomenal enjoyed at room temperature, perhaps with a steaming cup of freshly brewed coffee or a soothing herbal tea – a simple, yet utterly perfect pairing for a quiet afternoon treat or a relaxed brunch. <strong>But why stop there when you can elevate the experience to pure decadence?</strong> Imagine a warm square, just slightly heated in the microwave or a low oven, nestled alongside a generous scoop of artisanal vanilla bean ice cream, allowing the cold creaminess to melt gently into the rich, warm filling. For a truly unforgettable twist, consider a scoop of high-quality salted caramel ice cream; the additional layer of salt and caramel notes will create an explosion of flavor that will leave your taste buds singing a symphony of joy. A dollop of freshly whipped cream, perhaps lightly sweetened with a touch of maple syrup itself, would also be a magnificent accompaniment, adding a cloud-like texture contrast to the dense, chewy bar. And if you’re feeling particularly fancy, a delicate drizzle of high-quality pure maple syrup over the top before serving adds a beautiful sheen and an extra layer of that signature maple goodness, making each plate feel like a gourmet dessert.</p>
<p>One of the things I truly adore about baking is the freedom to personalize, and these bars are incredibly forgiving and open to creative variations, allowing you to tailor them perfectly to your taste or what you have on hand. While pecans are king here, don’t hesitate to experiment with other nuts if you’re feeling adventurous. A mix of walnuts and pecans, or even a batch made entirely with hazelnuts for a slightly different aromatic profile, would be utterly delicious. For those who simply can’t get enough chocolate, a handful of dark chocolate chips or chunks folded into the filling mixture before baking, or even sprinkled on top during the last 10 minutes, would introduce a wonderful bittersweet counterpoint that complements the maple and pecan beautifully. You could also play with the spice profile; a delicate pinch of cinnamon or nutmeg, or even a tiny dash of cayenne pepper for a subtle warmth and unexpected kick, can significantly elevate the complexity of the flavors, making them even more intriguing. If you’re looking for a different crust, a graham cracker crust offers a delightful, slightly crumbly texture and a different kind of sweetness, while a classic buttery shortbread crust provides a more refined and crumbly base. For those with dietary considerations, a gluten-free shortbread or oat-based crust can easily be adapted, ensuring everyone can enjoy these fantastic bars. These slight tweaks allow you to tailor the recipe to your personal taste, making each batch uniquely yours and showcasing your culinary creativity.</p>
<p>So, my dear fellow bakers and dessert enthusiasts, I genuinely hope you’re feeling inspired to roll up your sleeves and dive into creating these delightful treats. I promise you, the effort involved is minimal, especially for such a spectacular reward. There’s something incredibly satisfying about pulling a tray of these golden, glistening bars from the oven, filling your home with the intoxicating aroma of maple, nuts, and sweet baked goodness – it’s an experience in itself. Don’t let any hesitation hold you back; this recipe is designed for success, and I have every confidence that you will create something truly special and delicious that will impress anyone lucky enough to try it. <strong>Once you’ve made them – and undoubtedly savored every last crumb – I would be absolutely thrilled if you would share your experience!</strong> Did you stick to the original recipe, or did you venture into some of the exciting variations? What was your favorite part of the process, or the most memorable reaction from your family or friends? I absolutely love hearing about your kitchen adventures, your triumphs, and even your funny mishaps, so please, do come back and tell me all about it. Your stories and insights are incredibly valuable and inspiring to me and to our entire community of food lovers. Happy baking, and get ready to fall head over heels for your very own batch of these irresistible, perfectly balanced bars!</p>
Salted Maple Pecan Pie Bars
Salted Maple Pecan Pie Bars offer a perfect balance of sweet and savory, blending the rich, earthy sweetness of pure maple syrup with the satisfying crunch of pecans and a buttery shortbread crust, all finished with a delicate hint of sea salt. These conveniently portioned bars are ideal for any gathering or a delightful treat on the go.
Ingredients
-
1 ½ cups (180g) all-purpose flour
-
½ cup (100g) granulated sugar
-
¼ teaspoon fine sea salt (for crust)
-
1 cup (226g) unsalted butter, very cold and cubed (for crust)
-
1 teaspoon pure vanilla extract (for crust)
-
½ cup (113g) unsalted butter, melted (for filling)
-
1 cup (200g) packed light brown sugar
-
¾ cup (240g) pure maple syrup (for filling)
-
2 large eggs
-
1 teaspoon pure vanilla extract (for filling)
-
1 teaspoon fine sea salt (for filling)
-
2 cups (200g) pecan halves
-
1 cup (120g) confectioners’ sugar, sifted (optional glaze)
-
2 tablespoons pure maple syrup (optional glaze)
-
1-2 tablespoons milk or cream (optional glaze)
-
Pinch of fine sea salt (optional glaze)
Instructions
-
Step 1
Preheat oven to 350°F (175°C). Line a 9×13-inch baking pan with parchment paper, leaving an overhang. In a large bowl, whisk 1 ½ cups flour, ½ cup granulated sugar, and ¼ teaspoon fine sea salt. Cut in 1 cup very cold, cubed unsalted butter using fingertips, a pastry blender, or food processor until coarse crumbs form. Stir in 1 teaspoon vanilla extract. Press mixture evenly into the prepared pan. -
Step 2
Bake the crust for 18-20 minutes, or until lightly golden. Remove from oven and cool slightly. Keep oven on. -
Step 3
In a medium saucepan over low heat, melt ½ cup unsalted butter. Remove from heat and stir in 1 cup packed light brown sugar and ¾ cup pure maple syrup until sugar is dissolved. Let cool for a few minutes. In a separate bowl, lightly whisk 2 large eggs. Gradually whisk beaten eggs into the cooled maple mixture. Stir in 1 teaspoon vanilla extract and 1 teaspoon fine sea salt. Gently fold in 2 cups pecan halves. -
Step 4
Reduce oven temperature to 325°F (160°C). Pour the pecan filling over the pre-baked crust, spreading pecans evenly. Bake for 35-45 minutes, until the center is mostly set with a slight jiggle, and edges are golden. Tent with foil if pecans brown too quickly. -
Step 5
Remove from oven and cool completely on a wire rack for at least 3-4 hours at room temperature, or chill in the refrigerator for 2 hours (or overnight) until fully set. Use parchment overhang to lift bars from the pan. Cut into squares or rectangles with a sharp knife, wiping between cuts for clean slices. -
Step 6
In a small bowl, whisk 1 cup sifted confectioners’ sugar, 2 tablespoons pure maple syrup, and a pinch of fine sea salt. Gradually add 1-2 tablespoons milk or cream, 1 teaspoon at a time, until a smooth, pourable consistency is reached. Drizzle glaze over cooled, cut bars and let set for 15-20 minutes before serving.
Important Information
Nutrition Facts (Per Serving)
It is important to consider this information as approximate and not to use it as definitive health advice.
Allergy Information
Please check ingredients for potential allergens and consult a health professional if in doubt.


Leave a Comment