
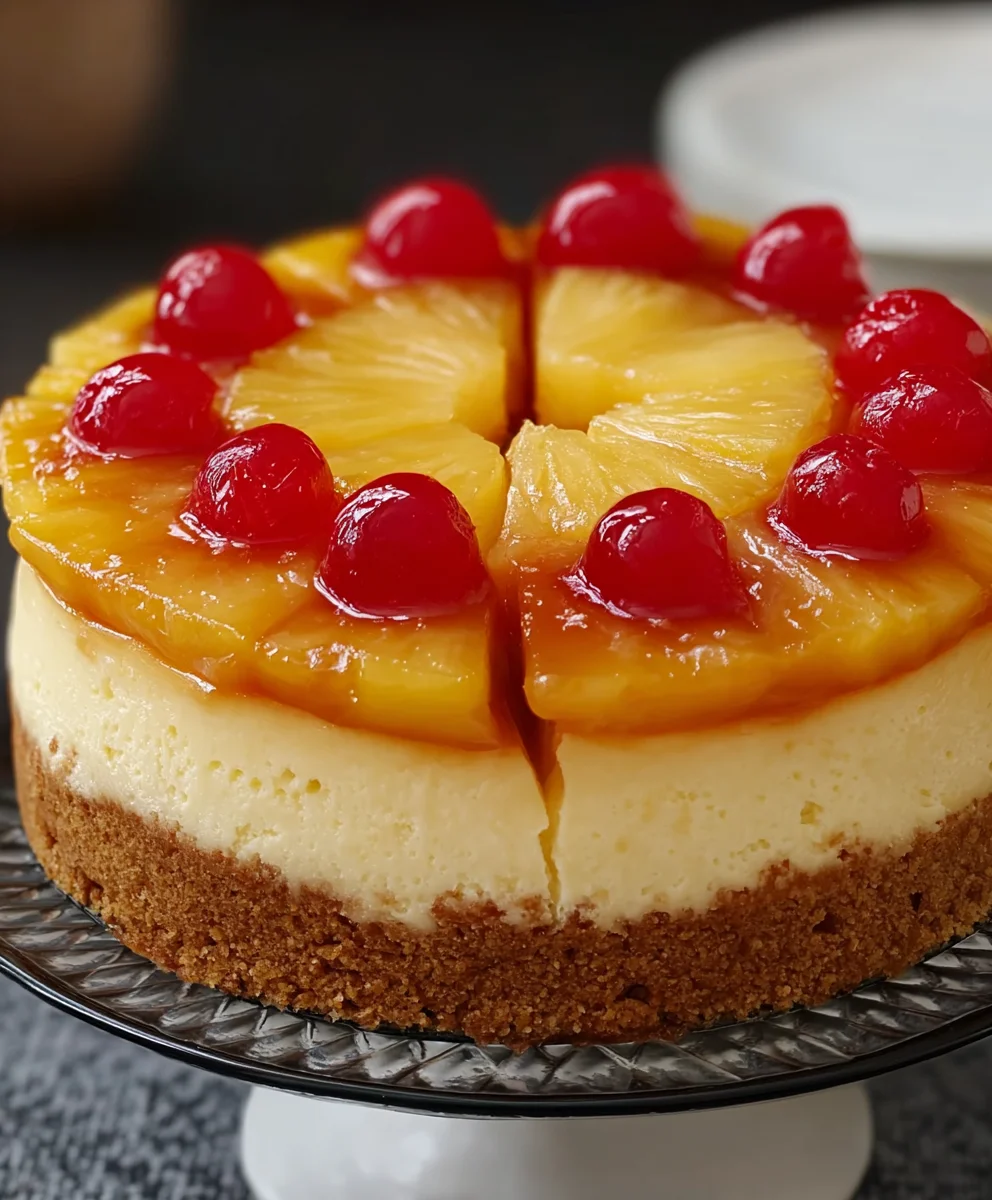
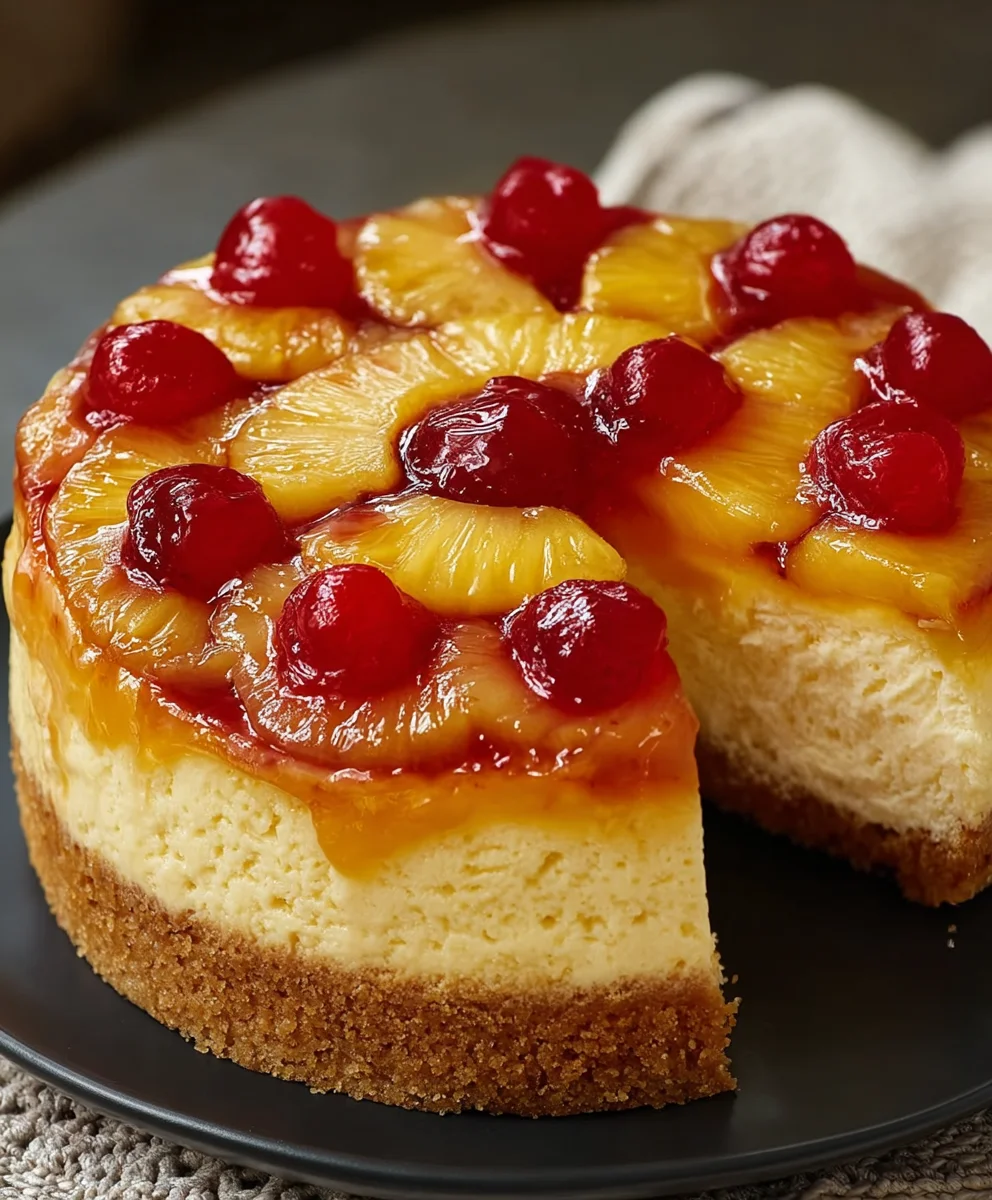
Pineapple Upside Down Cheesecake Recipe – I am thrilled to share a dessert that perfectly marries two beloved classics into one show-stopping creation. Imagine the rich, creamy decadence of a cheesecake, artfully combined with the vibrant, caramelized sweetness of a pineapple upside-down cake. This isn’t just a dessert; it’s an experience, a delightful twist that has captivated taste buds and garnered countless compliments, becoming a firm favorite in my kitchen and among my guests.
The concept of the pineapple upside-down cake emerged in American kitchens in the early 20th century, becoming a sensation for its beautiful presentation and delightful flavor. Cheesecake, with its ancient origins dating back to Greece, has evolved into a universal symbol of indulgence and celebration across countless cultures. My rendition takes the best of both worlds, offering a spectacular dessert that truly stands out. People adore this dish for its incredible balance of flavors: the tangy-sweet pineapple and its buttery, caramelized juices cut through the luxurious, velvety cream cheese filling, all resting on a perfectly baked, buttery crust. The visual appeal, with its glistening pineapple rings and vibrant maraschino cherry accents, is simply irresistible, making it an ideal centerpiece for any gathering. This Pineapple Upside Down Cheesecake Recipe promises not only a culinary adventure but also a guaranteed crowd-pleaser that delivers on taste, texture, and visual charm.

Ingredients:
- For the Pineapple Topping:
- 1/4 cup (56g) unsalted butter, melted
- 1/2 cup (100g) packed light brown sugar
- 1 (20-ounce) can pineapple rings in heavy syrup, drained well (reserve 2 tablespoons of syrup for the filling)
- 10-12 maraschino cherries, halved or whole, stems removed
- For the Graham Cracker Crust:
- 1 1/2 cups (180g) graham cracker crumbs (from about 10-12 full graham cracker sheets)
- 1/4 cup (50g) granulated sugar
- 1/2 teaspoon ground cinnamon (optional, but I love the warmth it adds!)
- 6 tablespoons (85g) unsalted butter, melted
- For the Cheesecake Filling:
- 3 (8-ounce) packages full-fat cream cheese, softened to room temperature
- 1 cup (200g) granulated sugar
- 1/4 cup (50g) packed light brown sugar
- 2 tablespoons reserved pineapple syrup (from the canned pineapple)
- 1 teaspoon pure vanilla extract
- 1/4 teaspoon salt
- 2 large eggs, at room temperature
- 1 large egg yolk, at room temperature
- 1/2 cup (120g) full-fat sour cream, at room temperature
- Optional Garnish:
- Whipped cream
- Fresh mint sprigs
Prepare Your Springform Pan and Pineapple Topping
This is where the magic of the “upside down” truly begins for our Pineapple Upside Down Cheesecake Recipe. Taking a little extra time here ensures a beautiful presentation and a delicious caramelized pineapple layer.
- First things first, I grab my 9-inch springform pan. I always make sure it’s completely clean and dry. To prevent any leaks during the water bath baking process, which is essential for a creamy cheesecake, I like to double-wrap the bottom and sides of the pan with heavy-duty aluminum foil. I start by tearing off two large sheets, placing one perpendicular to the other, and then carefully place the springform pan in the center. I wrap them up around the sides, trying to get a snug fit. This creates a really good barrier against water seeping in.
- Next, I preheat my oven to 325°F (160°C). This gives the oven time to come to temperature while I prepare the pineapple layer and crust.
- In a small microwave-safe bowl, I melt 1/4 cup of unsalted butter. Once it’s completely liquid, I pour it directly into the bottom of my foil-wrapped springform pan. I gently swirl the pan to ensure the butter evenly coats the entire bottom surface.
- Then, I sprinkle 1/2 cup of packed light brown sugar evenly over the melted butter. It’s important to distribute it as much as possible, as this will combine with the butter to form that wonderful caramel sauce after baking.
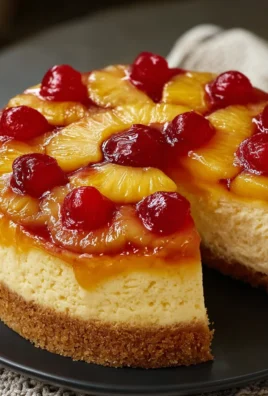
- Now for the star of the show: the pineapple rings! I take my drained pineapple rings and arrange them in a single layer over the brown sugar and butter. I usually start by placing one ring directly in the center of the pan. Then, I arrange the remaining rings around it, slightly overlapping them if necessary, to cover the entire bottom. The goal is to leave as few gaps as possible, because every bit covered by pineapple will be a delicious, sweet bite.
- Once the pineapple rings are in place, I strategically tuck my halved maraschino cherries into the empty spaces between the rings. I love the pop of color they add, and their sweet-tart flavor complements the pineapple beautifully. Sometimes, I even place a cherry half in the center of each pineapple ring for an extra flourish. This creates a visually stunning base that will become the top of your Pineapple Upside Down Cheesecake!
Crafting the Graham Cracker Crust
A sturdy, flavorful crust is the foundation of any great cheesecake, and our Pineapple Upside Down Cheesecake is no exception. This part is quick and easy, but don’t underestimate its importance!
- To make the graham cracker crumbs, I usually reach for my food processor. It makes quick work of crushing graham cracker sheets into fine crumbs. If you don’t have a food processor, no worries! You can place the graham crackers in a large Ziploc bag and crush them with a rolling pin or the bottom of a heavy glass until they’re finely crushed. I measure out 1 1/2 cups of these glorious crumbs.
- In a medium-sized bowl, I combine the graham cracker crumbs, 1/4 cup of granulated sugar, and my optional but highly recommended 1/2 teaspoon of ground cinnamon. I give it a good stir with a fork to ensure everything is well mixed.
- In a separate small, microwave-safe bowl, I melt 6 tablespoons of unsalted butter until it’s completely liquid.
- I then pour the melted butter over the graham cracker mixture. Using a fork, I stir and combine everything until the crumbs are uniformly moistened. The mixture should resemble wet sand – if you pinch a bit between your fingers, it should hold together.
- Now, here’s a crucial step: I carefully spoon the graham cracker mixture over the pineapple and cherry layer in the springform pan. I try to distribute it as evenly as possible.
- Using the bottom of a flat-bottomed glass or a measuring cup, I firmly press the crust mixture down into an even layer. It’s important to press quite firmly here, especially around the edges, to ensure the crust is compact and won’t crumble when sliced. A well-pressed crust holds its shape beautifully.
- Once the crust is pressed, I pop the pan into the preheated oven for about 10-12 minutes. This par-baking step helps to set the crust, making it sturdier and preventing it from becoming soggy once the cheesecake filling is added.
- After 10-12 minutes, I carefully remove the pan from the oven and set it aside to cool slightly while I prepare the cheesecake filling. I leave the oven on, as it will be needed again shortly.
Whipping Up the Luscious Cheesecake Filling
This is the heart of our Pineapple Upside Down Cheesecake Recipe – a truly creamy, rich, and utterly delightful cheesecake filling. The secret to a perfectly smooth filling is using room temperature ingredients and not overmixing.
- Before I even think about mixing, I make sure all my dairy ingredients – the cream cheese, eggs, egg yolk, and sour cream – are at true room temperature. I usually take them out of the fridge at least 1-2 hours before I plan to start baking. Cold ingredients don’t emulsify properly and can lead to a lumpy filling.
- In the bowl of my stand mixer fitted with the paddle attachment (or a large bowl with a hand mixer), I place the three packages of softened cream cheese. I beat the cream cheese on medium speed for about 2-3 minutes until it’s incredibly smooth and creamy, with no lumps whatsoever. This initial beating is vital for a silky-smooth texture.
- Next, I gradually add the 1 cup of granulated sugar and 1/4 cup of packed light brown sugar to the cream cheese, continuing to beat on medium speed. I scrape down the sides of the bowl frequently to ensure all the sugar is incorporated and the mixture remains smooth. I beat this for another 2-3 minutes until the sugar is fully dissolved and the mixture is light and fluffy.
- Now it’s time to add flavor! I stir in the 2 tablespoons of reserved pineapple syrup, 1 teaspoon of pure vanilla extract, and 1/4 teaspoon of salt. I mix until just combined. The pineapple syrup truly enhances the overall “Pineapple Upside Down Cheesecake” flavor.
- With the mixer on low speed, I add the 2 large eggs and 1 large egg yolk, one at a time. This is where I am extra cautious not to overmix! I beat each egg just until it’s incorporated into the batter, scraping down the sides of the bowl after each addition. Overmixing eggs introduces too much air into the batter, which can cause the cheesecake to crack during baking and cooling.
- Finally, I gently fold in the 1/2 cup of full-fat sour cream. I use a spatula for this part, stirring just until the sour cream is evenly distributed and the batter is smooth. The sour cream adds a wonderful tang and contributes significantly to the cheesecake’s rich, creamy texture.
- I give the batter one final scrape down of the bowl to ensure everything is perfectly combined. The batter should be smooth, thick, and utterly luscious.
Baking Your Pineapple Upside Down Cheesecake
The baking process for a cheesecake is unique, requiring a water bath to achieve that signature creamy texture and prevent cracks. This is a critical step for our Pineapple Upside Down Cheesecake Recipe.
- I carefully pour the cheesecake filling over the par-baked graham cracker crust and pineapple layer in the springform pan. I gently smooth the top with an offset spatula or the back of a spoon to ensure an even surface.
- Now, for the water bath setup. I place my foil-wrapped springform pan inside a larger roasting pan. The roasting pan needs to be large enough to hold the springform pan comfortably and have high enough sides to hold several inches of hot water.
- I very carefully pour hot water (I usually use freshly boiled water from a kettle) into the roasting pan around the springform pan, making sure the water comes about halfway up the sides of the springform pan. It’s crucial to be gentle here to avoid splashing water into the cheesecake batter or getting the foil wet. The water bath provides a moist, even heat environment, which helps the cheesecake bake slowly and prevents it from drying out or cracking.
- With extreme caution, I transfer the roasting pan, with the springform pan nestled inside, to the preheated 325°F (160°C) oven.
- I bake the cheesecake for approximately 60-75 minutes. I know it’s done when the edges are set, but the center (about a 2-inch diameter) still has a slight wobble when I gently jiggle the pan. This slight wobble indicates that the cheesecake is cooked through but hasn’t been overbaked, which would result in a dry texture.
- Once baked, I carefully turn off the oven and leave the cheesecake in the water bath inside the oven with the door slightly ajar for another hour. This slow cooling process helps prevent drastic temperature changes that can cause cracks.
- After an hour in the cooling oven, I carefully remove the roasting pan from the oven. Then, I gently lift the springform pan out of the water bath. I immediately remove the foil wrapping from the springform pan, as leaving it on can cause condensation and make the crust soggy.
- I place the cheesecake on a wire rack and let it cool completely to room temperature. This usually takes another 1-2 hours. Patience is key here!
The Grand Reveal: Chilling and Flipping Your Cheesecake
The moment of truth for your Pineapple Upside Down Cheesecake is almost here! This final stage requires patience, but the reward is a stunning, delicious dessert.
- Once the cheesecake has completely cooled to room temperature, I cover it loosely with plastic wrap and transfer it to the refrigerator. This is a crucial chilling step. The cheesecake needs to chill for at least 6-8 hours, but ideally overnight, to set properly and develop its full flavor and firm texture. Rushing this step will result in a messy slice!
- When I’m ready for the grand reveal, I remove the chilled cheesecake from the refrigerator. I run a thin knife or offset spatula carefully around the inner edge of the springform pan, between the cheesecake and the pan collar, to loosen it. This ensures a clean release.
- Then, I unlatch and remove the springform collar.
- Now for the exciting part! I place a large serving plate or a flat cake stand (one that is larger than the cheesecake) upside down over the top of the cheesecake.
- Holding the springform pan bottom and the serving plate firmly together, I confidently and carefully invert the cheesecake onto the serving plate. It’s a bit nerve-wracking the first time, but you’ll get the hang of it!
- Gently, I lift the springform pan bottom away from the cheesecake. The beautiful caramelized pineapple and cherry topping should now be revealed, sitting proudly on top of your magnificent Pineapple Upside Down Cheesecake!
- If any of the pineapple or cherries stuck to the pan bottom, I carefully peel them off and gently place them back onto the cheesecake where they belong.
- Finally, I like to serve this incredible dessert as is, or with an optional dollop of freshly whipped cream and a sprig of fresh mint for an extra touch of elegance. This Pineapple Upside Down Cheesecake Recipe is truly a showstopper and always a huge hit!
Conclusion:
Well, my friends, we’ve reached the grand finale of our culinary journey, and what a journey it has been! If you’ve followed along, you’ll understand why I am so incredibly enthusiastic about this particular dessert. This isn’t just another cheesecake; it’s a masterpiece that marries the best of two beloved classics into one show-stopping creation. When you embark on this Pineapple Upside Down Cheesecake Recipe, you’re not just baking; you’re crafting an experience that promises to impress. Imagine the vibrant, caramelized sweetness of pineapple, softened to perfection, glistening atop a velvety, rich, and perfectly tangy cream cheese filling. Then, picture that decadent filling resting on a delicate, buttery graham cracker crust that provides just the right amount of crunch and contrast. Every single bite is a symphony of flavors and textures – the juicy, sweet burst of pineapple, the smooth, cool embrace of the cheesecake, and the subtle, comforting crunch of the base. It’s sweet without being cloying, rich without being overwhelming, and utterly irresistible. This recipe transforms ordinary ingredients into something truly extraordinary, promising an explosion of tropical sunshine with every forkful. It’s the kind of dessert that elicits gasps of delight and immediate requests for the recipe, making it an absolute must-try for any occasion, from a casual family dinner to an elegant celebratory gathering. It truly elevates the humble cheesecake to an art form, giving you all the familiar comforts with a delightful and unexpected twist that will keep everyone coming back for more.
Serving Suggestions: Elevating Every Slice
Now, let’s talk about how to make this already spectacular dessert even more phenomenal, or how to put your own unique stamp on it. While it’s absolutely perfect served on its own, a few additions can take it to the next level. A small scoop of high-quality vanilla bean ice cream melting ever so slightly alongside a slice is pure heaven, creating a warm-cold contrast that’s simply divine and truly indulgent. Alternatively, a generous dollop of freshly whipped cream, perhaps infused with a hint of coconut extract, can add another layer of lightness and tropical flair, making each mouthful feel like a cloud. For those who love a little extra decadence, a delicate drizzle of homemade caramel sauce or even a light dusting of toasted coconut flakes makes for an incredible finish, adding a beautiful textural and flavor dimension. A sprig of fresh mint or a few candied pineapple chunks also add a beautiful touch of garnish, making each plate a mini work of art that’s almost too pretty to eat – almost!
Creative Variations: Make It Your Own!
But don’t stop there! The beauty of baking is in the experimentation and the joy of personalizing a recipe to fit your unique preferences. You could try swapping out the pineapple for other fruits – imagine a peach upside-down cheesecake, or even a mixed berry version with raspberries and blueberries for a different kind of vibrant burst of tartness and color! For a different crust, consider using crushed shortbread cookies, digestive biscuits, or even ginger snaps for a spicier, more complex undertone that pairs wonderfully with the sweet pineapple and creamy filling. Want to add more depth to the pineapple layer? A tiny splash of dark rum or bourbon simmered with the pineapple for a minute or two before baking can infuse it with an incredible, sophisticated warmth, transforming it into an adult-friendly treat (just be sure to cook off the alcohol if serving to everyone!). If you’re feeling adventurous, a sprinkle of finely grated lime or orange zest in the cheesecake batter could add an extra zing that beautifully complements the tropical fruit, cutting through the richness with a bright note. For individual servings, consider baking them in ramekins or even a muffin tin lined with paper liners; just adjust baking times accordingly and watch them closely for doneness. Imagine tiny, personal Pineapple Upside Down Cheesecakes for your next party – how charming and impressive would that be? The possibilities are truly endless, and each variation promises a delightful new experience tailored to your taste and creativity.
So, my dear fellow bakers and dessert enthusiasts, I implore you: don’t just read about this incredible dessert – go make it! Clear your schedule, gather your ingredients, and immerse yourself in the joyful process of creating something truly special. I promise you, the look on your loved ones’ faces, and that first magnificent bite, will be all the reward you need. This isn’t just a recipe; it’s an invitation to create memories, to share joy, and to indulge in a slice of pure happiness. Once you’ve successfully brought this tropical marvel to life, I would absolutely love to hear about your experience. Did you add a unique twist? Did it become the star of your dinner party? Please, share your photos, your stories, and your tips! Connect with me and other passionate home bakers by commenting below or tagging me on your social media posts. Your baking journey is an inspiration, and I can’t wait to see your stunning creations. Trust me, this will quickly become one of your go-to desserts, a beloved favorite that you’ll be proud to serve, and you’ll be so glad you took the plunge. Happy baking, everyone, and may your kitchens be filled with the sweet aroma of success and the even sweeter taste of this spectacular cheesecake!
Best Pineapple Upside Down Cheesecake Recipe Ever
A show-stopping dessert that perfectly blends the rich, creamy decadence of cheesecake with the vibrant, caramelized sweetness of a pineapple upside-down cake. Featuring tangy-sweet pineapple and its buttery, caramelized juices, a luxurious velvety cream cheese filling, all resting on a perfectly baked graham cracker crust. This recipe offers a spectacular balance of flavors and visual appeal.
Ingredients
-
For the Pineapple Topping:
-
1/4 cup (56g) unsalted butter, melted
-
1/2 cup (100g) packed light brown sugar
-
1 (20-ounce) can pineapple rings in heavy syrup, drained (reserve 2 tbsp syrup)
-
10-12 maraschino cherries, halved or whole
-
For the Graham Cracker Crust:
-
1 1/2 cups (180g) graham cracker crumbs
-
1/4 cup (50g) granulated sugar
-
1/2 teaspoon ground cinnamon (optional)
-
6 tablespoons (85g) unsalted butter, melted
-
For the Cheesecake Filling:
-
3 (8-ounce) packages full-fat cream cheese, softened
-
1 cup (200g) granulated sugar
-
1/4 cup (50g) packed light brown sugar
-
2 tablespoons reserved pineapple syrup
-
1 teaspoon pure vanilla extract
-
1/4 teaspoon salt
-
2 large eggs, room temperature
-
1 large egg yolk, room temperature
-
1/2 cup (120g) full-fat sour cream, room temperature
-
Optional Garnish:
-
Whipped cream
-
Fresh mint sprigs
Instructions
-
Step 1
Preheat oven to 325°F (160°C). Double-wrap a 9-inch springform pan with heavy-duty aluminum foil. Pour 1/4 cup melted butter into the pan, swirl to coat, then sprinkle 1/2 cup brown sugar evenly over it. Arrange drained pineapple rings in a single layer over the brown sugar and butter, tucking maraschino cherries into the spaces. -
Step 2
In a bowl, combine graham cracker crumbs, 1/4 cup granulated sugar, and optional cinnamon. Add 6 tablespoons melted butter; stir until moistened. Carefully spoon mixture over the pineapple/cherry layer and press firmly into an even layer. Par-bake for 10-12 minutes. Remove and cool slightly; keep oven on. -
Step 3
Ensure all dairy is at room temperature. In a stand mixer, beat softened cream cheese until smooth (2-3 min). Gradually add 1 cup granulated sugar and 1/4 cup brown sugar; beat until dissolved and fluffy (2-3 min), scraping sides. Stir in reserved pineapple syrup, vanilla, and salt. On low speed, add eggs and egg yolk one at a time, mixing just until incorporated (do not overmix). Gently fold in sour cream until smooth. -
Step 4
Pour filling over the par-baked crust. Place the foil-wrapped springform pan into a larger roasting pan. Pour hot water into the roasting pan until halfway up the springform sides. Carefully transfer to the preheated 325°F (160°C) oven. Bake for 60-75 minutes, until edges are set but the center (2-inch diameter) still slightly wobbles. -
Step 5
Turn off the oven. Leave the cheesecake in the water bath inside the oven with the door slightly ajar for 1 hour. Carefully remove from oven, lift springform from water bath, and immediately remove foil. Cool completely on a wire rack for 1-2 hours at room temperature. -
Step 6
Once completely cool, cover loosely and refrigerate for at least 6-8 hours, ideally overnight. To serve, run a thin knife around the inner pan edge, unlatch, and remove the collar. Place a large serving plate upside down over the cheesecake, then firmly invert the cheesecake onto the plate. Gently lift the springform pan bottom. If any topping stuck, carefully re-place it. Serve as is, or garnish with whipped cream and mint.
Important Information
Nutrition Facts (Per Serving)
It is important to consider this information as approximate and not to use it as definitive health advice.
Allergy Information
Please check ingredients for potential allergens and consult a health professional if in doubt.
Leave a Comment