
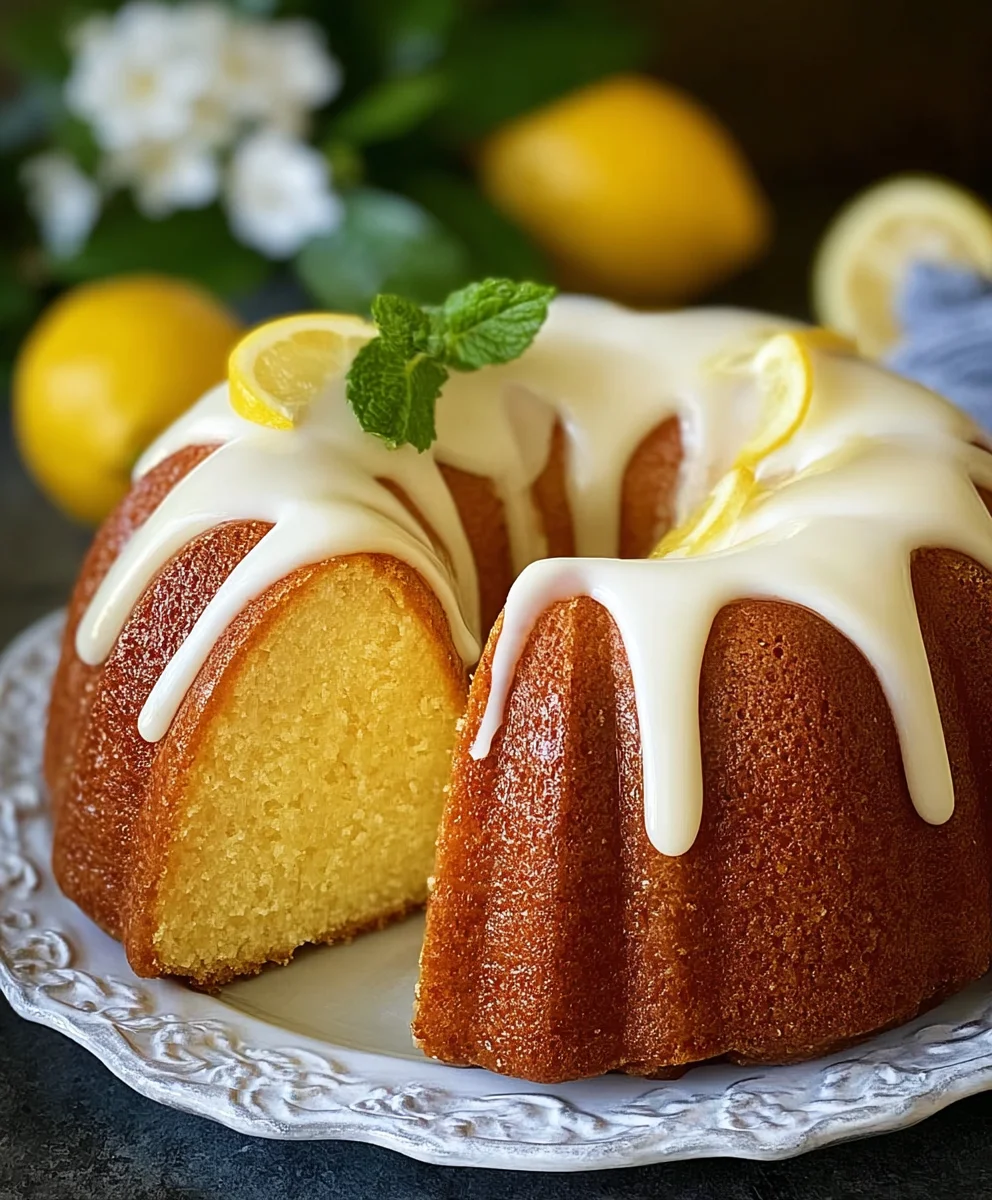
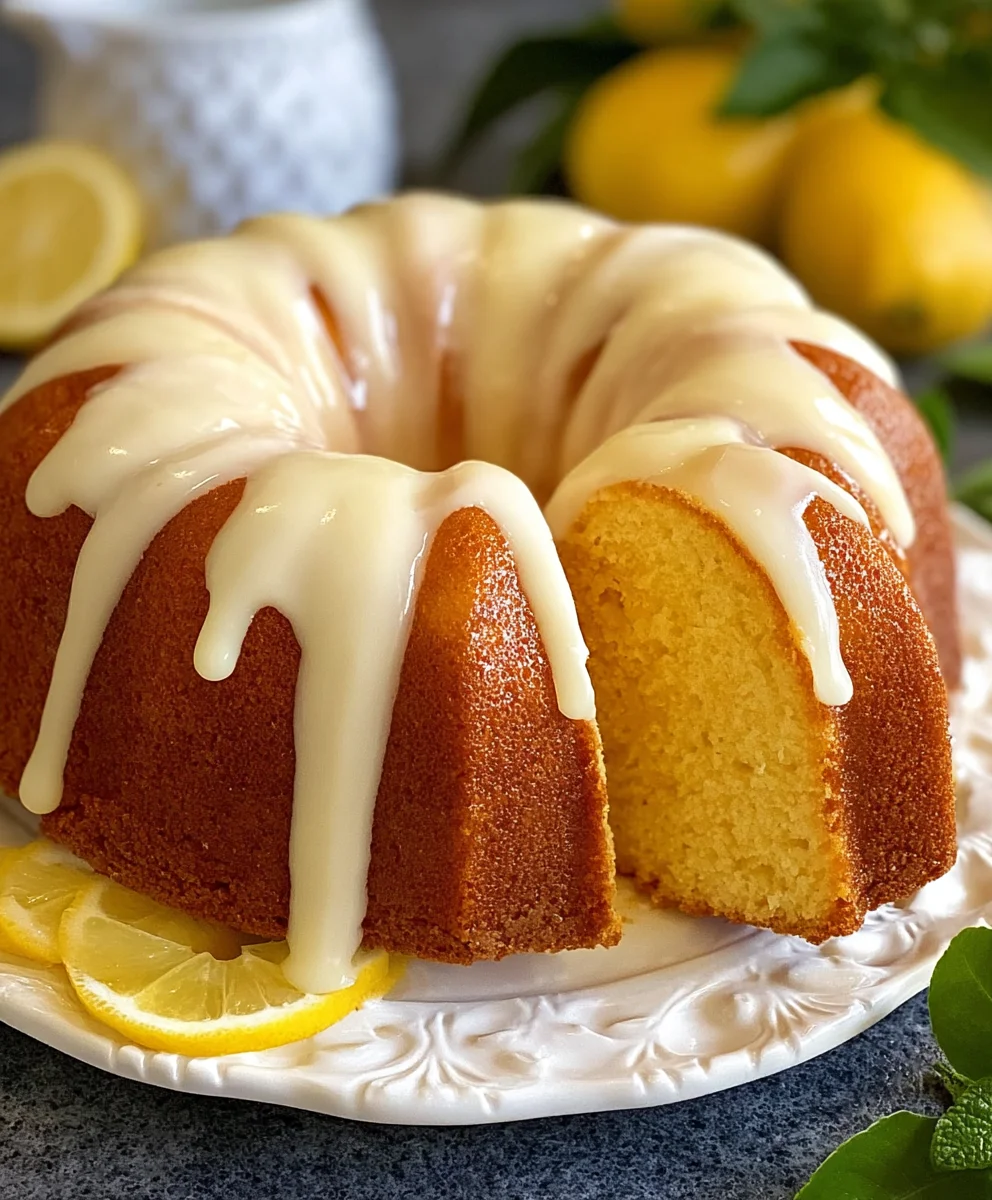
Lemon Bundt Cake is, without a doubt, one of life’s most exquisite culinary pleasures. There’s something undeniably captivating about a dessert that manages to be both profoundly comforting and vibrantly refreshing at the same time. Imagine a slice of golden-hued cake, its intricate fluted design promising a delightful experience, delivering a burst of bright, zesty lemon flavor perfectly balanced with a tender, moist crumb. It’s the kind of cake that instantly elevates any occasion, transforming a simple afternoon tea into an elegant affair or concluding a celebratory dinner with a truly memorable flourish. This particular dessert holds a special place in my heart, and I find myself drawn to its sunny disposition year-round.
The Bundt pan itself boasts an interesting lineage, popularized in America but rooted in European, specifically Nordic, baking traditions. This unique shape allows for even baking and creates a stunning presentation with minimal effort, making it a beloved choice for home bakers. When infused with the invigorating essence of fresh lemons, the result is nothing short of magical.
Why This Lemon Bundt Cake Charms Every Palate
People adore this Lemon Bundt Cake for its impeccable balance of sweet and tart, the delightfully soft texture that practically melts in your mouth, and the simple elegance it brings to the table. It’s a testament to how a few simple ingredients, thoughtfully combined, can create something truly extraordinary. I am absolutely thrilled to share the secrets to achieving this perfect balance with you, ensuring your next baking adventure is a resounding success.

Ingredients:
-
For the Lemon Bundt Cake:
- 3 cups (360g) all-purpose flour, spooned and leveled
- 2 teaspoons baking powder
- 1/2 teaspoon baking soda
- 1/2 teaspoon salt
- 1 cup (226g) unsalted butter, softened to room temperature
- 2 cups (400g) granulated sugar
- 4 large eggs, at room temperature
- 1 teaspoon pure vanilla extract
- 1/2 teaspoon pure lemon extract (optional, for an extra burst of lemon flavor)
- 1 tablespoon finely grated lemon zest (from about 2-3 medium lemons)
- 1 cup (240ml) buttermilk, at room temperature (or 1 cup milk mixed with 1 tablespoon lemon juice, let sit for 5 minutes)
-
For the Zesty Lemon Glaze:
- 2 cups (240g) confectioners’ sugar (powdered sugar), sifted
- 1/4 cup (60ml) freshly squeezed lemon juice (from about 1-2 medium lemons)
- 1 teaspoon finely grated lemon zest (optional, for extra flavor and speckles)
-
For Preparing the Bundt Pan:
- 2 tablespoons unsalted butter, melted (or non-stick baking spray with flour)
- 2 tablespoons all-purpose flour (for dusting)
Prepping Your Workspace and Oven
- Preheat your oven: Let’s get the oven ready! Adjust your oven rack to the middle position and preheat it to 325°F (160°C). For Bundt cakes, a slightly lower temperature helps ensure an even bake and prevents the exterior from over-browning before the inside is fully cooked.
- Prepare your Bundt pan with care: This step is absolutely crucial for ensuring your beautiful Lemon Bundt Cake releases perfectly. Using a 10-12 cup Bundt pan, generously brush the interior with melted butter, making sure to get into every nook and cranny of the design. Alternatively, you can use a high-quality non-stick baking spray that contains flour. Once buttered, dust the pan thoroughly with about 2 tablespoons of all-purpose flour. Rotate the pan, gently tapping it, to ensure the flour coats every part of the buttered surface. Then, invert the pan and tap out any excess flour. This creates a non-stick barrier that will make unmolding a breeze. Don’t skip this step – a perfectly prepared pan is key to a gorgeous Bundt cake!
Crafting the Lemon Bundt Cake Batter
- Combine the dry ingredients: In a medium bowl, whisk together the 3 cups of all-purpose flour, 2 teaspoons of baking powder, 1/2 teaspoon of baking soda, and 1/2 teaspoon of salt. I like to use a whisk to ensure everything is evenly distributed and aerated. Set this aside for now.
- Cream the butter and sugar: In a large mixing bowl, using an electric mixer fitted with the paddle attachment (or a stand mixer), cream together the 1 cup of softened unsalted butter and 2 cups of granulated sugar. Beat on medium-high speed for about 3 to 5 minutes, until the mixture is light, fluffy, and pale yellow. This process incorporates air into the batter, which contributes to the cake’s tender crumb. You’ll notice a significant change in texture and color.
- Incorporate the eggs: Add the 4 large eggs, one at a time, beating well after each addition. It’s important to allow each egg to fully incorporate into the butter-sugar mixture before adding the next. Scrape down the sides of the bowl as needed to ensure everything is evenly mixed. This gradual addition helps maintain the emulsification of the batter.
- Add the flavorings: Stir in the 1 teaspoon of pure vanilla extract, the optional 1/2 teaspoon of pure lemon extract (if you’re aiming for an intensely lemony flavor, I highly recommend it!), and the 1 tablespoon of finely grated lemon zest. The fresh lemon zest is really where a lot of that bright, authentic lemon flavor comes from, so don’t skimp on it! Beat until just combined.
-
Alternate dry and wet ingredients: Now, we’ll gradually add the dry ingredients and the buttermilk to the wet mixture. This is a common technique that helps create a balanced and moist cake.
- With the mixer on low speed, add about one-third of the dry ingredient mixture to the wet ingredients. Mix just until combined, being careful not to overmix.
- Next, pour in half of the 1 cup of buttermilk. Mix until just incorporated.
- Repeat this process: add another third of the dry ingredients, mix, then the remaining buttermilk, mix, and finally the last third of the dry ingredients.
A crucial tip here: Always begin and end with the dry ingredients. This helps prevent the batter from curdling and ensures a stable emulsion. Be very careful not to overmix the batter at this stage. Overmixing can develop the gluten in the flour too much, leading to a tough, dry cake. Mix only until no streaks of flour remain. A few small lumps are perfectly fine and often preferred.
- Transfer batter to the Bundt pan: Carefully spoon the finished Lemon Bundt Cake batter into your prepared Bundt pan. Use an offset spatula or the back of a spoon to gently spread the batter evenly. Give the pan a couple of gentle taps on the counter to release any trapped air bubbles and ensure the batter settles into all the crevices of the pan. This helps achieve that perfect, intricate Bundt cake shape.
Baking Your Beautiful Lemon Bundt Cake
- Bake the cake: Place the Bundt pan into your preheated 325°F (160°C) oven. Bake for approximately 60 to 75 minutes. Baking times can vary greatly depending on your oven and the specific Bundt pan you’re using.
- Check for doneness: To determine if your Lemon Bundt Cake is ready, insert a long wooden skewer or a toothpick into the deepest part of the cake. When it comes out clean or with only a few moist crumbs attached, your cake is done. If it comes out with wet batter, continue baking in 5-minute increments until fully cooked. The cake should also spring back lightly when gently touched.
- Cooling process – patience is a virtue! Once baked, remove the cake from the oven. Let the cake cool in the Bundt pan on a wire rack for exactly 15 minutes. This cooling period is essential; it allows the cake to firm up slightly, making it less likely to break when unmolding.
- Unmold the cake: After 15 minutes, place your wire rack directly over the top of the Bundt pan. Using oven mitts, carefully invert the cake onto the wire rack. Gently lift the Bundt pan away. If you prepared your pan well, the cake should slide out effortlessly. If it sticks, gently tap the bottom of the pan a few times.
- Complete cooling: Allow the Lemon Bundt Cake to cool completely on the wire rack before glazing. This typically takes at least 1 to 2 hours. It’s really important for the cake to be fully cool before applying the glaze; otherwise, the glaze will simply melt and soak into the cake, instead of forming a lovely, opaque coating.
Whipping Up the Zesty Lemon Glaze
- Prepare the glaze ingredients: In a medium bowl, combine the 2 cups of sifted confectioners’ sugar. Sifting the sugar helps prevent lumps, giving you a smooth, velvety glaze.
- Add the lemon juice: Gradually add the 1/4 cup of freshly squeezed lemon juice to the powdered sugar, whisking continuously. Start with about half the juice, mix, then slowly add more, a teaspoon at a time, until you reach your desired consistency. You’re looking for a thick, pourable consistency – not too watery, not too stiff. It should be thick enough to cling to the back of a spoon but still flow easily.
- Incorporate lemon zest (optional but recommended): If you want to add an extra layer of brightness and visual appeal, stir in the 1 teaspoon of finely grated lemon zest. This not only enhances the lemon flavor but also adds beautiful little specks to your glaze.
- Adjust consistency: If the glaze is too thick, add a tiny bit more lemon juice (1/2 teaspoon at a time). If it’s too thin, whisk in a tablespoon or two more of sifted confectioners’ sugar. Aim for that perfect balance that will slowly drip down the sides of your cooled Lemon Bundt Cake.
Glazing and Finishing Your Lemon Bundt Cake
- Position for glazing: Once your Lemon Bundt Cake is completely cool, place the wire rack with the cake over a baking sheet or a piece of parchment paper. This will catch any excess glaze and make cleanup much easier.
- Apply the glaze: Slowly pour the lemon glaze evenly over the top of the cooled Bundt cake. Start in the center and let the glaze cascade down the intricate ridges and sides of the cake. You can use the back of a spoon to help guide it if needed, but often, gravity does most of the work for you. For a thicker glaze, you can let the first layer set for about 10-15 minutes, then apply a second layer. This glossy, tangy glaze is the crowning glory of our Lemon Bundt Cake, providing that irresistible citrus finish!
- Allow the glaze to set: Let the glazed cake sit at room temperature for at least 20-30 minutes, or until the glaze has set and is no longer sticky. This is important before slicing and serving, especially if you plan to transport the cake.
- Optional garnishes: For an even more elegant presentation, you can sprinkle a little extra fresh lemon zest over the glazed cake just before the glaze sets completely. Candied lemon slices or thin fresh lemon slices can also make a beautiful garnish, really highlighting the citrus notes of this delightful dessert.
- Serve and enjoy: Carefully transfer your glorious Lemon Bundt Cake to a serving platter. Slice with a sharp, serrated knife and serve. This cake is absolutely perfect with a cup of tea or coffee, or as a refreshing dessert after any meal. The bright, zesty flavor is simply captivating!
- Storage instructions: Leftover Lemon Bundt Cake can be stored at room temperature, loosely covered, for up to 3-4 days. For longer storage, you can refrigerate it for up to a week. If refrigerating, it’s best to let it come to room temperature for about 30 minutes before serving, as the flavors and texture are best when not too cold. You can also freeze individual slices or the whole cake (unglazed, then glaze after thawing) for up to 2-3 months in an airtight container or tightly wrapped in plastic wrap and then foil.
Conclusion:
As we reach the sweet end of our culinary journey, I truly hope you’re feeling inspired to roll up your sleeves and dive into the delightful world of this incredible recipe. What makes this particular creation a true standout, a masterpiece in its own right, is its unparalleled ability to deliver a symphony of flavors and textures that dance on your palate. It’s not just a cake; it’s an experience. Imagine the vibrant, zesty punch of fresh lemons perfectly balanced with a comforting sweetness, all encased in a crumb that is impossibly moist and tender, yet substantial enough to hold its elegant shape. This isn’t merely a dessert; it’s a statement piece, an edible work of art that effortlessly elevates any occasion, from a casual Sunday brunch to the most festive holiday gathering. The glorious aroma that will fill your kitchen as it bakes is, in itself, reason enough to try it – a promise of the pure bliss to come.
I genuinely believe that once you’ve experienced the sheer joy of creating and tasting this amazing dessert, it will quickly become a cherished staple in your baking repertoire. It’s that good! The beauty of this recipe also lies in its wonderful versatility, allowing for a touch of your own personal flair. While a simple dusting of powdered sugar or a quick, bright lemon glaze is always a winner, don’t hesitate to get creative with your serving suggestions and variations. For an added layer of indulgence, consider serving a slice warm with a dollop of freshly whipped cream, perhaps infused with a hint of vanilla or almond extract, and a scattering of fresh seasonal berries like raspberries or blueberries. The tartness of the berries beautifully complements the cake’s citrusy notes, creating a delightful contrast.
Feeling a little adventurous? Why not explore different flavor profiles? You could gently fold in a tablespoon or two of poppy seeds into the batter for a classic lemon-poppy seed twist, adding a subtle crunch and nutty undertone. Or, for a more aromatic experience, consider grating in the zest of an orange or lime alongside the lemon zest, introducing a nuanced complexity to the citrus bouquet. For those special autumn or winter moments, a spiced rendition with a touch of cardamom or ginger could be a surprisingly delicious variation. And for an even grander presentation, a homemade fruit compote – think warm raspberry or blackberry – spooned over each slice turns this humble cake into a truly show-stopping dessert. The possibilities are truly endless, limited only by your imagination, and each variation promises to be just as rewarding as the original.
So, what are you waiting for? I wholeheartedly encourage you to step into your kitchen, gather your ingredients, and embark on this incredibly rewarding baking adventure. Don’t be shy – this recipe is designed to be accessible and enjoyable for bakers of all skill levels, promising a stunning result that tastes as magnificent as it looks. There’s something profoundly satisfying about pulling a beautifully golden, perfectly formed Lemon Bundt Cake from the oven, knowing you’ve created something truly special with your own hands. Once you’ve made it, tasted it, and shared it with loved ones, I would absolutely love to hear about your experience!
Please, come back and share your thoughts, your photos, your personal tweaks, and any delightful variations you might have tried in the comments section below. Did you add a different glaze? Did you serve it with a unique accompaniment? Your insights and creativity inspire me and our entire community of fellow food enthusiasts. Let’s celebrate the joy of baking together. Happy baking, my friends!
People Also Ask:
What is the secret to a moist Bundt cake?
The secret to an incredibly moist Bundt cake often lies in a few key factors: using full-fat dairy like buttermilk or sour cream for richness and acidity, not overmixing the batter (which can develop gluten too much, leading to a tough cake), and baking it just until a wooden skewer inserted into the center comes out with moist crumbs, not wet batter, but also not completely dry. Our recipe incorporates these elements, ensuring a tender, luscious crumb every time.
How do you get a Bundt cake out without sticking?
Preventing your Bundt cake from sticking is crucial! The best method is to meticulously grease and flour your Bundt pan. Use a neutral oil or softened butter to generously coat every nook and cranny, especially intricate designs. Then, dust with flour, tapping and rotating the pan to ensure the flour coats all greased surfaces, shaking out any excess. You can also use a baking spray that contains flour. After baking, let the cake cool in the pan on a wire rack for about 10-15 minutes before inverting it. This allows the cake to firm up slightly and pull away from the sides.
Can I use regular lemons instead of Meyer lemons?
Absolutely! This recipe is designed to shine with standard everyday lemons. Meyer lemons are a bit sweeter and less acidic with a more floral aroma, so if you use them, you might find the cake slightly less tart, but still delicious. For regular lemons, you’ll get that classic, bright, and zingy lemon flavor that makes the cake so irresistible.
How long does Lemon Bundt Cake last and how should I store it?
A Lemon Bundt Cake, when properly stored, can last for about 3-4 days at room temperature. The best way to store it is in an airtight container to prevent it from drying out. If you have leftover cake that’s already been cut, you can press a piece of plastic wrap directly onto the exposed cake to help keep it fresh before sealing the container. For longer storage, you can freeze individual slices or the whole cake.
Can I freeze Lemon Bundt Cake?
Yes, Lemon Bundt Cake freezes beautifully! To freeze, ensure the cake is completely cooled. If it’s glazed, make sure the glaze is fully set. You can wrap the entire cake or individual slices tightly in plastic wrap, then an additional layer of aluminum foil. This double-layer protection helps prevent freezer burn. It can be stored in the freezer for up to 2-3 months. Thaw overnight in the refrigerator or at room temperature before serving.
Can I make this Lemon Bundt Cake recipe gluten-free?
While this specific recipe uses all-purpose flour, many home bakers have successfully adapted Bundt cakes to be gluten-free. You would typically substitute the all-purpose flour with a 1:1 gluten-free baking flour blend that contains xanthan gum. Keep in mind that gluten-free flours can absorb liquids differently, so you might need to slightly adjust the baking time or observe the batter consistency. However, I highly recommend finding a recipe specifically developed for gluten-free baking to ensure the best texture and rise for your Lemon Bundt Cake.
Best Lemon Bundt Cake: Moist, Zesty & Simple Recipe
Lemon Bundt Cake is, without a doubt, one of life’s most exquisite culinary pleasures. There’s something undeniably captivating about a dessert that manages to be both profoundly comforting and vibrantly refreshing at the same time. Imagine a slice of golden-hued cake, its intricate fluted design promising a delightful experience, delivering a burst of bright, zesty lemon flavor perfectly balanced with a tender, moist crumb. It’s the kind of cake that instantly elevates any occasion, transforming a simple afternoon tea into an elegant affair or concluding a celebratory dinner with a truly memorable flourish. This particular dessert holds a special place in my heart, and I find myself drawn to its sunny disposition year-round.
Ingredients
-
3 cups (360g) all-purpose flour
-
2 tsp baking powder
-
1/2 tsp baking soda
-
1/2 tsp salt
-
1 cup (226g) unsalted butter, softened
-
2 cups (400g) granulated sugar
-
4 large eggs
-
1 tsp vanilla extract
-
1/2 tsp lemon extract (optional)
-
1 tbsp lemon zest
-
1 cup (240ml) buttermilk (or 1 cup milk + 1 tbsp lemon juice)
-
For Glaze:
-
2 cups (240g) confectioners’ sugar, sifted
-
1/4 cup (60ml) fresh lemon juice
-
1 tsp lemon zest (optional)
-
For Pan:
-
2 tbsp unsalted butter, melted
-
2 tbsp all-purpose flour
Instructions
-
Step 1
Preheat oven to 325°F (160°C). Generously grease a 10-12 cup Bundt pan with melted butter, then dust thoroughly with 2 tablespoons of all-purpose flour, tapping out any excess. -
Step 2
In a medium bowl, whisk together the 3 cups all-purpose flour, 2 tsp baking powder, 1/2 tsp baking soda, and 1/2 tsp salt. Set aside. -
Step 3
In a large mixing bowl, cream softened butter and granulated sugar with an electric mixer on medium-high speed for 3-5 minutes, until light, fluffy, and pale. -
Step 4
Add eggs one at a time, beating well after each. Stir in vanilla extract, optional lemon extract, and lemon zest until just combined. -
Step 5
With the mixer on low speed, gradually add dry ingredients and buttermilk to the wet mixture, starting and ending with dry ingredients. Mix only until no streaks of flour remain; do not overmix. -
Step 6
Spoon the batter into the prepared Bundt pan. Gently tap the pan on the counter a couple of times to release air bubbles and settle the batter. -
Step 7
Bake for 60-75 minutes, or until a long wooden skewer inserted into the deepest part of the cake comes out clean or with only a few moist crumbs attached. -
Step 8
Remove cake from oven and let cool in the Bundt pan on a wire rack for 15 minutes. After 15 minutes, invert the cake onto the wire rack and gently lift the pan away. Allow the cake to cool completely (1-2 hours) before glazing. -
Step 9
{‘@type’: ‘HowToStep’, ‘name’: ‘Prepare Lemon Glaze’, ‘text’: “In a medium bowl, whisk together sifted confectioners’ sugar and fresh lemon juice. Start with half the juice and gradually add more until you reach a thick, pourable consistency. Stir in optional lemon zest.”} -
Step 10
Place the cooled cake on a wire rack over a baking sheet. Slowly pour the lemon glaze evenly over the top, letting it cascade down the sides. Let the glaze set at room temperature for 20-30 minutes before slicing. Garnish with extra lemon zest or candied lemon slices if desired. -
Step 11
Transfer to a serving platter, slice, and enjoy. Store leftover cake loosely covered at room temperature for 3-4 days, or refrigerate for up to a week. For best texture, bring refrigerated cake to room temperature before serving.
Important Information
Nutrition Facts (Per Serving)
It is important to consider this information as approximate and not to use it as definitive health advice.
Allergy Information
Please check ingredients for potential allergens and consult a health professional if in doubt.

Leave a Comment