
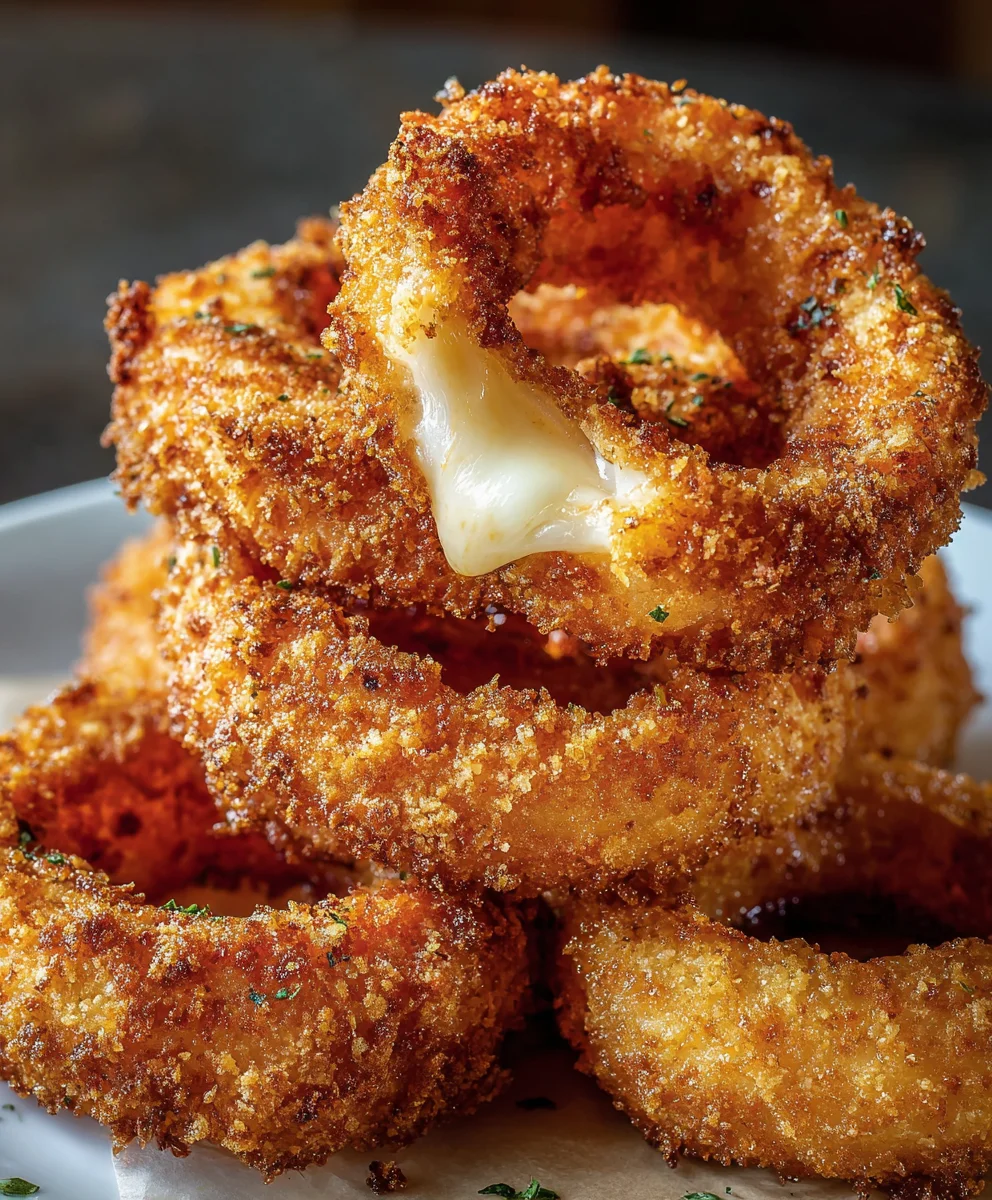
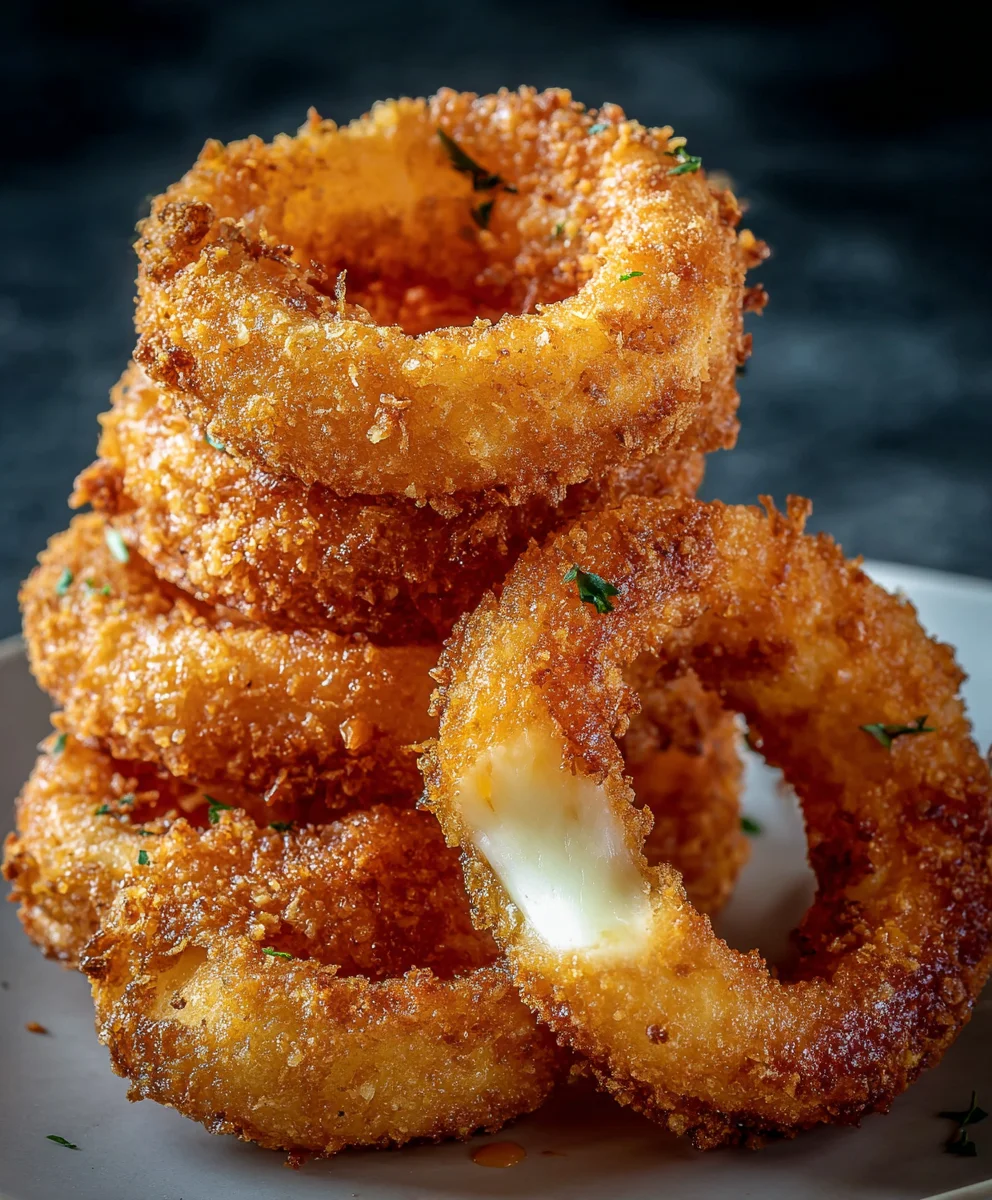
Cheesy Onion Rings are not merely a snack; they are an extraordinary culinary adventure, a symphony of textures and flavors designed to delight even the most discerning palate. Imagine biting into a perfectly crisp, golden-fried exterior, giving way to the tender, subtly sweet onion within, all seamlessly integrated with a warm, gooey blanket of savory, melted cheese. It’s a combination that transforms a classic comfort food into an irresistible indulgence.
While the humble onion ring has long held its revered place in American diners and backyard barbecues, boasting a rich history that sparks delightful culinary debates, the addition of cheese elevates this beloved side dish to new, decadent heights. This ingenious fusion takes everything you adore about the traditional version and infuses it with an unparalleled richness and umami punch, creating something truly special.
People universally adore this dish for its phenomenal contrast: the satisfying crunch, the soft, sweet onion, and the luscious, stretchy cheese—each element playing its part in a harmonious balance. These Cheesy Onion Rings are ideal for lively game nights, casual family gatherings, or simply as a well-deserved treat after a demanding week. I am thrilled to guide you through crafting this remarkably delicious and surprisingly simple recipe that promises to become a firm favorite in your kitchen.

Ingredients:
- For the Onions:
- 3 large (about 1.5 lbs) yellow onions, chosen for their size and ability to form large rings.
- Ice water, for soaking.
- For the Cheesy Filling:
- 8 oz sharp cheddar cheese, freshly grated. Grating your own ensures a smoother melt and better flavor compared to pre-shredded varieties.
- 4 oz Monterey Jack cheese, freshly grated. Its mild, creamy texture complements the sharp cheddar beautifully.
- 2 oz cream cheese, softened to room temperature. This acts as a binder, helping the cheese mixture hold its shape.
- 1 tablespoon all-purpose flour. A small amount helps prevent excessive melting and oozing during frying.
- ½ teaspoon garlic powder.
- ¼ teaspoon smoked paprika, for a subtle depth of flavor.
- A pinch of cayenne pepper (optional), for a very gentle kick.
- ½ teaspoon freshly ground black pepper.
- ¼ teaspoon fine sea salt.
- For the Dredging & Batter:
- 1 cup all-purpose flour, for the initial dredge.
- 1 ½ cups all-purpose flour, for the batter.
- ½ cup cornstarch. This helps create an incredibly crispy texture for our Cheesy Onion Rings.
- 1 teaspoon baking powder.
- ½ teaspoon baking soda.
- 1 teaspoon fine sea salt, for seasoning the batter.
- ½ teaspoon freshly ground black pepper.
- ¼ teaspoon garlic powder, for extra flavor in the batter.
- 1 ½ cups cold seltzer water or light beer. The carbonation is key for a light, airy batter. Using cold liquid also inhibits gluten development, keeping the batter tender.
- 1 large egg, whisked lightly.
- 4 cups panko breadcrumbs. These coarser breadcrumbs provide a superior crunch compared to standard breadcrumbs.
- For Frying:
- 6-8 cups vegetable oil, canola oil, or peanut oil, for deep frying. Choose an oil with a high smoke point.
- For Serving (Optional):
- Extra coarse sea salt or flaky salt, for sprinkling immediately after frying.
- Your favorite dipping sauces, such as sriracha mayo, ranch, or a sweet chili sauce.
Prepare the Onions: The Foundation for Perfect Cheesy Onion Rings
- Peel and Slice the Onions: Begin by carefully peeling the outer papery layers from your yellow onions. With a sharp knife, slice each onion into ½-inch thick rounds. I find that this thickness is perfect for holding the cheesy filling without being too thin or too cumbersome. Aim for consistent slices so your Cheesy Onion Rings cook evenly.
- Separate the Rings: Gently separate the onion slices into individual rings. You’ll want to pick out the larger, more substantial rings – typically the middle sections of the onion – as these will be the sturdy foundation for our incredibly cheesy creation. The smaller inner rings can be set aside for another dish, perhaps a sauté or a soup. For the best Cheesy Onion Rings, select rings that are wide enough to comfortably hold a layer of cheese inside.
- Soak in Ice Water: Place the separated onion rings into a large bowl filled with ice water. Let them soak for at least 30 minutes, or even up to an hour. This step is crucial for two reasons: it helps to mellow out the pungent flavor of the raw onion, and it also makes the rings firmer, which is beneficial for handling during the assembly process. You want those onion rings to stand up to all that cheesy goodness!
- Dry Thoroughly: After soaking, drain the onion rings well and spread them out on a few layers of paper towels or a clean kitchen towel. Pat them absolutely dry. Any excess moisture will prevent the flour and batter from adhering properly, leading to a less crispy, less appealing Cheesy Onion Ring. Take your time with this step; it truly makes a difference.
Crafting the Irresistible Cheese Filling: The Heart of Your Cheesy Onion Rings
- Grate and Combine Cheeses: In a medium-sized mixing bowl, combine the freshly grated sharp cheddar and Monterey Jack cheeses. The blend of these two provides a fantastic balance of robust flavor and gooey melt.
- Add Cream Cheese and Seasonings: Add the softened cream cheese to the grated cheeses. Follow this with the all-purpose flour, garlic powder, smoked paprika, optional cayenne pepper, black pepper, and sea salt. The cream cheese acts as a crucial binder, helping the mixture stay together, while the flour further aids in stability when heated.
- Mix Thoroughly: Using your hands (which I find works best for this!) or a sturdy spoon, thoroughly mix all the ingredients until everything is well combined and forms a relatively cohesive, somewhat pliable mixture. You want the seasonings to be evenly distributed throughout this cheesy base for our Cheesy Onion Rings.
- Form the Cheese Inserts: This is where the magic happens! Take two onion rings of similar size. Spoon or press a small amount of the cheese mixture into one onion ring, gently spreading it to form an even layer on the inside circumference. Then, carefully place the second onion ring directly on top of the cheese-lined one, essentially creating a “cheese sandwich” between two onion rings. Press gently but firmly to ensure the cheese adheres to both rings and seals them together. Repeat this process with all your chosen onion rings. You want to make sure the cheese layer isn’t too thick, or it might ooze out too much, but thick enough to be substantial.
- Chill the Cheesy Rings: Arrange the assembled cheesy onion rings on a baking sheet lined with parchment paper. Transfer the baking sheet to the freezer and chill for at least 30-45 minutes. This step is absolutely critical. Chilling the cheese filling until it’s firm will prevent it from melting out too quickly during frying, ensuring that your Cheesy Onion Rings retain their perfect form and the cheese stays where it belongs – inside!
Whipping Up the Crispy Batter and Dredging Station: The Golden Coat
-
Set Up Dredging Stations: You’ll need three shallow dishes or pie plates for your dredging stations.
- Station 1 (Flour Dredge): In the first dish, place the 1 cup of all-purpose flour. This initial flour layer helps the wet batter adhere better to the onion and cheese.
- Station 2 (Wet Batter): In a separate medium-sized bowl, whisk together the 1 ½ cups all-purpose flour, cornstarch, baking powder, baking soda, 1 teaspoon sea salt, ½ teaspoon black pepper, and ¼ teaspoon garlic powder until well combined. In another small bowl, whisk the cold seltzer water (or beer) with the lightly whisked egg. Gradually pour the wet ingredients into the dry ingredients, whisking until just combined. A few lumps are perfectly fine; overmixing can lead to a tough batter. The goal is a consistency similar to pancake batter – thick enough to coat, but not gloppy. The carbonation is your secret weapon for light, airy Cheesy Onion Rings!
- Station 3 (Panko Crumb Coat): In the third shallow dish, spread out the 4 cups of panko breadcrumbs. These will provide the ultimate crunch!
The Dredging and Coating Dance: Encapsulating Your Cheesy Onion Rings
- Prepare for Coating: Remove the chilled cheesy onion rings from the freezer. Working in batches of 2-3 rings at a time will help keep things manageable and prevent the cheese from warming up too much.
- First Flour Dredge: Gently take one assembled cheesy onion ring. Dredge it thoroughly in the plain all-purpose flour (Station 1), ensuring every surface, especially the cut edges where the cheese is, is lightly coated. Shake off any excess flour. This creates a dry surface for the wet batter to cling to.
- The Batter Dip: Carefully transfer the flour-dredged ring to the wet batter (Station 2). Submerge it completely, turning to ensure an even, generous coating of batter all around. Lift the ring, letting any excess batter drip back into the bowl. You want a good, thick, even coat for a truly crispy Cheesy Onion Ring.
- Panko Crumb Coating: Immediately transfer the battered ring to the panko breadcrumbs (Station 3). Gently press the panko onto all sides of the battered ring, ensuring it is completely covered. Pressing helps the crumbs adhere firmly. You want a thick, shaggy coat of panko for maximum crunch. Place the fully coated Cheesy Onion Rings back onto the parchment-lined baking sheet.
- Repeat and Chill (Optional, but Recommended): Continue this dredging and coating process with all your cheesy onion rings. Once all are coated, if you have time, place the baking sheet back into the freezer for another 15-20 minutes. This final chill will help the coating set and prevent it from falling off during frying, guaranteeing the most glorious Cheesy Onion Rings.
The Frying Process: Achieving Golden Perfection for Your Cheesy Onion Rings
- Heat the Frying Oil: Pour your chosen frying oil into a large, heavy-bottomed pot or a deep fryer. The oil should be at least 3-4 inches deep. Attach a deep-fry thermometer to the side of the pot, ensuring the tip is submerged but not touching the bottom. Heat the oil gradually over medium-high heat until it reaches a consistent temperature of 350°F (175°C). Maintaining this temperature is paramount for perfectly cooked Cheesy Onion Rings – too cool and they’ll be greasy; too hot and they’ll burn before cooking through.
- Fry in Batches: Once the oil is at temperature, carefully lower 2-3 Cheesy Onion Rings into the hot oil using tongs. Do not overcrowd the pot, as this will drop the oil temperature and lead to soggy results. Give them space to swim and crisp up!
- Cook Until Golden and Crispy: Fry the Cheesy Onion Rings for about 3-5 minutes per batch, turning them occasionally with your tongs to ensure even browning on all sides. They should transform into a beautiful golden-brown color, looking wonderfully crispy and inviting. The cheese inside will be perfectly molten.
- Monitor Oil Temperature: Keep a close eye on your thermometer. If the temperature drops too low, increase the heat slightly; if it gets too high, reduce the heat or remove the pot from the burner for a moment. Consistent temperature is key for delicious Cheesy Onion Rings.
- Drain Excess Oil: Once golden and cooked through, carefully remove the Cheesy Onion Rings from the oil using tongs or a spider skimmer. Transfer them immediately to a wire rack set over a baking sheet lined with paper towels. The wire rack allows air to circulate, keeping them crispy as they drain any excess oil.
- Season Immediately: While still hot, generously sprinkle the fried Cheesy Onion Rings with coarse sea salt or flaky salt. The salt adheres best when they’re fresh out of the oil, enhancing their flavor dramatically.
- Repeat for Remaining Batches: Continue frying the remaining Cheesy Onion Rings in batches, allowing the oil to return to 350°F (175°C) between each batch.
Serving Your Glorious Cheesy Onion Rings: Pure Indulgence!
- Serve Hot: These Cheesy Onion Rings are at their absolute best when served immediately, piping hot from the fryer. That’s when the cheese is gooey and stretchy, and the panko crust is at its crispiest.
- Offer Dipping Sauces: Arrange your magnificent Cheesy Onion Rings on a platter and provide a selection of your favorite dipping sauces. A tangy ranch, a spicy sriracha mayo, or even a classic ketchup can all be wonderful complements to the rich, savory flavors of these homemade treats.
- Enjoy the Cheesy Pull: Encourage everyone to pull apart the Cheesy Onion Rings to enjoy that satisfying, irresistible cheese stretch. It’s truly a sight to behold and a delight to taste. Prepare for compliments – these are no ordinary onion rings!
Conclusion:
Well, my friends, we’ve reached the grand finale, and I truly hope you’re as excited about the prospect of sinking your teeth into these delectable creations as I am sharing them with you. What makes this recipe an absolute game-changer, a true must-try in your culinary repertoire? It’s simple, really. We’re not just talking about any ordinary snack; we’re elevating a beloved classic to an entirely new dimension of flavor and texture. Imagine the crisp, golden-brown exterior giving way to a tender, sweet onion, but then, there’s that unexpected, glorious melt of cheese, perfectly integrated, creating a savory, gooey center that will make your taste buds sing. This isn’t just an appetizer; it’s an experience, a joyous celebration of comfort food refined. It’s the kind of dish that disappears from the plate faster than you can say “more, please!” Trust me when I say, once you’ve tried these, you’ll wonder how you ever settled for the plain version. They offer a delightful contrast of textures and a rich, satisfying taste that is utterly irresistible. I’ve seen faces light up with the first bite, and I guarantee yours will too. This recipe proves that sometimes, the simplest additions can lead to the most extraordinary results.
Now that I’ve hopefully convinced you of their undeniable deliciousness, let’s talk about how to make these wonders truly shine and integrate them into your meal planning. These are incredibly versatile, more so than you might initially think. Of course, they are phenomenal on their own, perhaps with a simple dip like a classic ranch, a spicy sriracha mayo, or even a tangy homemade BBQ sauce. But let’s get creative! Imagine pairing these Cheesy Onion Rings with a juicy gourmet burger, where the savory crunch and gooey cheese complement the patty perfectly, turning an ordinary burger night into an extraordinary feast. They also make an incredible sidekick to grilled chicken or fish, adding a comforting, indulgent element to a lighter main course. For a more adventurous pairing, consider serving them alongside a hearty chili or a warm bowl of tomato soup – the contrast is surprisingly delightful.
And the variations? Oh, the possibilities are endless! Don’t feel confined to one type of cheese. Experiment with a sharp cheddar for a more pungent flavor, a smoky gouda for depth, or even a blend of mozzarella and Parmesan for an Italian twist. You could also infuse the breading with different spices. A pinch of smoked paprika would add a beautiful color and smoky essence, while a dash of garlic powder or cayenne pepper could give them an extra kick. For those looking for a healthier option, consider baking them instead of deep-frying. While the texture will be slightly different, the core cheesy onion flavor will still shine through beautifully. Just a spritz of cooking spray and a hot oven can yield a wonderfully crisp result. Alternatively, for a truly decadent treat, you could even add a layer of crispy bacon bits to the cheese mixture before frying – pure bliss! Think about sprinkling fresh herbs like chives or parsley over the top just before serving for a burst of freshness. These simple tweaks allow you to customize the Cheesy Onion Rings to perfectly suit your taste preferences and dietary needs, making this a recipe you’ll return to again and again.
So, what are you waiting for? I’ve shared my passion, my tips, and my unwavering belief in the magic of these incredible Cheesy Onion Rings. Now it’s your turn! Gather your ingredients, roll up your sleeves, and dive into the satisfying process of creating these culinary masterpieces in your own kitchen. I promise you, the aroma alone will be enough to get everyone excited, and the first bite will confirm that all your efforts were more than worth it. I truly can’t wait for you to experience the joy of making and tasting these for yourself.
Once you’ve embarked on this delicious adventure, I would absolutely love to hear all about it. Did you try a different cheese? Did you find a new favorite dip? Did your family rave about them? Please, don’t keep your culinary triumphs (or even your learning moments!) to yourself. Share your experiences, your photos, and your unique twists in the comments section below. Your feedback and creativity inspire not just me, but also our entire community of food lovers. Let’s build a collection of delicious variations and stories around this fantastic recipe. Happy cooking, and may your kitchen be filled with the wonderful aroma of fresh, homemade indulgence!
Cheesy Onion Rings
Crispy onion rings with mozzarella cheese stuffed inside, coated in batter and Panko breadcrumbs, then fried until golden brown.
Ingredients
-
3 large (about 1.5 lbs) yellow onions
-
Ice water, for soaking
-
10 oz block mozzarella cheese, sliced (approximately)
-
Toothpicks
-
1 cup all-purpose flour (for initial dredge)
-
1 1/2 cups all-purpose flour (for batter)
-
1/2 cup cornstarch
-
1 teaspoon baking powder
-
1/2 teaspoon baking soda
-
1 teaspoon fine sea salt (for batter)
-
1/2 teaspoon freshly ground black pepper
-
1/4 teaspoon garlic powder (for batter)
-
1 1/2 cups cold seltzer water
-
1 large egg, lightly whisked
-
4 cups panko breadcrumbs
-
6-8 cups vegetable oil, canola oil, or peanut oil, for deep frying
-
Extra coarse sea salt or flaky salt, for sprinkling
-
Your favorite dipping sauces (e.g., sriracha mayo, ranch)
Instructions
-
Step 1
Peel and slice yellow onions into 1/2-inch thick rounds. Separate into large rings. Soak rings in ice water for 30-60 minutes, then drain thoroughly and pat dry. -
Step 2
Pair two onion rings of similar size. Slice mozzarella cheese to fit the space between them. Place mozzarella between the rings and secure with a toothpick. Repeat for all chosen rings. -
Step 3
Arrange assembled cheesy rings on a parchment-lined baking sheet and freeze for 30-45 minutes until the cheese is firm. -
Step 4
Prepare three shallow dishes: (1) 1 cup all-purpose flour. (2) Whisk 1 1/2 cups flour, cornstarch, baking powder, baking soda, 1 tsp sea salt, 1/2 tsp black pepper, 1/4 tsp garlic powder. In another small bowl, whisk cold seltzer water and egg, then combine with dry batter ingredients until just mixed. (3) 4 cups panko breadcrumbs. -
Step 5
Working in batches, dredge each chilled cheesy onion ring in flour (Station 1), shaking off excess. Dip completely in batter (Station 2), letting excess drip. Immediately transfer to panko (Station 3) and press to fully coat. Place coated rings back on parchment-lined baking sheet. Optionally, chill again for 15-20 minutes to set the coating. -
Step 6
Heat 3-4 inches of frying oil in a deep pot to 350°F (175°C). Fry 2-3 coated rings at a time for 3-5 minutes per batch, turning occasionally, until golden brown and crispy. Maintain oil temperature at 350°F. -
Step 7
Remove fried rings from oil and place on a wire rack over paper towels to drain excess oil. Immediately sprinkle with coarse sea salt. -
Step 8
Serve hot with your favorite dipping sauces. Remember to remove toothpicks before serving. Enjoy the satisfying cheesy pull!
Important Information
Nutrition Facts (Per Serving)
It is important to consider this information as approximate and not to use it as definitive health advice.
Allergy Information
Please check ingredients for potential allergens and consult a health professional if in doubt.

Leave a Comment