
Butter Cookies. Just uttering the name evokes a sense of comforting familiarity, a whisper of holidays past, and the promise of pure, unadulterated delight. These iconic confections are far more than just a simple sweet; they are a timeless classic that transcends generations and cultures. From their humble European origins, often associated with Danish baking traditions and those charming blue tins, to becoming a beloved staple in homes worldwide, butter cookies hold a special place in our hearts and on our dessert platters.
Why We Adore These Golden Beauties
What makes these delicate morsels so universally adored? It’s their exquisite simplicity and the unparalleled sensory experience they offer. Imagine a cookie with a wonderfully crisp edge that yields to a tender, melt-in-your-mouth crumb, rich with the glorious flavor of butter, balanced by just the right amount of sweetness. They are the epitome of elegance, yet surprisingly easy to create in your own kitchen. My carefully crafted recipe ensures that every batch of these beloved Butter Cookies delivers that perfect balance of texture and taste, making them an ideal treat for an afternoon tea, a festive gathering, or simply a moment of self-indulgence. Prepare to fall in love with the magic of homemade butter cookies all over again.

Ingredients:
- 2 sticks (1 cup) unsalted butter, softened to room temperature. It’s absolutely essential that your butter is perfectly softened for the best texture in your Butter Cookies.
- ½ cup granulated sugar. This provides a delightful sweetness and a bit of structure.
- ¼ cup powdered sugar (confectioners’ sugar). This fine sugar contributes to the melt-in-your-mouth texture we’re aiming for in our Butter Cookies.
- 1 large egg yolk. The egg yolk adds richness, tenderness, and a beautiful golden hue to the cookies without making them too cake-like.
- 1 teaspoon pure vanilla extract. Use a good quality vanilla extract; it makes all the difference in the flavor of simple Butter Cookies.
- ¼ teaspoon almond extract (optional, but highly recommended). Just a touch of almond extract elevates the flavor profile beautifully, complementing the vanilla without overpowering it.
- 2 cups all-purpose flour, spooned and leveled. Proper measuring of flour is key to preventing tough cookies.
- ½ teaspoon salt. Even in sweet recipes, salt is vital for balancing flavors and enhancing the sweetness.
- Optional: sprinkles, colored sugar, or a simple glaze for decorating your finished Butter Cookies.
Preparing Your Workspace and Tools:
Before we dive into the delightful process of creating these exquisite Butter Cookies, let’s take a moment to set up our kitchen for success. Trust me, a little preparation goes a long way in making the baking experience enjoyable and stress-free. You’ll want to gather all your ingredients first, ensuring they are at the correct temperature – especially that butter! Having everything measured out and ready to go in separate small bowls (this is often called “mise en place”) will make the mixing process flow seamlessly.
- First, make sure your 2 sticks (1 cup) unsalted butter have been sitting out at room temperature for at least an hour or two. This is not a suggestion; it’s a golden rule for Butter Cookies. Properly softened butter, where you can easily make an indent with your finger but it’s not greasy or melted, will cream beautifully with the sugars, incorporating air and leading to a wonderfully tender crumb.
- Preheat your oven to 350°F (175°C). This allows the oven to stabilize its temperature, ensuring a consistent bake from the very first batch of Butter Cookies to the last.
- Line two large baking sheets with parchment paper or silicone baking mats. This prevents sticking and makes for easy cleanup, ensuring your delicate Butter Cookies lift off effortlessly.
- Grab your stand mixer with the paddle attachment, or if you’re using a hand mixer, a large mixing bowl will be perfect. You’ll also need a rubber spatula for scraping down the sides of the bowl, measuring cups and spoons, and a whisk or sifter for your dry ingredients.
- If you plan on chilling the dough (and I strongly recommend you do!), make sure you have some plastic wrap ready.
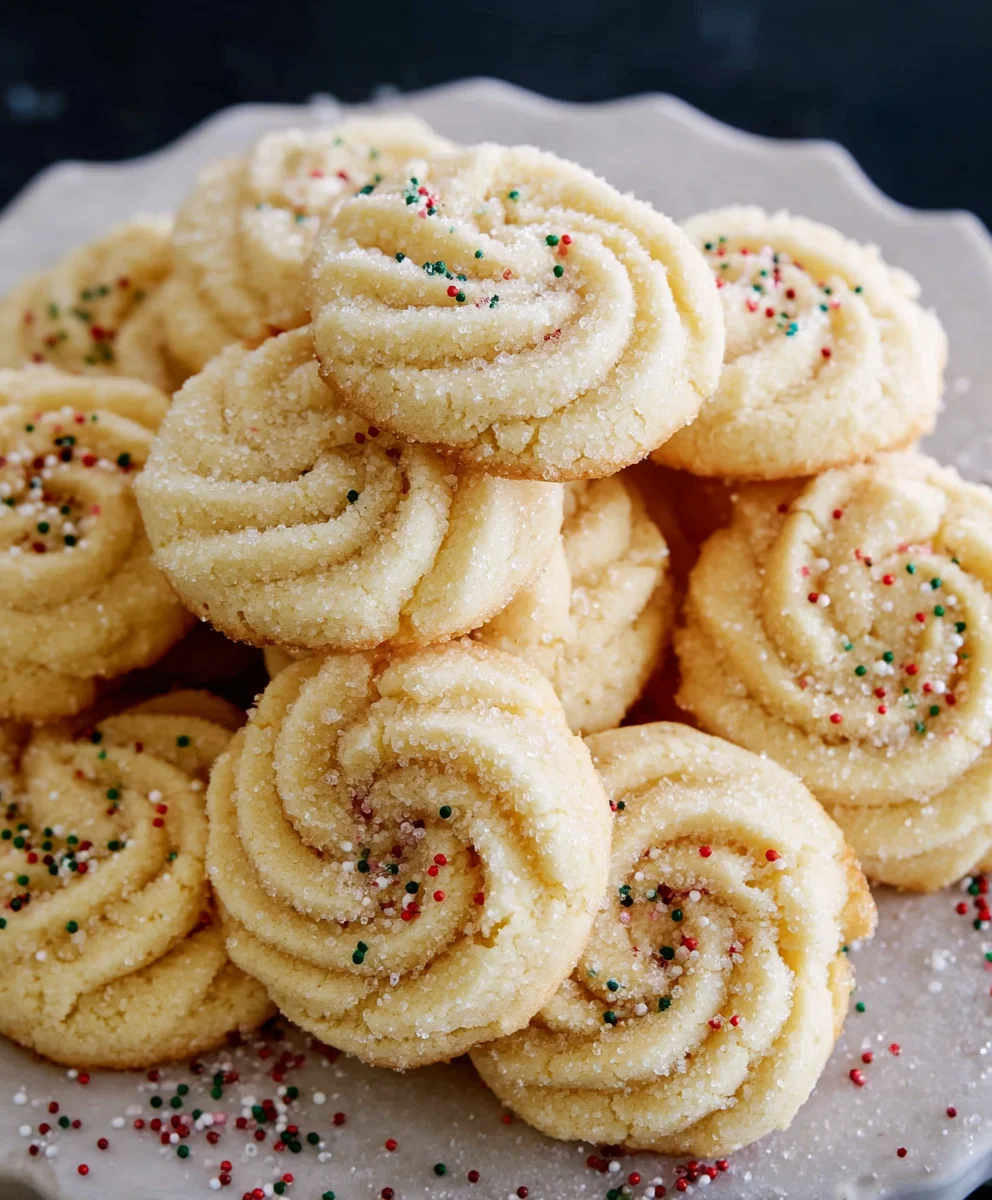
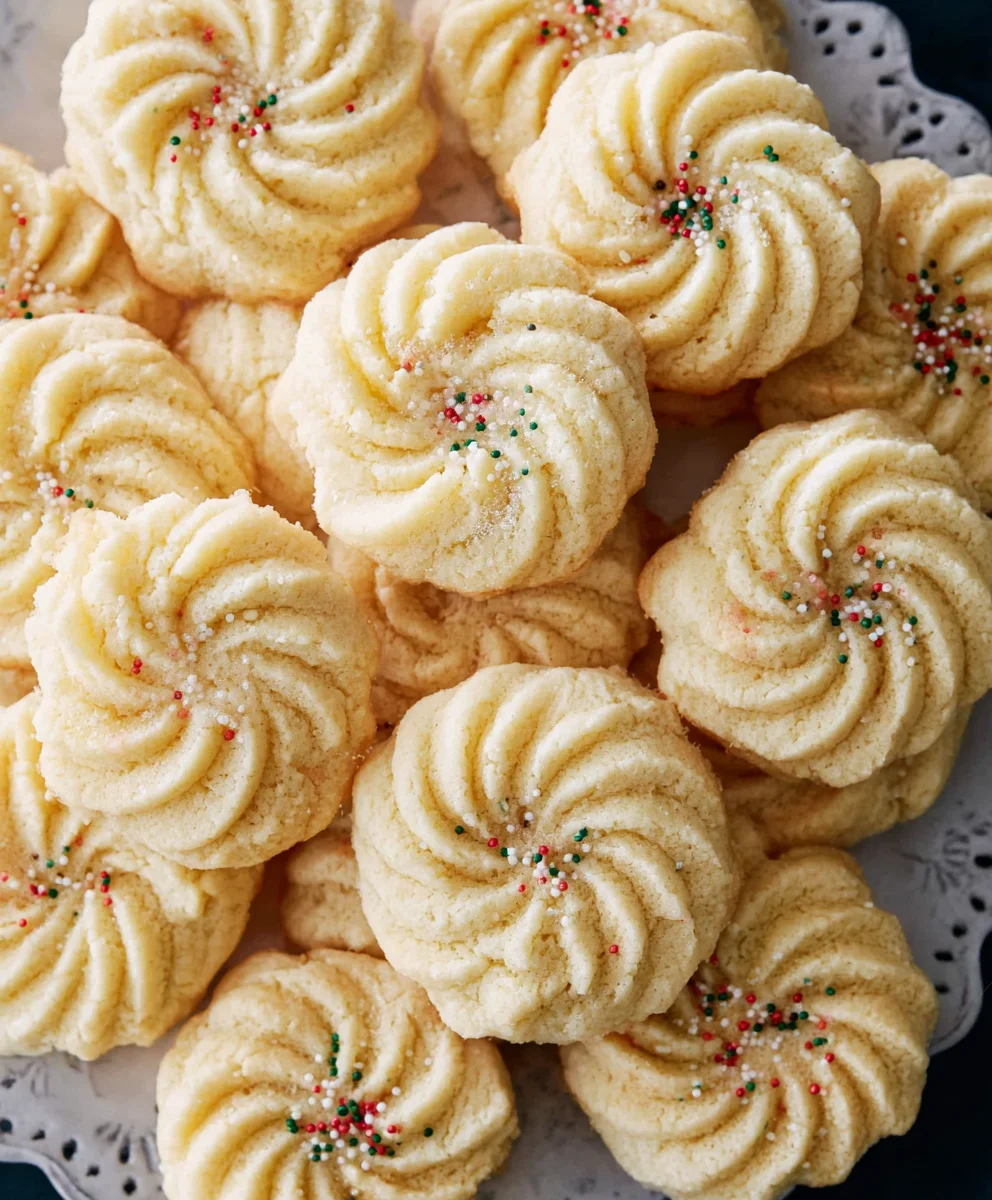
- For shaping, cookie cutters of various shapes are delightful, but you can also simply roll the dough into logs and slice them, or use a piping bag with a large star tip for classic piped Butter Cookies.
Making the Perfect Butter Cookie Dough:
Now, let’s get to the heart of our delicious journey: crafting the dough for these amazing Butter Cookies. This stage is all about combining ingredients carefully to achieve that iconic rich, tender, and subtly sweet flavor that everyone adores.
- First, in the bowl of your stand mixer fitted with the paddle attachment (or a large mixing bowl if using a hand mixer), combine your perfectly softened 2 sticks (1 cup) unsalted butter, ½ cup granulated sugar, and ¼ cup powdered sugar. The combination of both sugars here is a little secret to the perfect Butter Cookies; the granulated sugar adds a slight crispness, while the powdered sugar contributes to that delicate, melt-in-your-mouth texture.
- Begin creaming the butter and sugars together on medium speed. This step is absolutely crucial for creating light and airy Butter Cookies. You want to beat them until the mixture is wonderfully light, fluffy, and significantly pale in color. This process incorporates air, which is what gives our cookies their incredible tenderness and delicate structure. Be patient and don’t rush this! It usually takes about 3 to 5 minutes. Make sure to stop the mixer periodically and use a rubber spatula to scrape down the sides and bottom of the bowl. This ensures that all the butter and sugar are thoroughly combined and no pockets of uncreamed ingredients are left behind.
- Once you’ve achieved that glorious fluffy texture, it’s time to add the wet ingredients that will infuse our Butter Cookies with incredible depth of flavor. Add the 1 large egg yolk, 1 teaspoon pure vanilla extract, and the optional (but highly recommended!) ¼ teaspoon almond extract to the creamed butter mixture.
- Continue to beat on medium speed until these new additions are fully incorporated. This should only take another 1-2 minutes. Again, don’t forget to scrape down the sides of the bowl to ensure everything is evenly mixed. The mixture might look a little curdled at first, but keep beating, and it will come together into a smooth, fragrant paste.
- In a separate medium bowl, whisk together your dry ingredients: the 2 cups all-purpose flour (remember, spooned and leveled!), and ½ teaspoon salt. Whisking them together ensures that the salt is evenly distributed throughout the flour, preventing any overly salty bites in your Butter Cookies.
- Now, with the mixer on low speed, gradually add the dry ingredients to the wet ingredients, a third at a time. Mix only until just combined. As soon as you see no streaks of dry flour, stop the mixer. Overmixing at this stage can develop the gluten in the flour, leading to tough Butter Cookies, and we want them tender and delicate!
- Give the dough one final gentle stir with your rubber spatula, scraping down the bowl one last time to ensure everything is perfectly incorporated into a cohesive dough. At this point, you should have a soft, pliable dough that smells absolutely heavenly – the promise of delicious Butter Cookies to come!
Chilling the Butter Cookie Dough:
Chilling is a critical step that often gets overlooked, but it’s especially important for Butter Cookies. This period in the refrigerator isn’t just about making the dough easier to handle; it also significantly improves the flavor and texture of your finished cookies.
- Divide the cookie dough into two equal portions. This makes it easier to handle and roll out later. Gently shape each portion into a flat disc or a rough rectangle, depending on how you plan to cut your Butter Cookies.
- Wrap each disc tightly in plastic wrap. Make sure there are no exposed areas to prevent the dough from drying out in the refrigerator.
-
Place the wrapped dough in the refrigerator for at least 1 to 2 hours. For even better results and if time allows, chilling the dough for up to 24 hours can deepen the flavors and create an even firmer dough, making it a joy to work with. This chilling period is paramount for several reasons:
- Prevents Spreading: Cold butter in the dough melts more slowly in the oven, meaning your Butter Cookies will hold their shape better and won’t spread into flat, greasy puddles.
- Develops Flavor: Chilling allows the flavors of the butter, vanilla, and almond extract to meld and deepen, resulting in more complex and delicious Butter Cookies.
- Easier Handling: A chilled dough is much firmer and less sticky, making it considerably easier to roll out, cut into shapes, and transfer to your baking sheets without distortion.
- If you’re chilling the dough for longer than 2 hours, you might find it too firm to roll immediately when you take it out. Let it sit at room temperature for about 10-15 minutes to soften just enough to be workable, but still cold. You want it firm enough to hold its shape but soft enough that it doesn’t crack when rolled.
Shaping and Cutting Your Butter Cookies:
This is where your creative spirit can truly shine! Shaping Butter Cookies is a delightful process, whether you prefer classic rounds, intricate shapes, or elegant piped designs.
- Once your dough is perfectly chilled, remove one disc from the refrigerator and unwrap it. Lightly flour your work surface and your rolling pin. Don’t go overboard with the flour; too much extra flour can make your Butter Cookies tough.
- Place the dough on the floured surface and roll it out evenly to a thickness of about ¼ inch. Consistency in thickness is key here, as it ensures that all your Butter Cookies bake evenly. If some are thicker than others, you’ll end up with some perfectly golden and some underbaked or overbaked. Keep checking the thickness as you roll. If the dough starts to get too warm or sticky, simply pop it back into the fridge for 10-15 minutes to firm up again.
- Now for the fun part! Use your favorite cookie cutters to cut out shapes. Press firmly to ensure clean cuts, and try to get your cuts as close together as possible to minimize scraps. This way, you get more Butter Cookies from your dough.
- Carefully transfer the cut-out Butter Cookies to your prepared baking sheets, leaving about 1 inch of space between each cookie to allow for slight expansion during baking. A thin metal spatula can be very helpful for this delicate task.
- Gather the dough scraps, gently press them together into a disc, re-wrap, and chill for another 15-20 minutes before rolling and cutting again. This prevents the dough from becoming too warm and tough from overworking. You can repeat this process a couple of times, but avoid re-rolling too many times, as it can affect the tenderness of the final Butter Cookies.
- For Piped Butter Cookies: If you’re opting for elegant piped Butter Cookies, you might want to adjust the chilling step slightly. After making the dough, instead of chilling it as a disc, fill a piping bag fitted with a large star tip (like an Ateco 826 or Wilton 1M) immediately. Pipe your desired shapes directly onto the parchment-lined baking sheets. THEN, place the baking sheets with the piped cookies into the refrigerator for at least 30 minutes to firm up before baking. This extra chill helps them hold their intricate piped shape beautifully.
Baking the Golden Butter Cookies:
The baking process is where our beautiful dough transforms into those irresistible golden Butter Cookies. Precision with oven temperature and timing is crucial for achieving that perfect texture and color.
- Place your baking sheets with the cut-out (or piped) Butter Cookies into your preheated 350°F (175°C) oven. If your oven tends to have hot spots, you might want to rotate the baking sheets halfway through the baking time to ensure an even bake.
- Bake for 10 to 14 minutes. The baking time can vary slightly depending on the thickness of your cookies and your individual oven. Keep a close eye on them, especially during the last few minutes.
- You’re looking for the edges of the Butter Cookies to be just lightly golden. The centers should still look pale and set. Do not overbake! Overbaked Butter Cookies will be dry and crumbly rather than tender and melt-in-your-mouth. They might not look fully done in the very center when you pull them out, but they will continue to set as they cool on the baking sheet.
- Once they’ve reached that perfect light golden hue, carefully remove the baking sheets from the oven. Your kitchen will now be filled with the most wonderful aroma of freshly baked Butter Cookies!
Cooling and Optional Decorating Your Butter Cookies:
The final steps involve letting your gorgeous Butter Cookies cool properly and then, if you wish, adding a touch of decorative flair. This stage ensures they set perfectly and are ready for enjoyment.
- Allow the baked Butter Cookies to cool on the baking sheets for about 5 to 10 minutes. They will be quite delicate when hot, so this initial cooling period helps them firm up and prevents them from breaking when transferred.
- After this initial cooling, carefully transfer the Butter Cookies from the baking sheets to a wire cooling rack using a thin spatula. Allow them to cool completely on the wire rack. Cooling completely is very important, especially if you plan on decorating them, as any residual warmth can melt glazes or make sprinkles messy.
-
Optional Decorating: While these Butter Cookies are absolutely delicious plain, their simple elegance makes them a perfect canvas for decoration.
- Simple Glaze: For a quick and easy glaze, whisk together 1 cup of powdered sugar with 2-3 tablespoons of milk (or lemon juice for a tangy twist) and ½ teaspoon of vanilla extract until smooth. Drizzle or dip the cooled Butter Cookies into the glaze.
- Sprinkles/Colored Sugar: If you want to add sprinkles, you can do this immediately after baking while the cookies are still warm, gently pressing them onto the surface, or apply them to a wet glaze before it sets.
- Chocolate Dip: Melt some good quality chocolate (dark, milk, or white) and dip half of each cooled Butter Cookie into it. Place on parchment paper until the chocolate sets.
- Royal Icing: For more elaborate designs, use royal icing, which will harden to a crisp finish. This is perfect for holiday-themed Butter Cookies or special occasions.
- Once cooled and decorated (if desired), your beautiful Butter Cookies are ready to be savored! They are wonderful served with a cup of tea or coffee, or as a delightful treat on their own. These classic Butter Cookies are also fantastic for gifting.
- Store your cooled Butter Cookies in an airtight container at room temperature for up to one week. If you’ve decorated them with a glaze, ensure the glaze is completely set before stacking to prevent sticking. For longer storage, plain baked Butter Cookies freeze beautifully for up to 3 months. Just thaw them at room temperature when you’re ready to enjoy that buttery goodness again.
Conclusion:
And there you have it, my dear fellow bakers and dessert enthusiasts! We’ve journeyed through the simple yet profound magic of creating these exquisite treats, and I truly believe you’re now armed with everything you need to bake a batch that will bring pure joy. This isn’t just another cookie recipe; it’s an invitation to experience a culinary classic perfected, a staple that transcends trends and consistently delivers on its promise of delightful flavor and melt-in-your-mouth texture. I honestly cannot stress enough why this particular recipe for Butter Cookies is an absolute must-try. It strikes that perfect balance of being incredibly straightforward to make, even for novice bakers, while yielding results that taste like they came straight from a gourmet patisserie.
What makes these cookies stand out, you ask? It’s their unparalleled richness, that signature golden crispness around the edges, giving way to an unbelievably tender, crumbly center that literally melts on your tongue. The subtle sweetness, perfectly balanced with the luxurious hint of pure butter, creates an aroma that will fill your home with warmth and nostalgia. Imagine pulling a tray of these golden beauties from your oven; the intoxicating scent alone is enough to make anyone’s day brighter. They are, quite simply, the epitome of comfort food, designed to be savored slowly, bite by glorious bite. I’ve heard countless stories from friends and family about how these cookies have become their go-to for everything from unexpected guests to holiday gift-giving, and I’m certain they’ll become yours too.
Serving Suggestions & Creative Variations:
Now, while these cookies are absolutely divine on their own, a blank canvas of buttery perfection, they also lend themselves beautifully to an array of serving suggestions and creative variations. For a classic pairing, nothing beats a warm cup of coffee or a comforting mug of tea; the cookie’s richness perfectly complements the beverage. They’re also an elegant addition to any dessert platter, especially when arranged artfully with fresh berries and perhaps a dollop of homemade whipped cream. For the little ones, a tall glass of cold milk is the ultimate companion to these delightful morsels.
But let’s not stop there! This recipe is incredibly versatile, encouraging you to unleash your inner pastry artist. Consider dipping half of each cooled cookie into melted dark, milk, or white chocolate for an extra layer of decadence. A sprinkle of sea salt on the chocolate-dipped ones creates a truly sophisticated flavor profile. You could also pipe a thin glaze made from powdered sugar and a touch of lemon juice over them for a zesty twist. For the holidays, a touch of almond extract in the dough and some colorful sprinkles before baking transforms them into festive treats perfect for any seasonal celebration.
Feeling a bit more adventurous? Try adding a teaspoon of orange or lemon zest to the dough for a bright, citrusy aroma. A pinch of ground cardamom or cinnamon can elevate the flavor profile, making them even more aromatic and intriguing. You could also turn them into elegant sandwich cookies by filling them with a dollop of raspberry jam, lemon curd, or even a luscious chocolate ganache. For a sophisticated touch, pressing a single toasted almond or pecan half into the center of each cookie before baking adds a lovely nutty crunch and visual appeal. The possibilities are genuinely endless, and each variation simply enhances the already incredible foundation of this perfect butter cookie recipe.
Your Turn to Bake & Share!
So, what are you waiting for? I wholeheartedly encourage you to roll up your sleeves, gather your ingredients, and dive into the delightful world of baking these fantastic Butter Cookies. Trust me, the aroma that will waft through your kitchen alone is worth the effort, and the first bite will confirm that you’ve created something truly special. This isn’t just about following a recipe; it’s about creating memories, sharing warmth, and indulging in the simple, pure pleasure of homemade goodness. Whether you’re baking for a special occasion, a quiet afternoon treat, or to share with loved ones, these cookies are guaranteed to impress and bring smiles all around.
I would absolutely love to hear about your baking adventures and see your beautiful creations. Did you try a fun variation? Do you have a secret ingredient you added? Please don’t hesitate to share your experiences, tips, and photos in the comments section below or on social media! Let’s build a community of passionate home bakers who appreciate the magic of a perfectly made cookie. Your feedback and stories inspire me and others, and I can’t wait to hear what you think of this recipe. Happy baking, my friends!
Best Butter Cookies Recipe
These Best Butter Cookies are a timeless classic, offering a wonderfully crisp edge and a tender, melt-in-your-mouth crumb. Rich with glorious butter flavor and balanced sweetness, they are perfect for any occasion. This recipe ensures a delightful balance of texture and taste.
Ingredients
-
1 cup unsalted butter, softened (high-quality, name-brand recommended)
-
1 cup granulated sugar
-
1 large egg, room temperature
-
2 teaspoons pure vanilla extract
-
2 cups all-purpose flour
-
½ teaspoon salt
-
1-2 tablespoons milk (optional, for dough consistency or glaze)
-
Sprinkles (optional, for decorating)
Instructions
-
Step 1
Ensure butter is softened. Preheat oven to 350°F (175°C). Line two large baking sheets with parchment paper or silicone mats. Gather all ingredients and tools: mixer, bowls, spatula, measuring tools. -
Step 2
In a mixer, cream 1 cup softened unsalted butter and 1 cup granulated sugar on medium speed for 3-5 minutes until light, fluffy, and pale. Scrape down the bowl periodically. -
Step 3
Add 1 large egg and 2 teaspoons pure vanilla extract to the creamed mixture. Beat on medium speed for 1-2 minutes until fully incorporated, scraping down the bowl as needed. -
Step 4
In a separate bowl, whisk together 2 cups all-purpose flour and ½ teaspoon salt. Add gradually to the wet ingredients on low speed, mixing only until just combined. If dough is too dry, add 1-2 tablespoons of milk until cohesive. Do not overmix. -
Step 5
Divide dough into two portions, shape into flat discs, and wrap tightly. Refrigerate for at least 1-2 hours (up to 24 hours for best flavor and handling). Chilling prevents spreading and develops flavor. -
Step 6
Lightly flour a work surface and rolling pin. Roll out one chilled dough disc to about ¼ inch thick. Cut out shapes using cookie cutters and carefully transfer to prepared baking sheets, leaving 1 inch between cookies. Rework scraps, chill briefly, then roll and cut again. -
Step 7
Bake in the preheated 350°F (175°C) oven for 10-14 minutes, or until edges are lightly golden and centers are set. Do not overbake. Rotate sheets halfway through if needed. -
Step 8
Let cookies cool on baking sheets for 5-10 minutes, then transfer to a wire rack to cool completely. Optionally, decorate with sprinkles (add while warm for better adherence) or a simple glaze (using milk and powdered sugar for the glaze, if desired, noting the cookie dough itself does not use powdered sugar). -
Step 9
Store cooled cookies in an airtight container at room temperature for up to one week. Plain baked cookies can be frozen for up to 3 months.
Important Information
Nutrition Facts (Per Serving)
It is important to consider this information as approximate and not to use it as definitive health advice.
Allergy Information
Please check ingredients for potential allergens and consult a health professional if in doubt.


Leave a Comment