
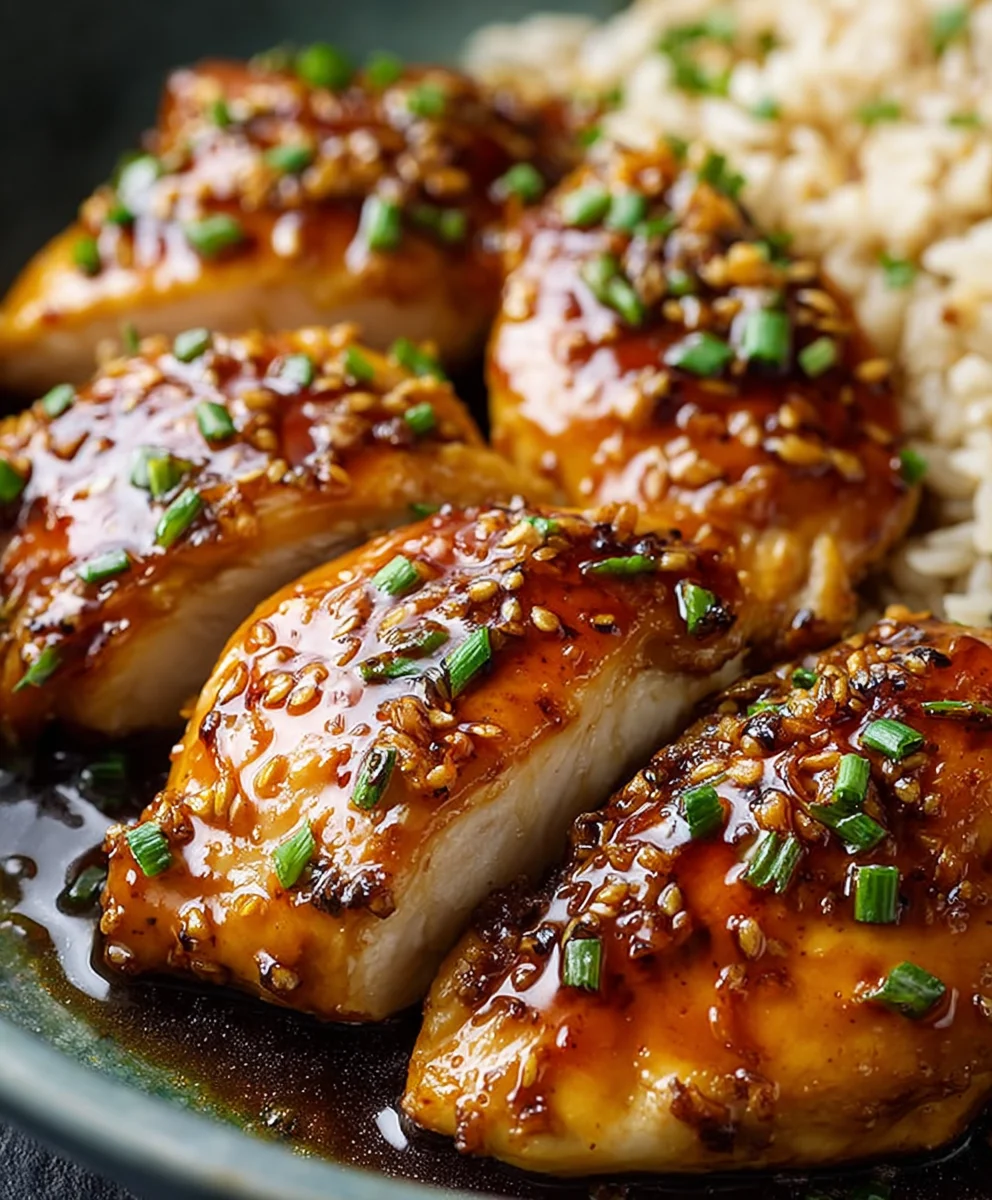
Baked Honey Garlic Chicken is, for me, more than just a meal; it’s a culinary triumph that I often turn to, knowing it will effortlessly transform an ordinary weeknight dinner into an extraordinary dining experience with remarkably little fuss. Imagine tender, juicy pieces of chicken, infused with a symphony of sweet honey and pungent garlic, emerging from my oven with a glistening, irresistible glaze. While the precise lineage of combining honey and garlic in savory dishes can be traced through various global cuisines, this particular baked iteration has soared in popularity, becoming a cherished staple in modern kitchens – and certainly in mine!
What truly solidifies this dish’s appeal and earns its place in so many recipe rotations is its incredible balance of flavors and sheer convenience. I find the chicken becomes unbelievably tender and juicy, absorbing all the aromatic flavors, while the glaze caramelizes to perfection – a sticky, savory-sweet delight that leaves a lasting impression. It’s a comforting yet sophisticated flavor profile that appeals to everyone at my table. Preparing this Baked Honey Garlic Chicken is remarkably straightforward, requiring minimal ingredients and fuss, making it the perfect solution for busy evenings when I crave something truly special without spending hours in the kitchen.

Ingredients:
- For the Chicken:
- 2 lbs boneless, skinless chicken thighs or breasts, about 6-8 pieces. I personally love using thighs for their juicy texture and tendency to stay moist during baking, but breasts work beautifully too – just be mindful of cooking times!
- 1 tablespoon olive oil or your preferred cooking oil. This helps with searing (if you choose to do a pre-sear) and overall even cooking.
- Salt and freshly ground black pepper, to taste. Don’t be shy here; proper seasoning is the foundation of flavor.
- For the Honey Garlic Sauce:
- ½ cup honey. This is the star of our sweet element, providing that beautiful golden glaze and deep, comforting sweetness. Any good quality honey will do the trick!
- ¼ cup low-sodium soy sauce. I always opt for low-sodium to control the saltiness myself, allowing the other flavors to shine without being overwhelmed.
- 2 tablespoons apple cider vinegar. This adds a crucial touch of acidity to balance the sweetness of the honey and the richness of the soy sauce, really elevating the flavor profile of our Baked Honey Garlic Chicken.
- 1 tablespoon fresh ginger, grated or minced. Fresh ginger is a game-changer here, bringing a zesty, aromatic warmth that dried ginger just can’t quite replicate.
- 4-5 cloves garlic, minced. And when I say minced, I mean really finely minced! Garlic is the other half of our dynamic duo, providing that pungent, savory depth. If you’re a garlic lover like me, an extra clove or two certainly won’t hurt.
- 1 tablespoon cornstarch or arrowroot powder. This is our thickening agent, ensuring our sauce becomes gloriously glossy and clings beautifully to the chicken.
- 2 tablespoons water or chicken broth. Used to create a slurry with the cornstarch, preventing lumps in our silky sauce.
- For Garnish (Optional, but highly recommended!):
- 1-2 tablespoons fresh parsley or cilantro, chopped. A sprinkle of fresh herbs adds a vibrant pop of color and a fresh, aromatic finish.
- 1 tablespoon sesame seeds, toasted. These offer a lovely textural contrast and a nutty aroma that complements the honey garlic flavors perfectly.
- Sliced green onions (scallions). For that extra layer of mild oniony freshness and visual appeal.
Preparing the Honey Garlic Sauce:
- Combine Wet Ingredients: In a medium-sized bowl or a liquid measuring cup, I like to start by whisking together the honey, low-sodium soy sauce, and apple cider vinegar. Give it a good, vigorous whisk until they are thoroughly combined and you see a consistent, uniform color. The honey can sometimes be a bit stubborn, so don’t rush this step. We’re creating the sweet and tangy foundation for our incredible Baked Honey Garlic Chicken here, so a perfect blend is key.
- Add Aromatics: Next, I stir in the freshly grated ginger and the minced garlic. Oh, the aroma already! This combination is truly magical and forms the heart of our honey garlic flavor. Make sure the ginger and garlic are finely incorporated throughout the liquid; we want every bite of chicken to be infused with their bold essences.
- Prepare Cornstarch Slurry: In a separate small bowl, it’s time to prepare our thickening agent. I combine the cornstarch (or arrowroot powder) with the 2 tablespoons of cold water or chicken broth. Whisk this together with a fork or a small whisk until it forms a smooth, lump-free slurry. This step is crucial because adding cornstarch directly to a warm liquid can lead to clumping, and we’re aiming for a perfectly smooth, glossy sauce.
- Thicken the Sauce (Optional, but recommended for a richer glaze): While you can simply use the sauce as is for marinating and baking, I often prefer to thicken about half of it gently on the stovetop first. This creates a more robust glaze. Pour half of the prepared honey garlic mixture into a small saucepan. Bring it to a gentle simmer over medium heat. Once simmering, slowly whisk in the cornstarch slurry. Continue to whisk constantly for about 1-2 minutes, until the sauce thickens and becomes wonderfully glossy. Remove it from the heat immediately. This thickened portion will be used for basting and as a final glaze, ensuring our Baked Honey Garlic Chicken gets that signature sticky, irresistible coating. The other half remains thin for optimal marination.
Preparing the Chicken:
- Pat Dry: First things first, I always lay my chicken pieces (whether thighs or breasts) on a cutting board lined with paper towels. Then, I take more paper towels and firmly pat them completely dry on all sides. This might seem like a small detail, but it’s incredibly important! Excess moisture on the chicken’s surface will steam in the oven instead of browning, preventing that beautiful caramelization we’re striving for with our Baked Honey Garlic Chicken. A dry surface allows the marinade to cling better and promotes a more flavorful crust.
- Trim and Season: If you’re using chicken thighs, I recommend trimming off any large pieces of excess fat. This prevents the dish from becoming too greasy. For both thighs and breasts, I then season them lightly but evenly on both sides with salt and freshly ground black pepper. Even though our marinade is flavorful, a little pre-seasoning directly on the chicken enhances its inherent taste and ensures every layer of flavor is optimized.
Marinating the Chicken:
- Combine Chicken and Sauce: In a large, non-reactive bowl (glass or ceramic works best, or a sturdy zip-top bag), I place all the prepared chicken pieces. Then, I pour about three-quarters of the unthickened honey garlic sauce over the chicken. Make sure to reserve at least a quarter of the unthickened sauce for basting later. If you opted to thicken half the sauce, you’ll be using the remaining thin sauce for this marination step. The key is to ensure every piece of chicken is thoroughly coated. I like to use my hands (with gloves, of course!) to really massage the sauce into the chicken, ensuring maximum contact and flavor absorption.
- Marinate for Flavor: Cover the bowl with plastic wrap or seal the zip-top bag, making sure to press out any excess air if using a bag. Place it in the refrigerator to marinate.
- Minimum Marinating Time: For good flavor penetration, I suggest marinating for at least 30 minutes. This is perfect if you’re short on time but still want a delicious Baked Honey Garlic Chicken.
- Optimal Marinating Time: For the most intense and deeply infused flavor, I highly recommend marinating for 2-4 hours. This allows the sweet, savory, and aromatic notes of the honey, soy, garlic, and ginger to truly meld with the chicken. The acidity from the apple cider vinegar in the sauce also helps to tenderize the chicken slightly, contributing to an incredibly juicy final product.
- Overnight Marination (Maximum Flavor): If you’re planning ahead, you can marinate the chicken overnight (up to 12 hours). This is my go-to method for preparing the most flavorful and tender Baked Honey Garlic Chicken possible. Just remember not to marinate for much longer than 12 hours, as the acid in the sauce can start to break down the chicken’s proteins too much, potentially making it mushy.
During the marination process, the chicken is essentially soaking up all those incredible flavors, which is what makes our “Baked Honey Garlic Chicken” so uniquely delicious and popular. The longer it sits, the more pronounced and complex the taste will be, extending beyond just the surface of the meat. This infusing period is where the magic truly begins, transforming simple chicken into a dish bursting with character.
Baking the Baked Honey Garlic Chicken:
- Preheat Oven and Prepare Baking Dish: About 15-20 minutes before you’re ready to bake, preheat your oven to 400°F (200°C). While the oven heats, I line a large baking sheet or a 9×13-inch baking dish with parchment paper or aluminum foil. If using foil, a light spray with cooking oil or a quick brush of olive oil prevents sticking, especially with a sticky, sugary marinade like ours. This step also makes cleanup so much easier – a true lifesaver when dealing with caramelized sauces!
- Arrange Chicken: Remove the marinated chicken from the refrigerator. If using a zip-top bag, simply transfer the chicken and all the marinade to the prepared baking dish. If in a bowl, ensure all the beautiful, flavorful marinade comes along for the ride. I arrange the chicken pieces in a single layer, making sure they aren’t crowded. Giving each piece a bit of space allows for even cooking and proper browning, leading to that desirable slightly crispy exterior on our Baked Honey Garlic Chicken.
- Initial Bake: Place the baking dish in the preheated oven and bake for 20-25 minutes. During this initial baking period, the chicken will start to cook through, and the marinade will begin to thicken and caramelize around the edges of the pan. The aromas filling your kitchen will be absolutely divine!
- First Basting and Flip: After 20-25 minutes, carefully remove the baking dish from the oven. Using tongs, flip each piece of chicken over. Then, remember that reserved unthickened honey garlic sauce? Now’s the time to brush or spoon a generous amount of it over the top of each chicken piece. This adds another layer of flavor and moisture and helps build up that beautiful, glossy glaze. Return the dish to the oven.
- Second Bake and Basting: Continue to bake for another 15-20 minutes, or until the chicken is cooked through and reaches an internal temperature of 165°F (74°C) when measured with a meat thermometer inserted into the thickest part of the chicken. About halfway through this second bake (around 7-10 minutes in), I like to pull the dish out again and baste the chicken one more time with any remaining reserved unthickened sauce or the thickened sauce if you prepared it. This final basting step is what truly creates that irresistible, sticky, and deeply flavorful glaze that makes our Baked Honey Garlic Chicken so utterly delicious. Keep a close eye on it during the last few minutes, as the honey can burn if left unattended. If you notice the sauce becoming too dark too quickly, you can loosely tent the dish with aluminum foil.
- Achieving Perfection: For an extra-beautiful finish, especially if you love a slightly crispier edge, you can turn on the broiler for the last 2-3 minutes. Keep a very close watch, as broiler heat is intense and can burn the glaze quickly. This step will make the top of your Baked Honey Garlic Chicken wonderfully golden and slightly caramelized.
- Checking for Doneness: The most reliable way to ensure your chicken is perfectly cooked and safe to eat is to use an instant-read meat thermometer. Insert it into the thickest part of the largest chicken piece. Once it registers 165°F (74°C), your chicken is done. The juices should also run clear when pierced with a knife. Overcooked chicken, particularly breast meat, can become dry, so avoid guessing. Achieving this perfect internal temperature ensures juicy and tender “Baked Honey Garlic Chicken” every single time.
Finishing Touches and Serving:
- Rest the Chicken: Once your Baked Honey Garlic Chicken is perfectly cooked, remove the baking dish from the oven. This next step is just as important as the baking itself: loosely tent the dish with aluminum foil and let the chicken rest for 5-10 minutes. This resting period allows the juices to redistribute throughout the meat, ensuring every bite is incredibly tender and moist. Skipping this step often results in drier chicken, as all those precious juices escape when you cut into it too soon.
- Utilize the Pan Sauce: While the chicken is resting, take a moment to admire the glorious pan sauce that has collected at the bottom of the baking dish. This caramelized, flavorful reduction is pure gold! If you opted to thicken half the sauce initially, you can simply spoon this rich, glossy thickened sauce over the chicken when serving. If you didn’t thicken any sauce previously, you can carefully pour the pan juices into a small saucepan, bring them to a simmer, and stir in a slurry of 1 teaspoon cornstarch mixed with 1 tablespoon cold water. Whisk continuously for 1-2 minutes until it thickens to your desired consistency. This creates an extra drizzle of luscious honey garlic sauce for serving.
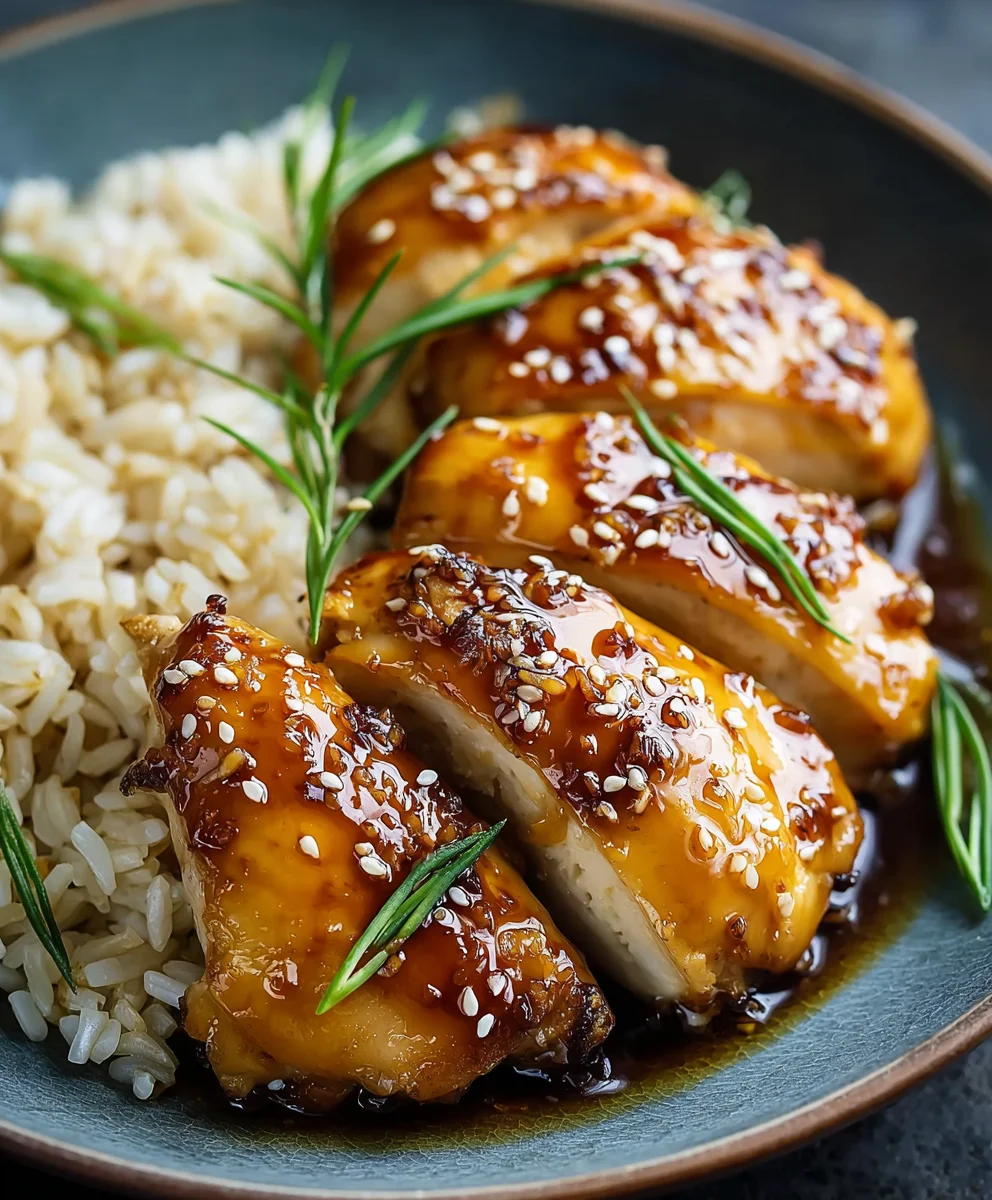
- Garnish and Serve: Now for the final flourish! Transfer the beautiful, glossy Baked Honey Garlic Chicken to a serving platter. Drizzle any extra pan sauce or the freshly thickened sauce generously over the top. Then, sprinkle with your chosen garnishes: the vibrant chopped fresh parsley or cilantro, the nutty toasted sesame seeds, and the crisp, mild sliced green onions. These additions not only add a pop of color but also contribute fresh, aromatic notes that beautifully complement the rich flavors of the chicken.
- Serving Suggestions: This delicious “Baked Honey Garlic Chicken” pairs wonderfully with a variety of side dishes. I often serve it over a bed of fluffy steamed jasmine rice or brown rice, which soaks up all that incredible sauce. Roasted or steamed vegetables, such as broccoli, asparagus, or green beans, make a fantastic healthy accompaniment. For a more complete meal, a simple side salad with a light vinaigrette can provide a refreshing contrast to the sweet and savory chicken. Enjoy this easy, flavorful, and incredibly satisfying dish – it’s sure to become a family favorite!
<h2>Conclusion:</h2>
<p>Well, my friends, we’ve reached the end of our culinary journey, but truly, it’s just the beginning of a delicious adventure for you! I genuinely believe that this <strong>Baked Honey Garlic Chicken</strong> recipe isn’t just another meal; it’s an experience waiting to happen in your kitchen. Why is it a must-try, you ask? Because it effortlessly combines that elusive trifecta of home cooking perfection: <strong>simplicity, incredible flavor, and crowd-pleasing appeal</strong>. Forget about complicated marinades that require hours, or dishes that leave your kitchen looking like a war zone. This recipe is designed to deliver maximum impact with minimal fuss. The sticky, glossy glaze, a perfect balance of sweet honey, pungent garlic, and a hint of savory soy, clings beautifully to every piece of tender chicken, creating an irresistible aroma that will draw everyone to the table. It’s the kind of dish that garners rave reviews, even from the pickiest eaters, and yet, it’s so straightforward, you’ll wonder why you haven’t been making it every week.</p>
<p>The beauty of this <strong>Baked Honey Garlic Chicken</strong> also lies in its incredible versatility when it comes to serving. While it’s utterly fantastic on its own, it truly shines when paired with the right accompaniments. Imagine serving these succulent pieces alongside a generous portion of <strong>steamed jasmine rice</strong>, allowing every grain to soak up that glorious, sweet-savory sauce. A simple <strong>side of roasted broccoli or asparagus</strong>, tossed with a little olive oil and sea salt, provides a delightful crunch and vibrant color, balancing the richness of the chicken perfectly. For those who prefer something heartier, <strong>creamy mashed potatoes</strong> or a fluffy quinoa salad would be absolutely superb. Don’t forget a sprinkle of fresh sesame seeds and thinly sliced green onions just before serving for that extra pop of flavor and visual appeal. And honestly, if you have any leftover sauce, it’s incredible drizzled over practically anything!</p>
<h4>Creative Serving & Variation Ideas:</h4>
<p>But let’s not stop there – this recipe is also incredibly forgiving and open to your personal touches. Feeling a little adventurous? <strong>Add a dash of sriracha or a pinch of red pepper flakes</strong> to the sauce mixture to introduce a spicy kick that will awaken your palate. For an herbaceous twist, a sprinkle of fresh cilantro or parsley before serving can add a wonderful freshness. You can also experiment with different cuts of chicken; boneless, skinless thighs work beautifully and stay incredibly juicy, or even try wings for a fantastic appetizer. <strong>For a vegetarian spin</strong>, I’ve heard incredible feedback from readers who’ve adapted the sauce for baked tofu or roasted cauliflower florets – the possibilities are truly endless! Consider marinating your chicken for an hour or two longer if you have the time; while not strictly necessary, it does allow the flavors to penetrate even deeper, resulting in an even more profound taste experience. This recipe is really about making it your own, adapting it to your family’s preferences, and finding new ways to enjoy those fantastic honey-garlic flavors.</p>
<p>So, what are you waiting for? <strong>I wholeheartedly encourage you to roll up your sleeves and give this wonderful Baked Honey Garlic Chicken recipe a try this week.</strong> I promise you won’t be disappointed. It’s the perfect solution for a busy weeknight, yet elegant enough for a casual gathering with friends. Once you’ve experienced the joy of creating this dish and, more importantly, the absolute delight of eating it, I would be thrilled to hear all about your culinary journey. Did you add a secret ingredient? What did you serve it with? <strong>Please share your thoughts, your successes, and even your creative variations</strong> – I love seeing how you make these recipes your own. Your feedback and experiences not only inspire me but also help our growing community of home cooks discover new favorites. Happy cooking, and I can’t wait to hear from you!</p>
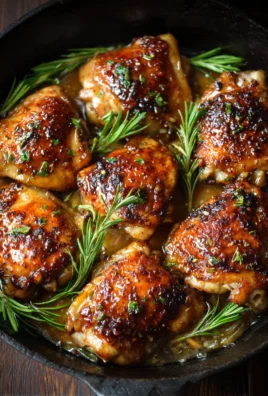
Baked Honey Garlic Chicken
This Baked Honey Garlic Chicken transforms an ordinary weeknight into an extraordinary dining experience. Tender, juicy chicken is infused with sweet honey and pungent garlic, emerging with a glistening, irresistible glaze. It’s cherished for its balanced flavors, convenience, and sophisticated profile, making it a perfect solution for busy evenings.
Ingredients
-
2 lbs boneless, skinless chicken thighs or breasts (6-8 pieces)
-
1 tablespoon olive oil
-
Salt, to taste
-
Freshly ground black pepper, to taste
-
½ cup honey
-
¼ cup low-sodium soy sauce
-
2 tablespoons apple cider vinegar
-
1 tablespoon fresh ginger, grated or minced
-
4-5 cloves garlic, minced
-
1 tablespoon cornstarch or arrowroot powder
-
2 tablespoons water or chicken broth
-
1-2 tablespoons fresh parsley or cilantro, chopped (optional, for garnish)
-
1 tablespoon sesame seeds, toasted (optional, for garnish)
-
Sliced green onions (scallions) (optional, for garnish)
Instructions
-
Step 1
Whisk together ½ cup honey, ¼ cup low-sodium soy sauce, and 2 tbsp apple cider vinegar in a medium bowl until thoroughly combined. -
Step 2
Stir in 1 tbsp fresh grated ginger and 4-5 cloves minced garlic into the sauce mixture. -
Step 3
In a separate small bowl, mix 1 tbsp cornstarch or arrowroot powder with 2 tbsp cold water or chicken broth until it forms a smooth, lump-free slurry. -
Step 4
For a richer glaze, pour half the prepared honey garlic mixture into a small saucepan. Bring to a gentle simmer over medium heat. Once simmering, slowly whisk in the cornstarch slurry. Continue whisking for 1-2 minutes until the sauce thickens and becomes glossy. Remove from heat immediately. Keep the other half of the unthickened sauce for marination and basting. -
Step 5
Pat chicken pieces completely dry with paper towels. Trim any large pieces of excess fat. Season lightly on both sides with salt and freshly ground black pepper. -
Step 6
Place prepared chicken in a large, non-reactive bowl or zip-top bag. Pour about ¾ of the *unthickened* honey garlic sauce over the chicken, ensuring all pieces are thoroughly coated. Reserve the remaining ¼ of the unthickened sauce for basting later. Cover and refrigerate to marinate for at least 30 minutes, optimally 2-4 hours, or up to 12 hours overnight for maximum flavor. -
Step 7
Preheat your oven to 400°F (200°C). Line a large baking sheet or 9×13-inch baking dish with parchment paper or aluminum foil, and lightly spray or brush with oil to prevent sticking. -
Step 8
Remove marinated chicken from the refrigerator. Arrange chicken pieces in a single layer in the prepared baking dish, ensuring they are not crowded. Pour any remaining marinade from the bowl over the chicken. -
Step 9
Place the baking dish in the preheated oven and bake for 20-25 minutes. -
Step 10
Carefully remove the baking dish from the oven. Using tongs, flip each piece of chicken over. Brush or spoon a generous amount of the reserved *unthickened* honey garlic sauce over the top of each chicken piece. Return the dish to the oven. -
Step 11
Continue to bake for another 15-20 minutes, or until the chicken is cooked through and reaches an internal temperature of 165°F (74°C). About halfway through this second bake (7-10 minutes in), baste the chicken one more time with any remaining reserved unthickened sauce or the previously thickened sauce. -
Step 12
For an extra-beautiful, slightly crispier finish, you can turn on the broiler for the last 2-3 minutes. Watch very closely to prevent burning. -
Step 13
Once cooked, remove the baking dish from the oven. Loosely tent the dish with aluminum foil and let the chicken rest for 5-10 minutes to allow juices to redistribute, ensuring tender and moist meat. -
Step 14
If you didn’t thicken any sauce previously, you can carefully pour the pan juices into a small saucepan, bring to a simmer, and stir in a slurry of 1 teaspoon cornstarch mixed with 1 tablespoon cold water. Whisk continuously for 1-2 minutes until it thickens to your desired consistency. If you thickened half the sauce earlier, spoon that rich, glossy sauce over the chicken when serving. -
Step 15
Transfer the chicken to a serving platter. Drizzle any extra pan sauce generously over the top. Garnish with chopped fresh parsley or cilantro, toasted sesame seeds, and sliced green onions. Serve hot with steamed rice, roasted vegetables, or a side salad.
Important Information
Nutrition Facts (Per Serving)
It is important to consider this information as approximate and not to use it as definitive health advice.
Allergy Information
Please check ingredients for potential allergens and consult a health professional if in doubt.
Leave a Comment