
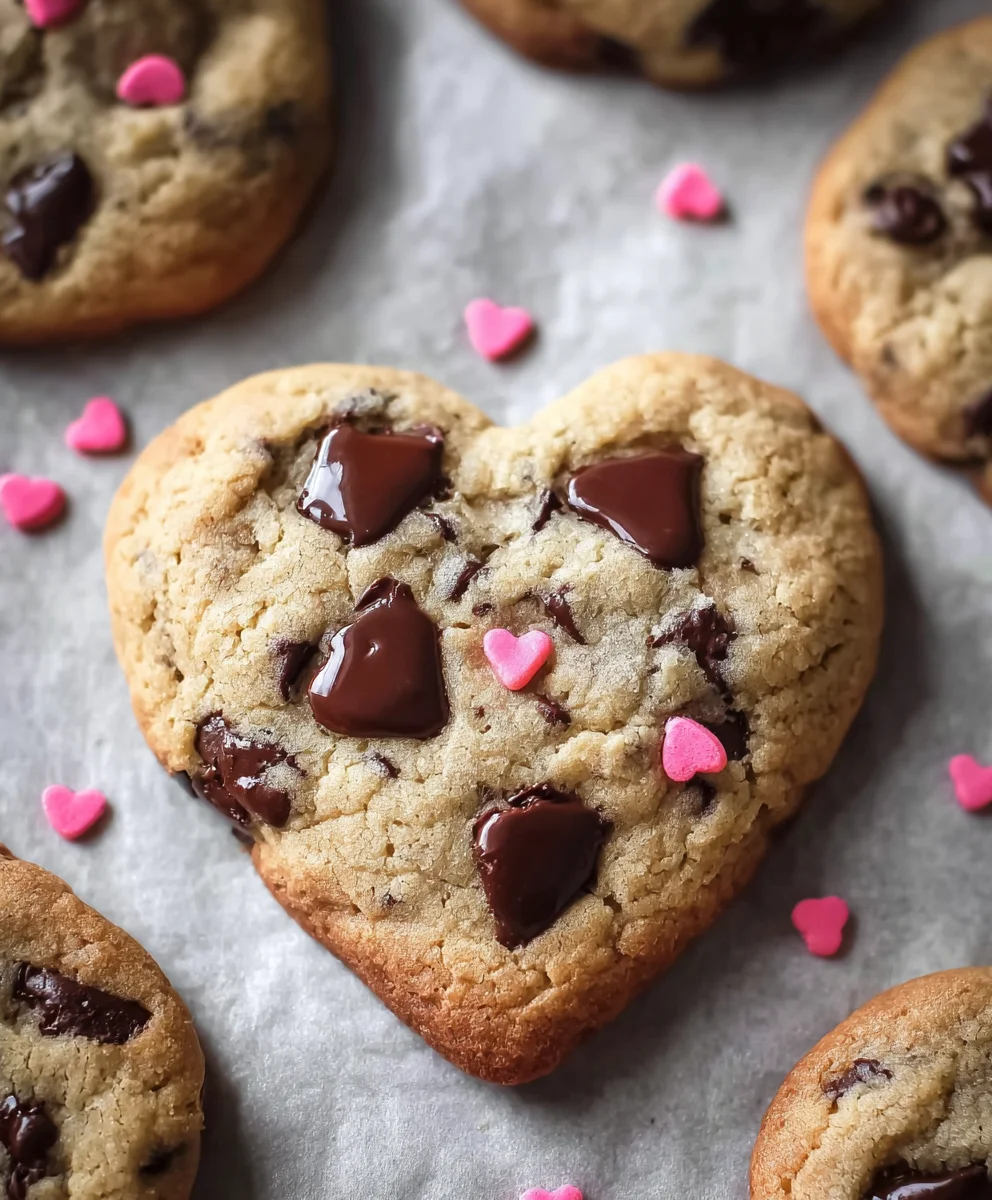
Easy Heart Shaped Chocolate Chip Cookies are more than just a sweet treat; they’re a delightful way to share a little bit of joy and affection with those you care about. Imagine the delight on someone’s face when they bite into a perfectly baked, chewy cookie, crafted especially for them. Whether it’s for Valentine’s Day, an anniversary, or simply a spontaneous gesture of love, these charming confections are truly special.
The humble chocolate chip cookie, a beloved American classic invented by Ruth Wakefield, has long been a symbol of comfort and home. By shaping them into hearts, we elevate this classic to a new level of thoughtfulness, transforming a simple dessert into a heartfelt message. What makes them so irresistible? It’s that perfect harmony of crisp edges and a soft, gooey center, generously studded with molten chocolate chips. And the best part? Our recipe ensures these delightful treats are incredibly simple to make, truly delivering on the promise of Easy Heart Shaped Chocolate Chip Cookies.
Forget complicated baking; I am excited to guide you through a process that’s as joyful as the cookies themselves. Get ready to fill your home with the comforting aroma of freshly baked goodness and spread some love, one delicious cookie at a time.

Ingredients:
- 2 ½ cups (300g) all-purpose flour
- 1 teaspoon baking soda
- 1 teaspoon fine sea salt
- 1 cup (226g) unsalted butter, softened to room temperature
- ¾ cup (150g) granulated sugar
- 1 cup (200g) packed light brown sugar
- 2 large eggs, at room temperature
- 2 teaspoons pure vanilla extract
- 2 cups (340g) semi-sweet chocolate chips, good quality (or a mix of milk, dark, and semi-sweet)
- Optional: 1 cup additional chocolate chips or chopped chocolate for pressing into the tops after baking
- Optional: Festive sprinkles for decoration
Preparing the Perfect Cookie Dough
- Bring your ingredients to the right temperature: Before you even think about mixing, I always make sure my butter and eggs are at room temperature. This is a crucial step for achieving that wonderfully smooth, emulsified dough that will lead to the best texture in your Easy Heart Shaped Chocolate Chip Cookies. If your butter is too cold, it won’t cream properly with the sugars, leading to a lumpy dough. If it’s too warm, it can make your cookies spread too much. I usually take them out of the fridge at least an hour before I plan to start baking.
- Whisk together your dry ingredients: In a medium-sized bowl, I combine my all-purpose flour, baking soda, and fine sea salt. I give it a good whisk for about 30 seconds to ensure everything is evenly distributed. This step is more important than you might think; an even distribution of baking soda means your cookies will rise uniformly, and the salt helps to balance the sweetness and really brings out the rich chocolate flavor. Set this bowl aside for now.
- Cream the butter and sugars: In a large mixing bowl, either with a stand mixer fitted with the paddle attachment or using an electric hand mixer, I beat the softened unsalted butter on medium speed for about one minute until it’s wonderfully creamy and light. Then, I add in both the granulated sugar and the packed light brown sugar. I continue to beat this mixture for at least 2-3 minutes, sometimes even up to 5 minutes, scraping down the sides of the bowl as needed. The goal here is to achieve a light, fluffy, and pale mixture. This creaming process incorporates air into the butter, which is what gives our cookies their fantastic texture and helps them to spread beautifully. Don’t rush this step; it’s fundamental for the success of your Easy Heart Shaped Chocolate Chip Cookies.
- Add the eggs and vanilla: Once your butter and sugar mixture is light and fluffy, I crack in one large egg at a time, beating well after each addition. I make sure each egg is fully incorporated before adding the next. Then, I stir in the pure vanilla extract. Vanilla is a magical ingredient that enhances all the other flavors, especially the chocolate. I beat the mixture for another minute or so until it’s well combined and looks smooth and creamy. Again, scraping down the sides of the bowl is key to ensure everything is evenly mixed.
- Gradually incorporate the dry ingredients: Now it’s time to bring in our whisked dry ingredients. I add them to the wet ingredients in two or three additions, mixing on low speed after each addition just until just combined. The keyword here is “just combined.” Overmixing your dough once the flour has been added can develop the gluten too much, resulting in tough, dry cookies. We want tender, chewy cookies, so stop mixing as soon as you no longer see streaks of dry flour.
- Fold in the chocolate chips: This is my favorite part! I gently fold in the semi-sweet chocolate chips using a rubber spatula. I like to use good quality chocolate chips because they melt beautifully and provide that rich, indulgent chocolate burst in every bite. If you’re feeling adventurous, a mix of different chocolate types – milk, dark, and semi-sweet – can add wonderful complexity. I fold until the chocolate chips are evenly distributed throughout the dough.
- Chill the dough (essential for shaping!): While it might be tempting to bake right away, I strongly recommend chilling your cookie dough. This is an absolutely critical step, especially when making Easy Heart Shaped Chocolate Chip Cookies that you want to hold their shape. Chilling the dough solidifies the butter, preventing the cookies from spreading too much in the oven. It also allows the flavors to meld and deepen, resulting in a richer, more flavorful cookie. I cover the bowl with plastic wrap and refrigerate the dough for at least 2-3 hours. For the best results and easiest shaping, I often chill it overnight. You can even chill it for up to 2-3 days, or freeze it for later!
Crafting Your Easy Heart Shaped Chocolate Chip Cookies
- Prepare your baking environment: Once the dough is thoroughly chilled, I preheat my oven to 375°F (190°C). I line my baking sheets with parchment paper or silicone baking mats. This prevents sticking and ensures even baking and easy cleanup. It’s a little step that makes a big difference!
- Roll out the chilled dough: This is where the “heart shaped” magic truly begins. I take out a portion of the chilled dough – it will be quite firm – and place it on a lightly floured surface or between two sheets of parchment paper. Using a rolling pin, I roll the dough out to an even thickness of about ¼ to ½ inch (roughly 0.6 to 1.2 cm). Rolling it between parchment paper can be less messy and prevents the dough from sticking to the rolling pin. The even thickness is important for consistent baking; thin spots will burn, and thick spots will be undercooked. If the dough starts to get too warm and sticky while you’re rolling, pop it back into the fridge for 10-15 minutes. Patience here pays off for perfectly formed hearts.
- Cut out your heart shapes: Now for the fun part of making your Easy Heart Shaped Chocolate Chip Cookies! I grab my favorite heart-shaped cookie cutters. You can use various sizes if you like, but I find a medium-sized cutter (around 2-3 inches) works best for a good cookie-to-chocolate-chip ratio. I press the cookie cutter firmly into the rolled-out dough, making sure to get a clean cut. I try to place the cutters as close together as possible to minimize scraps. Gently lift the cut-out heart cookies and place them about 2 inches apart on your prepared baking sheets.
- Gather and re-roll scraps: After cutting out as many hearts as possible from the first batch of dough, I gather the remaining dough scraps. I gently press them together to form a new ball, being careful not to overwork the dough. Then, I re-roll this new ball of dough and cut out more heart shapes. I repeat this process until I’ve used up all the dough. Sometimes, if the dough gets too warm and soft after multiple re-rolls, I’ll pop it back in the fridge for 15-20 minutes to firm up again before the final re-roll. This ensures your last batch of heart cookies are just as perfect as the first.
Baking and Finishing Your Sweet Hearts
- Bake to golden perfection: I place one baking sheet at a time into the preheated oven. I bake the Easy Heart Shaped Chocolate Chip Cookies for 9-12 minutes. The exact baking time can vary depending on your oven and the thickness of your cookies, so keep a close eye on them. You’re looking for edges that are lightly golden brown, but the centers should still look slightly soft and puffy. This indicates a chewy center and a perfectly crisp edge. If you bake them until the centers are firm, they might become dry.
- Cool on the baking sheet, then transfer: Once baked, I carefully remove the baking sheet from the oven. It’s really important to let the cookies cool on the baking sheet for about 5-10 minutes. This allows them to set up and firm up gently without breaking. If you try to move them too soon, they might fall apart because they are still very soft and delicate.
- Optional: Add extra chocolate and sprinkles: While the cookies are still warm and soft on the baking sheet, this is the perfect time for an extra touch of indulgence and visual appeal. I often like to press a few additional chocolate chips onto the tops of my Easy Heart Shaped Chocolate Chip Cookies. The warmth of the cookie will slightly melt the added chips, making them adhere beautifully and look extra tempting. If I’m feeling festive or making them for a special occasion, I’ll scatter some colorful sprinkles over the warm cookies too. This makes them even more delightful and adds a pop of color, especially great for a celebration.
- Transfer to a wire rack: After their initial rest on the baking sheet, I carefully transfer the cookies to a wire cooling rack to cool completely. Cooling them on a wire rack allows air to circulate all around them, preventing the bottoms from getting soggy and ensuring an even, crispier texture. I always make sure they are completely cool before storing them, or else condensation can form, making them soft.
- Storage tips for lasting freshness: These delicious Easy Heart Shaped Chocolate Chip Cookies are best enjoyed fresh, ideally within a day or two. To keep them at their peak, I store them in an airtight container at room temperature. For an extra touch, I sometimes place a slice of bread in the container with them; the cookies will absorb moisture from the bread, helping to keep them soft and chewy for longer. They will generally stay fresh for up to 3-4 days. If you want to keep them for an extended period, you can freeze the baked cookies in an airtight container or freezer bag for up to 2-3 months. Just thaw them at room temperature when you’re ready for a sweet treat!

Conclusion:
So, we’ve baked, we’ve shaped, and hopefully, you’re about to indulge! I truly hope you’re as excited about this recipe as I am. These aren’t just any cookies; they are a delightful fusion of simplicity and heartfelt charm, making them an absolute must-try for everyone, from novice bakers to seasoned pros. Their undeniable ability to bring smiles and warmth to any occasion is truly something special. Imagine the aroma filling your kitchen – that classic, comforting scent of warm chocolate and vanilla – a true sensory delight even before the first bite. The soft, chewy texture, generously studded with melty chocolate chips, is simply irresistible. And of course, there’s that perfect shape, transforming a humble cookie into a little token of affection. This recipe for Easy Heart Shaped Chocolate Chip Cookies stands out because it delivers on its promise: utterly delicious results without any stress. It’s an opportunity to create memorable moments, whether you’re baking for a special someone, a family gathering, or just treating yourself to a little dose of joy.
Beyond their charming appearance and incredible taste, the true beauty of these cookies lies in their versatility and the sheer ease of preparation. I know how precious time can be, and that’s precisely why I adore recipes that deliver maximum impact with minimum fuss. This isn’t a project that will have you spending hours in the kitchen; instead, it’s a quick, rewarding process that yields professional-looking and tasting results every single time. The simple ingredients, often already found in your pantry, combine to create a classic flavor that appeals to virtually everyone. They are perfect for impromptu celebrations, a thoughtful last-minute gift, or simply to brighten a regular Tuesday afternoon. The act of making them, especially when involving little ones, becomes an experience in itself, creating cherished memories right alongside those delectable cookies. This recipe is designed to take the intimidation out of baking, proving that gourmet-quality treats are well within anyone’s reach, regardless of their baking background.
Now, let’s talk about how to truly elevate your cookie experience. While these cookies are absolutely divine straight from the oven, still warm and gooey, there are so many wonderful ways to enjoy them. For a classic pairing that never disappoints, I highly recommend serving them alongside a tall glass of cold milk, a steaming cup of coffee, or your favorite herbal tea. Imagine dunking one of these soft, chocolatey hearts into a hot beverage on a chilly evening – pure bliss! They also make an incredible base for an ice cream sandwich; just scoop your favorite flavor (vanilla bean or strawberry would be divine) between two cooled cookies, and gently press. For a more sophisticated presentation, arrange them artfully on a dessert platter with some fresh berries and a delicate dusting of powdered sugar. They’re also fantastic when crumbled over a bowl of vanilla ice cream or incorporated into a decadent trifle. Don’t forget their potential as thoughtful, homemade gifts! Stack a few in a decorative box or bag, tie with a beautiful ribbon, and you have a personalized present that truly speaks from the heart.
Feeling a bit adventurous in the kitchen? These cookies are wonderfully adaptable, so feel free to experiment! While the classic chocolate chip is a timeless crowd-pleaser, don’t hesitate to switch things up with different types of chocolate chips – think rich dark chocolate chunks, sweet white chocolate morsels, or even a delightful mix of milk and semi-sweet for varied flavor profiles. For an added textural contrast and a hint of nutty goodness, try folding in a handful of chopped nuts like pecans or walnuts. Dried cranberries or cherries can add a lovely tartness and a vibrant pop of color, making them especially perfect for holiday seasons. A pinch of cinnamon or a tiny dash of almond extract in the dough can introduce a subtle yet intriguing twist to the traditional flavor. You could even drizzle them with melted white chocolate or a simple powdered sugar glaze once they’re cooled for an extra layer of sweetness and visual appeal. The possibilities are truly endless, allowing you to tailor this recipe to your own unique taste and creative spirit. Each variation offers a chance to make these already special cookies uniquely yours and discover new favorites.
So, what are you waiting for? I sincerely hope you feel inspired to gather your ingredients, preheat your oven, and embark on this delightful baking journey. There’s something incredibly satisfying about pulling a tray of perfectly golden, heart-shaped cookies from the oven, knowing you created such a beautiful treat yourself. I promise you, the joy of making and sharing these cookies is immense, and the delicious rewards speak for themselves. This recipe is more than just a set of instructions; it’s an invitation to spread a little love, one delicious bite at a time. Please, give this recipe a try! I would absolutely love to hear about your baking adventures. Did you try a fun variation? What did your family think? Share your experiences, your photos, and your tips in the comments below. Your feedback helps our community grow and inspires others to get baking. Happy baking, my friends, and enjoy every single heartwarming bite!
Recipe
A delicious recipe
Ingredients
Instructions
Important Information
Nutrition Facts (Per Serving)
It is important to consider this information as approximate and not to use it as definitive health advice.
Allergy Information
Please check ingredients for potential allergens and consult a health professional if in doubt.


Leave a Comment