
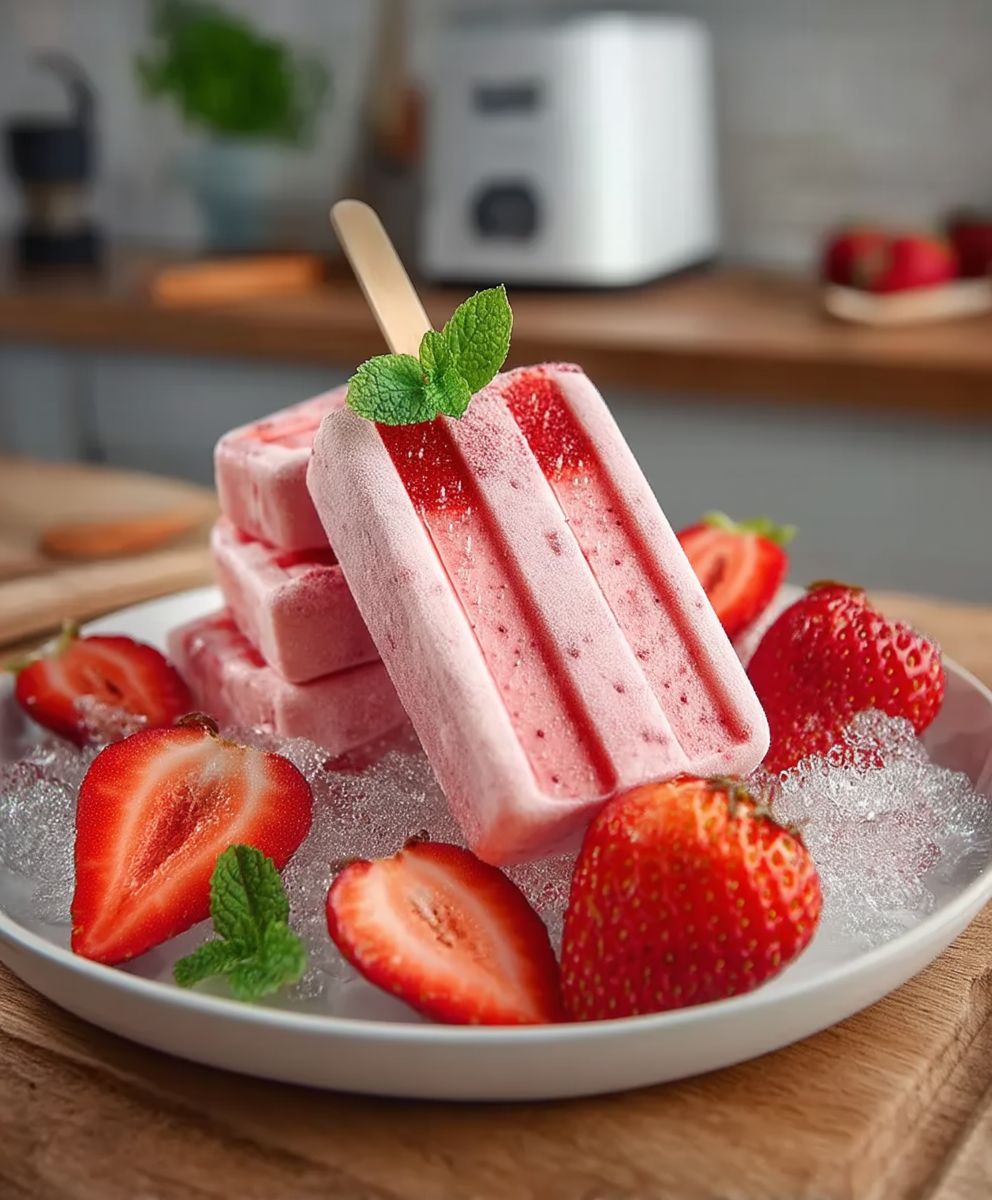
Strawberry Iced Treats: the quintessential taste of summer, frozen into delightful, refreshing bites! Imagine sinking your teeth into a perfectly sweet, icy treat bursting with the vibrant flavor of fresh strawberries. Its a simple pleasure that evokes memories of carefree days and sunny afternoons. But these aren’t just any frozen desserts; they’re a celebration of the strawberry itself.
Strawberries have a rich history, enjoyed for centuries and even revered by the Romans for their medicinal properties. While the modern strawberry we know and love is a relatively recent hybrid, its appeal is timeless. And what better way to showcase its natural sweetness than by transforming it into a frosty delight?
People adore Strawberry Iced Treats for their simplicity and pure, unadulterated flavor. They’re incredibly easy to make, requiring minimal ingredients and effort, making them the perfect treat for busy weeknights or impromptu gatherings. The combination of the sweet, slightly tart strawberries with the icy texture is simply irresistible, offering a refreshing escape from the heat. Plus, they’re a naturally healthier alternative to many store-bought frozen desserts, allowing you to indulge without the guilt. So, get ready to experience the magic of summer with these easy and delicious treats!

Ingredients:
- For the Strawberry Puree:
- 2 pounds fresh strawberries, hulled
- 1/4 cup granulated sugar (adjust to taste)
- 2 tablespoons lemon juice
- For the Creamy Base:
- 1 (14 ounce) can sweetened condensed milk
- 1 cup heavy cream
- 1 teaspoon vanilla extract
- Pinch of salt
- Optional Add-ins:
- 1/4 cup finely chopped fresh mint leaves
- 1/4 cup mini chocolate chips
- 1/4 cup graham cracker crumbs
- Equipment:
- Blender or food processor
- Mixing bowls
- Whisk
- Ice pop molds (various shapes and sizes)
- Ice cream maker (optional, for a smoother texture)
- Spatula
Preparing the Strawberry Puree
- Wash and Hull the Strawberries: Start by thoroughly washing your strawberries under cold water. Make sure to remove all the stems and hulls. This is important because the hulls can be bitter and affect the overall flavor of your iced treats. I like to use a small paring knife to carefully remove the green parts.
- Combine Ingredients: In a blender or food processor, combine the hulled strawberries, granulated sugar, and lemon juice. The lemon juice helps to brighten the strawberry flavor and acts as a natural preservative.
- Blend Until Smooth: Blend the mixture until it is completely smooth. You want to make sure there are no chunks of strawberries remaining. If you prefer a smoother puree, you can strain it through a fine-mesh sieve to remove any seeds. This step is optional, but it can improve the texture of your final product.
- Taste and Adjust: Taste the strawberry puree and adjust the sweetness as needed. If the strawberries are particularly tart, you may want to add a little more sugar. Remember that the flavor will be slightly muted once frozen, so it’s better to err on the side of slightly sweeter.
- Chill the Puree: Transfer the strawberry puree to a bowl, cover it with plastic wrap, and refrigerate for at least 30 minutes. Chilling the puree helps to prevent ice crystals from forming during the freezing process, resulting in a smoother final product.
Making the Creamy Base
- Combine Ingredients: In a separate mixing bowl, combine the sweetened condensed milk, heavy cream, vanilla extract, and a pinch of salt. The sweetened condensed milk adds sweetness and creaminess, while the heavy cream provides richness and a smooth texture. The vanilla extract enhances the overall flavor, and the pinch of salt balances the sweetness.
- Whisk Until Smooth: Whisk the ingredients together until they are well combined and smooth. Be careful not to overwhip the mixture, as this can cause it to become too thick. You want a consistency that is pourable but still slightly thick.
- Optional: Use an Ice Cream Maker: For an even creamier texture, you can churn the creamy base in an ice cream maker according to the manufacturer’s instructions. This will help to incorporate air into the mixture, resulting in a lighter and smoother final product. If you don’t have an ice cream maker, don’t worry the iced treats will still be delicious!
Combining the Strawberry Puree and Creamy Base
- Gently Fold Together: Gradually pour the chilled strawberry puree into the creamy base, gently folding them together with a spatula. Be careful not to overmix, as this can cause the mixture to become too thin. You want to maintain a slightly marbled effect, with streaks of strawberry puree running through the creamy base.
- Add Optional Add-ins: If you’re using any optional add-ins, such as chopped mint, mini chocolate chips, or graham cracker crumbs, now is the time to gently fold them into the mixture. Be careful not to overmix, as this can cause the add-ins to sink to the bottom of the molds.
Filling the Ice Pop Molds
- Prepare the Molds: Make sure your ice pop molds are clean and dry. If you’re using reusable molds, you may want to lightly grease them with a neutral oil to make it easier to remove the iced treats later.
- Fill the Molds: Carefully pour the strawberry and cream mixture into the ice pop molds, leaving a little bit of space at the top to allow for expansion during freezing. If you want to create a layered effect, you can alternate between pouring in a layer of strawberry puree and a layer of creamy base.
- Insert Sticks: Insert the ice pop sticks into the center of each mold. Make sure the sticks are securely in place so they don’t fall out during freezing. If you’re using molds that don’t have built-in stick holders, you can use a piece of aluminum foil to hold the sticks in place. Simply cover the top of the molds with foil and poke the sticks through the foil.
- Remove Air Bubbles: Gently tap the molds on the counter to release any air bubbles that may be trapped in the mixture. This will help to ensure that the iced treats are smooth and even.
Freezing the Strawberry Iced Treats
- Freeze for at Least 6 Hours: Place the filled ice pop molds in the freezer and freeze for at least 6 hours, or preferably overnight. This will ensure that the iced treats are completely frozen and solid.
- Check for Solid Freezing: Before removing the iced treats from the molds, make sure they are completely frozen solid. You can test this by gently pressing on the top of the molds. If the mixture is still soft, return them to the freezer for a longer period of time.
Removing the Iced Treats from the Molds
- Loosen the Iced Treats: To easily remove the iced treats from the molds, you can run the molds under warm water for a few seconds. Be careful not to let the water get too hot, as this can cause the iced treats to melt.
- Gently Pull Out: Gently pull the ice pop sticks to remove the iced treats from the molds. If they are still stuck, you can try running the molds under warm water for a few more seconds.
- Serve Immediately: Serve the strawberry iced treats immediately and enjoy! They are best enjoyed fresh, as they can become icy if stored in the freezer for too long.
Tips and Variations
- Use Different Fruits: You can easily adapt this recipe to use other fruits, such as raspberries, blueberries, or peaches. Simply substitute the strawberries with your favorite fruit.
- Add Yogurt: For a tangier flavor, you can substitute some of the heavy cream with plain yogurt. This will also add a boost of protein.
- Make it Vegan: To make this recipe vegan, you can use coconut cream instead of heavy cream and agave nectar or maple syrup instead of sweetened condensed milk.
- Create Layers: Get creative with layering different flavors and textures. For example, you could create a layer of strawberry puree, a layer of creamy base, and a layer of chocolate sauce.
- Drizzle with Chocolate: After removing the iced treats from the molds, you can drizzle them with melted chocolate for an extra touch of indulgence.
- Storage: If you have any leftover iced treats, you can store them in the freezer for up to a week. Wrap them individually in plastic wrap to prevent freezer burn.
Conclusion:
So there you have it! These Strawberry Iced Treats are more than just a recipe; they’re a passport to a refreshing escape, a burst of summer sunshine in every bite. I truly believe this is a must-try recipe, especially when you’re craving something sweet, healthy, and incredibly easy to make. The vibrant color, the intense strawberry flavor, and the icy coolness combine to create a truly unforgettable treat. It’s the perfect way to cool down on a hot day, impress your friends at a summer gathering, or simply treat yourself to a little bit of happiness.
But the fun doesn’t stop there! Feel free to get creative with your Strawberry Iced Treats. For a richer, creamier experience, try adding a dollop of Greek yogurt or a splash of coconut milk to the blender before freezing. This will give them a delightful, almost ice cream-like texture. If you’re feeling adventurous, you could even swirl in a spoonful of Nutella or peanut butter for a decadent twist. Imagine the combination of sweet strawberry and rich chocolate pure bliss!
Serving suggestions are endless! These treats are fantastic on their own, of course, but they also pair beautifully with other desserts. Try serving them alongside a slice of angel food cake or a warm brownie for a delightful contrast in textures and temperatures. You could also crumble them over a bowl of granola for a healthy and refreshing breakfast or snack. And for a truly elegant presentation, garnish them with fresh mint leaves, a drizzle of honey, or a sprinkle of chopped nuts.
Another variation I love is to add other fruits to the mix. A handful of blueberries, raspberries, or even a few slices of mango will complement the strawberry flavor perfectly and add an extra boost of vitamins and antioxidants. You can also experiment with different sweeteners. While I prefer honey for its natural sweetness and health benefits, you could also use maple syrup, agave nectar, or even a sugar substitute if you’re watching your sugar intake. The key is to find what works best for your taste buds and dietary needs.
I’m so excited for you to try this recipe and experience the joy of making your own Strawberry Iced Treats. It’s a simple, satisfying, and incredibly rewarding process. And the best part is, you can customize it to your heart’s content! Don’t be afraid to experiment with different flavors, textures, and presentations. The possibilities are truly endless.
So, what are you waiting for? Gather your ingredients, dust off your blender, and get ready to create some magic in the kitchen. I promise you won’t be disappointed. And when you do, please, please, please share your creations with me! I’d love to see your photos, hear your feedback, and learn about your own unique variations. You can tag me on social media using [Your Social Media Handle] or leave a comment below. I can’t wait to see what you come up with! Happy creating, and happy indulging!
Remember, the best recipes are the ones that are shared and enjoyed with loved ones. So, make a batch of these Strawberry Iced Treats and spread the joy! They’re the perfect way to brighten someone’s day and create lasting memories. Enjoy!
Strawberry Iced Treats: Cool Down with These Delicious Recipes
Cool off with these creamy and refreshing Strawberry Iced Treats! Made with fresh strawberry puree and a sweet, creamy base, these homemade popsicles are the perfect summer treat.
Ingredients
- 2 pounds fresh strawberries, hulled
- 1/4 cup granulated sugar (adjust to taste)
- 2 tablespoons lemon juice
- 1 (14 ounce) can sweetened condensed milk
- 1 cup heavy cream
- 1 teaspoon vanilla extract
- Pinch of salt
- 1/4 cup finely chopped fresh mint leaves
- 1/4 cup mini chocolate chips
- 1/4 cup graham cracker crumbs
Instructions
- Wash and Hull the Strawberries: Thoroughly wash strawberries under cold water. Remove stems and hulls.
- Combine Ingredients (Puree): In a blender or food processor, combine hulled strawberries, granulated sugar, and lemon juice.
- Blend Until Smooth (Puree): Blend until completely smooth. Strain through a fine-mesh sieve for a smoother puree (optional).
- Taste and Adjust (Puree): Taste and adjust sweetness as needed.
- Chill the Puree: Transfer strawberry puree to a bowl, cover, and refrigerate for at least 30 minutes.
- Combine Ingredients (Creamy Base): In a separate mixing bowl, combine sweetened condensed milk, heavy cream, vanilla extract, and a pinch of salt.
- Whisk Until Smooth (Creamy Base): Whisk until well combined and smooth. Be careful not to overwhip.
- (Optional) Use an Ice Cream Maker: For an even creamier texture, you can churn the creamy base in an ice cream maker according to the manufacturer’s instructions.
- Gently Fold Together: Gradually pour the chilled strawberry puree into the creamy base, gently folding them together with a spatula. Be careful not to overmix.
- Add Optional Add-ins: If using, gently fold in chopped mint, mini chocolate chips, or graham cracker crumbs.
- Prepare the Molds: Make sure your ice pop molds are clean and dry. You may want to lightly grease them with a neutral oil to make it easier to remove the iced treats later.
- Fill the Molds: Carefully pour the strawberry and cream mixture into the ice pop molds, leaving a little bit of space at the top to allow for expansion during freezing. If you want to create a layered effect, you can alternate between pouring in a layer of strawberry puree and a layer of creamy base.
- Insert Sticks: Insert the ice pop sticks into the center of each mold. Make sure the sticks are securely in place so they don’t fall out during freezing. If you’re using molds that don’t have built-in stick holders, you can use a piece of aluminum foil to hold the sticks in place. Simply cover the top of the molds with foil and poke the sticks through the foil.
- Remove Air Bubbles: Gently tap the molds on the counter to release any air bubbles that may be trapped in the mixture. This will help to ensure that the iced treats are smooth and even.
- Freeze for at Least 6 Hours: Place the filled ice pop molds in the freezer and freeze for at least 6 hours, or preferably overnight.
- Check for Solid Freezing: Before removing the iced treats from the molds, make sure they are completely frozen solid. You can test this by gently pressing on the top of the molds. If the mixture is still soft, return them to the freezer for a longer period of time.
- Loosen the Iced Treats: To easily remove the iced treats from the molds, you can run the molds under warm water for a few seconds. Be careful not to let the water get too hot, as this can cause the iced treats to melt.
- Gently Pull Out: Gently pull the ice pop sticks to remove the iced treats from the molds. If they are still stuck, you can try running the molds under warm water for a few more seconds.
- Serve Immediately: Serve the strawberry iced treats immediately and enjoy! They are best enjoyed fresh, as they can become icy if stored in the freezer for too long.
Notes
- Use different fruits like raspberries, blueberries, or peaches.
- Add yogurt for a tangier flavor.
- Make it vegan with coconut cream and agave/maple syrup.
- Create layers of different flavors and textures.
- Drizzle with melted chocolate.
- Store leftover iced treats wrapped in plastic wrap in the freezer for up to a week.


Leave a Comment