
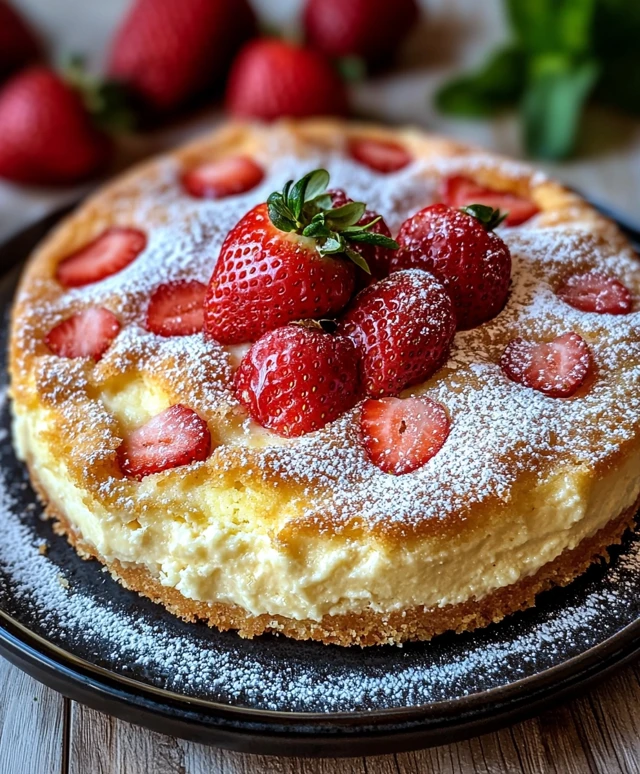
Strawberry Cheesecake Dump Cake is a delightful dessert that combines the rich, creamy flavors of cheesecake with the sweet, fruity essence of strawberries, all in a simple, no-fuss recipe. This dish has become a favorite in many households, not just for its delicious taste but also for its ease of preparation. Originating from the classic dump cake concept, where ingredients are literally “dumped” into a baking dish, this version elevates the traditional dessert experience with the addition of cheesecake flavors that evoke nostalgia and comfort.
People love Strawberry Cheesecake Dump Cake for its perfect balance of texturesthe creamy cheesecake layer pairs beautifully with the soft, moist cake and the juicy strawberries. Its a dessert that can be whipped up in no time, making it ideal for gatherings, potlucks, or simply a sweet treat at home. Whether youre a seasoned baker or a novice in the kitchen, this recipe promises to impress with minimal effort. Join me as we dive into the world of Strawberry Cheesecake Dump Cake and discover how to create this scrumptious dessert that will surely become a staple in your recipe collection!

Ingredients:
- 1 box (15.25 oz) yellow cake mix
- 1 cup unsalted butter, melted (2 sticks)
- 1 can (21 oz) strawberry pie filling
- 8 oz cream cheese, softened
- 1 cup powdered sugar
- 1 teaspoon vanilla extract
- 1 cup fresh strawberries, sliced (optional, for garnish)
- Whipped cream (optional, for serving)
Preparing the Cream Cheese Mixture
Before we dive into the cake, lets start with the cream cheese mixture. This will add a delightful layer of flavor to our dump cake.
- In a medium mixing bowl, add the softened cream cheese. Make sure its at room temperature for easy mixing.
- Using a hand mixer or a whisk, beat the cream cheese until its smooth and creamy. This should take about 1-2 minutes.
- Gradually add the powdered sugar to the cream cheese, mixing well after each addition. This will help to avoid lumps.
- Once the powdered sugar is fully incorporated, add the vanilla extract and mix until everything is well combined. Set this mixture aside for now.
Preparing the Cake Base
Now that our cream cheese mixture is ready, lets move on to the cake base. This is where the magic happens!
- Preheat your oven to 350°F (175°C). This is crucial for ensuring that our cake bakes evenly.
- Grease a 9×13 inch baking dish with non-stick cooking spray or butter. This will prevent the cake from sticking to the pan.
- In the greased baking dish, spread the can of strawberry pie filling evenly across the bottom. Make sure to cover the entire surface.
- Next, take the cream cheese mixture we prepared earlier and dollop it over the strawberry pie filling. Use a spatula to spread it out gently, but dont worry about making it perfect; it will spread as it bakes.
Adding the Cake Mix
Now its time to add the cake mix, which will create a delicious topping for our dump cake.
- Open the box of yellow cake mix and sprinkle it evenly over the cream cheese layer. Make sure to cover it completely.
- Once the cake mix is spread out, pour the melted butter evenly over the top. This will help to create a golden, crispy crust as it bakes.
- Do not mix the butter into the cake mix; just let it sit on top. This is what makes it a dump cake!
Baking the Cake
Now that everything is assembled, its time to bake our delicious creation!
- Place the baking dish in the preheated oven and bake for 45-50 minutes. Youll know its done when the top is golden brown and a toothpick inserted into the center comes out clean.
- Once baked, remove the cake from the oven and let it cool for about 10-15 minutes. This will help the layers set a bit before serving.
Serving the Dump Cake
Now comes the best partserving and enjoying our strawberry cheesecake dump cake!
- Using a large spoon or spatula, scoop out portions of the dump cake and place them on individual plates.
- If youd like, garnish each serving with fresh sliced strawberries for an extra pop of color and flavor.
- Top with a generous dollop of whipped cream if desired. This adds a lovely creaminess that complements the cake perfectly.
- Serve warm or at room temperature. Either way, its going to be a hit!
Storing Leftovers
If you happen to have any leftovers (which is rare, but it happens!), heres how to store them:
- Allow the cake to cool completely before covering it with plastic wrap or aluminum foil.
- Store it in the refrigerator for up to 3-4 days. The flavors
Conclusion:
In summary, this Strawberry Cheesecake Dump Cake is an absolute must-try for anyone who loves a delightful dessert that combines the rich creaminess of cheesecake with the sweet, fruity flavor of strawberries. The beauty of this recipe lies in its simplicity and the way it effortlessly brings together a few key ingredients to create a show-stopping treat that will impress your family and friends. For serving suggestions, I recommend pairing this cake with a dollop of freshly whipped cream or a scoop of vanilla ice cream to elevate the experience even further. You can also experiment with variations by swapping out strawberries for other fruits like blueberries or raspberries, or even adding a sprinkle of crushed graham crackers on top for that extra crunch. I truly encourage you to give this Strawberry Cheesecake Dump Cake a try! Its perfect for gatherings, potlucks, or simply as a sweet indulgence after dinner. Once youve made it, Id love to hear about your experiencefeel free to share your thoughts and any creative twists you added to the recipe. Happy baking! Print
Strawberry Cheesecake Dump Cake: A Simple and Delicious Dessert Recipe
- Total Time: 65 minutes
- Yield: 12 servings 1x
Description
Enjoy a deliciously easy Strawberry Cheesecake Dump Cake that combines creamy cheesecake and sweet strawberries in a delightful dessert. Perfect for any occasion, this cake is simple to prepare and sure to impress your guests!
Ingredients
- 1 box (15.25 oz) yellow cake mix
- 1 cup unsalted butter, melted (2 sticks)
- 1 can (21 oz) strawberry pie filling
- 8 oz cream cheese, softened
- 1 cup powdered sugar
- 1 teaspoon vanilla extract
- 1 cup fresh strawberries, sliced (optional, for garnish)
- Whipped cream (optional, for serving)
Instructions
- In a medium mixing bowl, add the softened cream cheese. Ensure its at room temperature for easy mixing.
- Using a hand mixer or a whisk, beat the cream cheese until smooth and creamy (about 1-2 minutes).
- Gradually add the powdered sugar to the cream cheese, mixing well after each addition to avoid lumps.
- Once fully incorporated, add the vanilla extract and mix until well combined. Set aside.
- Preheat your oven to 350°F (175°C).
- Grease a 9×13 inch baking dish with non-stick cooking spray or butter.
- Spread the can of strawberry pie filling evenly across the bottom of the greased baking dish.
- Dollop the cream cheese mixture over the strawberry pie filling and gently spread it out.
- Open the box of yellow cake mix and sprinkle it evenly over the cream cheese layer.
- Pour the melted butter evenly over the top of the cake mix. Do not mix; let it sit on top.
- Place the baking dish in the preheated oven and bake for 45-50 minutes, or until the top is golden brown and a toothpick inserted into the center comes out clean.
- Remove the cake from the oven and let it cool for about 10-15 minutes.
- Scoop out portions of the dump cake and place them on individual plates.
- Garnish with fresh sliced strawberries if desired.
- Top with whipped cream for added creaminess.
- Serve warm or at room temperature.
- Allow the cake to cool completely before covering it with plastic wrap or aluminum foil.
- Store in the refrigerator for up to 3-4 days.
Notes
- For an extra touch, consider adding a sprinkle of graham cracker crumbs on top before serving to mimic a cheesecake crust.
- This cake can be made ahead of time and served later, making it a great option for parties.
- Prep Time: 15 minutes
- Cook Time: 50 minutes

Leave a Comment