
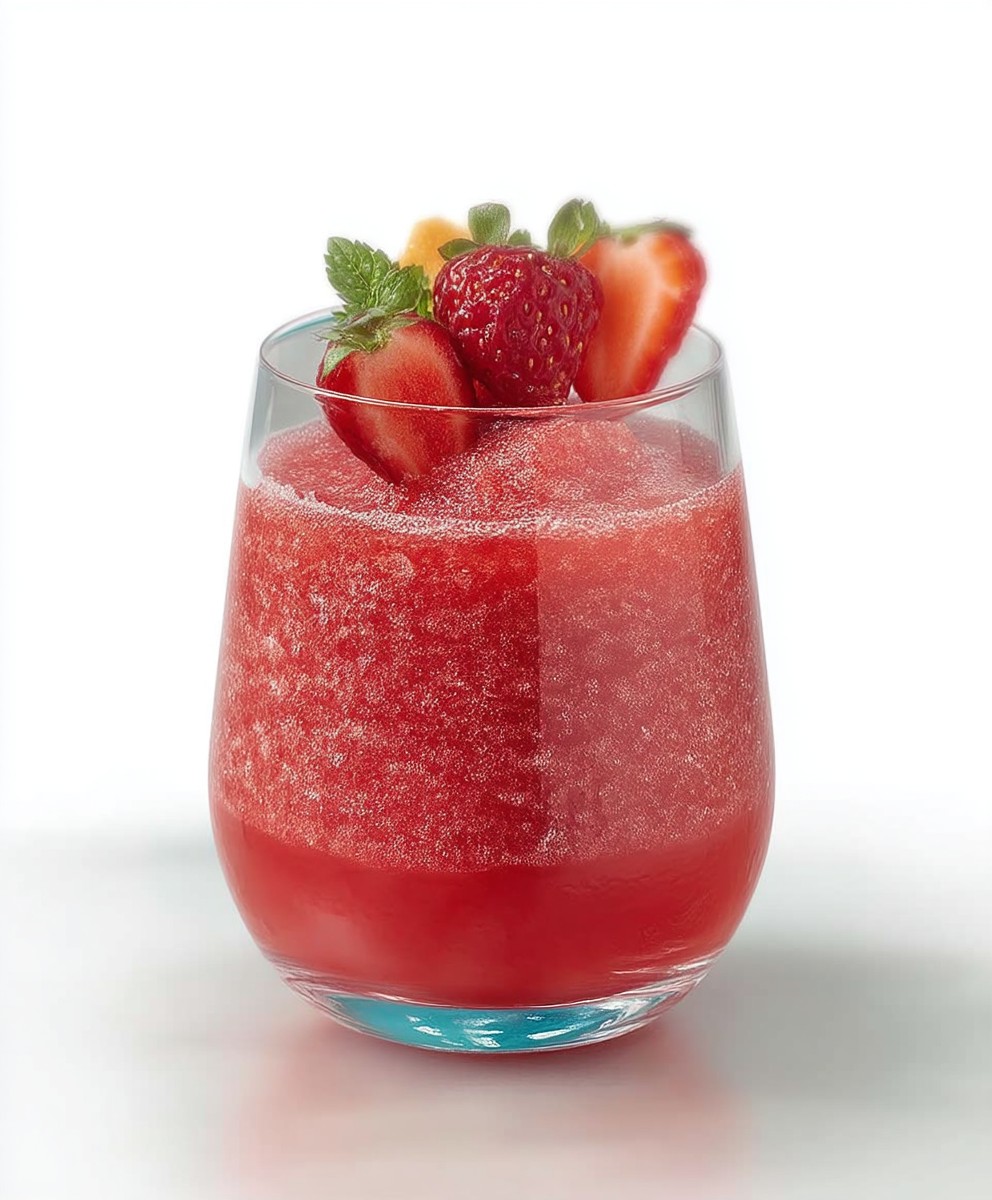
Slush Sangria Ice Cream: Prepare to be amazed! Imagine the vibrant, fruity flavors of sangria, transformed into a refreshingly cool and creamy dessert. This isn’t just ice cream; it’s a party in every spoonful! I’ve taken the essence of Spain’s beloved wine punch and given it a frosty, fun twist that’s perfect for hot summer days or any occasion that calls for a celebration.
Sangria itself boasts a rich history, dating back centuries as a way to make wine more palatable and refreshing. Traditionally, it’s a blend of red wine, chopped fruits, a touch of sweetener, and sometimes a splash of brandy or other spirits. The beauty of sangria lies in its versatility every region, every family, has its own unique spin on the classic recipe. And now, I’m adding my own twist with this delightful frozen treat.
People adore sangria for its bright, fruity taste and its ability to bring people together. It’s the quintessential party drink, and this Slush Sangria Ice Cream captures all of that convivial spirit in a scoopable form. The combination of sweet fruit, a hint of wine, and the creamy texture of ice cream is simply irresistible. Plus, it’s surprisingly easy to make, requiring no special equipment beyond a blender and an ice cream maker. Get ready to impress your friends and family with this unique and unforgettable dessert!

Ingredients:
- 1 (750ml) bottle of your favorite red wine (I prefer a fruity Rioja or a light-bodied Garnacha)
- 1 cup orange juice, freshly squeezed is best!
- ½ cup brandy (optional, but highly recommended for that extra kick!)
- ¼ cup lime juice, freshly squeezed
- ¼ cup lemon juice, freshly squeezed
- ½ cup granulated sugar (adjust to your sweetness preference)
- 1 orange, sliced into thin rounds
- 1 lemon, sliced into thin rounds
- 1 lime, sliced into thin rounds
- 1 cup mixed berries (strawberries, raspberries, blueberries a colorful mix is key!)
- 1 cup chopped peaches or nectarines (canned in juice, drained, works in a pinch)
- 1 cup club soda or sparkling water (for a little fizz before freezing)
- 1 cup heavy cream
- ½ cup whole milk
- ¼ teaspoon salt
Preparing the Slush Sangria Base:
- First, let’s get that sangria flavor going! In a large pitcher or bowl, combine the red wine, orange juice, brandy (if using), lime juice, lemon juice, and sugar. Stir well until the sugar is completely dissolved. Give it a taste and adjust the sweetness if needed. Some wines are naturally sweeter than others, so you might want to add a little more sugar if it’s too tart.
- Now, add the sliced oranges, lemons, and limes to the sangria mixture. These will infuse the liquid with their citrusy goodness. Gently muddle the fruit with a wooden spoon to release their flavors, but be careful not to pulverize them.
- Next, toss in the mixed berries and chopped peaches or nectarines. The fruit will not only add flavor but also create a beautiful visual appeal in the final ice cream. Gently stir everything together.
- Cover the pitcher or bowl with plastic wrap and refrigerate for at least 4 hours, or preferably overnight. This allows the flavors to meld together and create a truly delicious sangria base. The longer it sits, the better the flavor will be!
- Before moving on to the next step, give the sangria a good stir. Then, strain the mixture through a fine-mesh sieve into a clean bowl or pitcher. This will remove the fruit solids, leaving you with a smooth and flavorful sangria liquid. Don’t discard the fruit! You can snack on it later, or even use it to garnish the finished ice cream.
- Stir in the club soda or sparkling water. This will add a touch of fizz to the sangria, which will translate into a lighter and more refreshing ice cream.
Creating the Ice Cream Base:
- In a separate bowl, whisk together the heavy cream, whole milk, and salt. The salt might seem like an odd ingredient, but it actually enhances the sweetness and balances the flavors in the ice cream.
- Slowly pour the cream mixture into the strained sangria, whisking constantly to combine. Make sure everything is well incorporated.
- Give the mixture a final taste. If you feel like it needs a little more sweetness or a touch more citrus, now is the time to adjust it. Remember that the flavors will mellow slightly once the ice cream is frozen.
Churning and Freezing the Ice Cream:
- Pour the sangria ice cream base into your ice cream maker. Follow the manufacturer’s instructions for churning. Typically, this involves chilling the ice cream maker bowl for at least 24 hours before use.
- Churn the ice cream for approximately 20-25 minutes, or until it reaches a soft-serve consistency. The exact churning time will depend on your ice cream maker and the ambient temperature.
- Once the ice cream has reached the desired consistency, transfer it to a freezer-safe container. I like to use a loaf pan or a plastic container with a tight-fitting lid.
- Gently press a piece of plastic wrap directly onto the surface of the ice cream to prevent ice crystals from forming. Then, cover the container with the lid.
- Freeze the ice cream for at least 4 hours, or preferably overnight, to allow it to fully harden.
Serving and Enjoying Your Slush Sangria Ice Cream:
- Before serving, let the ice cream sit at room temperature for a few minutes to soften slightly. This will make it easier to scoop.
- Scoop the ice cream into bowls or cones.
- Garnish with the reserved sangria-soaked fruit, fresh berries, or a sprig of mint. You can even drizzle a little extra brandy over the top for an extra boozy treat!
- Serve immediately and enjoy! This Slush Sangria Ice Cream is the perfect refreshing dessert for a hot summer day, or any time you’re craving a taste of sangria.
Tips and Variations:
- Adjust the sweetness: The amount of sugar in this recipe can be adjusted to your liking. If you prefer a sweeter ice cream, add a little more sugar. If you prefer a less sweet ice cream, reduce the amount of sugar.
- Use different fruits: Feel free to experiment with different fruits in this recipe. Peaches, plums, cherries, and grapes would all be delicious additions.
- Add a little spice: For a little extra warmth, add a pinch of cinnamon or nutmeg to the ice cream base.
- Make it non-alcoholic: If you prefer a non-alcoholic version of this ice cream, simply omit the red wine and brandy. Replace the red wine with grape juice or cranberry juice.
- Get creative with garnishes: The possibilities for garnishing this ice cream are endless. Try topping it with whipped cream, chocolate shavings, or chopped nuts.
- Storage: Store leftover ice cream in the freezer for up to 2 weeks. Be sure to keep it in a tightly sealed container to prevent freezer burn.
Troubleshooting:
- Ice cream is too icy: This can happen if the ice cream base wasn’t cold enough before churning, or if the ice cream wasn’t frozen quickly enough. Make sure to chill the ice cream base thoroughly before churning, and freeze the ice cream in a shallow container to help it freeze faster.
- Ice cream is too soft: This can happen if the ice cream maker wasn’t cold enough, or if the churning time was too short. Make sure to chill the ice cream maker bowl for at least 24 hours before use, and churn the ice cream until it reaches a soft-serve consistency.
- Ice cream is too hard: This can happen if the ice cream was frozen for too long. Let the ice cream sit at room temperature for a few minutes before serving to soften it slightly.
Enjoy your homemade Slush Sangria Ice Cream! I hope you love it as much as I do!
Conclusion:
This Slush Sangria Ice Cream isn’t just a dessert; it’s a vibrant, boozy celebration in every spoonful! I truly believe this recipe is a must-try for anyone looking to elevate their summer treats. The combination of the refreshing sangria flavors with the creamy texture of homemade ice cream is simply irresistible. It’s the perfect way to cool down on a hot day, impress your friends at a barbecue, or simply treat yourself to something special.
What makes this recipe so special? It’s the unexpected twist on a classic cocktail. We’ve taken the fruity, wine-infused goodness of sangria and transformed it into a frozen delight that’s both sophisticated and playful. The slushy texture adds an extra layer of refreshment, making it the ultimate summer indulgence. Plus, it’s surprisingly easy to make! You don’t need any fancy equipment, just a little patience and a love for delicious things.
Serving Suggestions and Variations:
The possibilities are endless when it comes to serving and customizing this Slush Sangria Ice Cream. For a truly elegant presentation, scoop it into chilled martini glasses and garnish with fresh berries and a sprig of mint. You could also serve it in waffle cones for a more casual, fun vibe.
Here are a few variations to try:
* White Sangria Ice Cream: Substitute red wine with a crisp white wine like Sauvignon Blanc or Pinot Grigio. Use green grapes, honeydew melon, and lime for a lighter, more refreshing flavor profile.
* Sparkling Sangria Ice Cream: Add a splash of sparkling wine or Prosecco to the ice cream mixture before churning for an extra bubbly kick.
* Spiced Sangria Ice Cream: Infuse the sangria mixture with cinnamon sticks, star anise, and cloves for a warm, comforting flavor that’s perfect for fall.
* Non-Alcoholic Sangria Ice Cream: For a kid-friendly version, simply omit the wine and use grape juice or cranberry juice as a base. Add a splash of lemon-lime soda for some fizz.
* Deluxe Toppings: Consider adding toppings like chocolate shavings, chopped nuts, or a drizzle of caramel sauce for an extra layer of indulgence.
Don’t be afraid to experiment with different fruits, wines, and spices to create your own signature Slush Sangria Ice Cream. The beauty of this recipe is that it’s incredibly versatile and adaptable to your personal preferences.
I’m confident that you’ll absolutely love this recipe. It’s a guaranteed crowd-pleaser and a unique way to enjoy the flavors of sangria in a whole new way. The vibrant colors and refreshing taste make it a truly memorable dessert.
So, what are you waiting for? Gather your ingredients, fire up your ice cream maker (or use the no-churn method!), and get ready to experience the magic of Slush Sangria Ice Cream. I can’t wait to hear what you think!
I encourage you to try this recipe and share your experience with me. Let me know what variations you tried, what toppings you added, and how much your friends and family loved it. You can leave a comment below, tag me on social media, or send me an email. I’m always excited to see your creations and hear your feedback. Happy ice cream making!
Slush Sangria Ice Cream: The Ultimate Boozy Summer Treat
Boozy and refreshing Slush Sangria Ice Cream! A perfect summer treat combining the flavors of sangria with the creamy texture of homemade ice cream.
Ingredients
- 1 (750ml) bottle of your favorite red wine (Rioja or Garnacha recommended)
- 1 cup orange juice, freshly squeezed
- ½ cup brandy (optional)
- ¼ cup lime juice, freshly squeezed
- ¼ cup lemon juice, freshly squeezed
- ½ cup granulated sugar (adjust to taste)
- 1 orange, sliced into thin rounds
- 1 lemon, sliced into thin rounds
- 1 lime, sliced into thin rounds
- 1 cup mixed berries (strawberries, raspberries, blueberries)
- 1 cup chopped peaches or nectarines (canned in juice, drained, works)
- 1 cup club soda or sparkling water
- 1 cup heavy cream
- ½ cup whole milk
- ¼ teaspoon salt
Instructions
- In a large pitcher or bowl, combine the red wine, orange juice, brandy (if using), lime juice, lemon juice, and sugar. Stir well until the sugar is completely dissolved. Taste and adjust sweetness as needed.
- Add the sliced oranges, lemons, and limes to the sangria mixture. Gently muddle the fruit with a wooden spoon to release their flavors, being careful not to pulverize them.
- Toss in the mixed berries and chopped peaches or nectarines. Gently stir everything together.
- Cover the pitcher or bowl with plastic wrap and refrigerate for at least 4 hours, or preferably overnight, to allow the flavors to meld.
- Before moving on, give the sangria a good stir. Then, strain the mixture through a fine-mesh sieve into a clean bowl or pitcher. Discard the fruit solids.
- Stir in the club soda or sparkling water.
- In a separate bowl, whisk together the heavy cream, whole milk, and salt.
- Slowly pour the cream mixture into the strained sangria, whisking constantly to combine. Make sure everything is well incorporated.
- Give the mixture a final taste. If you feel like it needs a little more sweetness or a touch more citrus, now is the time to adjust it. Remember that the flavors will mellow slightly once the ice cream is frozen.
- Pour the sangria ice cream base into your ice cream maker. Follow the manufacturer’s instructions for churning. Typically, this involves chilling the ice cream maker bowl for at least 24 hours before use.
- Churn the ice cream for approximately 20-25 minutes, or until it reaches a soft-serve consistency. The exact churning time will depend on your ice cream maker and the ambient temperature.
- Once the ice cream has reached the desired consistency, transfer it to a freezer-safe container. I like to use a loaf pan or a plastic container with a tight-fitting lid.
- Gently press a piece of plastic wrap directly onto the surface of the ice cream to prevent ice crystals from forming. Then, cover the container with the lid.
- Freeze the ice cream for at least 4 hours, or preferably overnight, to allow it to fully harden.
- Before serving, let the ice cream sit at room temperature for a few minutes to soften slightly. This will make it easier to scoop.
- Scoop the ice cream into bowls or cones.
- Garnish with the reserved sangria-soaked fruit, fresh berries, or a sprig of mint. You can even drizzle a little extra brandy over the top for an extra boozy treat!
- Serve immediately and enjoy! This Slush Sangria Ice Cream is the perfect refreshing dessert for a hot summer day, or any time you’re craving a taste of sangria.
Notes
- Adjust Sweetness: Adjust the sugar to your preference.
- Fruit Variations: Experiment with peaches, plums, cherries, or grapes.
- Spice it Up: Add a pinch of cinnamon or nutmeg.
- Non-Alcoholic: Omit wine and brandy; replace with grape or cranberry juice.
- Garnish Ideas: Whipped cream, chocolate shavings, chopped nuts.
- Storage: Store in a tightly sealed container in the freezer for up to 2 weeks.
Leave a Comment