
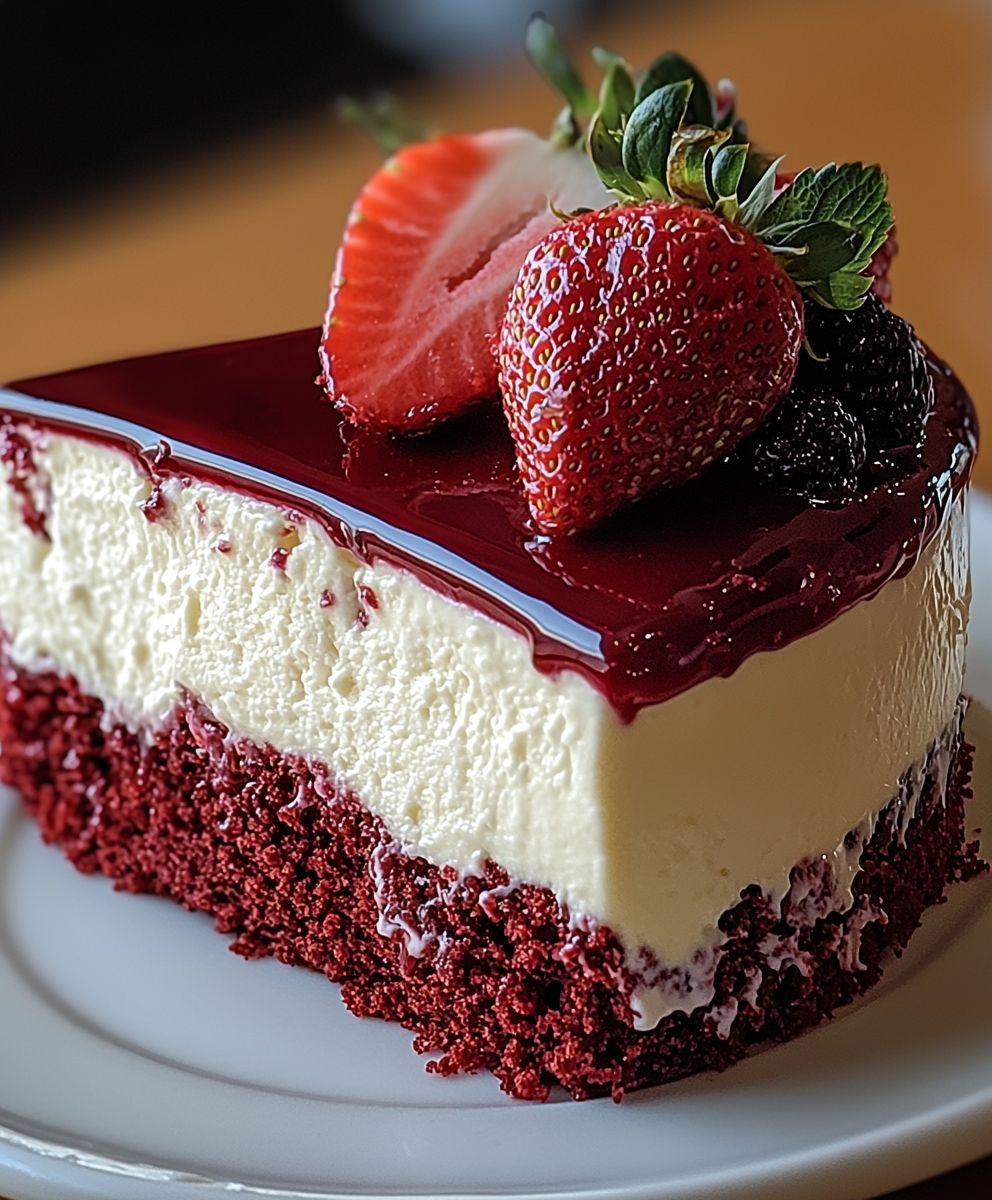
Red Velvet Strawberry Cheesecake: Prepare to be utterly captivated! Imagine the tangy, creamy decadence of a classic cheesecake, swirled with the unmistakable allure of red velvet cake, and then crowned with fresh, juicy strawberries. It’s not just a dessert; it’s an experience, a symphony of flavors and textures that will leave you craving more.
The history of cheesecake stretches back centuries, with variations found in ancient Greece. Red velvet, on the other hand, is a more modern creation, gaining popularity in the United States during the early 20th century. Combining these two iconic desserts, and adding the bright, fresh element of strawberries, creates a truly unforgettable treat. This Red Velvet Strawberry Cheesecake is a showstopper, perfect for special occasions or simply when you want to indulge in something extraordinary.
What makes this dessert so irresistible? It’s the perfect balance of sweet and tangy, rich and refreshing. The velvety smooth cheesecake filling melts in your mouth, while the subtle cocoa notes of the red velvet add depth and complexity. The strawberries provide a burst of freshness that cuts through the richness, making each bite a delightful surprise. Plus, let’s be honest, it looks absolutely stunning! This recipe is surprisingly easy to follow, and the results are guaranteed to impress. So, let’s get baking and create a dessert that will have everyone begging for the recipe!

Ingredients:
- For the Red Velvet Cake Layers:
- 2 ½ cups all-purpose flour
- 2 cups granulated sugar
- 1 teaspoon baking soda
- 1 teaspoon baking powder
- 1 teaspoon salt
- 1 cup buttermilk
- 1 cup vegetable oil
- 2 large eggs
- 2 tablespoons unsweetened cocoa powder
- 1 ounce (2 tablespoons) red food coloring
- 1 teaspoon white vinegar
- 1 teaspoon vanilla extract
- For the Cheesecake Layer:
- 32 ounces (4 packages) cream cheese, softened
- 1 ½ cups granulated sugar
- 4 large eggs
- 1 cup sour cream
- 2 teaspoons vanilla extract
- For the Strawberry Puree:
- 1 pound fresh strawberries, hulled
- ¼ cup granulated sugar
- 1 tablespoon lemon juice
- For the Cream Cheese Frosting:
- 1 cup (2 sticks) unsalted butter, softened
- 8 ounces cream cheese, softened
- 6 cups powdered sugar
- 2 teaspoons vanilla extract
- Pinch of salt
- 2-4 tablespoons milk or heavy cream (optional, for consistency)
- For Garnish (Optional):
- Fresh strawberries, sliced
- Red velvet cake crumbs
Preparing the Red Velvet Cake Layers:
- Preheat and Prep: Preheat your oven to 350°F (175°C). Grease and flour two 9-inch round cake pans. You can also line the bottoms with parchment paper circles for easier removal. This step is crucial to prevent sticking!
- Combine Dry Ingredients: In a large bowl, whisk together the flour, sugar, baking soda, baking powder, and salt. Make sure everything is evenly distributed. This ensures a consistent rise and texture.
- Combine Wet Ingredients: In a separate bowl, whisk together the buttermilk, oil, eggs, cocoa powder, red food coloring, vinegar, and vanilla extract. Don’t worry if the mixture looks a little strange; that’s perfectly normal.
- Combine Wet and Dry: Gradually add the wet ingredients to the dry ingredients, mixing on low speed until just combined. Be careful not to overmix! Overmixing can lead to a tough cake.
- Divide and Bake: Divide the batter evenly between the prepared cake pans. Bake for 25-30 minutes, or until a wooden skewer inserted into the center comes out clean. Keep a close eye on them; ovens vary!
- Cool Completely: Let the cakes cool in the pans for 10 minutes before inverting them onto a wire rack to cool completely. Make sure they are completely cool before assembling the cheesecake. This prevents the frosting from melting.
Preparing the Cheesecake Layer:
- Preheat and Prep (Again!): Preheat your oven to 325°F (160°C). Wrap the bottom of a 9-inch springform pan tightly with heavy-duty aluminum foil. This is essential for the water bath.
- Cream Cheese and Sugar: In a large bowl, beat the softened cream cheese and sugar together until smooth and creamy. This is the foundation of a good cheesecake, so take your time and get it right.
- Add Eggs: Add the eggs one at a time, beating well after each addition. Be careful not to overmix at this stage; you don’t want to incorporate too much air.
- Sour Cream and Vanilla: Stir in the sour cream and vanilla extract until just combined. The sour cream adds a lovely tang and richness.
- Prepare Water Bath: Place the foil-wrapped springform pan inside a larger roasting pan. Pour hot water into the roasting pan until it reaches about halfway up the sides of the springform pan. The water bath helps the cheesecake bake evenly and prevents cracking.
- Pour and Bake: Pour the cheesecake batter into the prepared springform pan. Bake for 70-80 minutes, or until the edges are set but the center still has a slight jiggle.
- Cool Gradually: Turn off the oven and crack the oven door slightly. Let the cheesecake cool in the oven for 1 hour. This gradual cooling helps prevent cracking.
- Chill Completely: Remove the cheesecake from the water bath and let it cool completely on a wire rack. Then, cover it with plastic wrap and refrigerate for at least 4 hours, or preferably overnight. This allows the cheesecake to set properly.
Preparing the Strawberry Puree:
- Combine Ingredients: In a medium saucepan, combine the hulled strawberries, sugar, and lemon juice.
- Cook and Simmer: Cook over medium heat, stirring occasionally, until the strawberries release their juices and the mixture comes to a simmer.
- Simmer Until Thickened: Reduce the heat to low and simmer for 10-15 minutes, or until the puree has thickened slightly.
- Cool Completely: Remove from heat and let the puree cool completely. You can use an immersion blender to smooth it out if you prefer a smoother texture.
Preparing the Cream Cheese Frosting:
- Cream Butter and Cream Cheese: In a large bowl, beat the softened butter and cream cheese together until smooth and creamy. Make sure there are no lumps!
- Add Powdered Sugar: Gradually add the powdered sugar, one cup at a time, beating on low speed until combined. Be careful not to create a powdered sugar cloud!
- Add Vanilla and Salt: Stir in the vanilla extract and salt.
- Adjust Consistency: If the frosting is too thick, add milk or heavy cream, one tablespoon at a time, until you reach your desired consistency.
- Beat Until Fluffy: Beat the frosting on medium-high speed for 2-3 minutes, or until it is light and fluffy.
Assembling the Red Velvet Strawberry Cheesecake:
- Level the Cake Layers: If your cake layers are uneven, use a serrated knife to level them. This will ensure a more even and professional-looking cake.
- First Cake Layer: Place one red velvet cake layer on a serving plate or cake stand.
- Strawberry Puree Layer: Spread half of the cooled strawberry puree evenly over the cake layer.
- Cheesecake Layer: Carefully remove the cheesecake from the springform pan. Place the cheesecake layer on top of the strawberry puree.
- Second Cake Layer: Place the second red velvet cake layer on top of the cheesecake layer.
- Frost the Cake: Frost the entire cake with the cream cheese frosting. You can use a spatula or piping bag to create your desired design.
- Garnish (Optional): Garnish the cake with fresh strawberry slices and red velvet cake crumbs, if desired.
- Chill Before Serving: Refrigerate the assembled cake for at least 30 minutes before serving. This allows the frosting to set and the flavors to meld together.
- Slice and Serve: Slice and serve your delicious Red Velvet Strawberry Cheesecake! Enjoy!
Conclusion:
And there you have it! Our Red Velvet Strawberry Cheesecake is truly a showstopper, a dessert that’s guaranteed to impress and leave everyone craving more. From the vibrant red velvet base to the creamy, tangy cheesecake filling, and the sweet burst of fresh strawberries, every layer is a symphony of flavors and textures that dance on your palate. It’s the perfect balance of richness and lightness, making it an ideal treat for any occasion, whether it’s a special celebration or simply a well-deserved indulgence. But why is this recipe a must-try? It’s more than just a pretty dessert; it’s an experience. The red velvet cake, with its subtle cocoa notes and moist crumb, provides a delightful foundation. The cheesecake filling, made with cream cheese, sour cream, and a touch of vanilla, is incredibly smooth and decadent. And the fresh strawberries, scattered throughout and on top, add a refreshing sweetness that cuts through the richness perfectly. It’s a dessert that appeals to all the senses, from the vibrant colors to the irresistible aroma and the unforgettable taste. Beyond its incredible flavor, this Red Velvet Strawberry Cheesecake is also surprisingly versatile. While it’s fantastic served chilled as is, you can also experiment with different toppings and variations. For a more decadent experience, try drizzling it with melted white chocolate or dark chocolate ganache. A sprinkle of chopped pecans or walnuts would add a delightful crunch. Or, if you’re feeling adventurous, you could even incorporate other berries, such as raspberries or blueberries, for a mixed berry sensation. Serving suggestions? This cheesecake is perfect on its own, but it also pairs beautifully with a scoop of vanilla ice cream or a dollop of whipped cream. A cup of coffee or tea is the ideal accompaniment, allowing you to savor each bite and fully appreciate the complex flavors. For a truly special occasion, consider serving it with a glass of sparkling wine or champagne. Don’t be intimidated by the multiple layers; this recipe is easier than it looks! I’ve broken down each step into clear and concise instructions, so even beginner bakers can achieve stunning results. The key is to follow the directions carefully and allow ample time for chilling, which is essential for the cheesecake to set properly. I truly believe that this Red Velvet Strawberry Cheesecake will become a new favorite in your household. It’s a dessert that’s both elegant and comforting, perfect for sharing with loved ones or enjoying all to yourself (I won’t judge!). So, what are you waiting for? Gather your ingredients, preheat your oven, and get ready to create a masterpiece. I’m confident that you’ll be thrilled with the results. And most importantly, I’d love to hear about your experience! Please, try this recipe and share your photos and comments with me. Let me know what you think, what variations you tried, and how much everyone loved it. Your feedback is invaluable, and it inspires me to continue creating delicious and exciting recipes for you to enjoy. Happy baking! Print
Red Velvet Strawberry Cheesecake: The Ultimate Dessert Recipe
- Total Time: 600 minutes
- Yield: 12–16 servings 1x
Description
Decadent Red Velvet Cake layered with creamy cheesecake, sweet strawberry puree, and tangy cream cheese frosting. A show-stopping dessert!
Ingredients
- 2 ½ cups all-purpose flour
- 2 cups granulated sugar
- 1 teaspoon baking soda
- 1 teaspoon baking powder
- 1 teaspoon salt
- 1 cup buttermilk
- 1 cup vegetable oil
- 2 large eggs
- 2 tablespoons unsweetened cocoa powder
- 1 ounce (2 tablespoons) red food coloring
- 1 teaspoon white vinegar
- 1 teaspoon vanilla extract
- 32 ounces (4 packages) cream cheese, softened
- 1 ½ cups granulated sugar
- 4 large eggs
- 1 cup sour cream
- 2 teaspoons vanilla extract
- 1 pound fresh strawberries, hulled
- ¼ cup granulated sugar
- 1 tablespoon lemon juice
- 1 cup (2 sticks) unsalted butter, softened
- 8 ounces cream cheese, softened
- 6 cups powdered sugar
- 2 teaspoons vanilla extract
- Pinch of salt
- 2–4 tablespoons milk or heavy cream (optional, for consistency)
- Fresh strawberries, sliced
- Red velvet cake crumbs
Instructions
- Preparing the Red Velvet Cake Layers:
- Preheat and Prep: Preheat your oven to 350°F (175°C). Grease and flour two 9-inch round cake pans. You can also line the bottoms with parchment paper circles for easier removal. This step is crucial to prevent sticking!
- Combine Dry Ingredients: In a large bowl, whisk together the flour, sugar, baking soda, baking powder, and salt. Make sure everything is evenly distributed. This ensures a consistent rise and texture.
- Combine Wet Ingredients: In a separate bowl, whisk together the buttermilk, oil, eggs, cocoa powder, red food coloring, vinegar, and vanilla extract. Don’t worry if the mixture looks a little strange; that’s perfectly normal.
- Combine Wet and Dry: Gradually add the wet ingredients to the dry ingredients, mixing on low speed until just combined. Be careful not to overmix! Overmixing can lead to a tough cake.
- Divide and Bake: Divide the batter evenly between the prepared cake pans. Bake for 25-30 minutes, or until a wooden skewer inserted into the center comes out clean. Keep a close eye on them; ovens vary!
- Cool Completely: Let the cakes cool in the pans for 10 minutes before inverting them onto a wire rack to cool completely. Make sure they are completely cool before assembling the cheesecake. This prevents the frosting from melting.
- Preparing the Cheesecake Layer:
- Preheat and Prep (Again!): Preheat your oven to 325°F (160°C). Wrap the bottom of a 9-inch springform pan tightly with heavy-duty aluminum foil. This is essential for the water bath.
- Cream Cheese and Sugar: In a large bowl, beat the softened cream cheese and sugar together until smooth and creamy. This is the foundation of a good cheesecake, so take your time and get it right.
- Add Eggs: Add the eggs one at a time, beating well after each addition. Be careful not to overmix at this stage; you don’t want to incorporate too much air.
- Sour Cream and Vanilla: Stir in the sour cream and vanilla extract until just combined. The sour cream adds a lovely tang and richness.
- Prepare Water Bath: Place the foil-wrapped springform pan inside a larger roasting pan. Pour hot water into the roasting pan until it reaches about halfway up the sides of the springform pan. The water bath helps the cheesecake bake evenly and prevents cracking.
- Pour and Bake: Pour the cheesecake batter into the prepared springform pan. Bake for 70-80 minutes, or until the edges are set but the center still has a slight jiggle.
- Cool Gradually: Turn off the oven and crack the oven door slightly. Let the cheesecake cool in the oven for 1 hour. This gradual cooling helps prevent cracking.
- Chill Completely: Remove the cheesecake from the water bath and let it cool completely on a wire rack. Then, cover it with plastic wrap and refrigerate for at least 4 hours, or preferably overnight. This allows the cheesecake to set properly.
- Preparing the Strawberry Puree:
- Combine Ingredients: In a medium saucepan, combine the hulled strawberries, sugar, and lemon juice.
- Cook and Simmer: Cook over medium heat, stirring occasionally, until the strawberries release their juices and the mixture comes to a simmer.
- Simmer Until Thickened: Reduce the heat to low and simmer for 10-15 minutes, or until the puree has thickened slightly.
- Cool Completely: Remove from heat and let the puree cool completely. You can use an immersion blender to smooth it out if you prefer a smoother texture.
- Preparing the Cream Cheese Frosting:
- Cream Butter and Cream Cheese: In a large bowl, beat the softened butter and cream cheese together until smooth and creamy. Make sure there are no lumps!
- Add Powdered Sugar: Gradually add the powdered sugar, one cup at a time, beating on low speed until combined. Be careful not to create a powdered sugar cloud!
- Add Vanilla and Salt: Stir in the vanilla extract and salt.
- Adjust Consistency: If the frosting is too thick, add milk or heavy cream, one tablespoon at a time, until you reach your desired consistency.
- Beat Until Fluffy: Beat the frosting on medium-high speed for 2-3 minutes, or until it is light and fluffy.
- Assembling the Red Velvet Strawberry Cheesecake:
- Level the Cake Layers: If your cake layers are uneven, use a serrated knife to level them. This will ensure a more even and professional-looking cake.
- First Cake Layer: Place one red velvet cake layer on a serving plate or cake stand.
- Strawberry Puree Layer: Spread half of the cooled strawberry puree evenly over the cake layer.
- Cheesecake Layer: Carefully remove the cheesecake from the springform pan. Place the cheesecake layer on top of the strawberry puree.
- Second Cake Layer: Place the second red velvet cake layer on top of the cheesecake layer.
- Frost the Cake: Frost the entire cake with the cream cheese frosting. You can use a spatula or piping bag to create your desired design.
- Garnish (Optional): Garnish the cake with fresh strawberry slices and red velvet cake crumbs, if desired.
- Chill Before Serving: Refrigerate the assembled cake for at least 30 minutes before serving. This allows the frosting to set and the flavors to meld together.
- Slice and Serve: Slice and serve your delicious Red Velvet Strawberry Cheesecake! Enjoy!
Notes
- Make sure all ingredients are at room temperature unless otherwise specified. This helps with even mixing and a smoother batter/frosting.
- Don’t overmix the cake batter or cheesecake batter. Overmixing develops gluten, which can result in a tough cake or cheesecake.
- The water bath is crucial for preventing cracks in the cheesecake. Make sure the foil is tightly sealed around the springform pan to prevent water from seeping in.
- Cooling the cheesecake gradually in the oven helps prevent cracking.
- Chilling the assembled cake before serving allows the flavors to meld together and the frosting to set.
- For a smoother strawberry puree, use an immersion blender or regular blender after cooking.
- Adjust the amount of red food coloring to your preference.
- If you don’t have buttermilk, you can make a substitute by adding 1 tablespoon of white vinegar or lemon juice to a liquid measuring cup, then filling the rest of the cup with milk. Let it sit for 5 minutes before using.
- Prep Time: 90 minutes
- Cook Time: 135 minutes


Leave a Comment