
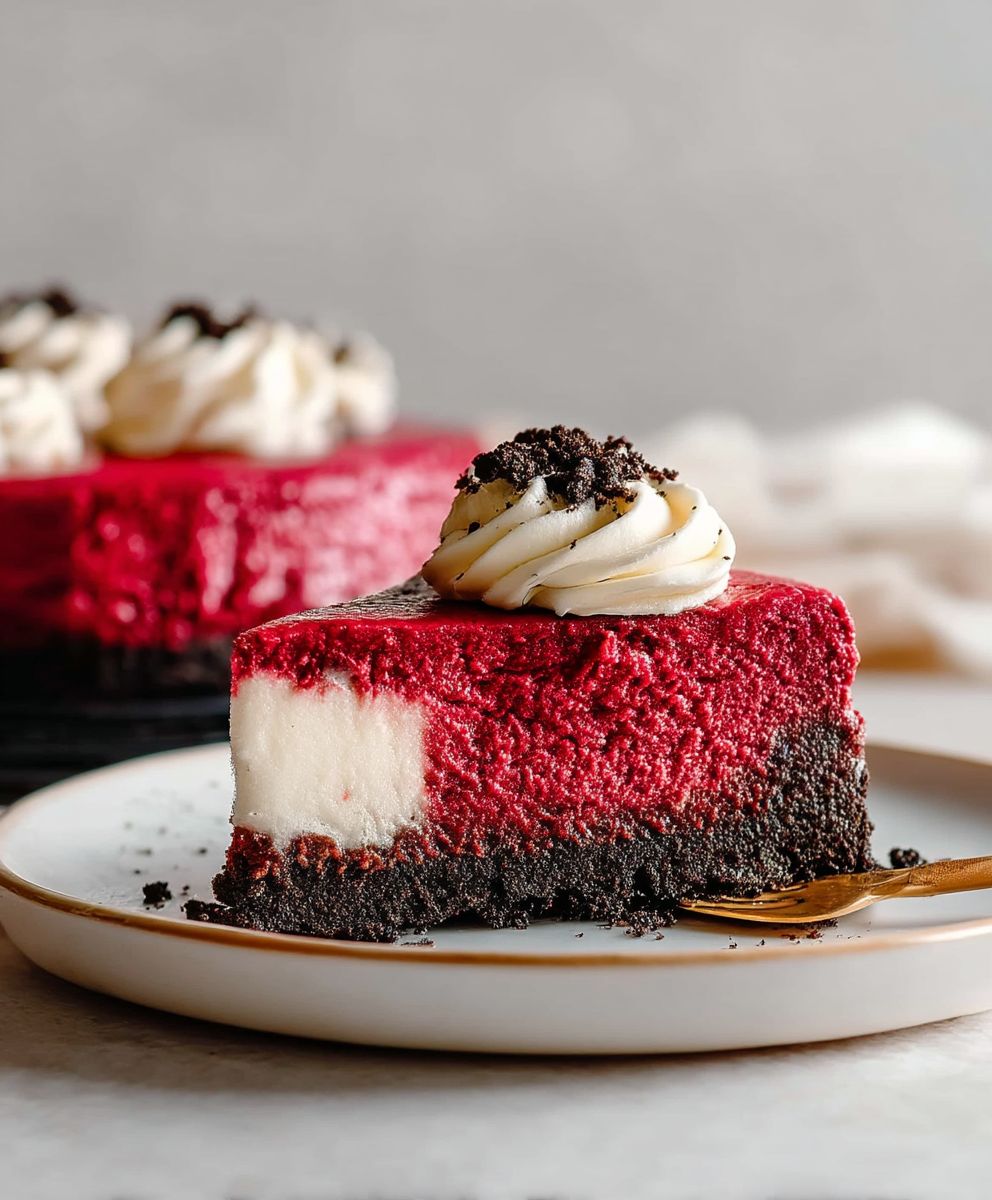
Red Velvet Oreo Cheesecake: Prepare to be utterly captivated! Imagine the tangy, velvety smoothness of red velvet cake swirled together with the satisfying crunch of Oreo cookies, all culminating in a decadent cheesecake experience. It’s a dessert symphony that will have everyone begging for seconds.
While the exact origins of red velvet cake are debated, its popularity soared in the mid-20th century, often associated with upscale hotels and bakeries. The vibrant red hue, traditionally achieved through a chemical reaction between cocoa powder and acidic ingredients, adds a touch of elegance and intrigue. Oreos, on the other hand, are a beloved American classic, instantly recognizable and universally adored. Combining these two iconic treats into a cheesecake? Pure genius!
What makes this Red Velvet Oreo Cheesecake so irresistible? It’s the perfect balance of textures and flavors. The creamy cheesecake filling melts in your mouth, while the Oreo cookie crust provides a delightful contrast. The subtle cocoa notes of the red velvet complement the rich, chocolatey Oreos, creating a harmonious blend that’s both comforting and indulgent. Plus, it’s surprisingly easy to make, making it the perfect show-stopping dessert for any occasion. Get ready to impress your friends and family with this unforgettable treat!

Ingredients:
- For the Oreo Crust:
- 24 Oreo cookies, finely crushed (about 2 cups)
- 6 tablespoons (3 ounces) unsalted butter, melted
- For the Red Velvet Cheesecake Filling:
- 32 ounces (4 packages) cream cheese, softened to room temperature
- 1 3/4 cups granulated sugar
- 1/4 cup sour cream
- 2 large eggs
- 1 teaspoon vanilla extract
- 1 tablespoon unsweetened cocoa powder
- 2 tablespoons red food coloring (gel food coloring recommended)
- 1/2 teaspoon white vinegar
- 1/2 teaspoon baking soda
- For the Oreo Swirl:
- 12 Oreo cookies, coarsely chopped
- For the Red Velvet Whipped Cream Topping (Optional):
- 1 cup heavy cream
- 2 tablespoons powdered sugar
- 1/2 teaspoon vanilla extract
- 1/4 teaspoon red food coloring (gel food coloring recommended)
- For Garnish (Optional):
- Mini Oreo cookies
- Red velvet cake crumbs
Preparing the Oreo Crust:
- First, let’s get that Oreo crust ready! In a food processor, pulse the 24 Oreo cookies until they are finely crushed. If you don’t have a food processor, you can place the cookies in a large zip-top bag and crush them with a rolling pin. Make sure they’re really fine; we don’t want any big chunks in our crust.
- Next, in a medium bowl, combine the crushed Oreo cookies with the melted butter. Mix well until the crumbs are evenly moistened. The mixture should resemble wet sand.
- Now, press the Oreo crumb mixture firmly into the bottom of a 9-inch springform pan. I like to use the bottom of a measuring cup to really pack it down and make sure it’s even. This will give us a nice, solid base for our cheesecake.
- Place the prepared crust in the freezer while you prepare the cheesecake filling. This helps it set up and prevents it from getting soggy during baking.
Making the Red Velvet Cheesecake Filling:
- Alright, let’s move on to the star of the show the red velvet cheesecake filling! In a large bowl (or the bowl of your stand mixer), beat the softened cream cheese with an electric mixer on medium speed until smooth and creamy. It’s crucial that the cream cheese is at room temperature; otherwise, you’ll end up with lumps in your cheesecake.
- Gradually add the granulated sugar to the cream cheese, beating until well combined and smooth. Scrape down the sides of the bowl as needed to ensure everything is evenly mixed.
- Stir in the sour cream, vanilla extract, cocoa powder, red food coloring, white vinegar, and baking soda. Mix until everything is thoroughly combined and the batter is a vibrant red color. The vinegar and baking soda react to create that classic red velvet tang and help with the cake’s texture.
- Add the eggs one at a time, beating well after each addition. Be careful not to overmix the batter at this point. Overmixing can incorporate too much air, which can cause the cheesecake to crack during baking.
Assembling and Baking the Cheesecake:
- Remove the springform pan with the Oreo crust from the freezer.
- Gently fold in the coarsely chopped Oreo cookies into the red velvet cheesecake batter. Distribute them evenly throughout the batter.
- Pour the cheesecake batter over the Oreo crust in the springform pan. Smooth the top with a spatula.
- To prevent cracking, we’re going to bake this cheesecake in a water bath. Wrap the bottom of the springform pan tightly with heavy-duty aluminum foil. This will prevent water from seeping into the cheesecake.
- Place the wrapped springform pan inside a larger roasting pan. Carefully pour hot water into the roasting pan, reaching about halfway up the sides of the springform pan.
- Bake in a preheated oven at 325°F (160°C) for 70-80 minutes, or until the edges are set but the center still has a slight jiggle. The baking time may vary depending on your oven, so keep an eye on it.
- Turn off the oven and crack the oven door slightly. Let the cheesecake cool in the oven for 1 hour. This gradual cooling process helps prevent cracking.
- After 1 hour, remove the cheesecake from the water bath and let it cool completely on a wire rack.
- Once the cheesecake is completely cooled, cover it with plastic wrap and refrigerate for at least 6 hours, or preferably overnight. This allows the cheesecake to set completely and develop its flavors.
Preparing the Red Velvet Whipped Cream Topping (Optional):
- If you’re making the red velvet whipped cream topping, now’s the time! In a chilled bowl, combine the heavy cream, powdered sugar, vanilla extract, and red food coloring.
- Beat with an electric mixer on medium-high speed until stiff peaks form. Be careful not to overwhip, or the cream will turn grainy.
Assembling and Serving:
- Once the cheesecake is thoroughly chilled, carefully remove it from the springform pan. Run a thin knife around the edge of the cheesecake to loosen it from the pan before releasing the sides.
- If desired, spread the red velvet whipped cream topping evenly over the top of the cheesecake.
- Garnish with mini Oreo cookies and red velvet cake crumbs, if desired.
- Slice and serve! Enjoy your decadent Red Velvet Oreo Cheesecake!
Conclusion:
This Red Velvet Oreo Cheesecake isn’t just a dessert; it’s an experience. The marriage of tangy red velvet, the satisfying crunch of Oreos, and the creamy decadence of cheesecake creates a symphony of flavors and textures that will leave you and your guests utterly speechless. Seriously, prepare for requests for the recipe! It’s the kind of dessert that elevates any occasion, from a casual weeknight treat to a show-stopping centerpiece for a holiday gathering.
I know, I know, cheesecake can seem intimidating, but trust me, this recipe is surprisingly straightforward. The steps are clearly outlined, and even if you’re a novice baker, you can absolutely nail this. The reward is well worth the effort, I promise! The vibrant red hue of the cake layers peeking through the creamy filling is visually stunning, and the taste? Oh, the taste! It’s a perfect balance of sweet and tangy, rich and refreshing.
But the best part? This Red Velvet Oreo Cheesecake is incredibly versatile. Feel free to experiment with different variations to make it your own. For a more intense red velvet flavor, add a tablespoon of cocoa powder to the batter. If you’re a chocolate lover, swirl some melted dark chocolate into the cheesecake filling before baking. Want to add a touch of elegance? Garnish with fresh raspberries or a dusting of cocoa powder before serving.
Serving suggestions are endless! A simple dollop of whipped cream is always a classic choice. For a more decadent treat, drizzle with chocolate sauce or caramel. A scoop of vanilla ice cream alongside a slice of this cheesecake is pure bliss. And if you’re feeling adventurous, try pairing it with a glass of chilled sparkling wine or a rich dessert wine.
For a festive twist, consider using red and green sprinkles for a Christmas-themed cheesecake. Or, for a birthday celebration, top it with colorful candles and a personalized message. You can even make mini cheesecakes in individual ramekins for a fun and elegant presentation.
Don’t be afraid to get creative and personalize this recipe to your liking. The most important thing is to have fun and enjoy the process. Baking should be a joyful experience, and this Red Velvet Oreo Cheesecake is guaranteed to bring a smile to your face.
So, what are you waiting for? Gather your ingredients, preheat your oven, and get ready to create a dessert masterpiece. I’m confident that this recipe will become a new favorite in your household.
I’m so excited for you to try this recipe! Once you’ve made your own Red Velvet Oreo Cheesecake, I’d love to hear about your experience. Share your photos and comments on social media using #RedVelvetOreoCheesecake. Let me know what variations you tried and how your family and friends enjoyed it. Your feedback is invaluable, and I can’t wait to see your creations! Happy baking!
Red Velvet Oreo Cheesecake: The Ultimate Dessert Recipe
Red Velvet Cheesecake with Oreo crust, Oreo swirl filling, and optional red velvet whipped cream. A show-stopping dessert!
Ingredients
- 24 Oreo cookies, finely crushed (about 2 cups)
- 6 tablespoons (3 ounces) unsalted butter, melted
- 32 ounces (4 packages) cream cheese, softened to room temperature
- 1 3/4 cups granulated sugar
- 1/4 cup sour cream
- 2 large eggs
- 1 teaspoon vanilla extract
- 1 tablespoon unsweetened cocoa powder
- 2 tablespoons red food coloring (gel food coloring recommended)
- 1/2 teaspoon white vinegar
- 1/2 teaspoon baking soda
- 12 Oreo cookies, coarsely chopped
- 1 cup heavy cream
- 2 tablespoons powdered sugar
- 1/2 teaspoon vanilla extract
- 1/4 teaspoon red food coloring (gel food coloring recommended)
- Mini Oreo cookies
- Red velvet cake crumbs
Instructions
- Prepare the Oreo Crust: In a food processor, pulse the 24 Oreo cookies until finely crushed. Alternatively, place cookies in a zip-top bag and crush with a rolling pin. Combine crushed Oreos with melted butter in a medium bowl. Mix well. Press the mixture firmly into the bottom of a 9-inch springform pan. Freeze while preparing the filling.
- Make the Red Velvet Cheesecake Filling: In a large bowl, beat softened cream cheese with an electric mixer until smooth. Gradually add sugar, beating until well combined. Stir in sour cream, vanilla extract, cocoa powder, red food coloring, white vinegar, and baking soda. Mix until thoroughly combined. Add eggs one at a time, beating well after each addition. Do not overmix.
- Assemble and Bake: Remove the crust from the freezer. Gently fold in coarsely chopped Oreo cookies into the cheesecake batter. Pour the batter over the crust. Smooth the top. Wrap the bottom of the springform pan tightly with heavy-duty aluminum foil. Place the wrapped pan in a larger roasting pan. Pour hot water into the roasting pan, reaching halfway up the sides of the springform pan. Bake at 325°F (160°C) for 70-80 minutes, or until the edges are set but the center still has a slight jiggle.
- Cooling: Turn off the oven and crack the oven door slightly. Let the cheesecake cool in the oven for 1 hour. Remove from the water bath and let cool completely on a wire rack.
- Chill: Cover with plastic wrap and refrigerate for at least 6 hours, or preferably overnight.
- Prepare Whipped Cream Topping (Optional): In a chilled bowl, combine heavy cream, powdered sugar, vanilla extract, and red food coloring. Beat with an electric mixer until stiff peaks form.
- Assemble and Serve: Remove the cheesecake from the springform pan. Spread the red velvet whipped cream topping over the top, if desired. Garnish with mini Oreo cookies and red velvet cake crumbs, if desired. Slice and serve.
Notes
- Ensure cream cheese is at room temperature to avoid lumps.
- Do not overmix the cheesecake batter to prevent cracking.
- A water bath is crucial for even baking and preventing cracks.
- Cooling the cheesecake gradually in the oven also helps prevent cracking.
- Chilling the cheesecake completely is essential for the best texture and flavor.
- Gel food coloring is recommended for a vibrant red color.
Leave a Comment